Table of Contents
Advertisement
Advertisement
Table of Contents

Related Manuals for Electrolux EE600x


Summary of Contents for Electrolux EE600x
- Page 1 INSTRUCTION BOOKLET Mod. EE600x...
- Page 2 ENGLISH INSTALLATION AND FOR YOUR PERSONAL MAINTENANCE SAFETY The appliance should be installed and connected to mains by QUALIFIED PERSONS only. Before carrying out any This new appliance is easy to use. work on the appliance always make sure However, it is important to read the that it has been DISCONNECTED from whole of this booklet before installing or mains.
- Page 3 Before demolishing the appliance, cut the power supply cable so that it cannot be put to improper use. This instruction booklet should be kept with the appliance for future reference. If the appliance is sold or transferred, make sure that the booklet is handed over to the new owners so that they are aware of the operating instructions and relative warnings.
-
Page 4: Table Of Contents
INDEX INFORMATION INFORMATION FOR THE USER INSTALLER DESCRIPTION OF THE COFFEE MACHINE PAGE 4 TECHNICAL SPECIFICATIONS PAGE 12 FIRST USE PAGE 5 INSTALLATION PAGE 12 MAKING COFFEE PAGE 6 WATER SUPPLY PAGE 15 HOT WATER PAGE 7 ELECTRICAL CONNECTION PAGE 16 STEAM PAGE 7 DRAWER... -
Page 5: Description Of The Coffee Machine
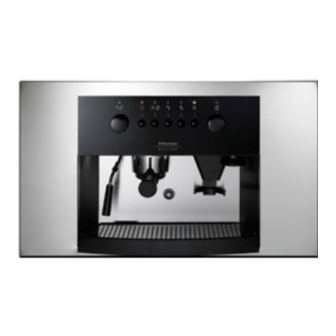
DESCRIPTION OF THE COFFEE MACHINE 1. Steam knob 2. Grinding texture knob 3. On button 4. Coffee button 5. Hot water button 6. Steam button 7. Light button 8. Orange 'ON' indicator light 9. Red 'water temperature' indicator light 10. Green 'coffee' indicator light 11. -
Page 6: First Use
Turn the knob clockwise for a finer texture FIRST USE and stronger coffee. Turn anticlockwise for a coarser grind and weaker coffee. FILL THE WATER TANK PROGRAMMING THE QUANTITY Open the unit clamping lock (ref.24) using the key supplied. OF GROUND COFFEE Pull the coffee machine out of the unit on the telescopic runners. -
Page 7: Making Coffee
ACCESSORIES SUPPLIED When the red water temperature indicator light (ref.9) goes out, press the coffee button (ref.4). The coffee machine is supplied with a filter holder Once the required quantity of coffee has (ref.20) for one-cup filters (ref.21) and two-cup been reached press the coffee button (ref.4) filters (ref.22). -
Page 8: Hot Water
TIPS ON HOW TO PREPARE AN Keep the steam button (ref.6) pressed and wait until the red indicator light (ref.9) EXCELLENT ESPRESSO COFFEE goes out. Place the receptacle beneath the steam To make a good espresso coffee, the cleanliness of spout and slowly turn the steam knob the machine and the right temperature are (ref.1) anti-clockwise. -
Page 9: Cleaning & Maintenance
Move to the refrigerator ½ hour before COLD ESPRESSO SHAKE serving. Serve two-three balls of the ice-cream in a Frothy and extremely refreshing, this makes a pleasant small bowl and decorate with roasted coffee drink on hot days. beans. Prepare an espresso coffee, add sugar and pour into a cocktail shaker with large ice cubes. -
Page 10: Faults
Press the coffee button repeatedly so that the service, or if you wish to purchase spare parts, water/vinegar solution comes through a little at a please contact your local ELECTROLUX time until the tank is empty. Service Force Centr: Repeat the operation until clean water comes through (with no trace of lime-scale). -
Page 11: Guarantee Conditions (Aus)
Subject to the conditions below, this appliance is caused directly or indirectly by power warranted by Electrolux Home Products Pty. Ltd. surges, electrical storm damage or A.B.N. 51 004 762 341, (the "Company"), to be free incorrect power current. -
Page 12: Guarantee Conditions (Nz)
This appliance is warranted by Electrolux Home indirectly arising from the use or Products (NZ) Ltd (“the Company”) from the date of inability to use this appliance, or for purchase. -
Page 13: Technical Specifications
TECHNICAL SPECIFICATIONS Width 594 mm Depth 280 mm Height 357 mm Tank capacity 3 It. Net weight 17 kg Gross weight 19 kg Power supply voltage 220 V Power absorption resistors 1000 W Power absorption pump 50 W Working pressure 12 bar Fuse 10 A. - Page 14 Assemble the runners on the sides of the machine (using the screws supplied) as shown in fig.1. Fasten the telescopic runner supports (RH and LH) using three wood screws (fig.2) and taking care to follow the measurements shown in fig.2. Make a slot in the bottom of the open compartment following the measurements given in fig.2.
- Page 15 Fig. 4 Assemble the telescopic runners of the coffee machine in the supports fixed to the inside of the unit; push the runners in until they reach the limit stop and action the safety clamps (fig.5). Fig. 5...
-
Page 16: Water Supply
WATER SUPPLY Take the lid off the water tank (ref.27) and take out the Brita filter. Take the filter out of the packaging and soak it in cold water for half an hour before fitting it firmly into the hole in the tank (fig.6). Place the water hose in the relative channel (fig.7) and push it down until it reaches the bottom of the tank (fig.8). -
Page 17: Electrical Connection
ELECTRICAL CONNECTION Make sure that the electric circuit is suitably earthed. Connect the power cable supplied to the connector on the back of the appliance, plug the connector into the power supply unit on the back of the post (fig.3) where you will find the terminal board (fig.9) set to operate at a supply voltage of 230V monophase. -
Page 18: Drawer
DRAWER The required dimensions of the compartment for installing the machine with the drawer are given in fig. 10 and 11. Fig.10 Fig.11...