Panasonic SC-AK340 Operating Instructions Manual
Cd stereo system model no. sc-ak340; sc-ak240
Hide thumbs
Also See for SC-AK340:
- Operating instructions manual (28 pages) ,
- Operating instructions manual (20 pages) ,
- Operating instructions manual (28 pages)
Table of Contents
Advertisement
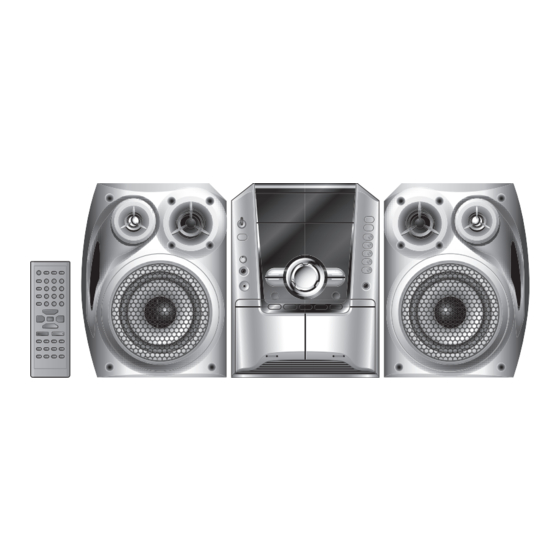
The illustrations show SC-AK340.
Table of contents
Placement of speakers ............................3
Getting started .........................................4
Overview of controls ...............................6
Discs .........................................................7
Cassette tape - Play and record ..........11
Radio .......................................................13
Microphone mixing ................................14
Timer .......................................................15
Sound adjustment .................................16
External unit ...........................................17
Maintenance ...........................................17
When moving the unit ...........................17
Troubleshooting guide ..........................18
Specifi cations ........................................19
Before connecting, operating or adjusting this product,
please read the instructions completely.
Please keep this manual for future reference.
Operations in these instructions are described mainly
using remote control, but you can do the operations on
the main unit if the controls are the same.
Unless otherwise indicated, illustrations in these
operating instructions are of SC-AK340.
Your unit may not look exactly the same as illustrated.
GCP
En
Sp
Operating Instructions
CD Stereo System
Model No.
SUPPLIED ACCESSORIES
SUPPLIED ACCESSORIES
Please check and identify the supplied accessories.
1 x AC power supply cord
2 x Remote control batteries
1 x Power plug adaptor
1 x FM indoor antenna
1 x AM loop antenna
1 x Remote Control
(N2QAHB000065)
SC-AK340
SC-AK240
RQTV0070-1M
L1105KE1115
Advertisement
Table of Contents

Related Manuals for Panasonic SC-AK340


Summary of Contents for Panasonic SC-AK340
-
Page 1: Table Of Contents
(N2QAHB000065) the main unit if the controls are the same. Unless otherwise indicated, illustrations in these operating instructions are of SC-AK340. Your unit may not look exactly the same as illustrated. RQTV0070-1M L1105KE1115... - Page 2 Dear customer Thank you for purchasing this product. For optimum performance and safety, please read these instructions carefully. These operating instructions are applicable to the following systems. : indicates features applicable to SC-AK340 only. AK340 : SC-AK240 only. AK240 SC-AK340 SC-AK240...
-
Page 3: Important Safety Instructions
IMPORTANT SAFETY INSTRUCTIONS Placement of speakers You cannot take the front net off the speakers. AK340 Place the front speakers so that the tweeter is on the Use only the supplied speakers. inside. The combination of the main unit and speakers provide the best Tweeter sound. -
Page 4: Getting Started
Getting started Step 1 Step 1 - Making the connections - Making the connections Connect the AC power supply cord only after all other connections have been made. Connect the AC power supply cord. Insertion of connector Even when the connector is perfectly inserted, depending on the type of inlet used, the front part of the connector may jut out as shown in the drawing. - Page 5 Optional antenna connections Optional antenna connections Use outdoor antenna if radio reception is poor. Note: Disconnect the outdoor antenna when the unit is not in use. Do not use the outdoor antenna during a lightning storm. FM outdoor antenna AM outdoor antenna FM outdoor antenna AM outdoor antenna (not included) (not included)
-
Page 6: Overview Of Controls
Overview of controls Main unit Main unit Refer to the numbers in parentheses for page reference. AC supply indicator [AC IN] Remote control signal This indicator lights when the unit is connected sensor to the AC power supply. Disc trays 1 Standby/on switch [y/l, POWER] (10, 18) Press to switch the unit from on to standby Disc tray open/close (7) -
Page 7: Discs
Discs skip tracks Press [4, REW / ] or [¢, / FF]. • During random play (\ see below, “Play Mode function”), you cannot skip to tracks which have been played. During 1-ALBUM and 1-ALBUM RANDOM mode, track skipping can only be done within the current album. - Page 8 Discs (Continued) Note: • When track number 25 or greater is playing, remaining play time display shows “– –:– –”. • When a title is longer than 9 characters, it will scroll across the display. The scrolling will start after every 3 seconds. •...
- Page 9 Action Advanced function ( Advanced function ( only) only) add to the program Album scan Album scan Repeat steps 3 to 4 in the stop mode. This function allows you to fi nd an album by listening to the fi rst track of all albums in the current disc for 10 seconds Repeat steps 4 to 6 in the stop mode.
- Page 10 Discs (Continued) NOTE on CDs • This unit can access up to 99 tracks. • Choose disc with this mark. • This unit can play MP3 or WMA fi les and CD-DA format audio CD-R/RW that have been fi nalized. •...
-
Page 11: Cassette Tape - Play And Record
Cassette tape – Play and record The buttons described for “Cassette tape – Play and NOTE on MP3 or WMA record” are mainly for the main unit unless indicated • Files are treated as tracks and folders are treated as albums. otherwise. - Page 12 Cassette tape – Play and record (Continued) By remote control only record 1) Press [DISC] and then [1] ~ [5] to select specifi c the disc. discs/tracks Ensure disc is stopped. 2) Press [PLAY MODE] to select the desired mode (\ page 7). For 1-ALBUM mode and 1-SONG mode: Press [ALBUM ( )] to select the...
-
Page 13: Radio
Radio Manual tuning Manual tuning Memory preset Memory preset Up to 15 stations each can be set in the FM and AM bands. Press [TUNER, BAND] to select “FM” or “AM”. Preparation Press [PLAY MODE] to select “MANUAL”. Press [TUNER, BAND] to select “FM” or “AM”. Press [4, REW / ] or [¢, / FF] to select the frequency of the required station. -
Page 14: Microphone Mixing
Microphone mixing Record microphone mixing Record microphone mixing Press [OPEN 0] for DECK 2 and insert the cassette to be recorded. Insert with the side to be recorded facing towards you and the exposed tape facing down. Lower the volume with [MIC VOL], then connect the microphone. -
Page 15: Timer
Timer Repeat steps 2 to 3 to set the finishing time. Setting the clock Setting the clock This is a 24-hour clock. Press [CLOCK/TIMER] to select “CLOCK”. Each time you press the button: Finish time ˚ PLAY ˚ REC CLOCK ➞... -
Page 16: Sound Adjustment
Timer (Continued) Sound adjustment Selecting sound effects Selecting sound effects Preset EQ Preset EQ MUSIC Press [PRESET EQ] repeatedly to select your desired PORT setting. jack HEAVY SOFT CLEAR VOCAL DISCO ➞ ➞ ➞ ➞ ➞ ➞ FLAT (off) HALL LIVE Setting Effect... -
Page 17: External Unit
External unit Connecting to a portable audio equipment Connecting to a portable audio equipment This feature enables you to enjoy music from a portable audio equipment. Portable audio equipment (not included) Audio cord (not included) Playing from a portable audio equipment Playing from a portable audio equipment Recording from Recording from a a portable audio... -
Page 18: Troubleshooting Guide
Troubleshooting guide Before requesting service, make the following checks. If you can’t fi x the system as described below, or if something not listed here occurs, refer to the enclosed directory to locate an Authorized Service Center convenient to you or contact your dealer. -
Page 19: Specifi Cations
Specifi cations DISC SECTION AMPLIFIER SECTION SPEAKER SECTION AK340 AK240 Disc played [8 cm or 12 cm] Type RMS output power (1) CD-Audio (CD-DA) THD 10%, both channels driven 2 way, 2 speaker system (Bass refl ex) (2) CD-R/RW Speaker(s) 1 kHz (CD-DA, MP3, WMA formatted disc) (Low channel) 105 W per channel (3 Ω) - Page 20 Matsushita Electric Industrial Co., Ltd. Web Site: http://www.panasonic.co.jp/global/ RQTV0066-B L1005KE0 RQT8043...