
Related Manuals for LG DP691D


Summary of Contents for LG DP691D
-
Page 1: Portable Dvd Player
OWNER’S MANUAL Portable DVD Player Please read this manual carefully before operating your set and retain it for future reference. DP691D P/NO : MFL67007228... - Page 2 Getting Started Getting Started Safety Information Use of controls, adjustments or the performance of procedures other than those specified herein may result in hazardous radiation exposure. To prevent direct exposure to laser beam, do not try CAUTION to open the enclosure. Visible laser radiation when RISK OF ELECTRIC SHOCK open.
- Page 3 The excessive sound pressure from earphones use of certain dangerous substances in electrical and headphones can cause hearing loss. and electronic equipment. LG Electronics hereby declares that this/ Caution of usage in the car these product(s) is/are in compliance with the essential requirements and...
-
Page 4: Notes On Discs
Getting Started Notes on Copyrights Notes on the Unit y This product incorporates copyright protection y Please save the original shipping carton and technology that is protected by U.S. patents packing materials. If you need to ship the unit, and other intellectual property rights. Use of for maximum protection, re-pack the unit as it this copyright protection technology must be was originally packed at the factory. -
Page 5: Table Of Contents
Table of Contents Table of Contents Operating Viewing a TV Channel General Playback – Playing a Disc Getting Started – Playing a file – Displaying Quick Menu Information Safety Information – Basic operations for video and audio Introduction content – About the “7” Symbol Display –... -
Page 6: Getting Started
Getting Started Introduction Playable Discs DVD-VIDEO (8 cm / 12 cm disc) Discs such as movies that can be About the “7” Symbol Display purchased or rented. “7” may appear on the screen during operation DVD±R (8 cm / 12 cm disc) and indicates that the function explained in this - Video mode and finalized only owner’s manual is not available on that specific... -
Page 7: File Compatibility
Getting Started File compatibility Photo Files Recommended size: more than 32 x 32 x 32 bit/pixel Overall less than 5760 x 4608 x 32 bit/pixel Available File extensions: “.avi”, “.mpg”, ”.mpeg”, “.mp3”, “.wma”, “.jpg”, “.jpeg” y Progressive and lossless compression photo image files are not supported. -
Page 8: Main Unit
Getting Started Main Unit l TV Antenna connector m DC 12V IN: Connect the AC adapter or automotive adapter. n USB Port: Connect a USB Flash Drive. Supplied Accessories RCA Video/Audio Remote control (1) Adaptor (1) Automotive Adaptor (1) Battery for Remote Control (Lithium Battery) (1) a LCD screen... -
Page 9: Remote Control
Getting Started Remote control • • • • • • • • • • c • • • • • • • • • • Numerical buttons (0-9): Selects numbered items in a menu. TV SETUP: Displays or exits the [TV SETUP] menu. CLEAR: Removes a mark on the search menu or a number when setting the password. -
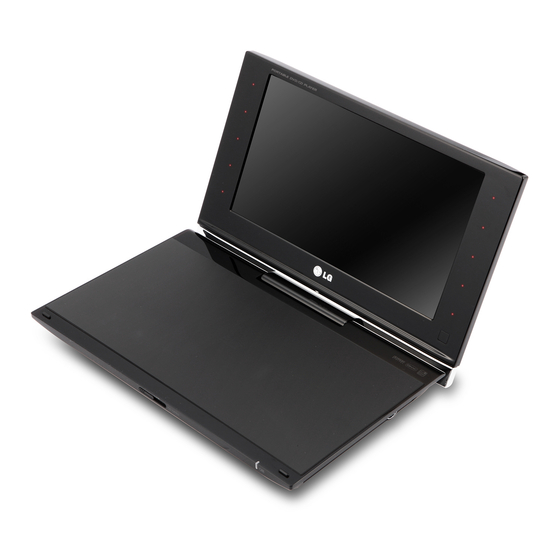
Page 10: Revolving The Lcd Panel
Getting Started Revolving the LCD y When the remaining time of the battery power is under a few minutes, “. Check Battery” will blink panel on the screen. Using [Home Menu] You can revolve the LCD panel of the unit clockwise menu a maximum of 180 degrees for use. -
Page 11: Using The Touch Sensor Buttons
Getting Started > Caution Using the touch sensor Precautions for using the touch sensor buttons: buttons y Use the touch pad with clean and dry hands. y Do not touch the buttons on the touch pad If you want to use the touchable sensor button, with too much force. -
Page 12: Connecting
Connecting Connecting Connecting the AC Connecting Audio and Adaptor Video cable Connect the unit to the power supply with the Connect the AV OUT on the unit to AV cable supplied AC Adaptor. connected from TV with the supplied AV Adaptor. Audio/Video Cable (not supplied) -
Page 13: System Setting
System Setting System Setting Settings [DISPLAY] Menu TV Aspect When the unit is turned-on at the first time, you have to select the desired language. (optional) Select which screen aspect to use based on the shape of your TV screen. Adjust the Setup Settings [4:3]: Select when a standard 4:3 TV is You can change the settings of the unit in the... -
Page 14: [Audio] Menu
System Setting [AUDIO] Menu [OTHERS] Menu DRC (Dynamic Range Control) REC Bitrate Make the sound clear when the volume is turned You can choose a bit rate for USB direct recording. down (Dolby Digital only). Set to [On] for this effect. Higher bit rate gives the better sound quality but uses more space on the USB Flash Drive. -
Page 15: Operating
Operating Operating Viewing a TV Channel Channel Selection You can select channels as described below. If the TV channel is not set, use [Auto Tuning] Auto Tuning option in [TV SETUP] menu. y Use CH +/- to select a channel through the Automatically finds all channels available through channels in memory. -
Page 16: General Playback
Operating General Playback Displaying Quick Menu Information Playing a Disc You can display and adjust various information and settings about the content. 1. While playback, press Q.MENU(m) to show 1. Turn on the Power Switch. various playback information. 2. Open the disc lid and insert a disc. 2. -
Page 17: Basic Operations For Video And Audio Content
Operating Basic operations for video and Using the disc menu audio content To stop playback To display the disc menu Press STOP (Z) while playback. The menu screen may be displayed first after loading a disc which contains a menu. If you want To pause playback to display the disc menu while playback, press DISC MENU. -
Page 18: Advanced Playback
Operating Note Advanced Playback y If you press V once during Repeat Chapter/Track playback, the repeat playback Repeating a specific portion cancels. y This function may not work on some disc or title. y To return to normal playback, press REPEAT This player can repeat a portion you have selected. -
Page 19: Last Scene Memory
Operating Last Scene Memory Changing subtitle code page This unit memorizes the last scene from the last disc If the subtitle is displayed in broken letter, you can that is viewed. The last scene remains in memory change the subtitle code page to view the subtitle even if you remove the disc from the unit or switch file properly. -
Page 20: Options While Viewing A Photo
Operating Options while viewing a photo Options on the [MUSIC] menu You can use various options during viewing a y During playback a MP3 file, it displays the file photo in full screen. information. [Song, Album, Artist, Time progress bar] 1. -
Page 21: Usb Direct Recording
2. Insert an Audio CD and display [MUSIC] menu. criminal offense. This equipment should not be 3. Use MARKER to select the desired track(s). used for such purposes. LG expressly disclaims any responsibility for illegal distribution or 4. Press AUDIO to display the [CD Ripping] menu. -
Page 22: Troubleshooting
Troubleshooting Troubleshooting Troubleshooting Symptom Cause Solution No power The power cord is disconnected. Plug the power cord into the wall outlet securely. The battery is discharged. Recharge the battery. The power is on, but No disc is inserted. Insert a disc. the unit does not work. -
Page 23: Appendix
Appendix Appendix Area Code List Choose an area code from this list. Area Code Area Code Area Code Area Code Singapore Afghanistan Fiji Monaco Argentina Finland Mongolia Slovak Republic Australia France Morocco Slovenia Austria Germany Nepal South Africa Great Britain Netherlands South Korea Belgium... -
Page 24: Language Code List
Appendix Language Code List Use this list to input your desired language for the following initial settings: [Disc Audio], [Disc Subtitle] and [Disc Menu]. Language Code Language Code Language Code Language Code Afar 6565 French 7082 Lithuanian 7684 Sindhi 8368 Macedonian 7775 Singhalese... -
Page 25: Specifications
Appendix Specifications Trademarks and Licenses Power requirements 12 V 0 2 A AC adaptor 100 - 240 V ~ 1 A, requirements 50/60 Hz Automotive Adaptor 8.5 V -16 V DC Manufactured under license from Dolby requirements Laboratories. Dolby and the double-D symbol Power consumption 10 W are trademarks of Dolby Laboratories. -
Page 26: Enjoying In A Car With The Headrest Mounting Bracket
Appendix Enjoying in a car with 1. Separate the headrest. (Refer to your car’s user guide.) the Headrest Mounting 2. Install the cradle as shown in the figure. Note Bracket If you may not be able to install the headrest cradle because of the pipe thickness of your headrest, extend the cradle loosing its screws You can enjoy video in the back seat attaching the...