Advertisement
Quick Links
Advertisement

Related Manuals for Philips ColorBlast TRX


Summary of Contents for Philips ColorBlast TRX
- Page 1 ColorBlast TRX Theatrical RGBAW LED wash light with expanded color range...
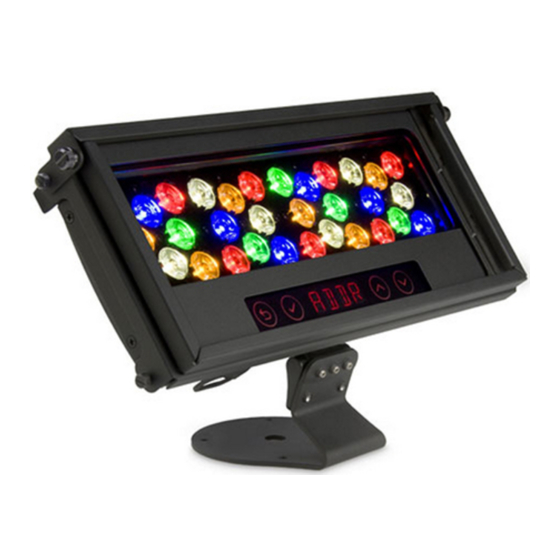
- Page 2 ColorBlast TRX Theatrical RGBAW LED wash light with expanded color range ColorBlast TRX is a fully-featured RGBAW LED wash/flood/spotlight, offering a significantly enhanced color ® range, light output of up to 1577 lumens, and onboard addressing and configuration features for ease of use and control. Ideal for theatrical and rental distributors, exhibition houses, theaters, nightclubs, and other entertainment venues, rugged ColorBlast TRX fixtures are designed to withstand the rigors of demanding stage, set, and touring environments. • Flexible color control — Color control modes • Quick fixture aiming and locking — An industrial- include five-channel RGBAW in/out, three-channel grade constant torque hinge offers stable, 110° RGB in/out, and three-channel RGB in mapped fixture tilting for quick and dependable aiming. to five-channel RGBAW out. RGB modes offer Standard set screws lock the fixture in position consistent operation in installations with a mix of without special tools. ColorBlast TRX and traditional RGB LED fixtures, • Versatile mounting options — A pre-assembled such as ColorBlast TR. mounting base easily accommodates truss clamps • Full range of features — ColorBlast TRX fixtures and other mounting and positioning options. Built- can operate in DMX or standalone mode. 16-bit in 6 ft (1.8 m) power cables can be extended up resolution supports smooth dimming and precise to 175 ft (53.3 m) with standard color scroller or...
- Page 3 74 71 68 83 75 70 66 82 74 70 66 73 69 66 73 69 66 72 68 66 80 72 67 64 79 72 67 64 71 67 64 70 66 64 70 66 63 For lux multiply fc by 10.7 ColorBlast TRX Product Guide...
-
Page 4: Specifications
4.5 in ∅ 0.2 in (114 mm) (5 mm) 4x ∅ 0.5 in measurements that comply with IES LM-80-08 testing (13 mm) procedures. See www.colorkinetics.com/support/ ∅ 3.5 in appnotes/lm-80-08.pdf for more information. (89 mm) Ambient Temps. † 5 RGBAW Channels Full On @ 25° C 60,000 hours 100,000 hours @ 50° C 50,000 hours 80,000 hours = 70% maintenance of lumen output (when light output drops below 70% of initial output). † L = 50% maintenance of lumen output (when light output drops below 50% of initial output). ColorBlast TRX Product Guide... -
Page 5: Included In The Box
Item Type Item Number Philips 12NC City Theatrical Inc. offers a line of polycarbonate holographic Half Top Hats Black (dry / damp / wet location) 120-000009-04 — lenses for ColorBlast TRX, with a range of symmetric and asymmetric beam angles. Visit www.citytheatrical.com for details. Top Hats Black (dry / damp / wet location) 120-000005-04 — Egg Crate Louvers Black (dry / damp / wet location) 120-000015-04 — Barndoors Black (dry / damp / wet location) 120-000019-04 — Horizontal Spread Lens 36 / 50° 120-000025-00 — Horizontal / Vertical 40° / 40° 120-000025-01 — Spread Lens ColorBlast TRX Product Guide... -
Page 6: Planning Your Installation
The built-in power cable can be You can connect ColorBlast TRX fixtures directly to a power / data supply, such extended with a standard 4-pin XLR patch cable. as the PDS-750 TRX, using the built-in 6 ft (1.8 m) power cable with standard XLR connector. Owner / User Responsibilities It is the responsibility of the contractor, installer, purchaser, owner, and user to Refer to the ColorBlast TRX Installation install, maintain, and operate ColorBlast TRX fixtures in such a manner as to comply Instructions for specific warning and caution with all applicable codes, state and local laws, ordinances, and regulations. Consult statements. with the appropriate electrical inspector to ensure compliance. Planning Your Installation ColorBlast TRX is a highly flexible, capable LED lighting fixture with multiple points of control. Your approach to addressing, configuring, and mounting ColorBlast TRX... - Page 7 75 ft (22.9 m) per port The number of ColorBlast TRX fixtures that each power / data supply can support is determined by the such factors as the supply’s capacity and number of available ports. The PDS-750 TRX, for example, offers power / data ports for connecting up to 12 ColorBlast TRX fixtures simultaneously. Included in the box 2. On an architectural diagram or other diagram that shows the physical layout of ColorBlast TRX fixture with accessory holder the installation, identify the locations of all switches, controllers, power / data and 6 ft (1.8 m) power cable supplies, fixtures, and cables. Frosted glass 23° lens Clear glass 10° lens (4) 6-32 stainless steel screws for lens bezel installation Unpack Fixtures 3/32 in hex key wrench for fixture tilting and locking Snap-on ferrite core for advanced EMI suppression 1. Carefully inspect the box containing ColorBlast TRX and the contents for any Installation Instructions damage that may have occurred in transit. 2. Each ColorBlast TRX fixture comes pre-programmed with a unique serial number. As you unpack the fixtures, record the serial numbers in a layout grid (typically a spreadsheet or list) for easy reference and light addressing. 2. Assign each fixture to a position in the lighting design plan. 3. To streamline installation and aid in light show programming, you can affix a label identifying the order or placement in the installation to an inconspicuous location on each light fixture’s housing. ColorBlast TRX Product Guide...
- Page 8 Blue Amber White 16-Bit Mode Red Coarse Red Fine Green Coarse Green Fine Blue Coarse Blue Fine Amber Coarse Amber Fine White Coarse White Fine To address a ColorBlast TRX fixture, you set its DMX starting address. Sequential ColorBlast TRX fixtures come factory- DMX addresses are automatically assigned to the fixture beginning with the starting addressed to starting DMX address 1. DMX address. For instance, if you set a fixture to RGB3 mode, 8-bit operation, and starting DMX address 73, the fixture is automatically assigned three DMX addresses, 73 – 75. If you set a fixture to RGBAW (NORM) mode, 16-bit operation, and starting DMX address 400, the fixture is automatically assigned ten DMX addresses, 400 – 409. For lighting designs where fixtures work in unison, all fixtures can be assigned the same starting DMX address. For light show designs that show different colors on different fixtures simultaneously, you must assign starting DMX addresses to your fixtures such that the DMX addresses assigned to each fixture are unique and do not overlap. • You can manually set the color control mode, fixture resolution, and starting DMX address of a ColorBlast TRX fixture using the onboard menus. See “Using the ColorBlast TRX Onboard Menus” below for details.
- Page 9 Exchange ColorBlast TRX Lenses (Optional) ColorBlast TRX is designed to let you quickly and easily exchange lenses. The clear 10º lens is designed for long throw and spotlighting applications, while the frosted 23º lens is designed for wash lighting applications. The 23º lens is factory installed, and the 10º lens is included in the box. 1. Using a flathead screwdriver, remove the two lockdown screws located on each side of the fixture at the top of the accessory holder. (Do not remove the screws on the edge of the accessory holder closest to the base.) 2. Grab the tabs at the top of the lens bezel and gently flex it apart until the tabs release from the fixture housing. Pivot the bezel and accessory holder forward to access the lens. 3. Remove the installed lens. 4. Clean both sides of the lens using a mild, non-abrasive cleaner. Handle the lens by the gasket, making sure not to touch or soil either surface. Place the lens in the fixture housing, making sure the gasket around the lens is properly fitted. 5. Pivot and press the lens bezel and accessory holder back in place, then replace and tighten the lockdown screws. ColorBlast TRX Product Guide...
- Page 10 Install Spread Lenses and Accessories (Optional) Designed specifically for the family of Blast fixtures by City Theatrical, Inc., spread lenses and accessories provide additional options for controlling and dispersing light. Spread lenses and accessories slip into the accessory holder, which is designed to accommodate one spread lens and one accessory (barn door, top hat, half top hat, or egg crate louver) simultaneously. Captive thumbscrews hold spread lenses and accessories firmly in place, and prevent them from falling out if the fixture is tipped or hung upside down. 1. If hanging a ColorBlast TRX fixture upside down (clamped to a pipe, for example), flip the accessory holder as follows: Using a flathead screwdriver, remove the lockdown screws from the four ▪ corners of the accessory holder. Remove the accessory holder from the fixture housing, and reverse its ▪ orientation. Re-install the accessory holder using the four lockdown screws. ▪ 2. Loosen the two captive thumbscrews located on the upper edge of the accessory holder, and pivot the top of the accessory holder back to expose the slot. ColorBlast TRX Product Guide...
- Page 11 3. Slip the spread lens or accessory into the accessory holder slot. 4. Pivot the top of the accessory holder back in place, and tighten the captive thumbscrews. Fixture with accessories installed upright Fixture with accessories hung upside down ColorBlast TRX Product Guide...
- Page 12 Using ColorBlast TRX Without the Accessory Holder (Optional) If you’re not planning to use spread lenses or accessories, you can remove the accessory holder and secure the lens bezel to the fixture housing using the four included stainless steel screws, 1. Using a flathead screwdriver, remove the lockdown screws from the four corners of the accessory holder. 2. Remove the accessory holder from the fixture housing. 3. Secure the lens bezel directly to the fixture housing using the four included 6-32 Phillips head stainless steel screws. ColorBlast TRX Product Guide...
-
Page 13: Start The Installation
0.82 mm 70 mm 4. For EMI suppression, snap the included ferrite core onto each fixture cable as close as possible to the power / data supply output port. Power Cable pinouts Signal Wire Color +24 VDC (not used) Data White DC Common Black For complete instructions on how to wire the PDS-750 TRX, refer to the PDS-750 TRX Operator’s Manual. PDS-750 TRX ColorBlast TRX Product Guide... - Page 14 Attach Safety Cable (Optional) Each ColorBlast TRX fixture is designed for use with a safety cable to tether it to a Safety cable minimum requirements secure anchor point. When dictated by local or state code or advised by a structural engineer, attach a safety cable to the bracket on the back of the fixture using a Material 316 Stainless Steel standard carabiner clip. Attach the safety cable to the mounting surface using a 5/64 to 3/16 in (2 to 5 mm) nominal Size diameter. Minimum break load must be method that follows the code or engineer’s requirements. greater than 400 lbs (181 kg) Construction 7 x 7 (49 wires) preformed stranded Aim and Lock the Fixtures Using the included 3/32 in hex key wrench, loosen the tilting set screws located on the front of the fixture’s mounting base. Aim the fixture by tilting the beam as desired. Optionally tighten the set screws to lock the fixture in place. 130° 3/32 in ColorBlast TRX Product Guide...
- Page 15 Using the ColorBlast TRX Onboard Menus ColorBlast TRX offers convenient onboard menus that give you fingertip control of all of the fixture’s functions. You can put the fixture in standalone mode, set the fixture’s starting DMX address, set the color control mode, fixture resolution, dimming curve, and LED transition speed. You can also display version and diagnostic information, such as current internal operating temperature and voltage consumption. For convenience, you can save and load profiles (groups of settings), or restore the factory default settings. Overview of the Onboard Menus The ColorBlast TRX onboard menus appear in an LCD window below the LEDs on the face of the fixture. For unobstructed access to the menus, make sure that no accessories or spread lenses are installed. (You can access the menus with the clear or frosted lens installed.) You can navigate the menus and make selections using four touch-sensitive buttons: Return Enter Readout Down Return returns to the previous menu (moves up one level in the menu tree) ▪ Enter advances to the next menu (moves down one level in the menu tree), or ▪ confirms your selection Up moves up in the current menu’s set of options ▪ Down moves down in the current menu’s set of options ▪ The readout area displays menu option names, or fixture configuration or status information. ColorBlast TRX...
- Page 16 RGB3 3-channel (RGB) DMX input, 3-channel output (no A or W) 8-bit Set the fixture’s resolution 16-bit Gamma curve that matches most Philips Color Kinetics fixtures NORM Set the fixture’s CURV LINR Linear relationship between DMX input and power output...
- Page 17 Locking and Unlocking Menus For security, the ColorBlast TRX menu times out and locks after a short period of inactivity. When locked, the readout briefly displays LOCK when a button is touched, then displays the starting DMX address if in DMX mode, or FIXD if in standalone mode. To unlock the ColorBlast TRX menu: ► Press and hold the Return and Down buttons until the menu responds (displays ▪ ADDR or FIXD). To set the ColorBlast TRX menu unlock time: ► Select UTIL > UNLK, then 1, 2, or 5, depending on how many seconds you want a user to hold Return and Down before the menu unlocks. Press Enter to confirm your selection. Displaying and Setting Fixture Mode ColorBlast TRX can work in either DMX mode or standalone mode. When in DMX mode, ColorBlast TRX responds to DMX data input from a controller or power / data supply. In standalone mode, ColorBlast TRX ignores any DMX data and displays a fixed color. You can set the fixed color by entering a brightness value (0 – 255) for each of the fixture’s five channels (red, green, blue, amber, and white).
- Page 18 Setting Color Control Mode ColorBlast TRX offers three color control modes: RGBAW (NORM) ColorBlast TRX accepts five channels of DMX data, and outputs to five channels of LEDs (red, green, blue, amber, and white) RGB3 ColorBlast TRX accepts three channels of DMX data (red, green, and blue), and outputs to three channels of LEDs (the amber and white channels are not used) RGB5 ColorBlast TRX accepts three channels of DMX data (red, green, and blue), and maps the input to five channels of LEDs (red, green, blue, amber, and white) To set a fixture’s color control mode: ► Select CFG > CTRL. Select NORM, RGB5, or RGB3, then press Enter to confirm your selection. Setting Fixture Resolution ColorBlast TRX can function in 8-bit or 16-bit mode. 16-bit mode affords finer control over brightness and color selection, but requires a 16-bit DMX controller. To set a fixture’s resolution: ► Select CFG > BIT. Select 8 or 16, then press Enter to confirm your selection. ColorBlast TRX Product Guide...
- Page 19 Setting Fixture Dimming Curve Dimming curves describe how slowly or quickly a fixture dims at different levels of input. For finer control, ColorBlast TRX offers three different dimming curves for use in different situations and applications: Normal (NORM) The non-linear (gamma) dimming curve used in most Philips Color Kinetics LED lighting fixtures. Use this dimming curve to achieve consistent dimming behavior in an installation where ColorBlast TRX is installed alongside other Philips Color Kinetics lighting fixtures. Linear (LINR) A dimming curve with a linear relationship between power input and DMX output. Tungsten / Incandescent (TUNG) A non-linear dimming curve that emulates the dimming curve of incandescent lamps on a DMX dimmer. This curve offers the most control at low intensities. To set a fixture’s dimming curve: ► Select CFG > CURV. Select NORM, LINR, or TUNG. Press Enter to confirm your selection. Setting LED Transition Speed Normally, LEDs react to DMX or other control data instantaneously. In some cases, you may want to slow down the reaction speed to achieve smoother transitions when the intensity of different LED channels changes. ColorBlast TRX offers five levels of...
- Page 20 To save the fixture’s current settings to a profile: ► Configure the fixture however you wish. Select UTIL > PROF > SAVE. Select 1 or 2. Press Enter to confirm. To load a saved profile: ► Select UTIL > PROF > LOAD. Select 1 or 2. Press Enter to confirm. To restore a fixture’s initial factory settings: ► Select UTIL > PROF > LOAD. Select DFLT. Select Restore Defaults?, then Yes?. Press Enter to confirm. ColorBlast TRX Product Guide...
- Page 21 PDS-750 TRX XLR-to-RJ45 patch cable 2. Run QuickPlay Pro, and click Fixture Configuration. 3. Enter the serial number of the fixture you want to configure in the Enter Serial Number text box, and press Enter. When QuickPlay Pro recognizes the fixture, a ColorBlast TRX tab appears in the Configuration area. 4. Do one or more of the following: To set the fixture’s dimming curve, select Normal, Linear, or Tungsten from the ▪ See “Using the Onboard ColorBlast TRX Menus” above for descriptions of each of Dimming Curve drop-down list, then click Program. these configuration options. To set the fixture’s LED transition speed, select Fast, Delay-1, Delay-2, Delay-3, ▪ or Delay-4 from the LED Transition Speed drop-down list, then click Program. To set the fixture mode, select DMX or Fixed from the Fixture Mode drop- ▪ down list, then click Program. ColorBlast TRX...
- Page 22 To set the fixture’s color control mode, select Normal (RGBAW in/out), RGB3 ▪ (RGB in/out), or RGB5 (RGB in, RGBAW out) from the Color Control Mode drop-down list, then click Program. To set the menu unlock time, select 1 sec, 2 sec, or 5 sec from the Menu Unlock ▪ Time drop-down list, then click Program. 4. To set the fixture’s starting DMX address, click the DMX Address tab, enter a starting DMX address in the New DMX Address box, and click Program. ColorBlast TRX Product Guide...
- Page 23 Updating ColorBlast TRX Firmware The ColorBlast TRX firmware image is periodically updated to improve system performance and functionality. To maximize system performance, make sure your ColorBlast TRX fixtures are running the most recent version of the firmware. Download ColorBlast TRX Firmware If a more recent version of the ColorBlast TRX firmware is available, download the You can check the version of the firmware installed on a ColorBlast TRX firmware file (.pck extension): fixture using the UTIL > INFO > VER menu. 1. Visit the Firmware Updates page at www.colorkinetics.com/support/downloads/ firmware/ to check for the latest firmware version. 2. If a newer firmware image is available, click the link on the Firmware Updates page to download the firmware file to an accessible location on your computer.
- Page 24 EssentialWhite, eW, iColor, iColor Cove, IntelliWhite, iW, iPlayer, Optibin, and Powercore are either Tel 888.385.5742 registered trademarks or trademarks of Philips Solid-State Lighting Solutions, Inc. in the United States and / or other countries. All other brand or product names are trademarks or registered Tel 617.423.9999...