Table of Contents

Related Manuals for Asus V9950 Ultra / Delux / TVD / 256M


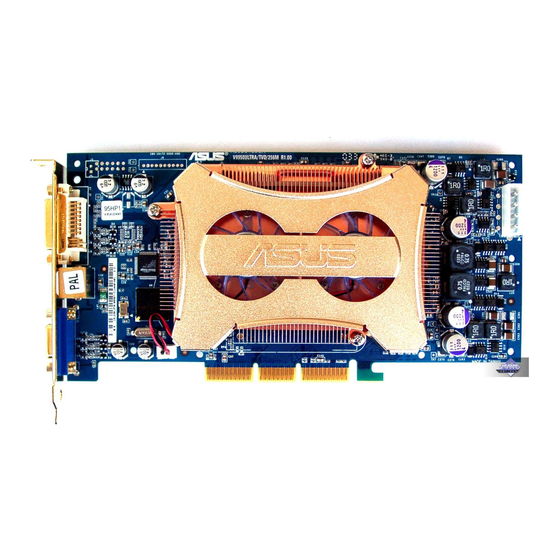
Summary of Contents for Asus V9950 Ultra / Delux / TVD / 256M
- Page 1 V V V V V 995 995 0 0 0 0 0 Series Series Series Series Series Graphics Card V9950 Ultra / Deluxe / TVD / 256M V9950 / Deluxe / TVD / 128M V9950 Ultra / TD / 128M V9950 / TD / 128M V9950SE 256 / 128M USER’S MANUAL...
- Page 2 Product warranty or service will not be extended if: (1) the product is repaired, modified or altered, unless such repair, modification of alteration is authorized in writing by ASUS; or (2) the serial number of the product is defaced or missing.
-
Page 3: Table Of Contents
Method 3: Plug and Play ........11 Method 4: Display Property Page ......12 4.1.2 Windows 2000/XP ..........14 Method 1: ASUS Quick Setup Program ....14 Method 2: Plug and Play ........14 4.1.3 Windows NT 4.0 ........... 15 Method 1: Display Property Page ...... - Page 4 8. ASUS Home Theater ..............36 8.1 Introduction ..............36 8.2 Installing ASUS Home Theater ........39 9. ASUS PowerDirector Pro ............40 9.1 Introduction ..............40 9.2 Installing ASUS PowerDirector Pro ......... 42 10. Remote control functions ............43 11.
-
Page 5: Notices
This digital apparatus does not exceed the Class B limits for radio noise emissions from digital apparatus set out in the Radio Interference Regulations of the Canadian Department of Communications. This class B digital apparatus complies with Canadian ICES-003. ASUS V9950 Series User Guide... -
Page 6: Safety Information
• Avoid dust, humidity, and temperature extremes. Do not place the product in any area where it may become wet. • Place the product on a stable surface. • If you encounter technical problems with the product, contact a qualified service technician or your retailer. ASUS V9950 Series User Guide... - Page 7 1. ASUS Websites The ASUS websites worldwide provide updated information on ASUS hardware and software products. The ASUS websites are listed in the ASUS Contact Information on page viii. 2. Optional Documentation Your product package may include optional documentation, such as warranty flyers, that may have been added by your dealer.
-
Page 8: Asus Contact Information
Technical Support Support Fax: +1-502-933-8713 General Support: +1-502-995-0883 Notebook Support: +1-510-739-3777 x5110 Support Email: tsd@asus.com ASUS COMPUTER GmbH (Germany and Austria) Address: Harkortstr. 25, 40880 Ratingen, BRD, Germany General Email: sales@asuscom.de (for marketing requests only) General Fax: +49-2102-9599-31 Web Site: www.asuscom.de... -
Page 9: Introduction
(GPU), the ASUS V9950 series delivers breakthrough leading-edge graphics performance. Enjoy superior image fidelity regardless of the CPU (central processing unit) employed by the computer system. With the ASUS V9950 series, you will experience stunning yet realistic 3D graphics. -
Page 10: Hardware Setup
2. Hardware setup ASUS V9950 Series User Guide... - Page 11 ASUS V9950 Series User Guide...
- Page 12 ASUS V9950 Series User Guide...
- Page 13 ASUS V9950 Series User Guide...
- Page 14 ASUS V9950 Series User Guide...
-
Page 15: Card Installation
8. Unplug all cables from the wall sockets and remove computer cover. 9. Remove existing VGA card. 10. Follow steps #5 to #11 in section 3.1 above to install new VGA card into the AGP slot. ASUS V9950 Series User Guide... -
Page 16: Display Driver Installation
The ASUS fine-tuned enhanced driver delivers the best 3D performance on your video output. 4.1.1 Windows 98SE/ME Before you install the ASUS enhanced driver, make sure to change the Windows display driver setting to “Standard Display Adapter (VGA)”. Perform the following procedures to change the Windows display driver settings. -
Page 17: Method 1: Asus Quick Setup Program
9. The system prompts an update driver warning, click Yes. 10. Click Next on the succeeding screen prompts and click on Finish then Yes to restart your computer. Method 1: ASUS Quick Setup Program ( when Autorun is enabled 1. Insert the support CD into your CD-ROM drive. -
Page 18: Method 2: Asus Quick Setup Program
Method 2: ASUS Quick Setup Program ( when Autorun is disabled 1. Boot your computer. 2. Insert the support CD into the CD-ROM drive. 3. Double-click the CD drive icon in My Computer or run the setup utility from the following path : \Win9xME\ANVSetup.exe... -
Page 19: Method 3: Plug And Play
Method 3: Plug and Play Before proceeding with the following steps, replace your old VGA card with an ASUS graphic card. 1. Boot your computer. 2. When Windows detects your ASUS graphics card, the New Hardware Found dialog box appears. -
Page 20: Method 4: Display Property Page
Next. 7. From the combo list box, click Next. 8. Click Show all hardware then Have Disk... to display Install From Disk dialog box. ASUS V9950 Series User Guide... - Page 21 OK. 11. From the Update Driver Warning box, click Yes to confirm the setting up of the ASUS enhanced display drivers. 12. Follow the succeeding screen instructions. 13. When Setup prompts that it has finished installing all the necessary files to your computer, click Finish.
-
Page 22: Windows 2000/Xp
CD-ROM drive. 5. From the 2D/3D Graphic & Video Accelerator main menu, click Drivers then Install ASUS Enhanced Driver on the Driver dialog box. 6. Follow the onscreen instructions. 7. When Setup has finished installing all the necessary files on your computer, it will prompt you to restart your computer. -
Page 23: Method 1: Display Property Page
9. Follow succeeding onscreen instructions. 10. When Setup has finished installing all the necessary files to your computer, it will prompt you to restart your computer, click OK to restart your computer and complete Setup. ASUS V9950 Series User Guide... -
Page 24: Windows Nt 4.0
Browse to select the path of the display driver for Windows NT then click OK. 10. Select your ASUS VGA Card model then click OK. 11. Windows NT will once again prompts for confirmation. Confirm installation of display drivers to copy all the necessary files. When done, click Close to return to the Display Properties box then click Apply. -
Page 25: Install Whql Driver
5. Setup prompts you when it has finished copying all the files to your computer. Click OK to finish the installation. Some features of ASUS display card is not supported by this reference drive. ASUS V9950 Series User Guide... -
Page 26: Install Directx
DirectX 9. Make sure that your applications or games support DirectX 9 before installing the DirectX 9 runtime libraries. DirectX 9 currently cannot be uninstalled by regular means, such as outlined in Uninstall Display Driver. ASUS V9950 Series User Guide... -
Page 27: Install Gart Driver
Detection box appears with the chipset detected on your motherboard. 6. Select an option to install the displayed VGART driver or to select from a list. Click on the option buttons to select then click ASUS V9950 Series User Guide... - Page 28 8. Follow the succeeding instructions to complete the setup or click Cancel to abort installation. 9. Setup prompts that it has finished copying all the files to your computer. Click OK to finish the installation. ASUS V9950 Series User Guide...
-
Page 29: Asus Videosecurity
5. ASUS VideoSecurity The ASUS VideoSecurity is available only for Deluxe/TVD models since this application requires a video input support. Install VideoSecurity VideoSecurity is a powerful video stream comparison and detection utility that helps in detecting potential errors or intrusions at a specific time interval by using a video capture devices. -
Page 30: Using Asus Videosecurity
5.2 Using ASUS VideoSecurity The ASUS VideoSecurity lets you detect intruders into your system and environmental changes and monitor a specified location or any incoming visitor. If VideoSecurity detects any deviation from the norm that you set, it may give an error message or not. Regardless of any messages, VideoSecurity will record: •... - Page 31 The following descriptions are only for selected features of the ASUS VideoSecurity utility. For a full description of the features described in this manual and other features, refer to the ASUS VideoSecurity Online Help (HTML) format included with your support CD. You may also click the Help button to open the online help file.
- Page 32 Devices Click the Devices tab to select capture devices and video standard. Use mouse to fine tune the Video Security screen and then click OK when done. ASUS V9950 Series User Guide...
- Page 33 5.2.3 Running ASUS VideoSecurity Click the ASUS icon on the taskbar’s status area. Clicking this icon opens the ASUS Control Panel, then click the ASUS VideoSecurity to run VideoSecurity. Detect Region Click the Detect Region button to define your VideoSecurity video window.
-
Page 34: Asus Gameface
Visit the ASUS website (www.asus.com) for more information about the ASUS GameFace technology. ASUS V9950 Series User Guide... -
Page 35: Installing Asus Gameface
6.2 Install ASUS GameFace The revolutionary ASUS GameFace is a real-time audio/video communication feature that enhances interactive gaming experience by enabling point-to-point video conferencing functions and online gaming to take place at the same time thus allowing you to see and talk to your opponents while playing full-screen online games! 1. - Page 36 6. Follow the succeeding screen instructions. 7. Click Finish after the installation is complete. ASUS V9950 Series User Guide...
-
Page 37: Using Asus Gameface
6.3 Using ASUS GameFace Follow the given instructions to use ASUS GameFace. STEP 1: Enabling ASUS OSD Open Display Properties dialog box from desktop or control panel. Select Advanced tab on Settings page. Select OSD from in Advanced tab. Check the Enable OSD check box and input the appropriate hotkey. - Page 38 “Make a Call” button. You will see and hear the remote audio/video signal if the remote computer accepts the call. For the computer name and IP addresses go to Tools-> Info for lists of information. ASUS V9950 Series User Guide...
- Page 39 File menu or press the “End the Call” button to disconnect. STEP 5: GameFace Settings Select Option from the Tool menu. Select GameFace Option Dialogue Enter GameFace page to adjust transparency, position and hotkey settings. ASUS V9950 Series User Guide...
- Page 40 Press the On-Screen Display hotkey to show the OSD menu. Use the arrow keys to select the GameFace application page and adjust the Transparency, Position X, Position Y, Size or toggle to enable or disable GameFace. ASUS V9950 Series User Guide...
-
Page 41: Asus Smartdoctor
ASUS SmartDoctor The bundled ASUS SmartDoctor application is not a full version. It only supports the ASUS Tweak utility. 7.1 Install Smart Doctor The Smart Doctor utility monitors the VGA card’s condition and significantly cools down the VGA chipset. The utility also allows you to adjust the VGA graphic card clock settings. -
Page 42: Using Asus Tweak Utility
7.2 Using ASUS Tweak Utility The ASUS Tweak utility is designed to adjust the working frequency of the graphic engine and video memory. Use ASUS Tweak Utility with extreme caution and only if you are well acquainted with your display card. Inappropriate use may damage your graphic card, its components and even your system. - Page 43 7.2.2 Set/Test When you click the Set/Test button, the Tweak Utility tests the graphic card onscreen memory and displays the following screen while testing. ASUS V9950 Series User Guide...
-
Page 44: Asus Home Theater
8. ASUS Home Theater Software The ASUS Home Theater is available only for Deluxe/TVD models since this application requires a video input support. 8.1 Introduction The ASUS Home Theater is an integrated software with various multimedia applications. It allows you to enjoy multimedia entertainment such as watching TV, listening to MP3s, playing DVD, sorting and viewing video or pictures in one friendly user interface. - Page 45 Sort pictures from TV/DVD/Video • Display pictures from TV/DVD/ Video • Instant preview feature • Print pictures E. Play DVD/VCD on your PC! • DVD/VCD playback • Still image capture feature • 5.1 channel audio support ASUS V9950 Series User Guide...
- Page 46 F. Timeshifting feature! Don’t you hate that annoying phone call during your favorite TV show or an important game? ASUS has the perfect answer. The “Timeshifting” feature allos you to simultaneously watch, replay and record a TV program on same computer. You can now view, stop and replay any part of a show without missing the rest due to unexpected interruption.
-
Page 47: Installing Asus Home Theater
8.2 Installing ASUS Home Theater The ASUS Home Theater enables you to watch TV, listen to MP3s, view DVDs or video clips and browse pictures on your PC. 1. Insert the ASUS Home Theater support CD into your CD-ROM drive. -
Page 48: Asus Powerdirector Pro
MPEG or DV AVI formats that do not contain effects, which saves you huge amounts of time compared to our competitors that compress and decompress the entire movie! ASUS V9950 Series User Guide... - Page 49 • adding titles to clips • adding audio streams to clips • picture-in-pictures (adding video or images to an existing video clip) • a huge collection of transitions, video and titles effects • master audio files • watermarks ASUS V9950 Series User Guide...
-
Page 50: Installing Asus Powerdirector Pro
3. Select a language from the combo list box then click Next. 4. The PowerDirector Pro Setup window appears. Click Next to start the installation. 5. Follow the succeeding on- screen instructions to complete setup. ASUS V9950 Series User Guide... -
Page 51: Remote Control Functions
10. Remote Control Functions ASUS Remote Controller The ASUS Remote Control is bundled on Deluxe models only. ASUS Remote Controller Layout ASUS V9950 Series User Guide... - Page 52 Close App Close App Close App Close App Close App Music Mode Pictures Mode Video Mode Mode Mouse/ Mouse/ Mouse/ Mouse/ Mouse/ Arrow Arrow Arrow Arrow Arrow Keys Keys Keys Keys Keys LMouse/ LMouse/ LMouse/ LMouse/ LMouse/ Back Back Back Back Back ASUS V9950 Series User Guide...
- Page 53 Rewind Rewind Stop Stop Stop Stop Stop Fast Fast Fast Forward Forward Forward Volume Volume Volume Volume Volume Up/Down Up/Down Up/Down Up/Down Up/Down Home/ Home/ Home/ Home/ Home/ Launch Launch Launch Launch Launch Channel Up/Down ASUS V9950 Series User Guide...
- Page 54 Remote control button functions (cont’) Button Mode 1 Mode 2 Mode 3 Mode 4 Mode 5 Mute Mute Mute Mute Mute Record Remote Remote Remote Remote Remote Toggle Toggle Toggle Toggle Toggle ASUS V9950 Series User Guide...
-
Page 55: Specifications
PC systems with available FM tuner features. Features: 1. Innovation design of ASUS Remote Controller for controlling ASUSDVD XP/PowerVCR II/EPG software with desktop PC. 2. Mouse mode can be used as mouse function while you aren’t in front of your computer. -
Page 56: Resolution Table
75Hz 75.2 √ √ √ 85Hz 86.0 √ √ √ 100Hz 101.7 √ √ √ 120Hz 123.5 √ √ √ 140Hz 145.1 √ √ 144Hz 150.5 √ √ √ 150Hz 157.2 √ √ 170Hz 179.8 ASUS V9950 Series User Guide... -
Page 57: Color Depth
70Hz 104.9 √ √ 72Hz 108.5 √ √ √ 75Hz 112.5 √ √ 85Hz 129.4 √ √ √ 2048 x 1536 60Hz 95.5 √ √ 70Hz 111.9 √ √ 72Hz 115.3 √ √ 75Hz 121.3 ASUS V9950 Series User Guide... - Page 58 ASUS V9950 Series User Guide...