Canon FS400 Quick Manual
Digital camcorder
Hide thumbs
Also See for FS400:
- Brochure & specs (2 pages) ,
- Instruction manual (133 pages) ,
- Product manual (26 pages)
Table of Contents
Advertisement
Quick Links
Advertisement
Chapters
Table of Contents

Related Manuals for Canon FS400


Summary of Contents for Canon FS400
-
Page 47: Instruction Manual
PUB. DIE-0380-000 Digital Camcorder Instruction Manual... -
Page 48: Important Usage Instructions
Unauthorized recording of copyrighted materials may infringe on the rights of copyright owners and be contrary to copyright laws. Digital Video Camcorder FS40 A / FS400 A systems This device complies with Part 15 of the FCC Rules. Operation is subject to the following two conditions: (1) This device may not cause harmful interference, and (2) this device must accept any interference received, including interference that may cause undesired operation. - Page 49 WARNING: To reduce the risk of electric shock, do not expose this product to dripping or splashing. The Mains plug is used as the disconnect device. The Mains plug shall remain readily operable to disconnect the plug in case of an accident. CAUTION: •...
-
Page 50: Important Safety Instructions
IMPORTANT SAFETY INSTRUCTIONS In these safety instructions the word “product” refers to the Canon Digital Video Camcorder FS40 A / FS400 A and all its accessories. Read these instructions. Keep these instructions. Heed all warnings. Follow all instructions. Do not use this apparatus near water. - Page 51 Placing or Moving — Do not place on an unstable cart, stand, tripod, bracket or table. The product may fall, causing serious injury to a child or adult, and serious damage to the product. A product and cart combination should be moved with care. Quick stops, excessive force, and uneven surfaces may cause the product and cart combination to overturn.
- Page 52 Replacement Parts — When replacement parts are required, be sure the service technician has used replacement parts that are specified by Canon or that have the same characteristics as the original part. Unauthorized substitutions may result in fire, electric shock or other hazards.
- Page 53 Trademark Acknowledgements • SD, SDHC and SDXC Logos are trademarks of SD-3C, LLC. • Microsoft and Windows are trademarks or registered trademarks of Microsoft Corporation in the United States and/or other countries. • Macintosh and Mac OS are trademarks of Apple Inc., registered in the U.S. and other countries. •...
-
Page 54: Exciting Features
Exciting Features Whether you are using a camcorder for the first time or are very experienced, this camcorder offers many easy-to-use functions. The following are just but a few examples of the many functions that can enrich your shooting experience. Pre-recording Dual Flash Memory You can record in the built-in... - Page 55 Table of contents „ Introduction Exciting Features About this Manual Getting to Know the Camcorder Supplied Accessories and CD-ROMs Names of Parts „ Preparations Getting Started Charging the Battery Pack Preparing the Accessories Adjusting the Position and Brightness of the LCD Screen Basic Operation of the Camcorder Operating Modes...
- Page 56 „ Video Basic Recording Shooting Video Selecting the Video Quality (Recording Mode) Zooming: Optical, Advanced and Digital Zoom Quick Start Function Basic Playback Playing Back Video Selecting what Recordings to Play Back Searching for Scenes Pre-selecting Recordings from the Index Screen Deleting Scenes Advanced Functions Automatic Exposure and Special Scene Recording...
- Page 57 „ Photos Taking Photos Viewing Photos Slideshow Deleting Photos Copying Photos to a Memory Card „ External Connections Terminals on the Camcorder Connection Diagrams Playback on a TV Screen Saving and Sharing Your Recordings Saving Recordings on a Computer Copying Movies to an External Video Recorder Preparing Movies for the Web „...
-
Page 58: About This Manual
About this Manual Thank you for purchasing the Canon FS40 / FS400. Please read this manual carefully before you use the camcorder and retain it for future reference. Should your camcorder fail to operate correctly, refer to Troubleshooting ( 102). - Page 59 Brackets [ ] are used to refer to menu options as they are displayed on screen. The names of most buttons and switches are indicated within a “button” frame. FUNC. For example arrow is used to abbreviate menu selections. For a detailed explanation on how to use the menus, refer to Using the Menus 27).
-
Page 60: Getting To Know The Camcorder
Getting to Know the Camcorder Supplied Accessories and CD-ROMs The following accessories are supplied with the camcorder: XCA-570 Compact Power Adapter (incl. power cord) BP-808 Battery PackW XIFC-300PCU/S USB Cable STV-250N Stereo Video CableW Yellow • Red • White plugs XQuick Guide Installation Guide for PIXELA’sW... - Page 61 The following CD-ROMs and software are supplied with the camcorder: • PIXELA’s Transfer Utility CD-ROM* - Use Transfer Utility for saving and transferring movies and music files you can use as background music. • PIXELA’s VideoBrowser CD-ROM* - In addition to all the functionality of Transfer Utility, you can use VideoBrowser for managing, editing, and playing back movies.
-
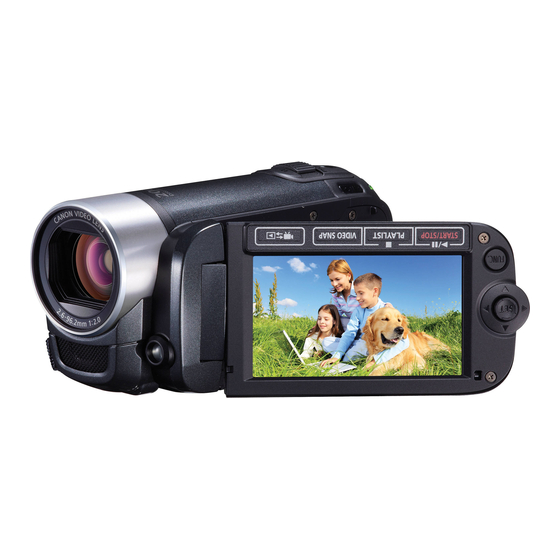
Page 62: Names Of Parts
Names of Parts Left side view 1 RESET button ( 106) button ( 25)/ WEB button ( 3 DISP. (on-screen display) button 62, 66)/BATT. INFO button 101) 4 Speaker ( 5 AV OUT terminal ( 80, 81) 6 USB terminal ( 80, 81) 7 DC IN terminal ( 8 ACCESS indicator (... - Page 63 Top view Zoom lever ( PHOTO button ( POWER button Joystick ( LCD screen ( FUNC. button ( 28, 90) (play/pause) button ( 43)/ START/STOP button ( (stop) button ( 43)/ PLAYLIST button ( VIDEO SNAP (video snapshot) button (camera/play) button ( S d ON/OFF (CHG) (charge) indicator: Green –...
- Page 64 Bottom view S g Battery release latch S h Tripod socket ( 114) S j Memory card slot ( S k Battery compartment ( S l Battery compartment cover/Memory card slot cover D q Serial number The serial number label is located on the battery compartment cover.
-
Page 65: Getting Started
Preparations This chapter describes basic operations, such as navigating the menus, and first time settings to help you learn more about your camcorder. Getting Started Charging the Battery Pack The camcorder can be powered with a battery pack or directly using the compact power adapter. - Page 66 3 Close the cover and slide it toward the lens until you hear a click. 4 Connect the power cord to the compact power adapter. 5 Plug the compact power adapter into a power outlet. 6 Connect the compact power adapter to the camcorder’s DC IN terminal.
- Page 67 To remove the battery pack 1 Slide the battery compartment cover away from the lens and open it. 2 Press the battery release latch and pull out the battery pack. 3 Close the cover and slide it toward the lens until you hear a click.
-
Page 68: Preparing The Accessories
• We recommend that you prepare battery packs to last 2 to 3 times longer than you think you might need. • USA and Canada only: The Lithium ion/polymer battery that powers the product is recyclable. Please call 1-800-8-BATTERY for information on how to recycle this battery. -
Page 69: Adjusting The Position And Brightness Of The Lcd Screen
To attach an optional wrist strap Pass the attaching end of the wrist strap through the rear bracket on the camcorder, thread the wrist strap through the loop and fasten. Adjusting the Position and Brightness of the LCD Screen Rotating the LCD Panel Open the LCD panel 90 degrees. - Page 70 LCD Backlight When recording in bright places it may be difficult to use the LCD screen. Turn on the LCD backlight to make it brighter. With the camcorder on, hold DISP. pressed down for more than 2 seconds. Repeat this action to switch the LCD backlight between off (normal) and on (bright).
-
Page 71: Basic Operation Of The Camcorder
Basic Operation of the Camcorder Operating Modes Recording The camcorder offers two basic modes for recording video and photos: mode, for beginners or if you just prefer not to bother with detailed camcorder settings, and flexible recording ( ) mode, which lets you change the cam- corder’s settings to your preference. - Page 72 menu: [Rec Media for Movies]*, [Rec Media for Photos]*, [Widescreen], [Video Snapshot Length]. menu: [Image Stabilizer]**, [Auto Slow Shutter]. menus: All settings. only. ** The [ Standard] setting will be used in mode if set to [ Off] in mode. •...
-
Page 73: Joystick And Joystick Guide
Joystick and Joystick Guide Use the joystick to operate the camcorder’s menus. Push the joystick up, down, left or right Press the joystick itself ( ) to save ) to select an item or the settings or confirm an action. On change settings. - Page 74 Selecting an Option from the FUNC. Menu The following is an example of selecting a FUNC. menu option in mode. In playback modes, the operation varies depending on the function selected so refer to the relevant chapter as necessary. FUNC. 1 Press 2 Select ( ) the icon of the function...
- Page 75 FUNC. 6 Press FUNC. You can press to close the menu at any time. Š Preparations...
-
Page 76: First Time Settings
First Time Settings Setting the Date and Time You will need to set the date and time of the camcorder before you can start using it. The [Date/Time] screen will appear automatically when the cam- corder’s clock is not set. When the [Date/Time] screen appears, the year will be selected. -
Page 77: Changing The Language
Changing the Language The default language of the cam- corder is English. You can set it to one of 26 other languages. Operating modes: FUNC. Menu] [Language FUNC. Desired language NOTES • The displays that appear in some menu screens refer to the name of buttons on the camcorder and will not change, regardless of the language selected. -
Page 78: Using A Memory Card
Using a Memory Card Memory Cards Compatible for Use with the Camcorder You can use commercially available Secure Digital (SD) cards with this camcorder. However, depending on the memory card, you may not be able to record movies. Refer to the table below. As of May 2010, the movie recording function has been tested using SD/SDHC memory cards made by Panasonic, Toshiba and SanDisk, and SDXC memory cards made by Panasonic and Toshiba. - Page 79 SDXC Memory Cards As of May 2010, SDXC memory cards have been tested to work under Windows 7. For details on whether your computer's operating system is SDXC-compatible, check with your computer's manufacturer. IMPORTANT • If you use an SDXC memory card with a computer OS that is not SDXC-compatible, you may be prompted to format the memory card.
-
Page 80: Inserting And Removing A Memory Card
Inserting and Removing a Memory Card Make sure to initialize ( 35) all memory cards before using them with this camcorder. 1 Turn off the camcorder. Make sure the ON/OFF (CHG) indicator is off. 2 Slide the memory card slot cover away from the lens and open it. -
Page 81: Selecting The Memory For The Recordings
Selecting the Memory for the Recordings You can select to record your movies and photos in the built-in mem- ory or on a memory card. The built-in memory is the default memory for recording both. Operating modes: POINTS TO CHECK Eye-Fi cards •... - Page 82 FUNC. Menu] [Initialize [Built-in Mem.] or [Mem. Card] Initialization FUNC. method [Yes]* [OK] FUNC. Menu] [Initialize FUNC. Initialization method [Yes]* [OK] * If you selected the [Complete Initialization] option, you can press to cancel the initialization while it is in progress. All recordings will be erased and the memory can be used without any problem.
- Page 83 • At the time of purchase, Eye-Fi cards contain the necessary network configuration software. Be sure to install the software and complete the required configuration setup before you initialize the Eye-Fi card prior to using it with this camcorder. Š Preparations...
-
Page 84: Basic Recording
Video This chapter covers functions related to shooting movies, including recording, playback, advanced functions and playlist and scene operations. Basic Recording Shooting Video Operating modes: 1 Turn on the camcorder. By default, movies are recorded in the built-in memory. You can select the memory that will be used to record movies 35). -
Page 85: Selecting The Video Quality (Recording Mode)
• Be sure to save your recordings regularly ( 83), especially after mak- ing important recordings. Canon shall not be liable for any loss or cor- ruption of data. NOTES • About the Power Save mode: If [Power Saving Mode] is set to... -
Page 86: Zooming: Optical, Advanced And Digital Zoom
Approximate recording times Default value Recording mode → Memory ↓ 4 GB memory card 55 min. 1 hr. 20 min. 2 hr. 35 min. Built-in memory/ 1 hr. 50 min. 2 hr. 45 min. 5 hr. 10 min. 8 GB memory card 16 GB memory card 3 hr. -
Page 87: Quick Start Function
Move the zoom lever toward W (wide angle) to zoom out. Move it toward T (telephoto) to zoom in. By default, the zoom lever operates at a variable speed – press gently for a slow zoom; press harder for faster zooms. - Page 88 2 When you wish to resume recording, open the LCD panel. The ON/OFF (CHG) indicator turns back green and the camcorder is ready to record. IMPORTANT • Do not disconnect the power source during standby mode (while the ON/OFF (CHG) indicator is lit in orange). NOTES •...
-
Page 89: Basic Playback
Basic Playback Playing Back Video Operating modes: 1 Press to open the [Movies] index screen. 2 Move ( ) the selection frame to the scene you want to play back. When you have recorded a large number of scenes, you can display ) a slidebar below the scene thumbnails and browse ( ) through index pages;... - Page 90 IMPORTANT • Observe the following precautions while the ACCESS indicator is on or flashing. Failing to do so may result in permanent data loss. - Do not open the memory card slot cover. - Do not disconnect the power source or turn off the camcorder. - Do not change the camcorder’s operating mode.
-
Page 91: Selecting What Recordings To Play Back
toward * to skip to the beginning of the current scene or to skip to the next scene. * Push twice to skip to the beginning of the previous scene. Ending special playback modes During any special playback mode, press . -
Page 92: Searching For Scenes
1 In the index screen, move ( ) the orange selection frame to the tabs on the top of the screen. 2 Select ( ) the tab corresponding to the recordings you want to play back. 3 Return ( ) to the index screen to select a scene or photo. To open the [Video Snapshot] index screen You can open an index screen that contains only your video snapshot scenes (... - Page 93 2 Open the calendar screen. FUNC. Scene Search] [Calendar Screen] • The calendar screen appears. • Dates that contain scenes (that is, movies were recorded on that date) appear in white. Dates without recordings appear in black. 3 Move ( ) the cursor to the desired date.
-
Page 94: Pre-Selecting Recordings From The Index Screen
3 Select ( ) the date, month or year and move ( ) between recording dates. 4 After selecting the desired date, press The index screen will appear with the selection frame on the first scene recorded on the selected date. NOTES FUNC. -
Page 95: Deleting Scenes
Total number of scenes selected Selected scenes FUNC. 4 Press twice to close the menu. To cancel all the selections FUNC. Select] [Remove All Selections] [Yes] FUNC. [OK] NOTES • The pre-selection of scenes/photos will be canceled if you turn off the camcorder or change the operating mode. - Page 96 3 Delete the scenes. FUNC. Delete] Desired option [Yes]* [OK] FUNC. * If you selected any option other than [This Scene], you can press to inter- rupt the operation while it is in progress. Some scenes will be deleted never- theless.
-
Page 97: Advanced Functions
Advanced Functions Automatic Exposure and Special Scene Recording Programs The recording program determines how much control you have over the camcorder’s recording-related settings. Select the [ Pro- grammed AE] recording program to give you full control over functions like the white balance or image effects. Alternatively, give the cam- corder more control by selecting a Special Scene recording program. - Page 98 Sports] To record sports scenes such as tennis or golf. Snow] To record in bright ski resorts with- out the subject being underexposed. Beach] To record on a sunny beach with- out the subject being underexposed. Sunset] To record sunsets in vibrant col- ors.
-
Page 99: Automatic Backlight Correction
NOTES • [ Portrait]/[ Sports]/[ Snow]/[ Beach]: The picture may not appear smooth during playback. • [ Portrait]: The blur effect of the background increases the more you zoom in (T). • [ Snow]/[ Beach]: The subject may become overexposed on cloudy days or in shaded places. -
Page 100: Advanced Image Stabilization
Advanced Image Stabilization The image stabilizer reduces camcorder blur (blur due to the cam- corder moving) so you can get nice, stable shots. Select the image stabilization mode according to the shooting conditions. Operating modes: FUNC. Menu] [Image Stabilizer] FUNC. Desired IS mode ... -
Page 101: Video Snapshot
Operating modes: 1 Open ( ) the joystick guide. Pre REC 2 Select ( Pre REC] and press • appears. • Press again to turn pre-recording off. Start/Stop 3 Press The scene recorded in the memory will start 3 seconds before Start/Stop was pressed. -
Page 102: Digital Effects
• The camcorder records for about 4 seconds (the blue frame serves as a visual progress bar) and then automatically returns to record pause mode. • You can change the length of video snapshot scenes to 2 or 8 seconds with the [Video Snapshot Length] setting. -
Page 103: Manual Exposure Adjustment
Applying the Selected Digital Effect 1 Open ( ) the joystick guide. Digital Effects 2 Select ( Digital Effects] and press • The icon of the selected digital effect turns green. • Press again to deactivate the digital effect (its icon will turn white again). To fade in/out Activate the selected fader in record pause mode ( ), then press... -
Page 104: Manual Focus Adjustment
POINTS TO CHECK • Select a recording program other than [ Fireworks]. 1 Open ( ) the joystick guide. Exposure 2 Select ( Exposure] and press • The current exposure is locked. • The exposure adjustment indicator and the neutral value “±0” appear on the screen. -
Page 105: White Balance
POINTS TO CHECK • Adjust the zoom before you start the procedure. 1 Open ( ) the joystick guide. Focus 2 Select ( Focus] and press [MF] The current focus is locked and appears. 3 Adjust ( ) the focus as required. •... -
Page 106: Image Effects
When the adjustment is completed, stops flashing and stays on. The camcorder retains the custom setting even if you turn off the camcorder. FUNC. 2 Press to save the setting and close the menu. Options Default value) Automatic] The camcorder automatically sets the white bal- ance for natural looking colors. -
Page 107: Mini Video Light
FUNC. FUNC. Image Effect Off] Desired option Options Default value) Image Effect Off] Records with no image enhancing effects. Vivid] Emphasizes the contrast and color saturation. Neutral] Tones down the contrast and color saturation. Soft Skin Detail] Softens the details in the skin tone area for a more complimentary appearance. -
Page 108: Selecting The Playback Starting Point
Start/Stop For movies: Press The camcorder starts recording after a 10-second countdown. The countdown appears on the screen. PHOTO For photos: Press , first halfway to activate the autofocus and then fully. The camcorder will record the photo after a 10-second countdown. The countdown appears on the screen. -
Page 109: Playing Back Recordings Set To Background Music
• Press DISP. again to return to the index screen. Current scene / Total number of scenes Scene length Recording date and time Interval between frames Timeline ruler Page slidebar Frame selected for start of playback 3 Select ( ) the playback starting point from the timeline ruler. 4 Press to begin the playback. - Page 110 POINTS TO CHECK To play back scenes or a slideshow of photos recorded on the memory card, you will need to transfer the music tracks to the memory card in advance. Windows users: Use the supplied PIXELA’s software. For details, refer to the Software Guide (PDF file) of the supplied PIXELA’s software.
- Page 111 IMPORTANT • If you use copyrighted songs and music tracks in your video creations, remember that music under copyright may not be used without per- mission from the copyright holder, except for cases permitted under applicable laws, such as for personal use. Make sure to follow applica- ble laws when using music files.
-
Page 112: On-Screen Displays And Data Code
On-Screen Displays and Data Code You can turn most on-screen displays on or off. Operating modes: DISP. Repeatedly press to turn the on-screen displays on/off in the following sequence: mode: • All displays on • Most displays off* mode: • All displays on •... -
Page 113: Playlist And Scene Operations
Playlist and Scene Operations Editing the Playlist: Adding, Deleting and Moving Scenes Create a playlist to play back only the scenes you prefer and in the order of your choice. You can play back the scenes in the playlist using your favorite song as background music ( 63). - Page 114 NOTES • Deleting or moving scenes in the playlist will not affect the original recordings. • You can copy scenes from the built-in memory to the memory card ( 70) to include in the memory card’s playlist also scenes that were originally recorded in the built-in memory.
-
Page 115: Dividing Scenes
2 Select ( ) the scene you want to move. FUNC. 3 Press , select [ Move] and press 4 Move ( ) the orange marker to the desired position of the scene and press The original position of the scene and the current position of the marker are displayed at the bottom of the screen. -
Page 116: Copying Scenes To A Memory Card
The video from the division point to the end of the scene will appear as a new scene in the index screen. NOTES • When advancing/reversing frames while dividing the scenes, the inter- val will be 0.5 second. • If the scene cannot be divided at the point where you paused the play- back, advance/reverse a frame and then divide the scene. - Page 117 FUNC. Copy ( Desired option [Yes]* FUNC. [OK] * Press to interrupt the operation while it is in progress. Options [All Scenes] Copies all the scenes to the memory card. [All Scenes (this date)] Copies to the memory card all the scenes that were recorded on the same day as the selected scene.
- Page 118 NOTES • In the following cases, you will not be able to copy recordings to the memory card: - If the memory card slot is open. - If the LOCK switch on the memory card is set to prevent writing. - If there is no memory card in the memory card slot.
-
Page 119: Taking Photos
Photos Refer to this chapter for details on taking photos and playing them back. Taking Photos Operating modes: POINTS TO CHECK • Please read the IMPORTANT section before using an Eye-Fi card. 1 Turn on the camcorder. By default, photos are recorded in the built-in memory. -
Page 120: Viewing Photos
- Photos recorded on an Eye-Fi card will be uploaded automatically after setting the camcorder to playback mode if you are within the range of a configured network. Always verify that Eye-Fi cards have been approved in the country/region of use. See also Using an Eye-Fi card ( 88). - Page 121 To return to the index screen from single photo view 1 Open ( ) the joystick guide. 2 Select ( ) the icon and press You can also move the zoom lever toward W to return to the index screen. Photo Jump Function When you have recorded a large number of photos, you can jump 10 or 100 photos at a time.
-
Page 122: Slideshow
Slideshow You can play a slideshow of all the photos and even set it to music. Operating modes: 1 Open the [Photos] index screen. 2 Select the background music to use when playing back the photo slideshow ( 63, steps 1-3). 3 Back in the index screen, select ( ) the first photo of the slideshow. - Page 123 2 Select ( ) the photo you want to delete and press 3 Select ( ) [Yes] and press to delete the photo. FUNC. 4 Repeat steps 2-3 to delete additional photos or press twice to close the menu. Deleting Photos from the Index Screen 1 Open the [Photos] index screen.
-
Page 124: Copying Photos To A Memory Card
Copying Photos to a Memory Card You can copy photos only from the built-in memory to the memory card. POINTS TO CHECK • Please read the IMPORTANT section ( 79) before using an Eye-Fi card. Operating modes: Copying a Single Photo 1 Select to view the photos recorded in the built-in memory. - Page 125 3 Copy the photos. FUNC. Copy ( Desired option [Yes]* FUNC. [OK] * If you selected an option other than [This Photo], you can press to interrupt the operation while it is in progress. Options [All Photos] Copies all the photos. [This Photo] Copies only the photo marked with the orange selec- tion frame.
-
Page 126: Terminals On The Camcorder
External Connections This chapter explains how to connect your camcorder to an external device such as a TV, VCR, or computer. Terminals on the Camcorder 1 USB Terminal Access: Open the LCD panel. 2 AV OUT Terminal Access: Open the LCD panel. Sound from the built-in speaker will be muted while the STV-250N Stereo Video Cable is connected to the camcorder. - Page 127 Connection Composite Video Type: Analog Quality: Standard definition Output only Connect to a standard TV or a VCR with audio/video input terminals. Change the following settings on the camcorder: [TV Type] according to the TV set (widescreen or 4:3), if the TV cannot automatically detect and change the aspect ratio Yellow White...
-
Page 128: Playback On A Tv Screen
Playback on a TV Screen Connect the camcorder to a TV to enjoy your recordings with family and friends. Playback on an HDTV using one of the high-definition connections will ensure the best playback quality. Operating modes: 1 Turn off the camcorder and the TV. 2 Connect the camcorder to the TV. -
Page 129: Saving And Sharing Your Recordings
Saving and Sharing Your Recordings Saving Recordings on a Computer Movies and photos recorded with this camcorder are saved in the built-in memory ( only) or on the memory card. Because space is limited, make sure to save your recordings on a computer on a regular basis. - Page 130 101 and 998. • Windows XP: Your photos can be found under [Canon FS40]*. • Mac OS X: iPhoto will start up automatically and [Canon FS40]* will appear as a new device. * The actual name of the device will show your camcorder’s model.
-
Page 131: Copying Movies To An External Video Recorder
• Operation may not work correctly depending on the software and the specifications/settings of your computer. • If you wish to use the image files on your computer, make copies of them first. Use the copied files, retaining the originals. •... -
Page 132: Preparing Movies For The Web
2 Turn on the camcorder and set it to mode. 3 Camcorder: Locate the scene you wish to copy and pause the playback just before the desired scene. 4 Camcorder: Resume playback. • Push the joystick ( ) to hide the joystick guide. •... - Page 133 4 Play back the scene and pause the playback where you want the conversion to begin. 5 Press 6 Select ( ) [Yes] and press • Press twice to interrupt the operation while it is in progress. • The video from the point where you pressed until the end of the scene (or up to 10 minutes in...
- Page 134 • After you connect the camcorder to the computer, the supplied PIXELA’s software will copy the MPEG video files to the computer and upload them to the Web, leaving behind a copy of the video files in the memory card. Use the [Delete All Web Movies ] option to delete the MPEG files from the memory card after you confirm that the...
- Page 135 required to use Eye-Fi cards in many countries or regions. Without approval, use of the card is not permitted. If it is unclear whether the card has been approved for use in the area, please check with the card manufacturer. •...
-
Page 136: Appendix: Menu Options Lists
Additional Information This chapter contains troubleshooting advice, screen mes- sages, handling and maintenance tips, and other information. Appendix: Menu Options Lists Menu items not available appear grayed out. For details about how to select an item, refer to Using the Menus ( 27). - Page 137 Mode : [Movies] index screen (original scenes) : [Playlist] and [Playlist: Video Snapshot] index screens : [Video Snapshot] index screen Menu item Setting options [Select Music] [Off], list of music tracks – [Select] [Individual Scenes], [Remove All Selections] – [All Scenes], [All Scenes (this date)], –...
-
Page 138: Setup Menus
Setup Menus Camera Setup 1 ( Mode) Menu item Setting options [Built-in Mem.], [Mem. Card] [Rec Media for Movies] [Built-in Mem.], [Mem. Card] [Rec Media for Photos] [Widescreen] On], [ Off] – [Video Snapshot Length] [ 2 sec], [ 4 sec], [ 8 sec] –... - Page 139 Camera Setup 2 ( Mode) Menu item Setting options [Digital Zoom] On], [ Off] [Zoom Speed] Variable], [ Speed 3], [ Speed 2], Speed 1] [Image Stabilizer] Dynamic], [ Standard], [ Off] [Flicker Reduction] Off], [ 50 Hz], [ 60 Hz] –...
- Page 140 [Data Code]: Displays the date and/or time when the scene was recorded. Camera Data]: Displays the aperture (f-stop) and shutter speed used when recording the scene. System Setup 1 Menu item Setting options [Output Onscreen Displays] [ On], [ Off] –...
- Page 141 System Setup 2 Menu item Setting options [Notification Sounds] High Volume], – Low Volume], [ Off] [Power Saving Mode] On], [ Off] – [Quick Start] Off], [ 10 min], – – – 20 min], [ 30 min] [Initialize [Built-in Mem.], [Mem. Card] [Quick Initialization], [Initialize [Complete Initialization]...
- Page 142 bers from 0101 to 9900, and stored in folders containing up to 100 pho- tos. Folders are numbered from 101 to 998. Reset]: Photo numbers will restart from 101-0101 every time you insert a new memory card. Continuous]: Photo numbers will continue from the number follow- ing that of the last photo recorded with the camcorder.
- Page 143 Menu item Setting options [Calendar Start Day] [Saturday], [Sunday], [Monday] – – – [Date Format]: Select the date format to be used for most on-screen dis- plays. [Calendar Start Day]: Select the day on which the week starts for the cal- endar screen ( 46).
-
Page 144: Onscreen Icons And Displays
Appendix: Onscreen Icons and Displays Recording Movies Operating mode ( 25), While recording/during playback: Zoom 40), Scene counter (hours : minutes : Manual exposure seconds) In record pause mode: Recording program ( Total number of scenes White balance ( Remaining recording time Image effect ( On the memory card Digital effect (... - Page 145 Recording Photos AF frame ( Camcorder shake warning ( Self timer ( Focus and exposure lock ( Number of available photos On the memory card In the built-in memory only) Playing Movies (During Playback) Scene number Data code ( Eye-Fi wireless communication Š...
- Page 146 Viewing Photos Photo number ( Protected photo mark (photos on Date and time of recording the memory card that were protected using another device) Current photo / Total number of photos Š Additional Information...
- Page 147 A q Memory operation Record, Record pause, Playback, Playback pause, Fast playback, Fast reverse playback, Slow playback, Slow reverse playback A a Remaining battery time • The icon shows a rough estimate 100% of the remaining charge as a percentage of the full charge of the battery pack.
-
Page 148: Troubleshooting
- please read the “CHECK THIS FIRST” box before going on to the more detailed problems and solutions. Consult your dealer or a Canon Service Center if the problem persists. CHECK THIS FIRST Power supply •... - Page 149 - The camcorder may become hot after using it continuously for long periods of time; this is not a malfunction. If the camcorder becomes unusually hot or it becomes hot after using it only for a short while, it may indicate a problem with the camcorder. Consult a Canon Service Center.
-
Page 150: Additional Information
- The memory is full. Delete some recordings ( 49, 76) or initialize the memory ( to free some space. Cannot move scenes in the playlist. - The memory is full. Delete some recordings ( 49, 76) or initialize the memory ( 35) to free some space. - Page 151 The red ON/OFF (CHG) indicator flashes rapidly ( one flash at 0.5-second intervals). - Charging has stopped because the compact power adapter or the battery pack is faulty. Con- sult a Canon Service Center. The red ON/OFF (CHG) indicator flashes ( two flashes at 1-second intervals) - The remaining charge of the battery pack is at least 50% of a full charge.
- Page 152 Abnormal characters appear on the screen and the camcorder does not operate properly. - Disconnect the power source and reconnect it after a short time. If the problem still persists, remove the battery pack and disconnect all other power sources from the camcorder. Then, press the RESET button with a pointed object to reset all the camcorder’s settings to default values.
-
Page 153: List Of Messages
Save your recordings ( and initialize the memory ( 35). Built-in memory error - The built-in memory could not be read. Contact a Canon Service Center. Š Additional Information... - Page 154 Cannot communicate with the battery pack. Continue using this battery pack? - You attached a battery pack that is not recommended by Canon for use with this camcorder. - If you are using a battery pack recommended by Canon for use with this camcorder, there may be a problem with the camcorder or battery pack.
- Page 155 Cannot record - There is a problem with the memory. If this message appears often without apparent reason, contact a Canon Service Center. Cannot record Cannot access the built-in memory - There is a problem with the built-in memory. Save your recordings (...
- Page 156 - A memory card error occurred. The camcorder cannot record or display the image. Try removing and reinserting the memory card, or use a different memory card. - You inserted a MultiMedia Card (MMC) into the camcorder. Use a recommended memory card ( 32).
- Page 157 May not be possible to record movies on this memory card - You inserted a memory card without a Speed Class rating. Replace the memory card with one rated Speed Class 2, 4, 6 or 10. Mem. Card Number of scenes already at maximum - The memory card already contains the maximum number of scenes (3,999 scenes);...
- Page 158 Not enough available space - The scene could not be divided because there was not enough available space in the mem- ory. Delete some scenes ( 49). Number of scenes already at maximum - The maximum number of scenes (3,999 scenes) has been reached. Delete some scenes 49) to free some space.
- Page 159 To use this function, switch out of mode - You pressed a button that cannot be used in mode. Press to set the camcorder to flexible recording mode. Too many photos. Disconnect the USB cable. - Disconnect the USB cable. Try using a memory card reader or decrease the number of pho- tos on the memory card to fewer than 2,500 photos (Windows) or 1,000 photos (Mac OS).
-
Page 160: Do's And Don'ts
83) and save them on a regular basis. This will protect your impor- tant recordings in case of damage and create more free space on the memory. Canon shall not be liable for any data loss. • Do not carry the camcorder by the LCD panel. Be careful when closing the LCD panel. -
Page 161: Battery Pack
• When recording movies, try to get a calm, stable picture. Exces- sive camcorder movement while shooting and extensive use of fast zooms and panning can result in jittery scenes. In extreme cases, the playback of such scenes may result in visually induced motion sick- ness. - Page 162 Regarding the use of non-Canon battery packs • For your safety, battery packs that are not genuine Canon battery packs will not be charged even if you attach them to this camcorder or to the optional CG-800 Battery Charger.
- Page 163 Built-in Rechargeable Lithium Battery The camcorder has a built-in rechargeable lithium battery to keep the date/time and other settings. The built-in lithium battery is recharged while you use the camcorder; however, it will discharge completely if you do not use the camcorder for about 3 months. To recharge the built-in lithium battery: Connect the compact power adapter to the camcorder and leave it connected for 24 hours with the camcorder off.
-
Page 164: Maintenance/Others
Maintenance/Others Cleaning Camcorder Body • Use a soft, dry cloth to clean the camcorder body. Never use chemi- cally treated cloths or volatile solvents such as paint thinner. Lens • If the lens surface is dirty, autofocus may not work properly. •... -
Page 165: Playback On A Tv Screen
You can use the compact power adapter to operate the camcorder and to charge battery packs in any country with power supply between 100 and 240 V AC, 50/60 Hz. Consult a Canon Service Center for informa- tion on plug adapters for overseas use. -
Page 166: General Information
General Information Accessories (Availability differs from area to area) TV/HDTV VCR/DVD recorder Card Computer reader/writer Optional accessories not listed below are described in more detail in the following pages. 3 CA-570 Compact Power Adapter 7 IFC-300PCU/S USB Cable 5 WS-20 Wrist Strap 8 Memory card 6 STV-250N Stereo Video Cable Š... -
Page 167: Optional Accessories
Optional Accessories Call or visit your local retailer/dealer for genuine Canon video acces- sories. You can also obtain genuine accessories for your Canon cam- corder by calling: 1-800-828-4040, Canon U.S.A. Information Center. Use of genuine Canon accessories is recommended. This product is designed to achieve excellent performance when used with genuine Canon accessories. - Page 168 Charging, Recording and Playback Times The charging times given in the following table are approximate and vary according to charging conditions and initial charge of the battery pack. Charging conditions Charging time Using the camcorder 140 min.* Using the CG-800 Battery Charger 105 min.
-
Page 169: Product Codes
This mark identifies genuine Canon video accessories. When you use Canon video equipment, we recommend Canon-brand accessories or products bearing the same mark. Product Codes Provided Accessories CA-570 Compact Power Adapter 8468A002AA BP-808 Battery Pack 2740B002AA STV-250N Stereo Video Cable... -
Page 170: Specifications
Specifications FS40 / FS400 — Values given are approximate figures. System • Recording System Movies: SD-Video Video compression: MPEG-2; Audio compression: Dolby Digital 2ch Photos: DCF (Design rule for Camera File system) Image compression: JPEG (Super Fine) Size of Photos: 1024x768 pixels •... - Page 171 • Lens Configuration: 10 elements in 8 groups (1 double-sided, aspheric element) • AF System TTL autofocus or Manual focus (for movies only) • Minimum Focusing Distance 1 m (3.3 ft.); 1 cm (0.39 in.) at full wide angle • White Balance Auto white balance, Custom white balance or Preset white balance settings: Daylight, Tungsten •...
- Page 172 BP-808 Battery Pack • Battery type Rechargeable lithium ion battery, compatible with Intelligent System • Rated voltage: 7.4 V DC • Operating temperature: 0 – 40 °C (32 – 104 °F) • Battery capacity: 890 mAh (typical); 6.3 Wh / 850 mAh (minimum) ...
- Page 173 Audio sampling: 48 kHz, 16 bits, 2 channels Minimum length: 1 second File extension: WAV The music data is saved in the memory under the following folder structure. In the built-in memory: CANON MY_MUSIC MUSIC_01.WAV to MUSIC_99.WAV On the memory card: CANON PRIVATE MY_MUSIC MUSIC_01.WAV to MUSIC_99.WAV...
-
Page 174: Index
Index . . . 119 ... . . 107 Abroad, using the camcorder Error messages ....88 Aspect ratio of a connected TV Eye-Fi card . - Page 175 ....61 Self timer ....18 Serial number ..51 P (recording program) .
- Page 176 B) If the Equipment is defective as a result of leaking batteries, sand, dirt or water damage; C) If defects or damages are caused by the use of unauthorized parts or by service other than by Canon USA’s factory service centers or authorized service facilities;...
- Page 177 BY THE USE, MISUSE OR INABILITY TO USE THE EQUIPMENT, REGARDLESS OF THE LEGAL THEORY ON WHICH THE CLAIM IS BASED, AND EVEN IF CANON USA HAS BEEN ADVISED OF THE POSSIBILITY OF SUCH DAMAGES. NOR SHALL RECOVERY OF ANY KIND AGAINST CANON USA BE GREATER THAN THE PURCHASE PRICE OF THE EQUIPMENT SOLD BY CANON USA AND CAUSING THE ALLEGED DAMAGE.
- Page 178 Ship your Equipment in its original carton, box or equivalent, properly packed, fully insured with shipping charges prepaid, together with a copy of your bill of sale or other proof of purchase and a description of the problem to any of the Canon Service Facilities in Canada.
- Page 179 © 2011 CANON INC. 30-2, Shimomaruko 3-chome, Ohta-ku, Tokyo 146-8501, Japan PUB. DIE-0380-000...