
Related Manuals for Miele WS 5073 SLUICE


Summary of Contents for Miele WS 5073 SLUICE
-
Page 1: Operating Instructions
Operating Instructions Washer-Extractor WS 5073 SLUICE It is essential to read these operating instructions before installing or using the machine, to avoid the risk of accident M.-Nr. 05 068 971 /03 or damage to the machine. - Page 2 M.-Nr. 05068971/03...
-
Page 3: Table Of Contents
Contents Page Warning and Safety instructions ..... . . 4 Caring for the environment ......6 Guide to the machine . -
Page 4: Warning And Safety Instructions
This washer extractor is only intended for Faulty components should only be ex- items of laundry which have not been im- changed for Miele original spare parts. pregnated with dangerous or inflammable sub- Only when these parts are fitted can the stances. - Page 5 (gully) in the direct vicinity of the machine. Accessory parts may only be fitted when expressly approved by Miele. If other Chlorine or agents containing chlorine are parts are used, guarantee, performance and corrosive, and can under certain condition- product liability claims may be invalidated.
-
Page 6: Caring For The Environment
Caring for the environment Disposal of the packing material The transport and protective packing has been selected from materials which are envi- ronmentally friendly for disposal and can nor- mally be recycled. Rather than just throwing these materials away, please ensure they are offered for recy- cling. -
Page 7: Guide To The Machine
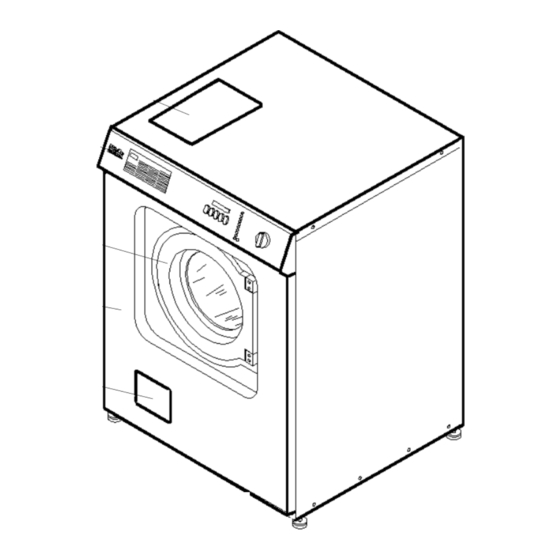
Guide to the machine WS 5073 washer extractor, sluice machine 1 -Detergent dispenser box 7 -Cable entry for extra equipment 2 -Control panel 8 -Cable entry for Dispenser pumps 3 -Drum door 9 -Cable entry for power supply 4 -Front wall panel 10 -Venting socket 5 -Flap for drainage system 11 -Cold water connection... - Page 8 Guide to the machine Push button switches Additional display min / °C a Door Time display h(rs)/min(s) (does not apply to programme Opens the drum door, releases the “With pre-wash” or “Starch” or “No final This display shows how long the wash pro- spin”...
- Page 9 Guide to the machine Programme sequence indicator lights Sluice programme Sluice programme for heavily soiled cotton and linen items. On/Start Smaller loads, e.g. 5 kg Cottons are washed more efficiently. Pre-wash Add detergent to Pre-wash i and Main Main wash wash j compartments.
-
Page 10: Before Using For The First Time
Guide to the machine Before using for the first time The first commissioning of the machine should be carried out only by a Miele ser- vice technician or an authorized Miele Ser- vice Dealer. It is essential that the machine is installed and connected to power, water and drain- age correctly. -
Page 11: Preparing The Wash Load
Preparing the wash load Maximum load (weight of dry washing): Cottons 7.5 kg Minimum iron 3.0 kg Delicates/Synthetics 1.5 kg Woollens 1.5 kg Short programme 7.5 kg Sluice 7.5 kg Empty all pockets Foreign objects, (eg nails, coins, paper clips etc) can cause damage to textiles and components in the machine. -
Page 12: Programme Selection
Programme selection Dispensing detergent Open the on-site stopcock. Switch on the on-site main switch. Select programme and temperature (e.g. programme Cottons 95 Add detergent for the main wash to com- partment j - and if required detergent for the pre-wash to compartment i, fabric conditioner to compartment p and liquid bleach to compartment y. - Page 13 Programme selection Press the “aOpen door” button - the drum door opens. Take out the washing. Only remove laundry from the machine once the drum has stopped turning, otherwise you may seriously injure yourself. Make sure the drum is empty, otherwise, Press the “h Start”...
-
Page 14: Changing Programme Sequence
Changing programme sequence The programme can be changed at any time To repeat a programme stage where it makes sense (does not apply to pro- (does not apply to programme gramme A programme stage must have been finished before it can be repeated: Turn the programme selector to the re- quired programme. -
Page 15: Fabric Conditioner/Starch
Fabric conditioner / Starch Powder and liquid starch Prepare and dispense the starch solution as stated on the packaging. Automatic dispensing of liquid starch Pour the liquid starch into compartment p (do not exceed the marker level). Close the compartment lid. Adding liquid or powder starch by hand Select the programme required and also push in the “Starch m”... -
Page 16: Coin Unit
Coin operating mechanism/coin unit Selecting a programme with a coin unit in Open the on-site stopcock(s). Switch on the on-site mains switch, Select a programme and temperature. m “Starching” and w “without final spin” are not available with coin operation. Add detergent and any fabric conditioner . -
Page 17: Programme Changes
Programme changes To change individual programmes by re- To access programming mode programming Programmes can be changed individually to accommodate different wash processes and methods. 20 Programmable functions can be changed with up to 4 Options. Before starting: After the drum door is shut the “+i with The on-site mains switch must be switched pre-wash”... - Page 18 Programme changes Example: Changing the temperature holding time in the main wash from 10 minutes to 5 or 15 or 20 minutes. 15 minutes is required. P 3 (15 minutes). Option 3 corresponds to 15 mins.; see Pro- gramme Change Chart No.8 / B Temperature holding time in minutes.
- Page 19 Programme changes Programme selector setting Options Enter programm Programme function Standard options Additional pre-wash 1 A 95 Wash time A,B (mins) no pre-w. Water level A,B high Pre-wash 3 A 60 Select pre-wash A,B,C,E via button gen/lly yes Wash times A,B (mins) 5 A 40 Temperature A,B,C,E (°C) Water level A,B,E,F high...
-
Page 20: Cleaning And Care
If replacing the inlet hose only use a hose able to withstand pressure up to 70 bar. Miele’s own hoses meet this requirement. Cleaning the filters in the water inlet The washing machine has the following filters... -
Page 21: Problem Solving Guide
Cleaning and Care Problem solving guide To clean the filter in the water inlet valve: Any work on the electrical components of this machine should only be carried out by Using pliers, carefully loosen the ribbed a suitably qualified and competent person. plastic nut on the inlet valve, and unscrew. - Page 22 If little or no water is taken in during the next programme, the water pressure may be too low. If it is adequate there may be a technical fault. In this case, call your local service dealer or the Miele Service Department. M.-Nr. 05068971/03...
- Page 23 Problem solving guide The indicator light “q” is flashing. Possible reasons for increased levels of foaming: Check whether the drainage system is clogged. – detergent type The Pre-wash indicator light “i" is flash- Only use detergent formulated for use in ing in the sequence display.
-
Page 24: After Sales Service
Problem solving guide After sales service Laundry is either not spun at all or not After sales service spun satisfactorily. Should a fault occur please contact your near- est authorized Service Dept. The “w No final spin” button was pushed When contacting the Service Department, please quote the model type, (Typ), the ma- The machine was not able to distribute the... -
Page 25: Explanation Of Symbols On The Data Plate
Explanation of symbols on the data plate 1 Machine type 2 Machine number/year of manufacture* 3 Voltage/Frequency 4 Control fusing 5 Drive motor 6 Plate diameter*/Plate quantity* 7 Drum data 8 Drum diameter/drum depth 9 Spin speed 10 Drum volume/Laundry dry weight Noise emission 11 Kinetic energy 12 Ex. -
Page 26: Notes For The Installer
If there is not already a concrete plinth on- “A” (1piece) site, the Miele Spare Parts department offer a steel plinth. It must be ensured that the steel plinth is secured to the floor, (see the en- The front panel must be taken off, (2 internal closed installation plan). - Page 27 90°C. This also ap- plies to all connection parts. Miele “Original” spare parts meet this require- ment. A water pressure flow rate of at least 1 bar, maximum 10 bar is essential to ensure the smooth operation of this machine.
- Page 28 The coin unit and connection cable are avail- is operated. able at extra cost from the Miele Spare Parts Department, or from Miele specialist dealers. Electrical connection All electrical work must be carried out by a suitably competent person in compliance with national and local regulations.
- Page 29 M.-Nr. 05068971/03...
- Page 30 Miele Co. Ltd, Fairacres, Marcham Road, ABINGDON, Oxon OX14 1TW tel: 01235 554455, fax: 01235 554477 Service department, tel: 01235 554466 Telephone calls may be monitored and recorded to improve our service. Alteration rights reserved 09.02 This paper consists of cellulose which has been bleached without the use of chlorine.