
Related Manuals for Toshiba SD-W1101


Summary of Contents for Toshiba SD-W1101
- Page 1 TOSHIBA DVD-RAM DRIVE SD-W1101/SD-W1111 HARDWARE INSTRUCTION MANUAL VERSION 3.0 JULY 1999...
- Page 2 TOSHIBA AMERICA ELECTRONIC COMPONENTS, INC. DISK PRODUCTS DIVISION 35 Hammond Irvine, CA 92618 Contents of this manual are subject to change without prior notice. © 1999 TOSHIBA AMERICA ELECTRONIC COMPONENTS, INC. All rights reserved Printed in USA TOSHIBA SD-W1101/W1111 DVD-RAM Drive P/N 470074-C0...
- Page 3 Photo CD symbol is a trademark of Kodak used under license. Must be used with Kodak approved host adapter board and software driver. Version Date Published Revised Contents January 1999 Initial release May 1999 Added SD-W1111 July 1999 Access time updated TOSHIBA SD-W1101/W1111 DVD-RAM Drive...
-
Page 4: Table Of Contents
Emergency Eject ..............18 Specifications ................19 Performance ................. 19 Environmental Conditions ............ 20 Realiability ................21 Physical Characteristics ............21 Software Driver ..............23 Technical Support ..............24 Repair Center ................. 25 Warranty ................26 TOSHIBA SD-W1101/W1111 DVD-RAM Drive... -
Page 5: Introduction
DVD-RAM drive. This manual will provide you with the information you will need to install and operate your new DVD-RAM. The SD-W1101 and SD-W1111 drives combine high storage capac- ity with unprecedented performance to benefit a range of applications including multimedia development, backup and data archiving. Fea- tures include: 2.6GB Capacity on one side of a 120mm disc. -
Page 6: Disc Formats
DISC FORMATS he SD-W1101 and SD-W1111 are capable of reading data from a variety of disc formats, some of which are: CD-ROM, CD- audio, CD-R/W, Photo-CD, DVD-ROM*, DVD-Video*, DVD-RAM* and DVD-R*. * You must have a DVD/MPEG-2 Playback Card installed in your system to utilize DVD options. -
Page 7: Installing Dvd-Ram
Connect computer power cable to internal DVD-RAM drive. Connect a sound cable to your DVD-RAM (optional). Additional audio connections may be available when using a DVD/MPEG Card (see MPEG card installation instructions). Load DVD-RAM driver software. TOSHIBA SD-W1101/W1111 DVD-RAM Drive... -
Page 8: Dvd-Ram Jumper Settings
Locate the block of jumper pins on the back left side of the DVD- RAM. (Note: Additional jumpers are provided with your drive and can be found in small bag that also contains emergency eject tool.) Jumper Location factory default: SCSI-ID 4 jumper on ID4 TOSHIBA SD-W1101/W1111 DVD-RAM Drive... - Page 9 Parity to OFF mode. In the OFF mode, the parity bit check function on the SCSI data bus is activated which enhances data bus reliability. Note: if your interface card does not provide “parity generation” function, this jumper will have no effect. TOSHIBA SD-W1101/W1111 DVD-RAM Drive...
- Page 10 This jumper turns termination power ON or OFF. The default setting is termination disabled (no jumper). If you are connecting more than one SCSI device to your system, and the DVD-RAM is not at the end of the chain, then terminator jumper is not required. TOSHIBA SD-W1101/W1111 DVD-RAM Drive...
-
Page 11: Placing Dvd-Ram Inside Your Computer
Before you push the drive all the way in you will need to connect the SCSI interface cable and the power cable to the back of the drive. Installing SD-W1101/SD-W1111 TOSHIBA SD-W1101/W1111 DVD-RAM Drive... -
Page 12: Cabling
ON. If there is no power cable in your system, contact your computer dealer. You may need a “power splitter lead” (a Y shaped cable which taps two power outputs from one input). TOSHIBA SD-W1101/W1111 DVD-RAM Drive... - Page 13 If you are using a DVD/MPEG card, additional sound options might be available. Refer to the documentation that came with your DVD/ MPEG card. SD-W1101 SD-W1111 Installing Sound Cable TOSHIBA SD-W1101/W1111 DVD-RAM Drive...
- Page 14 1. Terminator jumper must be jumpered when DVD-RAM is the last or only device on the SCSI BUS. 2. Terminator jumper should be removed when DVD is in a "daisy-chain" and is NOT the last drive. TOSHIBA SD-W1101/W1111 DVD-RAM Drive...
-
Page 15: Completing Installation
After you have connected all the necessary cables, you can push the DVD-RAM completely into the slot. There are 8 screw holes on the SD-W1101/SD-W1111 that are used to mount the DVD-RAM into your computer, 4 on the bottom and 2 on each side. Use either the 4 bottom screw holes or the 4 side screw holes, depending on your computer’s installation requirements. -
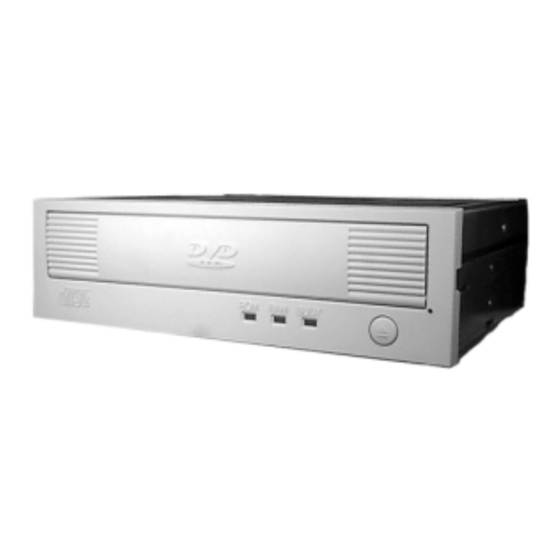
Page 16: Using Your Dvd-Ram
Using your DVD-RAM THE CONTROLS he SD-W1101 and SD-W1111 DVD-RAM drives have the following controls and features: DVD Loading Tray Load/Unload Button Emergency Eject Hole LEDs (ROM, RAM, BUSY) THE FRONT PANEL SD-W1101/SD-W1111 Front Panel (1) Loading Tray - Load disc using tray or recording cartridge. -
Page 17: Back Panel
(1) Audio Out Connector - Outputs CD audio on the DVD-RAM. (2) Mode Select Headers (jumpers) - Selects SCSI-ID, Parity, Verify, ONE LUN or TWO LUN and Termination. (3) SCSI Connector(s) - Connects DVD-RAM to computer. (4) Power Connector - Connects DVD-RAM to power source. TOSHIBA SD-W1101/W1111 DVD-RAM Drive... -
Page 18: Operating The Dvd Loading Tray
Using all four may cause the disc to not set properly in tray. The vertical position of the drive (eject button up or down) deter- mines which holders are used (see photo below). DVD Loading Tray TOSHIBA SD-W1101/W1111 DVD-RAM Drive... - Page 19 3. Position the disc behind disc holders on upper and rear side of tray. Then put disc behind bottom front holder. Installing Disc 4. Check to see that all three disc holders are holding disc securely. Secure all disc holders TOSHIBA SD-W1101/W1111 DVD-RAM Drive...
-
Page 20: Dvd-Ram Recording Cartridge
Type 2: • Cartridge is not reversible (side A only). • Disc in cartridge can be removed and replaced. * Your SD-W1101/SD-W1111 comes with a Type 1 single-sided cartridge. Installing Cartridge in DVD-RAM Place cartridge inside of DVD-RAM tray with label facing front of drive. - Page 21 DVD-RAM Recording Cartridges TOSHIBA SD-W1101/W1111 DVD-RAM Drive...
-
Page 22: Emergency Eject
If tray does not pull completely forward, use small end of “Emergency Eject Tool” to pull tray completely out. Note that tray must be in a “lifted” position clearing small tab on left side before tray can be pulled out. TOSHIBA SD-W1101/W1111 DVD-RAM Drive... -
Page 23: Specifications
Specifications he following describes the specifications of the SD-W1101 and SD-W1111 DVD-RAMs. (Specifications are subject to change without notice.) PERFORMANCE Disk Formats DVD-RAM, DVD-ROM, DVD-R Red Book, Yellow Book, CD-ROM XA, CD-I Bridge (Photo CD, Video CD), CD-I, CD-I Ready, CD-G, CD-... -
Page 24: Environmental Conditions
8% to 80% (no condensation) Storage/shipping humidity: 5% to 95% (no condensation) Storage temperature: 14° to 140° F (-10° to +60° C) Shipping temperature: -40° to +149° F (-40° to +65° C) Wet bulb temperature: 80.6° F (27° C) TOSHIBA SD-W1101/W1111 DVD-RAM Drive... -
Page 25: Realiability
10,000 times or more PHYSICAL CHARACTERISTICS Dimensions and weight Dimensions: 5.75 x 8 x 1.6 inches (146 x 203 x 41.3 mm) Weight: SD-W1101: 2.64 lbs (1.2 kg) SD-W1111: 2.51 lbs (1.14 kg) Horizontal and Vertical Operating position TOSHIBA SD-W1101/W1111 DVD-RAM Drive... - Page 26 External Dimensions TOSHIBA SD-W1101/W1111 DVD-RAM Drive...
-
Page 27: Software Driver
Software Driver DVD-RAM software driver must be installed in your system to allow your computer system to recognize the SD-W1101 and SD-W1111 DVD-RAMs. You may also be required to install software that was provided with your DVD/MPEG Card (see DVD/MPEG kit installation instructions). -
Page 28: Technical Support
Technical Support hould you require technical support, contact your local dis- tributor. If your distributor is unable to answer your questions, have them call Toshiba Disk Products Technical Support on your behalf. Toshiba Disk Products Business Unit Technical Support 949/455-0407... -
Page 29: Repair Center
DVD-RAM require maintenance, contact Toshiba DPD's Repair Center. In order to return your DVD-RAM a Return Authorization Number (RA#) must be obtained from Toshiba's DPD Repair Center (do not send drives without an autho- rized RA number). Toshiba Repair Center... -
Page 30: Warranty
Product to the attention of TAEC within the twelve (12) month period and no later than thirty (30) days after such malfunction, whichever occurs first. Failure to bring the malfunction to the attention of TAEC, within the prescribed time, will result in the Purchaser being not entitled to warranty service. TOSHIBA SD-W1101/W1111 DVD-RAM Drive... - Page 31 It may not be released, discharged, changed or modified, except by an instrument in writing signed by duly authorized representative of Toshiba America Electronic Compo- nents, Inc.
- Page 32 470074-C0 P/N 470074-C0...