
Related Manuals for Sony PMW-RX50


Summary of Contents for Sony PMW-RX50
-
Page 1: Operating Instructions
4-547-852-11 (1) Portable Memory Recorder Operating Instructions Before operating the unit, please read this manual thoroughly and retain it for future reference. PMW-RX50 © 2014 Sony Corporation... -
Page 2: Table Of Contents
Table of Contents Overview Part Identification ..............5 Front View ..............5 Rear View ............... 6 Top Panel ............... 6 Audio Input Box (Supplied) ........... 7 IR Remote Commander (Supplied) ........ 7 On-Screen Indications ............ 9 Software Downloads ............... 10 Preparations Power Supply ................ -
Page 3: Table Of Contents
UDF exFAT FAT/HD Shot Marks ....... 25 UDF exFAT OK/NG/KP Flags ........25 FAT/HD OK Mark ............25 Assignable Buttons ............26 UDF exFAT Clip Continuous Recording ....26 UDF exFAT Loop Recording ........27 Deleting Clips ............... 27 Storing/Retrieving the Setting Data ......28 Planning Metadata ............ - Page 4 Menu Configuration and Detailed Settings Overview of the Setup Menus ..........45 Setup Menu Layers ............45 Basic Menu Operations ............46 Setup Menu List ..............47 [AUDIO SET] Menu ............ 47 [VIDEO SET] Menu ............ 49 [LCD SET] Menu ............52 [TC/UB] SET Menu .............
-
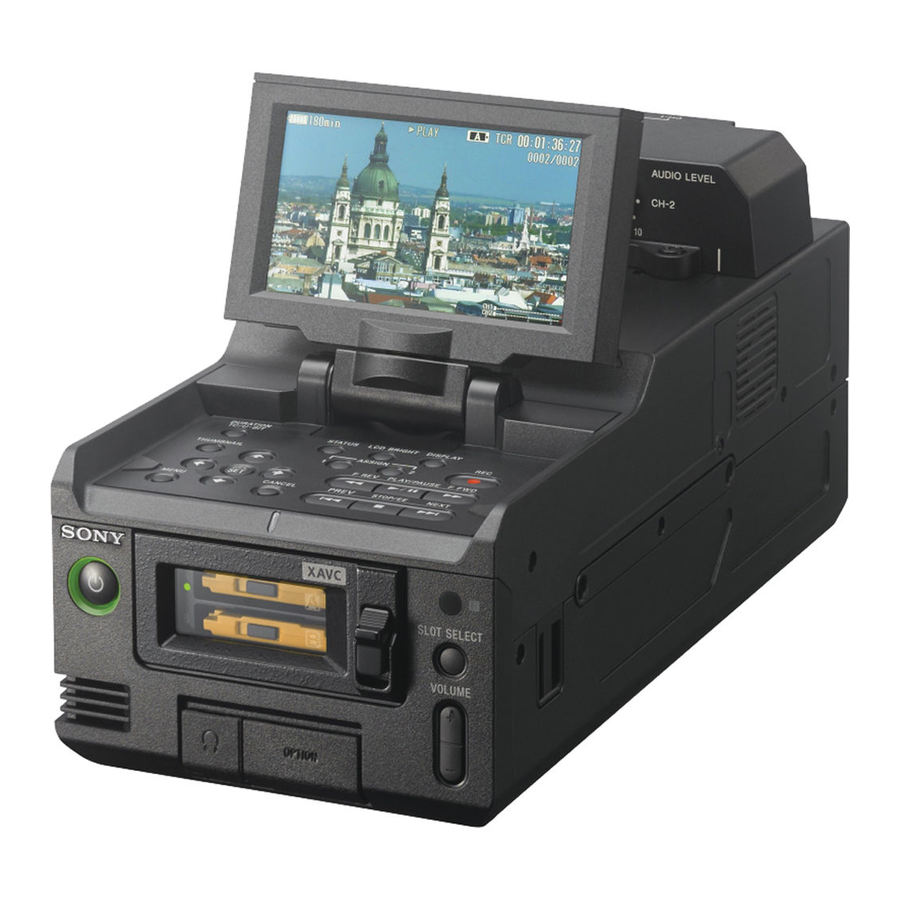
Page 5: Part Identification
Overview Part Identification For functions and usage, see the pages in parentheses. Front View The above is an illustration with the audio input box removed. For details on the parts of the audio input box, see “Audio Input Box (Supplied)” (page 7). LCD monitor Memory card slots (page 13) The LCD monitor LCD can be rotated 180°... -
Page 6: Rear View
VIDEO OUT (analog video output) Rear View connector (BNC type) (page 65) AUDIO OUT (analog audio output) connector (CH-1/CH-2) (page 65) Battery pack receptacle (page 11) DC IN (DC power supply input) connector (page 12) BATT RELEASE (battery release) button (page 11) SDI OUT 2 (serial digital output) connector... -
Page 7: Audio Input Box (Supplied)
LCD BRIGHT (LCD monitor brightness Audio Input Box (Supplied) adjustment) button This can also be used as the ASSIGN 4 The audio input box is removable. For details, see (assignable) button (page 26). “Removing and Attaching the Audio Input Box” DISPLAY button (page 9) (page 16). - Page 8 WARNING • Battery may explode if mistreated. Do not recharge, disassemble, or dispose of in fire. • Batteries shall not be exposed to excessive heat such as sunshine, fire or the like. CAUTION Danger of explosion if battery is incorrectly TC RESET (timecode reset) button replaced.
-
Page 9: On-Screen Indications
On-Screen Indications While recording or in standby mode, pressing the DISPLAY button displays the status and settings of this unit on the LCD monitor. Remarks [M]: The indication of the items named with this suffix can be independently turned on/off with [Display On/Off] in the [LCD SET] menu (page 52). -
Page 10: Software Downloads
Video Format indication [M] (page 21) Russia http://sony.ru/pro/ Clip name indication [M] (page 24) Brazil http://sonypro.com.br Australia http://pro.sony.com.au New Zealand http://pro.sony.co.nz Japan http://www.sonybsc.com Asia Pacific http://pro.sony-asia.com Korea http://bp.sony.co.kr China http://pro.sony.com.cn India http://pro.sony.co.in Sony Creative Software, software download page: http://www.sonycreativesoftware.com/ download/software_for_sony_equipment Software Downloads... -
Page 11: Power Supply
Checking battery charge remaining AC adaptor. When recording or playback is in progress on the For safety, use only the Sony battery packs and battery pack, an icon to show the current battery AC adaptor listed below: charge level and usage time remaining are Lithium-ion Battery Pack displayed on the LCD monitor (page 9). -
Page 12: Using Ac Power (Dc In Power)
Using AC Power (DC IN Power) Setting the Clock Connection example: when connecting BC-U1 When you turn the recorder on for the first time after purchasing or replacing the backup battery (page 83), the Initial Setting display appears on the LCD monitor. Time Zone The value shows the time difference from UTC (Coordinated Universal Time). -
Page 13: Using Sxs Memory Cards
“Using Other Media” (page 15). Removing a memory card Supported SxS memory cards Open the cover of the card slot block, Use the following Sony-made memory cards. press the EJECT button, then pull the For details on operations with media from other button out. - Page 14 Recording/playback during formatting Note You can perform recording or playback using the Approximately 600 clips can be recorded on one memory card in the other card slot while memory card at maximum. formatting is in progress. If the number of recorded clips reaches the limit, the remaining time indication becomes “0,”...
-
Page 15: Using Other Media
The high reliability and durability of professional SxS memory cards is not guaranteed. Supported media Use the following Sony media. For details on operations with media from other manufacturers, refer to the operating instructions for the media or consult the manufacturer’s information. -
Page 16: Removing And Attaching The Audio Input Box
Removing and Attaching the Audio Input Box The audio input box is removable. You can remove the audio input box when it is not in use. Note Turn the recorder off before attaching and removing the audio input box. Removing the Audio Input Box Loosen the four screws (M3) on the audio input box, and lift the box straight up. -
Page 17: Using A Wi-Fi Connection
Using a Wi-Fi Guide Connection Guide The recorder can connect to a computer, Guide smartphone, or tablet via Wi-Fi by attaching an Guide line optional Wi-Fi adapter on the recorder. The following Wi-Fi adapters are supported. • CBK-WA100 Wireless Adapter Guide •... -
Page 18: Connecting To Wi-Fi With The Cbk-Wa100
When supplying power to the CBK- WA100 from the recorder, set [OTHERS] >[Power Enable] in the setup menu to [Sony Wireless Adapter]. Secure the CBK-WA100 to the recorder The recorder will restart after you change the using the two screws (M4×6) supplied setting. -
Page 19: Using Wi-Fi Remote Control
“http://<recorder’s IP address>/.” Enter the user name and password, and click [OK]. User name: admin Password: pmw-rx50 To upload a planning metadata file Insert a media such as an SxS memory card. To display the Wi-Fi remote controls Click [Upload] in the Web menu. - Page 20 Configuring the recorder Device Browser Windows 7 Internet Explorer 11 Set [OTHERS] >[Wi-Fi] >[Wi-Fi] in the setup menu to [Enable]. Windows 8.1 Internet Explorer 11 OS 10.7 Safari Set [OTHERS] >[Wi-Fi] >[Wi-Fi OS 10.8 Remote] in the setup menu to [On]. Smartphone Android 4.1, 4.2, Chrome Configuring the device...
-
Page 21: Changing Basic Settings
Recording Changing Basic Settings The format of the signals output from the SDI Selecting an Input Signal OUT 1/2, VIDEO OUT, and HDMI OUT connectors changes according to the video format To record or output a signal, either SDI or i.LINK setting. - Page 22 exFAT/SD mode [Rec Format] setting Input signal format XAVC-I 1080/29.97P 1080/59.94i, 1080/ [Rec Format] setting Input signal format 29.97PsF DVCAM 59.94i 480/59.94i XAVC-L50 1080/29.97P 1080/59.94i, 1080/ IMX50 59.94i 486/59.94i 29.97PsF FAT/SD mode XAVC-L35 1080/29.97P 1080/59.94i, 1080/ 29.97PsF [Rec Format] setting Input signal format XAVC-I 1080/23.98P 1080/23.98PsF DVCAM 59.94i...
-
Page 23: Time Data
UDF/SD mode Displaying the Time Data [Rec Format] setting Input signal format Pressing the DISPLAY button displays the time DVCAM 50i 576/50i data on the screen (page 9). The indication is IMX50 50i 576/50i switched among the timecode, user bits, and exFAT/SD mode recording duration by pressing the DURATION/ TC/U-BIT button (page 6). -
Page 24: Recording
Clip (recording data) Recording When you stop recording, video, audio and subsidiary data from the start to end of the recording are recorded as a single clip on an SxS memory card. Note Clip name Using mobile phones and wireless devices near the For each clip recorded with this recorder, a clip recorder may result in recording and playback stops due name is automatically generated according to the... -
Page 25: Useful Functions
Note Useful Functions Shot marks cannot be recorded onto write-protected SxS memory cards. Also, shot marks cannot be inserted at the start or end of a clip. Color Bars/Reference Tone Shot marks can also be added and deleted using the Shot Mark screen (page 41). By setting [Color Bars On/Off] (page 49) in the For operation to apply a name to a shot mark, see [VIDEO SET] menu to [On], you can output a... -
Page 26: Assignable Buttons
Deleting the OK mark Notes Press the assignable button to which you assigned • Clip Continuous Recording cannot be used while the [OK Mark] function, and select [Execute]. recording. While standing by to record, you can also delete • This function cannot be used with FAT. the OK mark from the clip with the last-added OK Performing clip continuous recording mark. -
Page 27: Deleting Clips
the loop stops operating or other abnormality appears Loop Recording UDF exFAT during operation, restart the recorder. Restricted operations You can continue recording video for a fixed If you perform any of the following operations interval by alternately recording and deleting while loop recording, the recorder will switch to video using two SxS memory cards. -
Page 28: Storing/Retrieving The Setting Data
[Plan.Metadata] (page 60) in the [OTHERS] Insert the memory card on which you menu. stored the setup file into a card slot. UDF: General/Sony/Planning Check that the inserted card is selected. exFAT: XDROOT/General/Sony/Planning FAT: BPAV/General/Sony/Planning Select [Recall(SxS)] in [Setup Data]... - Page 29 When you specify a clip name in planning not appear if the directory where they are located on metadata, the name is displayed under the the USB flash drive (General/Sony/Planning) operation status indication on the LCD monitor. contains 512 or more files.
- Page 30 USB flash drives Use a text editor to modify the description for the <Meta name> tag. The following Sony USB flash drives are The shaded fields in the example are shot mark recommended for use with this recorder. name strings.
- Page 31 SET button. When formatting is completed, the message “Format USB Memory Done” is displayed. “\MSSONY\PRO\XDCAM\MEMDISC” folder and “\General\Sony\Planning” folder are automatically created in the drive. To restore a USB flash drive When you load a USB flash drive that cannot be...
-
Page 32: Thumbnail Screens
Playback Thumbnail Screens When you press the THUMBNAIL button (page 6), clips recorded on the SxS memory card are displayed as thumbnails on the screen. You can start playback from the clip selected on the thumbnail screen. The playback picture can be seen on the LCD monitor and external monitors. -
Page 33: Changing The Type Of Thumbnail Screen
FAT SD Mode FAT HD Mode: A lock mark appears if the selected clip has an OK mark. The normal thumbnail screen and All-Clip thumbnail screen are alternately displayed. AV independent file icon UDF exFAT FAT/HD OK/NG/KP/None-Clip thumbnail screen Displayed only if the selected clip is an AV independent file. -
Page 34: Playing Clips
SxS memory card mark appears to the left if the SxS memory Playing Clips card is write-protected. Time data Each time you press the DURATION/TC/U- For playback operations, use the playback control BIT button, the indication is switched between buttons on the top panel (page 6). When the IR timecode (TCR) and user-bit (UB) data. -
Page 35: Playing Clips In Repeat Mode
To select a clip for partial playback, attach an OK Press the SEL/SET button. flag or OK mark to the clip on the thumbnail The shot markselected in step 3 is set at the screen. current point, and the display returns to the OK-Clip thumbnail screen. -
Page 36: Clip Operations
Expand Clip screen (page 40) Clip Operations CANCEL EXPAND(COARSE) EXPAND(FINE) During thumbnail screen playback, etc., you can operate the clips or confirm and change the PAUSE subsidiary data for clips using the Clip Operation SET INDEX PIC menus. The corresponding Clip Operation menu pops up SHOT MARK1 ADD on the screens as shown below when you press SHOT MARK2 ADD... - Page 37 Effective with UDF and exFAT Mode only. Clip Operation menu on the thumbnail Effective with UDF, exFAT and FAT HD Mode. screen Item Function DISP CLIP INFO Displays the clip’s information screen (page 38). OK MARK Adds an OK mark (page 39). OK MARK Deletes the OK mark (page 39).
-
Page 38: Displaying The Detailed Information Of A Clip
Displaying the Detailed Information of a Clip Select [DISP CLIP INFO] from a Clip Operation menu. 120min CL I P I NFO 0011 / 0300 JPAN0011 ( 1 ) 01 / JAN / 2009 10 : 53 HQ 1920 / 23. 9 P S&Q Mot i on 29 / 24f p s TCR 00 : 05 : 00 : 02 TCR 00 : 05 : 00 : 00 STR... -
Page 39: Ok Mark Fat/Hd
Copying clips collectively FLAG ADD] in the Clip Operation menu (page 37) on the thumbnail screen. When deleting a Select [Clips] in [Copy All] (page 60) in the flag, select [CLIP FLAG DELETE]. [OTHERS] menu to copy clips on an SxS memory card collectively to another SxS memory Note card. - Page 40 This helps you to quickly cue up to a desired Timecode indication scene in a clip of long duration. The timecode of the frame at the cursor is displayed. You can display the [EXPAND CLIP] screen by selecting the clip on the thumbnail screen. EXPAND CLIP screen in FAT SD Mode Select a clip on the thumbnail screen, then press the SEL/SET button.
-
Page 41: Shot Mark Screen
Last frame: Press the F FWD and NEXT buttons Item Function simultaneously. DIVIDE CLIP To divide the clip into two clips at the selected frame (page 42) Switch to the clip shot mark screen for a different CLIP REPEAT Plays the selected clip repeatedly clip (page 35). -
Page 42: Changing The Index Frame
Changing the Index Frame UDF exFAT FAT/HD You can change the index frame to another frame you selected on the [EXPAND CLIP] screen (page 39) or the [SHOT MARK] screen (page 41). Select [SET INDEX PIC] from the Clip Operation menu. Note Even if you specify a frame other than the top frame for the index frame, playback always begins from the top... -
Page 43: Showing The Status Screens
Status Displays Showing the Status Screens Press the STATUS button (page 6) to display displayed according to the setting of [Output CH] status screens on the LCD monitor/external video in [Audio Output] in the [AUDIO SET] menu. monitor. If audio is input from the i.LINK connector while Use the up/down buttons (page 6) to perform displaying thumbnails, while playback is stopped, operations and switch the screens in sequence. -
Page 44: Button/Remote Status Screen
[3G SDI Out Level]: Data mapping method for 3G [Media A/Media B]: Remaining space, available SDI signals recording time, and estimated service life (rewriting limit) The data mapping method for 3G SDI signals set in [3G SDI OUT Level A/B] in the [VIDEO SET] The remaining space of the SxS memory cards in menu is displayed. -
Page 45: Overview Of The Setup Menus
Menu Configuration and Detailed Settings Overview of the Setup Menus Press the MENU button to display setup menus OTHERS All Reset on the LCD monitor with settings necessary for Setup Data recording and playback. (You can also display Time Zone setup menus on an external monitor.) Set items by Clock Set selecting them from the following menus. -
Page 46: Basic Menu Operations
Entering a character string Basic Menu Operations When you select an item for which a character string, such as a time value or filename, is to be specified, the input area for the character string is Menu controls highlighted, and [SET] appears at the right end. MENU button (page 6) Select characters, then press the SEL/ To turn Menu mode to use Setup menus on/off. -
Page 47: Setup Menu List
Setup Menu List The functions and available settings of menus are listed below. The default settings set at the factory are shown in bold face (example: ). The items marked with Speed [M] in the Menu items column cannot be set while displaying the thumbnail screen or during playback operations. - Page 48 AUDIO SET Menu items Subitems and setting values Contents Limiter Mode Select the limiter setting to use on large input signals when Off /–6dB /–9dB / –12dB / [Audio Level CH1] to [Audio Level CH2] are set to [Manual]. –15dB / –17dB [Off]: Do not use.
-
Page 49: Video Set] Menu
AUDIO SET Menu items Subitems and setting values Contents Audio Output 1KHz Tone Turn the 1-kHz reference tone signal on/off. On / Off Setting for audio outputs Monitor CH Select the audio channel(s) to be fed to the headphones and CH-1/CH-2 (CH-3/CH-4) the built-in speaker. - Page 50 VIDEO SET Menu items Setting values Contents SDI/HDMI/ In UDF/HD mode [3G (SDI)]: Output a 3G SDI signal from the SDI OUT 1/2 connectors, and an HD HDMI signal from the HDMI i.LINK I/O OUT connector. Select SD P [HD]: Output an HD SDI signal from the SDI OUT 1/2 Selecting input/ connectors, and an HD HDMI signal from the HDMI output signals for...
- Page 51 VIDEO SET Menu items Setting values Contents 3G SDI OUT LevelA / LevelB Select the data mapping method for 3G SDI output signals. Level A/B Tips Setting the 3G SDI • Support for Level A is planned for future updates. output signal •...
-
Page 52: Lcd Set] Menu
[LCD SET] Menu LCD SET Menu items Subitems and setting values Contents Color Adjust the color of pictures on the LCD monitor. –99 to +99 (±0) Adjusting the LCD monitor Contrast Adjust the contrast of pictures on the LCD monitor. –99 to +99 (±0) Brightness Adjust the brightness of pictures on the LCD monitor. -
Page 53: Tc/Ub] Set Menu
[TC/UB] SET Menu TC/UB SET Menu items Subitems and setting values Contents Timecode Mode Set the timecode mode. Preset / Regen / Ext Regen / [Preset]: To start the timecode from the specified value Setting the Clock [Regen] (regeneration): To continue the timecode during timecode recording only. -
Page 54: Others] Menu
TC/UB SET Menu items Subitems and setting values Contents TC Format DF / NDF Set the timecode format. [DF]: Drop frame Setting the time [NDF]: Non drop frame code format Note The current video format/frame frequency determines whether the mode is fixed either to DF or NDF (see below), regardless of the [TC Format] setting. - Page 55 For exFAT: /XDROOT/General/Sony/PRO/CAMERA/ drive XDCAM/PMW_RX50 For FAT: /SONY/PRO/CAMERA/XDCAM_EX/PMW_rx50/ When using USB flash drives For USB flash drives formatted in FAT32: /MSSONY/SONY/ PRO/CAMERA/XDCAM/PMW_RX50 The setup file cannot be saved to a USB flash drive formatted in exFAT. Recall(SxS)/(USB) Select [Execute] to retrieve the setting values from an SxS Execute/Cancel memory card.
- Page 56 OTHERS Menu items Subitems and setting values Contents Assign Button <1>, <2>, <3>, <4>, <5> Assign a function to the ASSIGN 1/2/3/4/5 buttons. (The Off / Last Clip DEL / IR selectable functions are shared.) Assigning Remote / Shot Mark1 / Shot [Off]: No function functions to the [Last Clip DEL]: Execute the last clip delete (retake) function...
- Page 57 OTHERS Menu items Subitems and setting values Contents Battery Alarm Low BATT Set the battery level at which the Low BATT warning is 5% / 10% / 15% / ... / 45% / generated (in steps of 5%). Setting the low power alarm BATT Empty Set the battery level at which the BATT Empty warning is...
- Page 58 OTHERS Menu items Subitems and setting values Contents Rec Format Select the video format for recording. The selectable video formats for recording will differ depending on the mode. HD Mode • Bit rate UDF: HD422 50 or HD420 HQ exFat: XAVC, HD422 50, or HD420 HQ FAT: HQ or SP •...
- Page 59 OTHERS Menu items Subitems and setting values Contents Clip Auto Naming Select the method to specify clip names. C**** / Title / Plan C****: UDF and exFAT Setting for clip [Title]: To specify as desired by [Title Prefix] name or deletion [Plan]: To use a name specified in planning metadata (if no name is specified in planning metadata, the name specified by [Title Prefix] is used.)
- Page 60 64 or less, all of the planning metadata files may not appear if the directory where they are located in the SxS memory card (General/Sony/ Planning) contains 512 or more files. • After you start loading, do not remove the SxS memory card until the completion message is displayed.
- Page 61 Power Enable Sony Wireless Adapter / USB A Set the connector that supplies power to external equipment. [Sony Wireless Adapter]: Supply power from the DC OUT Setting specifying connector (for CBK-WA100). the connector that [USB A]: Supply power from the USB (HOST) connector.
- Page 62 OTHERS Menu items Subitems and setting values Contents Password Sets a password in 0 to 31 alphanumeric characters. (pmw-rx50) Note Each password character is displayed as “ * ” (asterisk). Confirms the [Network] settings. Execute / Cancel Select [Execute] to confirm.
- Page 63 OTHERS Menu items Subitems and setting values Contents Wi-Fi Status Display “Connecting” while connection is being attempted. x x x Connecting (display Display black squares to show the connection status by the only) number of squares during communication. Note [Wi-Fi Status] is displayed when using the IFU-WLM3 in Adhoc mode.
- Page 64 If recording/playback cannot be made with an SxS When you copy an SxS memory card including memory card because it has been operated with a multiple clips and files to another card with the same device other than this recorder, or for some other capacity, all the clips and files may not be copied reason, updating the managerial file on the card may completely to the end, depending on the usage...
-
Page 65: Connecting External Monitors And Camcorders
Connecting External Devices Connecting External Monitors and Camcorders To display recording/playback pictures on an In SD Mode, only an SD HDMI interlace signal external monitor, select the output signal and use can be output. an appropriate cable for the monitor to be Use a commercially available HDMI cable for connected. -
Page 66: Connecting Audio Equipment
To start recording using a trigger signal from an external device Connecting Audio When recording HD SDI signal input, setting Equipment [SDI Rec Control] (page 51) to [On] in the [VIDEO SET] menu enables the recorder to start recording when a REC trigger signal is received You can input audio signals on channels separate from the device connected to the SDI IN from the video signal by using the AUDIO IN 1/... -
Page 67: Connecting A Computer
—Turning the power off or disconnecting the power cord Connecting a Computer —Removing the SxS memory card —Disconnecting the USB cable • When removing an SxS memory card from a Macintosh, do not select “Card Power Off” from the When you connect the recorder to a computer SxS memory card icon displayed on the menu bar. -
Page 68: Connecting Via I.link
Set the external device to recording Connecting via i.LINK standby status. Start recording with the recorder. The external device starts recording in Signals can be input/output on the i.LINK connector when an HDV-compatible video synchronization. format (SP 1440/59.94i, SP 1440/50i) or when DVCAM in SD mode is selected. -
Page 69: Recording And Sdi Output Of External Input Signals
Setting on this recorder Recording resumes when the signal is restored, but the clip number on the recorder is incremented. Set [SDI/HDMI/i.LINK I/O Select] (page 50) in • During DVCAM streams, images and audio may skip the [VIDEO SET] menu to [HD & HDV], [SD & or repeat after consecutive operations during DVCAM HDV], [SD P &... -
Page 70: Connecting Usb Media
The recommended USB media are as follows. button to copy all clips on the selected SxS • Sony PSZ-HA1T (1 TB) memory card to USB media. • Sony PSZ-HA50 (500 GB) A new folder is created and files are copied to it. - Page 71 assignable button, then press the button to display the USB media thumbnail screen. The operations that can be performed on the USB media thumbnail screen are basically the same as those for the SxS memory card thumbnail screen, although with the following differences. •...
-
Page 72: Important Notes On Operation
Do not subject the unit to severe shock Contact a Sony service or sales representative for The internal mechanism may be damaged or the more information about inspections. body warped. - Page 73 99.99%. Thus a Batteries very small proportion of pixels may be “stuck”, i) For safety, use only the Sony battery packs and either always off (black), always on (red, green, or blue), or flashing. In addition, over a long AC adaptors listed below.
-
Page 74: Recording Video Formats ([Rec Format])
exFAT/HD mode Recording Video [Country] MXF file Selectable recording settings format video formats Formats ([Rec Format]) XAVC-I 1080/59.94P [NTSC XAVC Area] or XAVC-L50 1080/59.94P [NTSC (J) XAVC-L35 1080/59.94P The video formats for recording that are Area] XAVC-I 1080/59.94i selectable in the [OTHERS] >[System] >[Rec XAVC-L50 1080/59.94i Format] setup menu are as follows. - Page 75 exFAT/SD mode Selectable recording [Country] settings video formats DVCAM 59.94i [NTSC Area] or [NTSC (J) Area] IMX50 59.94i [PAL Area] DVCAM 50i IMX50 50i FAT/HD mode Selectable recording [Country] settings video formats HQ 1920×1080/59.94i [NTSC Area] or [NTSC (J) Area] HQ 1440×1080/59.94i SP 1440×1080/59.94i HQ 1920×1080/29.97P...
-
Page 76: Formats And Limitations Of Outputs
Formats and Limitations of Outputs SDI OUT 1/2 Connector Output Formats Recording/standby (SDI input) (when [SDI/HDMI/i.LINK I/O Select] is [3G (SDI)]) Input format Output format [SDI/HDMI/i.LINK I/O Select] in [Rec Format] in [System] in [VIDEO SET] menu SDI IN [OTHERS] menu 3G (SDI) 59.94P (XAVC-I/XAVC-L) 1920×1080/59.94P... - Page 77 Recording/standby (i.LINK (DVCAM) input) [SDI/HDMI/i.LINK I/O Select] in the [VIDEO SET] menu. Enabled in FAT mode, UDF/SD mode only HD & HDV: 1920×1080/59.94i (i.LINK disabled in UDF/HD mode and exFAT SD & HDV: SD 59.94i mode). When [Rec Format] in [System] is set to [SP When [SDI/HDMI/i.LINK I/O Select] is set to 1440/50i] in the [OTHERS] menu, the output [SD &...
- Page 78 When [23.98P OUTPUT] is set to [59.94i (2-3 Pull When the playback clip format is 720. Also, pulldown Down)] in the [VIDEO SET] menu and the playback playback occurs automatically when playing a Pure P clip format is 1080 clip recorded in FAT/HQ1280/23.98P. When [23.98P OUTPUT] is set to [23.98PsF] in the Converted from 59.94P to 59.94i [VIDEO SET] menu and the playback clip format is...
- Page 79 HDMI OUT Connector Output Formats Recording/standby (SDI input) (when [SDI/HDMI/i.LINK I/O Select] is [3G (SDI)]) Input format Output format [SDI/HDMI/i.LINK I/O Select] in [Rec Format] in [System] in [VIDEO SET] menu SDI IN [OTHERS] menu 3G (SDI) 59.94P (XAVC-I/XAVC-L) 1920×1080/59.94P 1920×1080/59.94i 59.94i (XAVC-I/XAVC-L/HD/HQ) 1920×1080/59.94i...
- Page 80 Recording/standby (i.LINK (DVCAM) input) mode) in the [VIDEO SET] menu, the output Enabled in FAT mode, UDF/SD mode only format is set to “SD 59.94i/SD 50i” regardless of (i.LINK disabled in UDF/HD mode and exFAT the input format. mode). When [SDI/HDMI/i.LINK I/O Select] is set to When [SDI/HDMI/i.LINK I/O Select] is set to other values, a blue screen is output or the setting [SD &...
- Page 81 On thumbnail screens (when [SDI/HDMI/i.LINK I/O Select] is [3G (SDI)]) Input format Output format [SDI/HDMI/i.LINK I/O Select] in [VIDEO SET] menu [Rec Format] in [System] in [OTHERS] menu 3G (SDI) 59.94P (XAVC-I/XAVC-L) 1920×1080/59.94i 59.94i (XAVC-I/XAVC-L/HD/HQ) 1920×1080/59.94i 29.97P (XAVC-I/XAVC-L/HD/HQ) 23.98P (XAVC-I/XAVC-L/HD/HQ) 1920×1080/59.94i 59.94P (XAVC-I/XAVC-L/HD/HQ) 1280×720/59.94P...
- Page 82 When [Country] is set to [NTSC Area] or When a clip with a different format than that [NTSC(J) Area], and [Rec Format] is set to [SP above is played, with [Country] set to [PAL 1440/59.94i] in [System] in the [OTHERS] Area], the output format is as follows.
-
Page 83: Backup Battery Replacement
Backup Battery Replacement This recorder uses a backup battery to retain various setting data. A lithium battery (CR2032) for backup is mounted in the recorder at the factory. The backup battery retains the date, time, and timecode in Free Run mode even when no Insert a new backup battery (CR2032) operating power is being supplied. -
Page 84: Troubleshooting
Troubleshooting Power Symptoms Cause Remedy The recorder does not No battery pack is mounted and no Mount a battery pack (page 11) or connect to AC power on when you set power is supplied to the DC IN power using the BC-U1 or BC-U2 (page 12). the power button to ON. - Page 85 Turn off the power and check the connected equipment, cables, and media. If they are not defective, turn on the power again. If the error persists, consult Sony service personnel. (If power cannot be turned off by setting the power button to OFF, remove both the battery pack and the DC IN source.)
- Page 86 Warning indication Buzzer Tally Cause and measures on LCD lamps A partitioned memory card or one that contains recorded clips Unknown Media(A) exceeding the number permitted with this recorder is loaded. Please Change This card cannot be used with this recorder. Remove it and load a compatible card.
- Page 87 Warning indication Buzzer Tally Cause and measures on LCD lamps Not Enough Capacity There is not enough capacity for copying on the media. (xx/xx Copy Completed to xx/xx indicates the completed copy operations.) Replace the media. Reached Duplication There are already 10 or more clips with the same name as the Limit clip that you want to copy, so copying cannot continue.
-
Page 88: Licenses
WAS OBTAINED FROM A VIDEO the following URL and follow the download PROVIDER LICENSED TO PROVIDE instructions. AVC VIDEO. http://www.sony.net/Products/Linux/common/ search.html NO LICENSE IS GRANTED OR SHALL BE We would prefer that you do not contact us about IMPLIED FOR ANY OTHER USE. - Page 89 2. Redistributions in binary form must (INCLUDING, BUT NOT LIMITED TO, reproduce the above copyright PROCUREMENT OF SUBSTITUTE notice, this list of conditions and the GOODS OR SERVICES; following disclaimer in the LOSS OF USE, DATA, OR PROFITS; documentation and/or other OR BUSINESS INTERRUPTION) materials provided with the HOWEVER CAUSED AND ON ANY...
- Page 90 as such any Copyright notices in the FOR A PARTICULAR PURPOSE ARE code are not to be removed. DISCLAIMED. IN NO EVENT SHALL If this package is used in a product, THE AUTHOR OR CONTRIBUTORS BE Eric Young should be given attribution LIABLE FOR ANY DIRECT, INDIRECT, as the author of the parts of the library INCIDENTAL, SPECIAL, EXEMPLARY,...
-
Page 91: About Jquery,Sizzle.js
About JQuery,Sizzle.js Specifications This product uses the following software, General released under MIT License. Power supply 12 V DC jQuery JavaScript Library v1.7.2 Power consumption http://jquery.com/ Approx. 13 W (while recording, LCD Copyright 2011, John Resig monitor On) Approx. 22.5 W (while recording, LCD Sizzle.js monitor On, CBK-WA100 connected) http://sizzlejs.com/... - Page 92 XAVC-Long35 mode: XAVC-Long 422, XAVC-L mode 35 Mbps max, MPEG-4 AVC / H.264 / VBR XAVC-L50: Approx. 240 min. XAVC-Long25 mode: XAVC-Long 422, XAVC-L35: Approx. 340 min. 25 Mbps max, MPEG-4 AVC / H.264 / VBR XAVC-L25: Approx. 440 min. HD422 mode: MPEG-2 422P@HL, 50 Mbps / HD422 mode: Approx.
- Page 93 Pre-installed in the remote controller. OF THIS UNIT OR MADE BY THIRD Operating Instructions (CD-ROM) (1) PARTIES. Before Using this Unit (1) • SONY WILL NOT BE LIABLE FOR THE Warranty (1) LOSS, REPAIR, OR REPRODUCTION OF ANY DATA RECORDED ON THE Optional Accessories...
- Page 94 • The ExpressCard word mark and logos are owned by the Personal Computer Memory Card International Association (PCMCIA) and any use of such marks by Sony Corporation is under license. Other trademarks and trade names are those of their respective owners. The products or system names appearing in this document are trademarks or registered trademarks of their respective owners.