Panasonic Lumix DMC-CM1 Operating Instructions Manual
Advanced features
Hide thumbs
Also See for Lumix DMC-CM1:
- Basic owner's manual (64 pages) ,
- Basic operating instructions manual (60 pages)
Table of Contents

Related Manuals for Panasonic Lumix DMC-CM1


Summary of Contents for Panasonic Lumix DMC-CM1
-
Page 1: Operating Instructions
Operating Instructions for advanced features Digital Camera DMC-CM1 Model No. Please read these instructions carefully before using this product, and save this manual for future use. Troubleshooting P183 Contents SQW0019-1 F1014MR1015... -
Page 2: Table Of Contents
Contents Before Use How to use this manual ..................5 Standard Accessories ..................5 Names and Functions of Main Parts..............6 Stereo headset (optional)..................9 Inserting/Removing the microSIM card (optional)..........10 About the Built-in Memory/the microSD Card (optional)........11 Charging ......................14 Turning the unit on/off ..................16 Android™... - Page 3 Using the [Rec] Menu ..................96 Using the [Custom] Menu ................116 Basic camera settings ([Setup] menu)............122 Viewer Gallery ......................124 Photo Search Launching Photo Search ................129 Phone Emergency calls .....................132 Making a call....................132 Answering a call....................134 Call log......................135 Voicemail ......................136 Caller ID information ..................137 Fixed Dialling Numbers...................137 People Saving contacts ....................138...
- Page 4 Google Keep™ ....................158 Calendar ......................161 YouTube™ ......................163 Google Play Google Play™ Store ..................164 Deleting apps....................165 Access permissions ..................166 Installing apps from unknown sources............166 Connecting to external devices ® Bluetooth wireless technology...............167 USB connections ....................170 Printing......................172 Synchronise/Backup/Reset Synchronise and delete accounts..............173 Backup......................174 Reset ......................174 Security...
-
Page 5: Before Use
Before Use How to use this manual ≥ Click a cross reference in the text to jump to the corresponding page. ≥ By entering keywords in the search field at the top of the Adobe Reader screen, you can run a keyword search and jump to the corresponding page. -
Page 6: Names And Functions Of Main Parts
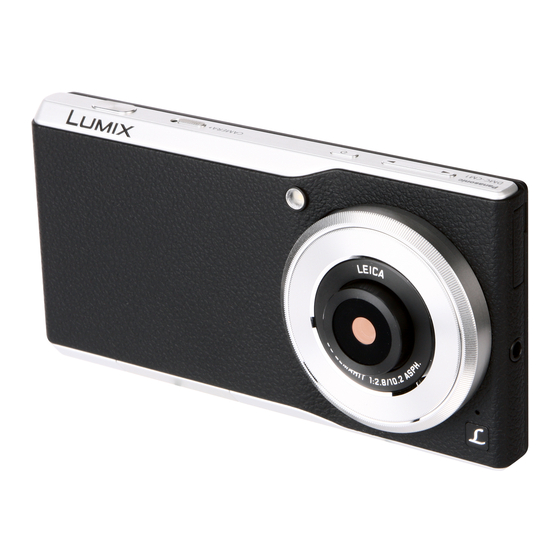
1. Before Use Names and Functions of Main Parts Shutter button (P46) Speaker (P133) Press to take a picture with the camera. Plays the ringtone, music or the caller’s voice Press halfway (lightly) to adjust the focus. when in handsfree mode. Camera selector switch (P42) NFC antenna... - Page 7 1. Before Use 12 13 18 19 microUSB terminal (P14, 170) Earphone terminal (P9) Use this when charging or connecting external Connect a headset (optional). devices. Inward facing camera (P42) Ringtone lamp/Charging lamp (P14, 180) Take pictures or motion pictures. Flashes if there is a missed call or new email, and microSIM card slot (P10)
- Page 8 1. Before Use About the mobile identification number ∫ This unit has a specific mobile identification number A. The mobile identification number is verified as follows. To verify the number on-screen: From the Home screen > [ ] > [ [About phone] >...
-
Page 9: Stereo Headset (Optional)
1. Before Use Stereo headset (optional) You can use a headset (optional) to listen to music or watch videos. If the headset (optional) has a microphone, you can also use it to talk on the phone. ≥ Check that the headset (optional) plug is completely inserted into the earphone terminal. -
Page 10: Inserting/Removing The Microsim Card (Optional)
1. Before Use Inserting/Removing the microSIM card (optional) A microSIM card is an integrated circuit that stores the customer’s phone number and other information. Calls and messages (SMS) cannot be sent or received unless the microSIM card is inserted. If you have inserted/removed the microSIM card, do not deliberately touch or damage the IC terminals. -
Page 11: About The Built-In Memory/The Microsd Card (Optional)
(4 GB to 32 GB) ≥ Check the corresponding manufacturer, capacity and other latest compatibility information from the following support site. http://panasonic.jp/support/global/cs/dsc/ (This Site is English only.) microSDXC Memory Card Note that this does not guarantee compatibility with all operations. -
Page 12: Number Of Recordable Pictures
1. Before Use Approximate number of recordable pictures and available recording time Number of recordable pictures ∫ ≥ [9999i] is displayed if there are more than 10000 pictures remaining. Aspect ratio [3:2], Quality [A] [Picture Size] 8 GB 32 GB 64 GB 128 GB L (20M) - Page 13 1. Before Use Inserting/Removing the microSD card Open the card slot cover, ensure that the connection terminal of the microSD card is facing down, and insert it firmly in the correct direction until it makes a “click” sound. A Do not touch the connection terminals of the microSD card.
-
Page 14: Charging
1. Before Use Charging ≥ The battery is not charged when this unit is shipped. Charge the battery before use. Charge with an AC adaptor Connect the unit and AC adaptor to charge. A To power outlet C microUSB terminal B AC adaptor D Charging lamp Open the microUSB terminal cover, check the direction of the AC adaptor cable... -
Page 15: Approximate Operating Time And Number Of Recordable Pictures
≥ CIPA is an abbreviation of [Camera & Imaging Products Association]. ≥ Temperature: 23 oC (73.4 oF)/Humidity: 50%RH when display is on. ≥ Using a Panasonic microSDHC Memory Card. ≥ Starting the camera application and recording 30 seconds after this unit is turned on. -
Page 16: Turning The Unit On/Off
1. Before Use Turning the unit on/off Turn on the unit by pressing [ ] for 2 seconds or more. ≥ The lock screen will be displayed after a short time. (P17) ≥ The default settings screen will be displayed when you turn the unit on for the first time. (P17) ≥... -
Page 17: Android™ Default Settings
1. Before Use Android™ default settings The first time you turn the unit on after purchase, follow the on-screen instructions ® and configure the language and Wi-Fi settings. Select language > [ Follow the on-screen instructions to configure various settings. After configuring various settings, read through description on diagnosis information >... -
Page 18: Basic Operation
Basic Operation Using the touch screen The unit features a touch screen, which you can operate by touching directly with your fingers. ≥ Peel off the sheet pasted to the touch screen when first bought before use. ≥ The touch screen is designed to be lightly touched with a finger. Do not press the touch screen strongly with your finger or press objects with sharp tips (claws/ball point pens/pins etc.) against it. - Page 19 2. Basic Operation Dragging Scrolling Tap an item or icon without Flick/drag your finger around releasing your finger and the screen to display a slide it. hidden area. Pinching When displaying a webpage or picture, use two fingers to push the screen apart and zoom in (pinch out), or bring them together to zoom out (pinch in).
-
Page 20: Switching Between Vertical And Horizontal Viewing Modes
2. Basic Operation Switching between vertical and horizontal viewing modes The unit switches the screen between vertical and horizontal viewing modes depending on its motion sensor that can detect the unit’s direction and movement. ≥ The screen display may not switch depending on the app being used and other reasons. -
Page 21: Home Screen
2. Basic Operation Home screen The Home screen is the main screen for launching apps. Tapping [ ] when other screens are displayed will return to the Home screen. 1 Google Search™ 2 Area for adding shortcuts, widgets or folders. 3 Displays the current page if there are numerous home screen pages. -
Page 22: Creating A Folder
2. Basic Operation Home screen operations Launching an app ∫ Tap the app’s icon. Moving an item in the Home screen ∫ Tap and hold an item. Drag the item to the desired location. ≥ Dragging an item to the edge of the screen displays the next page. Adding a widget to the Home screen ∫... -
Page 23: Status Bar
2. Basic Operation Status bar The status bar displays icons that let you know the status of the unit, and notification icons. Status bar List of main status icons ∫ Network strength Airplane mode is on ® Roaming Bluetooth feature is on GPRS network is available Bluetooth device is connected EDGE network is available... -
Page 24: Notifications Panel/Quick Menu
2. Basic Operation Notifications panel/Quick menu Notifications panel The notifications panel allows you to check notifications such as missed calls and incoming email messages. Drag the status bar down. Quick menu Various settings can be changed and profile confirmed from the quick menu. Tap [ ] in the notifications panel screen. -
Page 25: Control Icons
2. Basic Operation Control icons Control icons are displayed at the bottom of the screen. 1 Return to the previous screen. 2 Display the Home screen. 3 Display a thumbnail of recently used apps. Tapping a thumbnail launches that app. ≥... -
Page 26: Using Apps
2. Basic Operation Using apps Launching an app From the Home screen > [ Tap the app that you want to launch. Close the app Tap [ ≥ The app may pause or remain running in the background depending on the app. Display app options menu Tap [ ] when the app is running. - Page 27 2. Basic Operation App list ∫ [Camera] Refer to for details. Google Calendar™ Refer to P161 for details. [Gallery] Refer to P124 for details. [Downloads] Display downloaded files. Google Drive™ Refer to P156 for details. Google Hangouts™ Refer to P146 for details.
-
Page 28: Entering Text
2. Basic Operation Entering Text The keyboard is displayed automatically when you tap a text entry field. ≥ The keyboard may differ, or the text and symbols that can be entered may be restricted depending on the app used, language or selected text entry field. Select entry method The entry method can be selected depending on the language used. -
Page 29: Basic Settings
2. Basic Operation Basic settings Setting the date and time Set the date, time and time zone ∫ From the Home screen > [ ] > [ Tap [Date & time]. To set the date and time automatically Turn on the [Automatic date & time] and [Automatic time zone] checkboxes. ≥... - Page 30 2. Basic Operation Sound, vibration settings Adjust the volume ∫ From the Home screen > [ ] > [ [Sound] > [Volumes] > drag the slider for the sound to adjust left or right > [OK]. ≥ The ringtone volume can also be adjusted by pressing [ ]/[ ]. Change the ringtone for phone calls ∫...
-
Page 31: Screen Settings
2. Basic Operation Screen settings Change display language ∫ From the Home screen > [ ] > [ [Language & input] > [Language] > select the desired language. Change screen brightness ∫ From the Home screen > [ ] > [ [Display] >... -
Page 32: Connecting To Networks
Connecting to networks Connecting to mobile networks 2G/3G/LTE networks can be used to access email, messages and the internet. For most mobile network operators, the connection is configured automatically when a microSIM card is inserted. If the connection is not configured automatically, an access point must be configured manually. - Page 33 3. Connecting to networks Configure mobile network details Disabling mobile network connections ∫ Disable a 2G/3G/LTE network connection. This can be used to avoid unintentional downloads or synchronisation. ≥ Wi-Fi network settings will not be changed. From the Home screen > [ ] >...
-
Page 34: Connecting To Wi-Fi Networks
3. Connecting to networks ® Connecting to Wi-Fi networks This unit is compatible with Wi-Fi networks. You can use email and the internet with wireless LAN services. Turning on the Wi-Fi function From the Home screen > [ ] > [ Turn on [Wi-Fi]. - Page 35 3. Connecting to networks Adding a Wi-Fi network manually ∫ Some Wi-Fi networks cannot be detected automatically. In this case, you need to add the Wi-Fi network manually. For details, contact the network administrator. From the Home screen > [ ] >...
-
Page 36: Connecting To Vpns
3. Connecting to networks Connecting to VPNs If your company or school uses a Virtual Private Network (VPN), you must configure your unit so that you can use the VPN. For details about configuring your unit, contact the network administrator. Connecting to a VPN From the Home screen >... -
Page 37: Configure A Portable Wi-Fi Access Point
3. Connecting to networks Configure a portable Wi-Fi access point Using this unit as a portable Wi-Fi access point allows PCs with wireless LAN capabilities to connect to the internet. From the Home screen > [ ] > [ [More...] > [Tethering & portable hotspot] > [Set up Wi-Fi hotspot]. Configure the network SSID, security and password >... -
Page 38: Configure Airplane Mode
3. Connecting to networks Configure airplane mode This turns off all wireless features of the unit to prevent interference with aircraft equipment. From the Home screen > [ ] > [ [More...] > turn on the [Aeroplane mode] checkbox. ≥ [ ] is displayed in the status bar. -
Page 39: Camera
Camera Before using the camera ≥ Check whether the lens is stained. (P190) ≥ When starting the camera app, be careful not to interfere with the lens operation. ≥ Make sure that your fingers or hair do not cover the lens when taking pictures. ≥... -
Page 40: Tips For Taking Good Pictures
4. Camera Tips for taking good pictures ∫ Hold the unit gently with both hands, keep your arms still at your side and stand with your feet slightly apart. ≥ Do not cover the flash/AF Assist lamp A, the microphone B or the speaker C with your fingers or other objects. -
Page 41: Recording Flow
4. Camera Recording flow Slide and release the camera selector switch to start up the camera. (P42) ≥ Home screen > [ ] also starts the camera. Set the desired Recording Mode. (P51) Start recording. Taking a Still picture (P46) Changing settings to suit the desired situation, and start Press the shutter button halfway to focus. -
Page 42: Using Camera Functions
4. Camera Using camera functions Launching the camera Slide and release the camera selector switch. ≥ Home screen > [ ] also starts the camera. ≥ The camera can also be started by flicking [ ] to the left on the Lock screen. To end the camera ∫... -
Page 43: Viewing Recording Screens
4. Camera Viewing Recording screens Switching the Information Displayed on the recording screen From the Recording screen > [ About the tilt sensor display ∫ With the tilt sensor displayed, it is easy to correct the tilt of the unit etc. Tap [ ] to display the tilt sensor. -
Page 44: Screen Display
4. Camera Screen display The display on the screen shows the operation state of the unit. AF AF 30 p 0500 0500 0500 60 60 MENU DISP. DISP. DISP. DISP. MENU Recording Mode (P51) Photo Style (P101) Custom settings (P62) Flash Mode (P81) ‡... - Page 45 4. Camera AF AF 30 p 0500 0500 0500 60 60 MENU DISP. DISP. DISP. DISP. MENU Control ring menu (P84) Control ring operation (P84) Battery indication Programme Shift (P57) Aperture value (P46) Start/End recording Shutter speed (P46) motion picture (P47) Exposure compensation value...
-
Page 46: Taking A Still Picture
4. Camera Taking a Still picture Select the Recording Mode. (P51) Press the shutter button halfway to focus. ≥ Aperture value and shutter speed are displayed. (Flashes in red if the correct exposure is not achieved.) A Aperture value B Shutter speed When the subject When the subject Focus... -
Page 47: Recording Motion Picture
4. Camera Recording Motion Picture Applicable modes: Motion pictures can be recorded in the MP4 format. Audio will be recorded in stereo. From the Recording screen > [ AF AF 30 p 0500 0500 0500 A Available recording time B Elapsed recording time ≥... - Page 48 4. Camera ≥ Motion pictures cannot be recorded in the following cases. – [Glistening Water]/[Glittering Illuminations] (Scene Guide Mode) – [Miniature Effect]/[Star Filter] (Creative Control Mode) Configuring the recording quality ∫ From the Recording screen > [ ] > [Motion Picture] > [Rec Quality]. Select the item.
-
Page 49: Recording Still Pictures While Recording Motion Pictures
4. Camera Recording still pictures while recording motion pictures ∫ Applicable modes: Still pictures can be recorded even while recording a motion picture. (Simultaneous recording) During motion picture recording, press the shutter button fully to record a still picture. ≥ Tapping [ ] can also record still pictures. - Page 50 4. Camera 4K Pre-Burst Burst files are recorded 1.5 seconds before and after the moment that the shutter clicks, and your favourite frame can be selected and the still picture captured. From the Recording screen > [ ≥ Home screen > [ ] >...
-
Page 51: Selecting The Recording Mode
4. Camera Selecting the Recording Mode From the Recording screen > Recording AF AF 30 p 0500 0500 0500 Mode icon. 60 60 MENU DISP. DISP. DISP. DISP. MENU Select the Recording Mode. ≥ It can also be selected by rotating the control ring. (P84) Intelligent Auto Mode (P52) -
Page 52: Recording Mode
4. Camera Taking Pictures using the Automatic Function Recording Mode: When you wish to leave settings to this unit and record without thinking about them, use Intelligent Auto Plus Mode or Intelligent Auto Mode, which makes optimal settings for the subject and scene. Functions that can be set differ between Intelligent Auto Plus Mode and Intelligent Auto Mode. -
Page 53: Scene Detection
4. Camera Scene Detection ∫ When taking pictures > [i-Portrait] ¦ [i-Scenery] [i-Macro] [i-Night Portrait] [i-Night Scenery] [i-Food] [i-Sunset] When recording motion pictures > [i-Portrait] ¦ [i-Scenery] [i-Low Light] [i-Macro] ≥ [ ] is set if none of the scenes are applicable, and the standard settings are set. ¦... -
Page 54: The Backlight Compensation
4. Camera Functions that work automatically ∫ The following functions work automatically in order for the unit to perform the most optimum settings. ≥ Scene Detection ≥ Backlight Compensation ≥ Face Detection ≥ Auto White Balance ≥ Intelligent ISO sensitivity control ≥... - Page 55 4. Camera Taking a picture with a blurred background (Defocus Control) ∫ Recording Mode: You can easily set the blurriness of the background while checking the screen. Set the aperture value to a higher number when you want a sharp focus background. Set the aperture value to a lower number when you want a soft focus background.
-
Page 56: Recording Images By Changing The Brightness Or Colour Tone
4. Camera Recording images by changing the brightness or colour tone ∫ Recording Mode: This mode enables you to change the brightness and colour tone to your preferred settings from the ones set by this unit. Setting brightness ] > [ (P84) Operate the control ring to adjust the brightness. -
Page 57: Programme Shift
4. Camera (Programme AE Mode) Taking Pictures with Your Favourite Settings Recording Mode: The unit automatically sets the shutter speed and aperture value according to the brightness of the subject. You can take pictures with greater freedom by changing various settings in the [Rec] menu. - Page 58 4. Camera Aperture-Priority AE Mode Recording Mode: Set the aperture value to a higher number when you want a sharp focus background. Set the aperture value to a lower number when you want a soft focus background. Set the Recording Mode to [ (P51) Operate the control ring to set the aperture value.
- Page 59 4. Camera Shutter-Priority AE Mode Recording Mode: When you want to take a sharp picture of a fast moving subject, set with a faster shutter speed. When you want to create a trail effect, set to a slower shutter speed. Set the Recording Mode to [ (P51) Operate the control ring to set the shutter...
-
Page 60: Manual Exposure Mode
4. Camera Manual Exposure Mode Recording Mode: Determine the exposure by manually setting the aperture value and the shutter speed. The Manual Exposure Assistance appears on the lower portion of the screen to indicate the exposure. Set the Recording Mode to [ (P51) Operate the control ring to set the aperture value and shutter speed. - Page 61 4. Camera Manual Exposure Assistance 0 0 0 The exposure is adequate. 0 0 0 Set to faster shutter speed or larger aperture value. 0 0 0 Set to slower shutter speed or smaller aperture value. ≥ The Manual Exposure Assistance is an approximation. We recommend checking the pictures on the playback screen.
-
Page 62: Recording Using Registered Custom Set
4. Camera Registering your preferred settings (Custom Mode) Recording Mode: You can register the current camera function settings as custom settings. If you then record in Custom Mode, you can use the registered settings. ≥ Initial setting of the Programme AE Mode is registered as the custom settings initially. Registering Personal Menu Settings (Registering custom settings) ∫... - Page 63 4. Camera Taking Pictures that match the Scene being recorded (Scene Guide Mode) Recording Mode: If you select a scene to suit the subject and recording conditions while viewing sample pictures, the unit will set the optimal exposure, colour and focus, allowing you to take pictures matching the scene.
- Page 64 4. Camera [Clear Portrait] The brightness of the face is adjusted and the background is defocused to create a clear portrait. [Silky Skin] Brighter face and softer skin colour creates a healthy younger look. ≥ The smoothing effect is applied to the part that has a similar tone to the complexion of a subject, as well.
- Page 65 4. Camera [Sweet Child's Face] Moderate background defocusing and skin tone highlighted draws attention to the child’s face. [Distinct Scenery] Saturation of sky and trees creates more distinct scenery. [Bright Blue Sky] On a sunny day, the overall screen brightness is increased to create a vibrant image of the blue sky.
- Page 66 4. Camera [Vivid Sunset Glow] Red is enhanced to create a vivid image of the sunset. [Glistening Water] The glisten of the water is enhanced to look brighter and slightly bluish. ≥ Display of the Recording screen will be delayed more than usual and the screen will look as if frames are dropping.
- Page 67 4. Camera [Warm Glowing Nightscape] The warm colour tone creates a warm image of the nightscape. ≥ We recommend that you fix the unit and take pictures using the Self-timer. ≥ The shutter may remain closed after taking the picture. This is due to signal processing and is not a malfunction.
- Page 68 4. Camera [Clear Night Portrait] Fill flash and a longer exposure capture better portraits against the nightscape. ≥ Use the flash. ≥ We recommend that you fix the unit and take pictures using the Self-timer. ≥ When [Clear Night Portrait] is selected, keep the subject still for about 1 second after taking the picture.
- Page 69 4. Camera [Freeze Animal Motion] The faster shutter speed prevents blur and captures a clear image of the fast moving animal. [Clear Sports Shot] The faster shutter speed prevents blur, for example at sporting events. [Monochrome] A monochrome image captures the mood of the moment.
- Page 70 4. Camera Taking Pictures with different image effects (Creative Control Mode) Recording Mode: This mode records with additional image effects. Set the Recording Mode to [ ] and tap the image effect (filter). (P51) Select and tap the image effect (filter) (P72 P76).
-
Page 71: Setting Brightness
4. Camera Taking a picture with a blurred background (Defocus Control) ∫ You can easily set the blurriness of the background while checking the screen. ] > [ (P84) Operate the control ring to set the blur. ≥ Tap [ ] to return to the Recording screen. - Page 72 4. Camera [Expressive] This effect emphasises the colour to make a pop art picture. [Retro] This effect gives a faded image. [Old Days] This effect adds a bright, soft and nostalgic feel to the overall image. [High Key] This effect adds a bright, airy and soft feel to the overall image. ≥...
- Page 73 4. Camera [Low Key] This effect adds a dark and relaxing feel to the overall image and enhances bright parts. [Sepia] This effect creates a sepia image. [Monochrome] This effect creates a black and white picture. [Dynamic Monochrome] This effect gives a higher contrast to create an impressive black and white picture.
- Page 74 4. Camera [High Dynamic] This effect produces the optimum brightness for both dark and bright parts. [Cross Process] This effect gives your photo a dramatic colour look. [Toy Effect] This effect reduces peripheral brightness to give the impression of a toy camera.
- Page 75 4. Camera [Miniature Effect] This effect blurs peripheral areas to give the impression of a diorama. Setting the type of defocus With [Miniature Effect] you can make the subject stand out by intentionally creating defocused and in-focus portions. You can set the recording orientation (defocus orientation) and the position and size of the in-focus portion.
- Page 76 4. Camera [Fantasy] This effect creates a fantastical image in a pale colour tone. [Star Filter] This effect transforms pin-points of light into a star effect. ≥ Display of the Recording screen will be delayed more than usual and the screen will look as if frames are dropping. [One Point Color] This effect leaves one selected colour to emphasise impressiveness.
- Page 77 4. Camera Taking panorama pictures (Panorama Shot Mode) Recording Mode: Consecutive photos taken while this unit is moved are combined to form a panorama. Set the Recording Mode to [ (P51) Adding an image effect Operate the control ring to select the image effect. (P84) ≥...
- Page 78 4. Camera ≥ Move the unit towards the recording direction while taking care not to shake the unit. (If the camera shakes too much, pictures may not be able to be recorded, or the recorded panorama picture may become narrower (smaller).) ≥...
-
Page 79: Zoom And Flash
4. Camera Zoom and Flash Taking Pictures with the Zoom Applicable modes: You can zoom-out to record landscapes etc. in wide angle (Wide) or zoom-in to make people and objects appear closer (Tele). (Maximum magnification: 4k) Pinching in/pinching out the screen. Operating with the control ring. - Page 80 4. Camera About zoom types ∫ Use Extra Optical Zoom, Intelligent Zoom or Digital Zoom to zoom in. Combinations of zoom types are fixed depending on the picture sizes. ≥ This function works when any of the picture sizes indicated [EZ] Extra Optical Zoom with “EX”...
-
Page 81: Taking Pictures By Using The Flash
4. Camera Taking pictures by using the flash Applicable modes: With the built-in flash you can take pictures in dark places or adjust the entire contrast of a picture by illuminating a subject with a bright background. Flash Do not cover it with your fingers or other objects. From the Recording screen >... - Page 82 4. Camera The available flash range (approximation) ∫ If the distance to the subject is close when taking a picture using a flash, part of the recorded image becomes dark because the light of flash is blocked by the lens or it becomes out of flash range. Check the distance to the subject when taking a picture.
- Page 83 4. Camera Available flash settings by Recording Mode ∫ The available flash settings depend on the Recording Mode. (±: Available, —: Not available) Recording Mode ‡ ‰ Œ Intelligent Auto Mode — — ± ± Intelligent Auto Plus Mode — —...
-
Page 84: Operating The Control Ring
4. Camera Operating the control ring Applicable modes: A function to suit the Recording Mode is assigned to the control ring. Rotating the control ring ∫ Functions assigned by the control ring can be set by directly rotating the control ring from the Recording screen. The default function assigned to the control ring differs depending on the Recording Mode. - Page 85 4. Camera Change various settings with the control ring ∫ Tap [ AF AF 30 p ≥ To use the function displayed on the recording screen, rotate 0500 0500 0500 the control ring without tapping [ 60 60 MENU DISP. DISP.
-
Page 86: Compensating The Exposure
4. Camera Compensating the Exposure Applicable modes: Use this function when you cannot achieve appropriate exposure due to the difference in brightness between the subject and the background. ] > [ (P84) Operate the control ring to configure settings. Underexposed Properly exposed Overexposed Compensate the exposure towards... -
Page 87: Setting The Light Sensitivity
4. Camera Setting the Light Sensitivity Applicable modes: This allows the sensitivity to light (ISO sensitivity) to be set. Setting to a higher figure enables pictures to be taken even in dark places without the resulting pictures coming out dark. ] >... -
Page 88: Adjusting The White Balance
4. Camera ≥ For the focus range of flash when [AUTO] is set, refer to P82. ≥ [ ] is not available in the following cases. – Shutter-Priority AE Mode – Manual Exposure Mode ≥ [AUTO] is not available in the following case. –... -
Page 89: Auto White Balance
4. Camera Auto White Balance ∫ Depending on the conditions prevailing when pictures are taken, the pictures may take on a reddish or bluish tinge. Furthermore, when a multiple number of light sources are being used or there is nothing with a colour close to white, Auto White Balance may not function properly. -
Page 90: Setting The Colour Temperature
4. Camera Setting the colour temperature ∫ You can set the colour temperature manually for taking natural pictures in different lighting conditions. The colour of light is measured as a number in degrees Kelvin. As the colour temperature increases, the picture becomes more bluish. -
Page 91: Setting The Menu
4. Camera Setting the Menu Various menu options are available for you to set the unit to take pictures the way you want and to use it with ease. Example: In the [Rec] menu, change [Quality] from [ ] to [ ›... -
Page 92: Menu List
4. Camera Menu list [Rec] ∫ This menu lets you set the aspect ratio, number of pixels and other aspects of the pictures you are recording. ≥ [Photo Style], [Metering Mode], [i.Dynamic] and [i.Resolution] are common to both the [Rec] menu and [Motion Picture] menu. -
Page 93: Motion Picture
4. Camera [Motion Picture] ∫ This menu lets you set the [Rec Quality], and other aspects for motion picture recording. ≥ [Photo Style], [Metering Mode], [i.Dynamic] and [i.Resolution] are common to both the [Rec] menu and [Motion Picture] menu. Changing these settings in one of these menus is reflected in other menu. –... - Page 94 4. Camera [Setup] ∫ The unit can be configured for easier use, such as changing the save destination of images. Sets whether to append location information of the recording location to [Location Logging] P122 the picture or motion picture during recording. [Store in] Sets the storage location of recorded images.
- Page 95 4. Camera Calling frequently-used menus instantly (Quick Menu) By using the Quick Menu, some of the menu settings can be easily found. ≥ The features that can be adjusted using Quick Menu are determined by the mode or a display style the unit is From the Recording screen >...
-
Page 96: Using The [Rec] Menu
4. Camera Using the [Rec] Menu Select a Drive Mode Applicable modes: You can change what this unit will do when you press the shutter button. From the Recording screen > [ ] > [Rec] > [Drive Mode]. (P91) ([Single]) When the shutter button is pressed, only one picture is recorded. -
Page 97: Taking Pictures Using Burst Mode
4. Camera Taking Pictures using Burst Mode Applicable modes: Pictures are taken continuously while the shutter button is pressed. ≥ A maximum of 23 pictures is taken upon pressing the shutter button once when the burst speed is set to [SH]. ≥... - Page 98 4. Camera ≥ The focus is fixed in the first picture. ≥ Exposure, White Balance and ISO sensitivity will be fixed to the settings for the first picture when [SH]/[H] is set. ≥ When [SH]/[H] is set, the recording may be brighter or darker from the second picture depending on changes in the brightness of the subject.
-
Page 99: Taking Pictures Using Auto Bracket
4. Camera Taking Pictures using Auto Bracket Applicable modes: In this mode, 3 pictures are automatically recorded in the selected exposure compensation range each time the shutter button is pressed. With Auto Bracket d1 EV 1st picture 2nd picture 3rd picture d0 EV j1 EV i1 EV... -
Page 100: Taking Pictures With The Self-Timer
4. Camera Taking Pictures with the Self-timer Applicable modes: From the Recording screen > [ ] > [Rec] > [Drive Mode] > [Self Timer]. (P91) Select the time of the Self-timer. Picture is taken 2 seconds after shutter is pressed. ([2sec.]) ≥... - Page 101 4. Camera Adjusting the Picture Quality by Adding an Effect ([Photo Style]) Applicable modes: You can select effects to match the type of image you wish to record. You can adjust the colour and image quality of the effects. From the Recording screen > [ ] >...
-
Page 102: Adjusting The Picture Quality
4. Camera Adjusting the picture quality ∫ ≥ Picture quality cannot be adjusted in the Intelligent Auto Plus Mode. Tap the Photo Style that you wish to set. Tap the item that you wish to set. Tap [ ] or [ ] to adjust. -
Page 103: Setting The Aspect Ratio Of Pictures
4. Camera Setting the aspect ratio of pictures Applicable modes: This allows you to select the aspect ratio of the pictures to suit printing or the playback method. At the time of purchase, it is initially set to [3:2]. From the Recording screen > [ ] >... - Page 104 4. Camera Setting the number of pixels Applicable modes: Set the number of pixels. The higher the numbers of pixels, the finer the detail of the pictures will appear even when they are printed onto large sheets. From the Recording screen > [ ] >...
- Page 105 4. Camera Setting the compression rate of pictures ([Quality]) Applicable modes: Set the compression rate at which the pictures are to be stored. From the Recording screen > [ ] > [Rec] > [Quality]. Settings File format Description of settings A JPEG image in which image quality was ([Fine]) given priority.
- Page 106 4. Camera Select the type of Auto Focus Mode ([AF Mode]) Applicable modes: This allows the focusing method that suits the positions and number of the subjects to be selected. From the Recording screen > [ ] > [Rec] > [AF Mode]. (P91) The unit automatically detects the person’s face.
- Page 107 4. Camera Setting up [ ] ([AF Tracking]) ∫ When operating the shutter button ≥ Place the subject in the AF tracking frame, and press the shutter button halfway to lock the subject. A AF tracking frame – AF area will turn green when the unit detects the subject. –...
-
Page 108: Taking Pictures With Manual Focus
4. Camera Taking Pictures with Manual Focus Applicable modes: Use this function when you want to fix the focus or when the distance between the lens and the subject is determined and you do not want to activate Auto Focus. From the Recording screen >... - Page 109 4. Camera Achieving focus quickly using Auto Focus Tap [ ] in the MF adjustment screen to activate the Auto Focus. ≥ Enabling Auto Focus in the MF adjustment screen adjusts the focus to the centre of the enlarged screen. ≥...
- Page 110 4. Camera Compensating the contrast and exposure ([i.Dynamic]) Applicable modes: Contrast and exposure are compensated when the brightness difference between the background and subject is great, etc. From the Recording screen > [ ] > [Rec] > [i.Dynamic]. Settings: [Auto]/[High]/[Standard]/[Low]/[OFF] ≥...
- Page 111 4. Camera Combining pictures with different exposures ([HDR]) Applicable modes: You can combine 3 pictures with different levels of exposure into a single picture with rich gradation. You can minimise the loss of gradations in bright areas and dark areas when, for example, the contrast between the background and the subject is large.
- Page 112 4. Camera Setting the Shutter Type ([Shutter Type]) Applicable modes: There are two types of shutters, a mechanical shutter and an electronic shutter. Pictures can be taken with a fixed mechanical shutter or with the shutter system selected automatically. From the Recording screen > [ ] >...
- Page 113 4. Camera Correcting red eyes ([Red-Eye Removal]) Applicable modes: The Red-Eye Removal function works when the flash is activated to automatically detect red eyes and correct the image data. From the Recording screen > [ ] > [Rec] > [Red-Eye Removal]. Settings: [ON]/[OFF] ≥...
- Page 114 4. Camera Setting the step increment of ISO sensitivity ([ISO Increments]) Applicable modes: You can adjust the ISO sensitivity settings for every 1/3 EV. From the Recording screen > [ ] > [Rec] > [ISO Increments]. [L.100] ¢1 /[125]/[160]/[200]/[250]/[320]/[400]/[500]/[640]/[800]/[1000]/[1250]/[1600]/ [1/3 EV] [2000]/[2500]/[3200]/[4000]/[5000]/[6400]/[8000]/[10000]/[12800]/[H.16000] ¢1 ¢1...
- Page 115 4. Camera Setting the colour space ([Color Space]) Applicable modes: Set this when you want to correct the colour reproduction of the recorded pictures on a PC, printer etc. From the Recording screen > [ ] > [Rec] > [Color Space]. Colour space is set to sRGB colour space.
-
Page 116: Using The [Custom] Menu
4. Camera Using the [Custom] Menu Disabling Operational Sounds and the Output of Light at once ([Silent Mode]) Applicable modes: This function is useful for recording images in a quiet environment, public facility, etc. or recording images of subjects such as babies or animals. From the Recording screen >... - Page 117 4. Camera Fixing the Focus and the Exposure ([AF/AE Lock]) Applicable modes: This is useful when you want to take a picture of a subject outside the AF area or the contrast is too strong and you cannot achieve appropriate exposure. From the Recording screen >...
- Page 118 4. Camera Turning on the AF Assist Lamp ([AF Assist Lamp]) Applicable modes: AF assist lamp will illuminate the subject when the shutter button is pressed halfway, making it easier for the unit to focus when recording in low light conditions. (Larger AF area is displayed depending on the recording conditions.) From the Recording screen >...
- Page 119 4. Camera Highlighting in-focus portions ([Peaking]) Applicable modes: Works when focusing manually in the Manual Focus Mode. From the Recording screen > [ ] > [Custom] > [Peaking]. [ON] In-focus portions are highlighted with colour. [OFF] In-focus portions are not highlighted. Sets the detection level of the area in focus ([Peaking detect Level]) Applicable modes: From the Recording screen >...
- Page 120 4. Camera Displaying the histogram ([Histogram]) Applicable modes: From the Recording screen > [ ] > [Custom] > [Histogram]. Settings: [ON]/[OFF] ≥ A Histogram is a graph that displays brightness along the horizontal axis (black to white) and the number of pixels at each brightness level on the vertical axis. It allows you to easily check a picture’s exposure.
-
Page 121: Touch Screen
4. Camera Sets the touch operations during recording ([Touch Settings]) Applicable modes: The focus and brightness can be set to the specified subject and position using the touch screen. From the Recording screen > [ ] > [Custom] > [Touch Settings]. It is possible to set the focus to the subject specified on the touch screen. -
Page 122: Basic Camera Settings ([Setup] Menu)
4. Camera Basic camera settings ([Setup] menu) From the Recording screen > [ ] > [Setup] > select the item. Item Setting/Notes Tags of the recording location can be appended to pictures and motion pictures. [ON]/[OFF] [Location Logging] ≥ Cautions for Use: Be sure to pay special attention to the privacy, the likeness rights, etc. - Page 123 4. Camera Item Setting/Notes Sets whether to emit the beep or not. [Beep] [ON]/[OFF] ≥ When [Silent Mode] is set to [ON], [Beep] is set to [OFF]. Sets whether to emit the shutter sound or not. [Shutter] [ON]/[OFF] ≥ When [Silent Mode] is set to [ON], [Shutter] is set to [OFF]. Reset the file number of the next recording to 0001.
-
Page 124: Viewer
Viewer Gallery Display pictures, motion pictures or other items that have been taken. Playback slideshows, edit still pictures or capture still pictures from motion pictures. ≥ Data can be synchronised using your Google account. Viewing pictures and motion pictures From the Home screen > [ ] >... - Page 125 5. Viewer Switching display method ∫ Display by categorising location, time or other properties. From the Album list screen > [Albums] > select the item. Viewing in slideshow ∫ Playback pictures in an album using a slideshow. From the File list screen/Full screen display > [ ] >...
-
Page 126: Editing Pictures
5. Viewer Managing pictures and motion pictures Copying, moving ∫ Copy or move pictures or motion pictures to the unit or microSD card, or create folders. From the Full screen display > [ ] > [Move]/[Copy]. ] from the Album list screen or File list screen > [Select album] or [Select item] can move/copy ≥... -
Page 127: Capturing Still Pictures From Motion Pictures
5. Viewer Capturing still pictures from motion pictures Still pictures can be captured from motion pictures recorded with this unit. From the Home screen > [ ] > [ Tap a motion picture. Drag the slide bar and move it to the position to capture. - Page 128 5. Viewer Using “Swipe & Share” Tap and hold an album or file to use “Swipe & Share”. Drag albums or files to the menu displayed on the edge of the screen to active each function. From the Album list screen/File list screen/Full screen display > tap and hold an album or file.
-
Page 129: Photo Search
Photo Search Launching Photo Search Search for photography locations in the current location or travel destinations, or use pictures taken by other people in those locations as a reference. The walking route from the current location to the desired photography location can also be displayed. -
Page 130: Viewing Pictures
6. Photo Search Viewing pictures From the Map view screen/Grid view screen > tap the picture to view. ≥ The picture is displayed in full screen. ≥ The control icons and thumbnail images are switched from show/hide each time the screen is tapped. Saving a favourite Up to 50 favourites can be saved. - Page 131 6. Photo Search Configuring various settings Configuring how location information is used ∫ Use the unit’s location information. With [Photo Search] launched > [ Turn the [Use Location services] checkbox on. ≥ If you turn the [Use Location services] checkbox off, functions such as route display and favourite notification that make use of the current location information will be disabled.
-
Page 132: Phone
Phone Calls can be made/received using the phone app, and voicemail services can be used. Usable services vary depending on your mobile network operator. For more information, contact your contracted mobile network operator. Emergency calls From the Home screen > [ ] >... -
Page 133: Putting A Call On Hold
7. Phone Making an international call From the Home screen > [ ] > [ Enter the telephone number in order of: + (tap and hold [0]) > country number > region number (area code) > telephone number. ≥ If the region number (area code) starts with “0”, omit the first “0” and enter the number. Tap [ Tap [ ] after the call has ended. -
Page 134: Answering A Call
7. Phone Answering a call When a call is being received, drag [ ] to [ ≥ To reject the call, drag [ ] to [ Tap [ ] after the call has ended. Turning the ringer off temporarily ∫ The ringer can be turned off temporarily when receiving a call. -
Page 135: Call Log
7. Phone Call log Making a call from the call log From the Home screen > [ ] > [ ≥ The Call log screen is displayed. ≥ The following icons are used in the call log to indicate different types of calls. ]: Outgoing calls ]: Answered calls ]: Missed calls... -
Page 136: Voicemail
7. Phone Voicemail The voicemail service can be used depending on the mobile network operator. A message is stored on the voicemail centre if a call is missed. For information, contact your contracted mobile network operator. Configure voicemail number Configure the number to connect to the voicemail centre. For information on the number to enter, contact your mobile network operator. -
Page 137: Caller Id Information
7. Phone Caller ID information Configure whether to show/hide your phone number to other person when making a call. From the Home screen > [ ] > [ ] > [Settings]. [GSM call settings] > [Additional settings]. [Caller ID] > select the item. Fixed Dialling Numbers Configuring Fixed Dialling Number (FDN) means calls cannot be made to telephone numbers that are not saved on the FDN list. -
Page 138: People
People Saving contacts The name, telephone numbers, email addresses and other contact details of friends and family members can be saved to contacts. ≥ Data can be synchronised using your Google account. From the Home screen > [ ] > [ ] >... -
Page 139: Displaying Contacts
8. People Displaying contacts From the Home screen > [ ] > [ ≥ The Contact list screen is displayed. 1 Contact list Display all saved contacts. ] > [Contacts to display]. ≥ To display contacts for each account, tap [ 2 Favourite contact list/Frequently used contact list Display contacts saved as favourites or frequently used contacts. -
Page 140: Managing Contacts
8. People Managing contacts Editing contacts From the Contact list screen > tap the contact to edit. ] > [Edit]. Edit the required details > [DONE]. ≥ Tapping [ ] saves an image. Deleting contacts From the Contact list screen > tap the contact to delete. ] >... - Page 141 8. People Creating groups From the Contact list screen > [ ] > [ ≥ Select the account if there are multiple accounts. Enter group name > [DONE]. ≥ Entering the contact name in the [Type person’s name] column and selecting the contact saves the contact in the group.
-
Page 142: Email/Messaging Email
Email/Messaging Email Configuring an email account From the Home screen > [ ] > [ Enter the email address and password > [Next]. Follow the guidance on the screen. ≥ When configuring an account manually, consult your email service provider for details about settings. Creating an email and sending From the Home screen >... - Page 143 9. Email/Messaging Reading received email From the Home screen > [ ] > [ ≥ The Email inbox list screen is displayed. ] > [Refresh]. ≥ To update the email inbox, tap [ ≥ If there are multiple accounts, tap [Inbox] to switch accounts. Tapping [Combined view] displays all emails.
- Page 144 9. Email/Messaging Switching folders From the Email inbox list screen > [Inbox] > tap folder to display. Configure email settings Configure general email settings ∫ From the Email inbox list screen > [ ] > [Settings] > [General settings]. Adding an email account ∫...
-
Page 145: Gmail
9. Email/Messaging Gmail™ Gmail can be sent and received using a Google account. ≥ Each Gmail operation is similar to email. For details about the operating method, refer to “Email” on P142. Creating a Gmail and sending From the Home screen > [ ] >... -
Page 146: Google Hangouts
9. Email/Messaging Google Hangouts™ Send and receive messages, pictures and other files with friends, or hold video conversations with a group. ≥ A Google account is required to use all functions. Launching [Hangouts] From the Home screen > [ ] > [ ≥... - Page 147 9. Email/Messaging Starting a video chat From the Hangout screen > [ Enter the name, email address or telephone number of the other person and select the contact. ≥ Saved contacts can also be selected. ≥ The Chat screen is displayed. ≥...
-
Page 148: Web Browser
Web browser Launching the web browser The unit can be used to browse web pages, manage bookmarks and download images and other files. ≥ Contact your mobile network operator regarding data plans and rates. ≥ Additional charges may be incurred for accessing the internet or downloading media files from the internet. For information, contact your contracted mobile network operator. - Page 149 10. Web browser Navigating while web pages are displayed Zooming in/zooming out ∫ Pinch out to zoom in, pinch in to zoom out. Double-tapping the screen also zooms in/out. Returning to the previous page ∫ ] > [ ≥ Tapping [ ] will also return to the previous page.
- Page 150 10. Web browser Using the browser options menu Tapping [ ] displays the options menu. [New tab] Opens a new tab. [New incognito tab] Opens a new incognito tab. [Bookmarks] Opens a bookmark. (P151) [Recent tabs] Displays tabs opened with computers or other devices. [History] Opens the history.
-
Page 151: Bookmarks
10. Web browser Bookmarks Adding bookmarks From the Home screen > [ ] > [ Display web page to add > [ ] > [ Edit the required details > [Save]. Opening bookmarks From the Home screen > [ ] > [ ] >... -
Page 152: Music
Music Google Play Music™ [Play Music] launches the app to play music. Copying music from a computer or other devices Connect the computer and unit with a microUSB cable (commercially available). ≥ For details on how to connect to a computer, refer to P170. Copy music data to the unit. -
Page 153: Using Playlists
11. Music Displaying My Library Display My Library to search for songs by [GENRES]/[ARTISTS]/[ALBUMS]/ [SONGS] categories. From the Home screen > [ ] > [ Flick the left edge of the screen to the right > [My Library]. Using playlists Create playlists and management your favourite songs. -
Page 154: Maps
Maps Location information service This unit is compatible with location information services that use GPS. Various apps can be used, including searching for nearby shops or restaurants, adding location information to pictures, or displaying your current location on maps. From the Home screen > [ ] >... -
Page 155: Google Maps
12. Maps Google Maps™ Check current location with the [Maps] app, or search for locations or routes. From the Home screen > [ ] > [ Enter search words into the search box to display the destination on the map. Search box Tap the search box to select nearby spots by category. -
Page 156: Other Apps And Functions
Other apps and functions The NFC function can be used to transfer data with other NFC-compatible devices, or directly display websites on the unit by swiping it over devices with integrated NFC modules or smart posters. ≥ Refer to for details on the NFC antenna. From the Home screen >... - Page 157 13. Other apps and functions Displaying files From the Home screen > [ ] > [ Tap the file to display. ≥ Tapping [ ] searches for files. ≥ Tapping [ ] displays file information, and individual settings can be changed. Scanning files From the Home screen >...
-
Page 158: Google Keep
13. Other apps and functions Google Keep™ Notes can be created easily. Notes are managed on the web via the Google account, and can be accessed from anywhere. Creating notes From the Home screen > [ ] > [ [Add quick note] > enter note. ≥... - Page 159 13. Other apps and functions Create list items Create list items with check boxes. A strike-through line is displayed in list items when the check box is selected, and is convenient for checking whether items have been completed. From the Home screen > [ ] >...
- Page 160 13. Other apps and functions Moving notes to archive From the Home screen > [ ] > [ Select note. Tap [ ≥ Horizontally flicking notes to move also sends them to the archive. Displaying archives From the Home screen > [ ] >...
-
Page 161: Calendar
13. Other apps and functions Calendar Manage schedules with the [Calendar] app. ≥ Data can be synchronised using your Google account. Changing the calendar display From the Home screen > [ ] > [ Tap the date area. Tap [Day]/[Week]/[Month]/[Agenda]. Display multiple calendars From the Home screen >... -
Page 162: Deleting Schedules
13. Other apps and functions Editing schedules From the Home screen > [ ] > [ Tap the schedule in day display/week display. Tap [ Edit schedules > [DONE]. Deleting schedules From the Home screen > [ ] > [ Tap the schedule in day display/week display. -
Page 163: Youtube
13. Other apps and functions YouTube™ Play YouTube videos or post motion pictures. Viewing motion pictures From the Home screen > [ ] > [ Tap the motion picture to view. ≥ This unit displays in landscape viewing mode. Searching motion pictures From the Home screen >... -
Page 164: Google Play
Google Play Google Play™ Store Search for fun games or useful apps in the [Play Store], and install them on the unit. From the Home screen > [ ] > [ Searching and installing apps. ≥ Google Wallet™ can be used for the payment of paid apps. ≥... -
Page 165: Deleting Apps
14. Google Play Deleting apps Deleting all data within apps Delete app data if the unit has become full in order to free up space on the unit. From the Home screen > [ ] > [ ] > [Apps]. [ALL] tab >... -
Page 166: Access Permissions
14. Google Play Access permissions Access permissions define what information or functions apps on the unit that apps can access. Unauthorised apps that steal personal or other information and send them to external locations may misuse access permissions. When installing apps, download them from trusted sits and check the access permissions. -
Page 167: Connecting To External Devices Bluetooth Wireless Technology
Connecting to external devices ® Bluetooth wireless technology Use Bluetooth wireless technology with this unit and Bluetooth-compatible devices. Transfer data with Bluetooth-compatible devices, or connect to wireless headsets to listen to music. Turning on the Bluetooth function From the Home screen > [ ] >... - Page 168 15. Connecting to external devices Changing the unit’s name The name of this unit displayed on the other device can be changed. From the Home screen > [ ] > [ ] > [Bluetooth]. ] > [Rename phone]. Enter the name > [Rename]. Unpairing a Bluetooth device From the Home screen >...
- Page 169 15. Connecting to external devices Deleting paired Bluetooth devices From the Home screen > [ ] > [ ] > [Bluetooth]. Tap [ ] of the Bluetooth device to delete from the [PAIRED DEVICES] column. Tap [Unpair]. Sending data to a Bluetooth device Select the data to send from the app.
-
Page 170: Usb Connections
15. Connecting to external devices USB connections Using USB storage Connect the unit and a computer with a microUSB cable (commercially available), and use it as a removable disk. This allows data to be backed up to the computer, or transfer data with the unit as USB storage. - Page 171 15. Connecting to external devices Using USB tethering You can connect the unit and computer with a microUSB cable (commercially available) to connect your computer to the internet via the unit. Connected the unit to a computer with a microUSB cable (commercially available).
-
Page 172: Printing
15. Connecting to external devices Printing Turn registered print services on/off or configure them. This allows printing from anywhere when combined with a cloud-compatible printer. ≥ Printing services are not registered at the point of purchase. Please download these separately. From the Home screen >... -
Page 173: Synchronise/Backup/Reset
Synchronise/Backup/Reset Synchronise and delete accounts Configure synchronisation settings for each account, such as calendars and contacts. ≥ For details on how to add accounts, refer to P31. Configuring synchronisation items From the Home screen > [ ] > [ Tap account type > tap account to configure. Turn on the checkbox for the data to synchronise. -
Page 174: Backup
16. Synchronise/Backup/Reset Backup Backup app data, settings and other items to a Google server. From the Home screen > [ ] > [ ] > [Backup & reset]. Turn the [Back up my data] checkbox on. Reset Reset the unit to factory default settings. ≥... -
Page 175: Security
Security Screen lock Configure the screen lock when recovering from sleep mode or other actions. Configuring the screen lock prevents unauthorised access to the unit. Configuring the screen lock From the Home screen > [ ] > [ ] > [Security] > [Screen lock]. Select the screen unlock method. -
Page 176: Sim Card Lock
17. Security SIM card lock The microSIM card can be locked to prevent unauthorised access to the unit. Once the SIM card is locked, the SIM PIN code must be entered every time the unit is turned on. ≥ Incorrectly entering the SIM PIN code 3 times locks the SIM PIN code and it can no longer be used. If this happens, enter a PUK (Personal Unblocking Key) to unlock the SIM PIN code. -
Page 177: Updates
≥ During system update, information specific to this unit (e.g. model, manufacturing number etc.) will be sent to the system update server of Panasonic. Panasonic will not use the information sent for purposes other than system update. ≥ The unit will restart after a system update. - Page 178 18. Updates Searching for software updates manually Check whether or not software updates are required, and if so, download the update file over the network. From the Home screen > [ ] > [ [About phone] > [System updates] > [Update over the network]. Follow the guidance on the screen.
-
Page 179: Settings List
Settings list Settings list Tap Home screen > [ ] > [ ] to configure various settings on the unit. Settings are grouped into the following categories. [Wi-Fi] Refer to for details. [Bluetooth] Refer to P167 for details. [Date usage] The data usage management screen is displayed, and the mobile data network usage (as a guideline) is displayed for each period of time or app. - Page 180 19. Settings list [Display] [Brightness] Refer to for details. [Display adjustment] Adjusts the display colour tones. [Wallpaper] Configures the wallpaper of the Home screen. [Auto-rotate screen] Automatically switches from vertical/horizontal display to suit the orientation of the unit. [Sleep] Refer to for details.
- Page 181 19. Settings list [Encrypt phone] Encrypts all data on the unit. [Set up SIM card lock] Refer to P176 for details. [Make passwords visible] Configures whether or not to display characters when entering the password. [Device administrators] Enables/disables administrator rights of the unit. [Unknown sources] Refer to P166...
- Page 182 19. Settings list [Date & time] [Automatic date & time] [Automatic time zone] [Set date] Refer to for details. [Set time] [Select time zone] [Use 24-hour format] Refer to for details. [Choose date format] Switches the date display method. [Power] [Fast Start-up] Increases the start speed within 24 hours after turning the unit off.
-
Page 183: Others
Others Troubleshooting First, try out the following procedures (P183–P188). Cannot turn the unit on. ≥ Check that the battery is adequately charged. Touch screen does not operate even when tapping it. ≥ Check that the unit is not in sleep mode. >... - Page 184 20. Others Cannot receive calls. ≥ The reception may be weak in the area. > Move to another area. ≥ Check that you are connected properly to the mobile network. Calls are being dropped. ≥ The reception may be weak in the area. >...
- Page 185 20. Others The microSIM card is locked. ≥ If [Set up SIM card lock] has been configured, the microSIM card is locked when the unit is turned on. > Enter SIM PIN code. The microSIM card is PUK-locked. ≥ Contact your mobile network operator. The screen is no displayed.
- Page 186 20. Others Recording ∫ The picture cannot be recorded. ≥ Is there any memory remaining on the built-in memory or the microSD card? > Delete the pictures which are not necessary to increase available space in the memory. (P126) ≥ You may not be able to record for a short while after turning this unit on when using a large capacity microSD card. The recorded picture is whitish.
- Page 187 20. Others The brightness or the hue of the recorded picture is different from the actual scene. ≥ When recording under fluorescent or LED lighting fixture, etc., increasing the shutter speed may introduce slight changes to brightness and colour. These are a result of the characteristics of the light source and do not indicate a malfunction.
- Page 188 20. Others Striping or flicker appears under lighting such as a fluorescent or LED lighting fixture. The subject appears distorted. ≥ This is characteristic of MOS sensors which serve as the unit’s pickup sensors. This is not a malfunction. When a subject moves across the image very fast, the subject may appear slightly distorted. A clicking sound is recorded in the motion pictures.
-
Page 189: Cautions For Use
≥ This unit is equipped with GPS functionality, however must not be used as aircraft, vehicle or personal navigation device, or precision surveying device. Panasonic shall not be liable for all damages suffered as a result of inaccurate measurements and information that are caused by external factors (including running out of battery power) e.g. use of this unit outside of its intended purpose, or malfunctions and wrong operations of this unit etc. - Page 190 20. Others About the lens, screen ∫ ≥ If there is liquid or sand on the unit, wipe it with a soft, dry cloth. ≥ If the lens is dirty, lightly wipe the surface with a soft dry cloth. ≥ Do not press the lens with excessive force. ≥...
- Page 191 Contact the dealer or Panasonic for replacement of the battery. ≥ When the battery is replaced, your personal information will be deleted and settings will return to their default settings.
- Page 192 Bluetooth SIG, Inc. and any use of such marks by Panasonic Corporation is under licence. Other trademarks and trade names are those of their respective owners. ≥ The Wi-Fi CERTIFIED™ Logo is a certification mark of Wi-Fi ®...
- Page 193 LGPL as published by the Free Software Foundation. At least three (3) years from delivery of products, Panasonic Corporation will give to any third party who contacts us at the contact information provided below, for a charge no more than our cost of physically performing source code distribution, a complete machine-readable copy of the corresponding source code covered under GPL v2 and LGPL.
- Page 194 Ecodesign information The following are ecodesign information required by Commission Regulation (EC) No.1275/2008 amended by (EU) No.801/2013. 1) The power consumption of the product in networked standby is approximately 0.8 W if all wired network ports are connected and all wireless network ports are activated.