Table of Contents
Advertisement
COMPACT COMPONENT SYSTEM
MX-SK3—
MX-SK1—
(SP-XSSK3)
STANDBY/ON
SLEEP
AUX
FM MODE
FM/AM
VIDEO INTRO
ON SCREEN
HIGHLIGHT
PREV.
NEXT
SET
RETURN
ENTER
PBC
STILL
KEY CONTROL
1
2
3
DISC
DISC
DISC
DISC
REPEAT PROGRAM RANDOM
PROGRAM
CANCEL
SOUND
TAPE-A
REC
TAPE-B
TURBO
START/STOP
SOUND
MODE
KARAOKE
MPX
ACTIVE
FADE
BASS EX.
ECHO
MUTING
VOLUME
REMOTE CONTROL
(SP-XSK3)
SP-MXSK3
Consists of CA-MXSK3 and SP-MXSK3
CA-MXSK3 SP-MXSK3
Consists of CA-MXSK1 and SP-MXSK1
CA-MXSK1 SP-MXSK1
M X - S K 3
COMPACT
DIGITAL VIDEO
DISC
SELECT
ACTIVE
BASS EX.
PHONES
SELECT
EJECT
EJECT
CA-MXSK3
STANDBY/ON
SLEEP
AUX
FM MODE
FM/AM
VIDEO INTRO
ON SCREEN
HIGHLIGHT
PREV.
NEXT
SET
RETURN
ENTER
PBC
STILL
KEY CONTROL
DISC
1
DISC
2
DISC
3
DISC
PROGRAM
REPEAT PROGRAM RANDOM
CANCEL
SOUND
REC
TURBO
TAPE-A
START/STOP
TAPE-B
SOUND
MODE
KARAOKE
MPX
ACTIVE
FADE
BASS EX.
ECHO
MUTING
VOLUME
REMOTE CONTROL
SP-MXSK1
INSTRUCTIONS
(SP-XSSK3)
(SP-XSK3)
SP-MXSK3
M X - S K 1
COMPACT
DIGITAL VIDEO
ACTIVE
BASS EX.
PHONES
EJECT
EJECT
CA-MXSK1
DISC
SELECT
SELECT
SP-MXSK1
COMPACT
COMPACT
DIGITAL AUDIO
DIGITAL VIDEO
GVT0120-001C
[US, UN]
Advertisement
Chapters
Table of Contents
Troubleshooting

Related Manuals for JVC CA-MXSK1


Summary of Contents for JVC CA-MXSK1
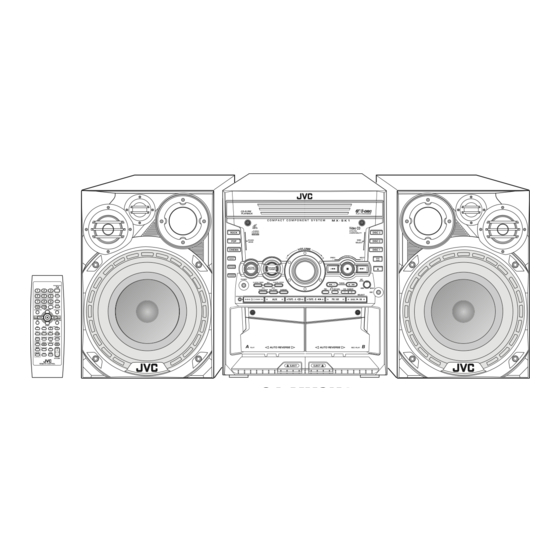
- Page 1 COMPACT COMPONENT SYSTEM MX-SK3— Consists of CA-MXSK3 and SP-MXSK3 MX-SK1— Consists of CA-MXSK1 and SP-MXSK1 (SP-XSSK3) PHONES STANDBY/ON SLEEP FM MODE FM/AM VIDEO INTRO ON SCREEN HIGHLIGHT PREV. NEXT RETURN ENTER STILL KEY CONTROL DISC DISC DISC DISC REPEAT PROGRAM RANDOM...
- Page 2 CAUTION — f f f f f / I button! Disconnect the mains plug to shut the power off completely (the f f f f f / I STANDBY/ON lamp goes off). The button in any position does not disconnect the mains line. •...
- Page 3 Place on the level surface. Maintain an adequate air path for ventilation by placing on a stand with a height of 10 cm or more. 1 cm 15 cm CA-MXSK3 CA-MXSK1 15 cm 1 cm 15 cm – G-2 –...
- Page 4 – G-3 –...
- Page 5 Introduction We would like to thank you for purchasing one of our JVC products. Before operating this unit, read this manual carefully and thoroughly to obtain the best possible performance from your unit, and retain this manual About This Manual This manual is organized as follows: •...
-
Page 6: Table Of Contents
Contents Location of the Buttons and Controls ... 3 Remote Control ... 3 Front Panel ... 4 Getting Started ... 6 Supplied Accessories ... 6 Putting the Batteries into the Remote Control ... 6 Connecting Antennas ... 6 Connecting Speakers ... 7 Surround Speakers ... -
Page 7: Location Of The Buttons And Controls
Location of the Buttons and Controls Remote Control STANDBY/ON SLEEP REV. MODE FM/AM ON SCREEN VIDEO INTRO HIGHLIGHT PREV. ENTER STILL KEY CONTROL DISC DISC DISC PROGRAM REPEAT PROGRAM RANDOM CANCEL SOUND TAPE-A TAPE-B TURBO START/STOP SOUND MPX/ MODE KARAOKE FM MODE ACTIVE FADE... -
Page 8: Front Panel
Continued Become familiar with the buttons and controls on your unit. Front Panel Front Panel C O M P A C T C O M P O N E N T S Y S T E M M X - S K 3 COMPACT DIGITAL VIDEO DISC... - Page 9 Display Window MP3 MONO S.MODE ACTIVE SOUND RDS TA BASS EX. TURBO NEWS INFO SLEEP DAILY See pages in the parentheses for details. Front Panel 1 VOLUME + / – control (10, 26 – 27) 2 SOUND TURBO button (10) 3 ACTIVE BASS EX.
-
Page 10: Getting Started
Getting Started Supplied Accessories Make sure that you have all the following items. The number in the parentheses indicates the quantity of the pieces supplied. • AM loop antenna (1) • FM antenna (1) • Remote control (1) • Batteries (2) •... -
Page 11: Connecting Speakers
AM antenna Vinyl-covered wire (not supplied) ANTENNA FM 75Ω COAXIAL AM loop antenna (supplied) Connect the AM loop antenna to the AM LOOP terminals as illustrated. • If the AM loop antenna wire is covered with vinyl, remove the vinyl by twisting it as shown in the diagram. -
Page 12: Surround Speakers
Surround Speakers For Model CA-MXSK3 To connect surround speakers. SURROUND SPEAKERS CAUTION: SPEAKER IMPEDANCE 16 ~ 32 Ω • Connect the right rear speaker to the RIGHT jack. • Connect the left rear speaker to the LEFT jack. How to install Surround Speakers •... -
Page 13: Common Operations
Common Operations Turning On or Off the Power To turn on the unit, press STANDBY/ON so that the STANDBY lamp goes off. To turn off the unit (on standby), press again so that the STANDBY lamp lights up. • A little power is always consumed even while the unit is on standby. -
Page 14: Selecting The Sources
Selecting the Sources To listen to the FM/AM broadcasts, press FM/AM. (See page 12.) To playback CDs, press DISC 3¥8. (See pages 13 – 16.) To playback tapes, press TAPE-A 2 3 or TAPE-B 2 3. (See page 23.) To select the external equipment as the source, press AUX. When you press the play button for a particular source (FM/AM, DISC 3/8, TAPE-A 2 3, TAPE-B 2 3 and AUX), the unit turns on (and the unit starts playing the source... -
Page 15: Selecting The Sound Modes
Selecting the Sound Modes You can select one of the 3 SEA (Sound Effect Amplifier) modes. This function only affects the playback sound, but does not affect your recording. On the unit: Press the sound mode button you want to get the effect of ROCK, POP, or CINEMA. -
Page 16: Listening To Fm And Am Broadcasts
Listening to FM and AM Broadcasts Tuning in a Station Press FM/AM. The unit automatically turns on and tunes in the previously tuned station (either FM or AM). • Each time you press the button, the band alternates between FM and AM. Start searching for stations. -
Page 17: Playing Back Cds (Cd/Cd-R/Cd-Rw)
Playing Back CDs (CD/CD-R/CD-RW) This unit has been designed to playback the following CDs: • CD (Audio CD) • CD-R (CD-Recordable) • CD-RW (CD-ReWritable) Continuous use of irregular shape CDs (heart-shape, octagonal, etc.) can damage the System. General Notes In general, you will have the best performance by keeping your CDs and the mechanism clean. -
Page 18: Playing Back The Entire Discs - Continuous Play
Playing Back the Entire Discs — Continuous Play Load CDs. Press one of the disc number buttons (DISC 1, DISC 2 and DISC 3) for the disc you want to play. CD starts playing from the first track of the selected disc. Elapsed playing time Selected disc indicator Track number... -
Page 19: Programming The Playing Order Of The Tracks - Program Play
Programming the Playing Order of the Tracks — Program Play You can arrange the order in which tracks play before you start playing. You can program up to 32 tracks. • To use Repeat play (see page 16) for Program play, press REPEAT after starting Program play. -
Page 20: Playing At Random - Random Play
Playing at Random — Random Play The tracks of all loaded CDs will play at random. • To use Repeat play for Random play, press REPEAT after starting Random play. Load CDs. • If the current playing source is not the CD player, press DISC 3¥8, then 7 before going to the next step. -
Page 21: Playing Back Video Cds
Playing Back Video CDs Selecting Video Output (PAL, PAL AUTO, NTSC) You can set this setting in Standby mode. Before playing a VCD, use the buttons on the unit to select a video output mode to match your TV system. Video output is preset for PAL. -
Page 22: Playing Video Cds With Pbc Function - Menu Play
Playing Video CDs with PBC Function — Menu Play This System provides Playback Control (PBC) which utilizes a procedure (menu selection) programmed in a video CD. The playback operation procedure may differ depending on the disc you use. For Menu Play, use the following buttons: (PBC mode must be turned on before operating Menu Play.) On the unit: NEXT + (¢) ... -
Page 23: Playing Video Cds Without Pbc - Continuous Play
Cancelling PBC • After cancelling PBC, you can Continuously Play more than one video CD without PBC. • When PBC is cancelled, some images such as still play pictures may not be played back. • You cannot change from PBC OFF to PBC ON while CD is playing. Reminder! Do not pause Video CD for more than 10 minutes to prevent screen burns. -
Page 24: Playing A Multiplex Sound Cd
The TV screen will show the following: 08/10 00:07 DISC 2 VIDEO INTRO ¢ Press the number button for the video intro you want to select. Playback starts from the selected track. To stop and cancel the video intro play, press 7. Viewing the Highlights of a Video CD You can view highlight scenes of the selected track on a video CD only when PBC is off. -
Page 25: Mp3 Disc Playback
MP3 Disc Playback About MP3 discs An MP3 disc can have several folders (albums). Tracks are contained within the albums. The player will only recognize up to 76 albums. Total number of tracks recognizable is 999. Recording your own MP3 discs •... - Page 26 Select a track from the CD selected in the above step. On the unit Press PRESET NEXT + (¢) or PREV. – (4), then press SET button. On the remote control: Press ¢ (NEXT ¡) or 4 (PREV. 1), then press ENTER button or SET button.
-
Page 27: Playing Back Tapes
Playing Back Tapes You can playback type I, type II and type IV tapes without changing any settings. Playing Back a Tape Press EJECT (0) for the deck you want to use. For Deck A Put a cassette in with the exposed part of the tape down. -
Page 28: Recording
Recording IMPORTANT: • It may be unlawful to record or play back copyrighted material without the consent of the copyright owner. • The recording level is automatically set correctly, so it is not affected by the VOLUME, the ACTIVE BASS EX., the SOUND TURBO, and the SOUND MODE. -
Page 29: Dubbing Tapes
To record on both sides — Reverse Mode Press REVERSE MODE so that the Reverse Mode indicator lights up – • When using Reverse Mode for recording, start recording in the forward direction first. Otherwise, recording will stop when recording is done only on one side (reverse) of the tape. -
Page 30: Using The Microphones
Using the Microphones You can enjoy singing along (Karaoke) and microphone mixing using a microphone. IMPORTANT: • Always set MIC LEVEL to MIN when connecting or disconnecting the microphone. • When not using the microphone, keep it disconnected. Singing along — Karaoke Karaoke Karaoke reduces the lead vocal of the playing source, and allows you to replace it by singing into the microphone as the... -
Page 31: Recording Your Singing
Recording Your Singing You can adjust the music key using the remote control. Follow the steps in “Singing Along with Multiplex Karaoke Discs (MPX)” on page 26. Follow the steps in “Recording a Tape on Deck B” on page 24 to record your singing. Adjusting the Music Key Control (for CD play only) On the remote control ONLY:... -
Page 32: Using The Timers
Using the Timers There are three timers available — Daily Timer, Recording Timer and Sleep Timer. Before using the timers, you need to set the clock built in the unit. (See page 9.) Using Daily Timer and Recording Timer With Daily Timer, you can wake to your favorite music or radio program. - Page 33 Select the timer (Daily Timer or Recording Timer) with the source to play. On the unit: Press 4 PREV. or ¢ NEXT to select the timer, then press CLOCK/TIMER. • Each time you press (¢) or (4), the timer mode and the source change as follows: TUNER DAILY TAPE...
-
Page 34: Using Sleep Timer
Using Sleep Timer With Sleep Timer, you can fall asleep to music. You can set Sleep Timer only while the unit is turned on. How Sleep Timer actually works The unit automatically turns off after the specified time length passes. On the remote control ONLY: Press SLEEP. -
Page 35: Maintenance
Maintenance To get the best performance of the unit, keep your discs, tapes, and mechanism clean. Handling discs • Remove the disc from its case by holding it at the edge while pressing the center hole lightly. • Do not touch the shiny surface of the disc, or bend the disc. -
Page 36: Troubleshooting
Troubleshooting If you have a problem with your unit, check this list for a possible solution before calling for service. If you cannot solve the problem from the hints given here, or the unit has been physically damaged, call a qualified person, such as your dealer, for service. -
Page 37: Specifications
Specifications CA-MXSK3 Amplifier section Output Power MAIN SPEAKERS: 80 W per channel, min. RMS, both channels driven into 6 Ω at 1 kHz with no more than 0.9% total harmonic distortion. SURROUND SPEAKER: 20 W per channel, min. RMS, both channels driven into 16 Ω... - Page 38 CA-MXSK1 Amplifier section Output Power MAIN SPEAKERS: 64 W per channel, min. RMS, both channels driven into 6 Ω at 1 kHz with no more than 0.9% total harmonic distortion. Audio input sensitivity/Impedance (Measured at 1 kHz, with tape recording signal 300 mV) AUX: 400 mV/50 kΩ...
- Page 39 Mains (AC) Line Instruction (not applicable for Europe, U.S.A., Canada, Australia, and U.K.) 110V 220V IMPORTANT for mains (AC) line BEFORE PLUGGING IN, do check that your mains (AC) line voltage corresponds with the position of the voltage selector switch provided on the outside of this equipment and, if different, reset the voltage selector switch, to prevent from damage or risk of fire/electric shock.
- Page 40 COMPACT COMPONENT SYSTEM ÁœdA È«eł« UÐ vL² OÝ W³ÂdÄ WOðu … MX-SK3— Consists of CA-MXSK3 and SP-MXSK3 MX-SK1— Consists of CA-MXSK1 and SP-MXSK1 (SP-XSSK3) ACTIVE BASS EX. PHONES STANDBY/ON SLEEP FM MODE FM/AM VIDEO INTRO ON SCREEN HIGHLIGHT PREV. NEXT...
- Page 41 CAUTION — f f f f f / I button! Disconnect the mains plug to shut the power off completely (the f f f f f / I STANDBY/ON lamp goes off). The button in any position does not disconnect the mains line. •...
- Page 42 Place on the level surface. Maintain an adequate air path for ventilation by placing on a stand with a height of 10 cm or more. 1 cm 15 cm CA-MXSK3 CA-MXSK1 15 cm 1 cm 15 cm – G-2 –...
-
Page 43: Important For Laser Products
IMPORTANT FOR LASER PRODUCTS 1. CLASS 1 LASER PRODUCT 2. CAUTION: Do not open the top cover. There are no user serviceable parts inside the unit; leave all servicing to qualified service personnel. 3. CAUTION: Visible and invisible laser radiation when open and interlock failed or defeated. - Page 44 Introduction We would like to thank you for purchasing one of our JVC products. Before operating this unit, read this manual carefully and thoroughly to obtain the best possible performance from your unit, and retain this manual About This Manual This manual is organized as follows: •...
- Page 45 Contents Location of the Buttons and Controls ... 3 Remote Control ... 3 Front Panel ... 4 Getting Started ... 6 Supplied Accessories ... 6 Putting the Batteries into the Remote Control ... 6 Connecting Antennas ... 6 Connecting Speakers ... 7 Surround Speakers ...
-
Page 46: Location Of The Buttons And Controls
Location of the Buttons and Controls Remote Control STANDBY/ON SLEEP REV. MODE FM/AM ON SCREEN VIDEO INTRO HIGHLIGHT PREV. ENTER STILL KEY CONTROL DISC DISC DISC PROGRAM REPEAT PROGRAM RANDOM CANCEL SOUND TAPE-A TAPE-B TURBO START/STOP SOUND MPX/ MODE KARAOKE FM MODE ACTIVE FADE... -
Page 47: Front Panel
Continued Become familiar with the buttons and controls on your unit. Front Panel Front Panel C O M P A C T C O M P O N E N T S Y S T E M M X - S K 3 COMPACT DIGITAL VIDEO DISC... - Page 48 Display Window MP3 MONO S.MODE ACTIVE SOUND RDS TA BASS EX. TURBO NEWS INFO SLEEP DAILY See pages in the parentheses for details. Front Panel 1 VOLUME + / – control (10, 26 – 27) 2 SOUND TURBO button (10) 3 ACTIVE BASS EX.
-
Page 49: Getting Started
Getting Started Supplied Accessories Make sure that you have all the following items. The number in the parentheses indicates the quantity of the pieces supplied. • AM loop antenna (1) • FM antenna (1) • Remote control (1) • Batteries (2) •... -
Page 50: Connecting Speakers
AM antenna Vinyl-covered wire (not supplied) ANTENNA FM 75Ω COAXIAL AM loop antenna (supplied) Connect the AM loop antenna to the AM LOOP terminals as illustrated. • If the AM loop antenna wire is covered with vinyl, remove the vinyl by twisting it as shown in the diagram. -
Page 51: Surround Speakers
Surround Speakers For Model CA-MXSK3 To connect surround speakers. SURROUND SPEAKERS CAUTION: SPEAKER IMPEDANCE 16 ~ 32 Ω • Connect the right rear speaker to the RIGHT jack. • Connect the left rear speaker to the LEFT jack. How to install Surround Speakers •... -
Page 52: Common Operations
Common Operations Turning On or Off the Power To turn on the unit, press STANDBY/ON so that the STANDBY lamp goes off. To turn off the unit (on standby), press again so that the STANDBY lamp lights up. • A little power is always consumed even while the unit is on standby. -
Page 53: Selecting The Sources
Selecting the Sources To listen to the FM/AM broadcasts, press FM/AM. (See page 12.) To playback CDs, press DISC 3¥8. (See pages 13 – 16.) To playback tapes, press TAPE-A 2 3 or TAPE-B 2 3. (See page 23.) To select the external equipment as the source, press AUX. When you press the play button for a particular source (FM/AM, DISC 3/8, TAPE-A 2 3, TAPE-B 2 3 and AUX), the unit turns on (and the unit starts playing the source... -
Page 54: Selecting The Sound Modes
Selecting the Sound Modes You can select one of the 3 SEA (Sound Effect Amplifier) modes. This function only affects the playback sound, but does not affect your recording. On the unit: Press the sound mode button you want to get the effect of ROCK, POP, or CINEMA. -
Page 55: Listening To Fm And Am Broadcasts
Listening to FM and AM Broadcasts Tuning in a Station Press FM/AM. The unit automatically turns on and tunes in the previously tuned station (either FM or AM). • Each time you press the button, the band alternates between FM and AM. Start searching for stations. -
Page 56: Playing Back Cds (Cd/Cd-R/Cd-Rw)
Playing Back CDs (CD/CD-R/CD-RW) This unit has been designed to playback the following CDs: • CD (Audio CD) • CD-R (CD-Recordable) • CD-RW (CD-ReWritable) Continuous use of irregular shape CDs (heart-shape, octagonal, etc.) can damage the System. General Notes In general, you will have the best performance by keeping your CDs and the mechanism clean. -
Page 57: Playing Back The Entire Discs - Continuous Play
Playing Back the Entire Discs — Continuous Play Load CDs. Press one of the disc number buttons (DISC 1, DISC 2 and DISC 3) for the disc you want to play. CD starts playing from the first track of the selected disc. Elapsed playing time Selected disc indicator Track number... -
Page 58: Programming The Playing Order Of The Tracks - Program Play
Programming the Playing Order of the Tracks — Program Play You can arrange the order in which tracks play before you start playing. You can program up to 32 tracks. • To use Repeat play (see page 16) for Program play, press REPEAT after starting Program play. -
Page 59: Playing At Random - Random Play
Playing at Random — Random Play The tracks of all loaded CDs will play at random. • To use Repeat play for Random play, press REPEAT after starting Random play. Load CDs. • If the current playing source is not the CD player, press DISC 3¥8, then 7 before going to the next step. -
Page 60: Playing Back Video Cds
Playing Back Video CDs Selecting Video Output (PAL, PAL AUTO, NTSC) You can set this setting in Standby mode. Before playing a VCD, use the buttons on the unit to select a video output mode to match your TV system. Video output is preset for PAL. -
Page 61: Playing Video Cds With Pbc Function - Menu Play
Playing Video CDs with PBC Function — Menu Play This System provides Playback Control (PBC) which utilizes a procedure (menu selection) programmed in a video CD. The playback operation procedure may differ depending on the disc you use. For Menu Play, use the following buttons: (PBC mode must be turned on before operating Menu Play.) On the unit: NEXT + (¢) ... -
Page 62: Playing Video Cds Without Pbc - Continuous Play
Cancelling PBC • After cancelling PBC, you can Continuously Play more than one video CD without PBC. • When PBC is cancelled, some images such as still play pictures may not be played back. • You cannot change from PBC OFF to PBC ON while CD is playing. Reminder! Do not pause Video CD for more than 10 minutes to prevent screen burns. -
Page 63: Playing A Multiplex Sound Cd
The TV screen will show the following: 08/10 00:07 DISC 2 VIDEO INTRO ¢ Press the number button for the video intro you want to select. Playback starts from the selected track. To stop and cancel the video intro play, press 7. Viewing the Highlights of a Video CD You can view highlight scenes of the selected track on a video CD only when PBC is off. -
Page 64: Mp3 Disc Playback
MP3 Disc Playback About MP3 discs An MP3 disc can have several folders (albums). Tracks are contained within the albums. The player will only recognize up to 76 albums. Total number of tracks recognizable is 999. Recording your own MP3 discs •... - Page 65 Select a track from the CD selected in the above step. On the unit Press PRESET NEXT + (¢) or PREV. – (4), then press SET button. On the remote control: Press ¢ (NEXT ¡) or 4 (PREV. 1), then press ENTER button or SET button.
-
Page 66: Playing Back Tapes
Playing Back Tapes You can playback type I, type II and type IV tapes without changing any settings. Playing Back a Tape Press EJECT (0) for the deck you want to use. For Deck A Put a cassette in with the exposed part of the tape down. -
Page 67: Recording
Recording IMPORTANT: • It may be unlawful to record or play back copyrighted material without the consent of the copyright owner. • The recording level is automatically set correctly, so it is not affected by the VOLUME, the ACTIVE BASS EX., the SOUND TURBO, and the SOUND MODE. -
Page 68: Dubbing Tapes
To record on both sides — Reverse Mode Press REVERSE MODE so that the Reverse Mode indicator lights up – • When using Reverse Mode for recording, start recording in the forward direction first. Otherwise, recording will stop when recording is done only on one side (reverse) of the tape. -
Page 69: Using The Microphones
Using the Microphones You can enjoy singing along (Karaoke) and microphone mixing using a microphone. IMPORTANT: • Always set MIC LEVEL to MIN when connecting or disconnecting the microphone. • When not using the microphone, keep it disconnected. Singing along — Karaoke Karaoke Karaoke reduces the lead vocal of the playing source, and allows you to replace it by singing into the microphone as the... -
Page 70: Recording Your Singing
Recording Your Singing You can adjust the music key using the remote control. Follow the steps in “Singing Along with Multiplex Karaoke Discs (MPX)” on page 26. Follow the steps in “Recording a Tape on Deck B” on page 24 to record your singing. Adjusting the Music Key Control (for CD play only) On the remote control ONLY:... -
Page 71: Using The Timers
Using the Timers There are three timers available — Daily Timer, Recording Timer and Sleep Timer. Before using the timers, you need to set the clock built in the unit. (See page 9.) Using Daily Timer and Recording Timer With Daily Timer, you can wake to your favorite music or radio program. - Page 72 Select the timer (Daily Timer or Recording Timer) with the source to play. On the unit: Press 4 PREV. or ¢ NEXT to select the timer, then press CLOCK/TIMER. • Each time you press (¢) or (4), the timer mode and the source change as follows: TUNER DAILY TAPE...
-
Page 73: Using Sleep Timer
Using Sleep Timer With Sleep Timer, you can fall asleep to music. You can set Sleep Timer only while the unit is turned on. How Sleep Timer actually works The unit automatically turns off after the specified time length passes. On the remote control ONLY: Press SLEEP. -
Page 74: Maintenance
Maintenance To get the best performance of the unit, keep your discs, tapes, and mechanism clean. Handling discs • Remove the disc from its case by holding it at the edge while pressing the center hole lightly. • Do not touch the shiny surface of the disc, or bend the disc. -
Page 75: Troubleshooting
Troubleshooting If you have a problem with your unit, check this list for a possible solution before calling for service. If you cannot solve the problem from the hints given here, or the unit has been physically damaged, call a qualified person, such as your dealer, for service. -
Page 76: Specifications
Specifications CA-MXSK3 Amplifier section Output Power MAIN SPEAKERS: 80 W per channel, min. RMS, both channels driven into 6 Ω at 1 kHz with no more than 0.9% total harmonic distortion. SURROUND SPEAKER: 20 W per channel, min. RMS, both channels driven into 16 Ω... - Page 77 CA-MXSK1 Amplifier section Output Power MAIN SPEAKERS: 64 W per channel, min. RMS, both channels driven into 6 Ω at 1 kHz with no more than 0.9% total harmonic distortion. Audio input sensitivity/Impedance (Measured at 1 kHz, with tape recording signal 300 mV) AUX: 400 mV/50 kΩ...
- Page 78 Mains (AC) Line Instruction (not applicable for Europe, U.S.A., Canada, Australia, and U.K.) ( )ﻏﻴﺮ ﻗﺎﺑﻞ اﺳﺘﻔﺎده ﺑﺮاى اروﭘﺎ, آﻣﺮﻳﻜﺎ, ﻛﺎﻧﺎدا, اﺳﺘﺮاﻟﻴﺎ و 110V 220V IMPORTANT for mains (AC) line BEFORE PLUGGING IN, do check that your mains (AC) line voltage corresponds with the position of the voltage selector switch provided on the outside of this equipment and, if differ- ent, reset the voltage selector switch, to prevent...
- Page 79 START/STOP SOUND MODE KARAOKE ACTIVE FADE BASS EX. ECHO MUTING VOLUME REMOTE CONTROL SP-MXSK1 Consists of CA-MXSK1 and SP-MXSK1 CA-MXSK1 ve SP-MXSK1’den Olusur M X - S K 1 COMPACT DIGITAL VIDEO ACTIVE BASS EX. PHONES EJECT EJECT CA-MXSK1 DISC...
- Page 80 CAUTION — f f f f f / I button! Disconnect the mains plug to shut the power off completely (the f f f f f / I STANDBY/ON lamp goes off). The button in any position does not disconnect the mains line. •...
- Page 81 3 Bottom: Place on the level surface. Maintain an adequate air path for ventilation by placing on a stand with a height of 10 cm or more. 1 cm 15 cm CA-MXSK1 15 cm 1 cm 15 cm – G-2 –...
- Page 82 IMPORTANT FOR LASER PRODUCTS 1. CLASS 1 LASER PRODUCT 2. CAUTION: Do not open the top cover. There are no user serviceable parts inside the unit; leave all servicing to qualified service personnel. 3. CAUTION: Visible and invisible laser radiation when open and interlock failed or defeated.
- Page 83 Introduction We would like to thank you for purchasing one of our JVC products. Before operating this unit, read this manual carefully and thoroughly to obtain the best possible performance from your unit, and retain this manual About This Manual This manual is organized as follows: •...
- Page 84 Contents Location of the Buttons and Controls ... 3 Remote Control ... 3 Front Panel ... 4 Getting Started ... 6 Supplied Accessories ... 6 Putting the Batteries into the Remote Control ... 6 Connecting Antennas ... 6 Connecting Speakers ... 7 Connecting Other Equipment ...
-
Page 85: Remote Control
Location of the Buttons and Controls Remote Control STANDBY/ON SLEEP REV. MODE ON SCREEN VIDEO INTRO HIGHLIGHT PREV. ENTER STILL KEY CONTROL DISC DISC DISC PROGRAM REPEAT PROGRAM RANDOM CANCEL SOUND TAPE-A TAPE-B TURBO START/STOP MPX/ SOUND KARAOKE MODE FM MODE ACTIVE FADE BASS EX. -
Page 86: Front Panel
Continued Become familiar with the buttons and controls on your unit. Front Panel Front Panel C O M P A C T C O M P O N E N T S Y S T E M M X - S K 1 COMPACT DIGITAL VIDEO DISC... - Page 87 Display Window S.MODE MP3 MONO ACTIVE SOUND RDS TA BASS EX. TURBO NEWS INFO SLEEP DAILY See pages in the parentheses for details. Front Panel 1 VOLUME + / – control (10, 26 – 27) 2 SOUND TURBO button (10) 3 ACTIVE BASS EX.
-
Page 88: Getting Started
Getting Started Supplied Accessories Make sure that you have all the following items. The number in the parentheses indicates the quantity of the pieces supplied. • AM loop antenna (1) • FM antenna (1) • Remote control (1) • Batteries (2) •... -
Page 89: Connecting Speakers
AM antenna Vinyl-covered wire (not supplied) ANTENNA FM 75Ω COAXIAL AM loop antenna (supplied) Connect the AM loop antenna to the AM LOOP terminals as illustrated. • If the AM loop antenna wire is covered with vinyl, remove the vinyl by twisting it as shown in the diagram. -
Page 90: Connecting Other Equipment
Connecting Other Equipment You can connect both analog and digital equipment. • DO NOT connect any equipment while the power is on. • DO NOT plug in any equipment until all connections are complete. To connect an analog component Be sure that the plugs of the audio cords are coloured: White plugs and jacks are for left audio signals, and red ones for right audio signals. -
Page 91: Common Operations
Common Operations Turning On or Off the Power To turn on the unit, press STANDBY/ON so that the STANDBY lamp goes off. To turn off the unit (on standby), press again so that the STANDBY lamp lights up. • A little power is always consumed even while the unit is on standby. -
Page 92: Selecting The Sources
Selecting the Sources To listen to the FM/AM broadcasts, press FM/AM. (See page 12.) To playback CDs, press DISC 3¥8. (See pages 13 – 16.) To playback tapes, press TAPE-A 2 3 or TAPE-B 2 3. (See page 23.) To select the external equipment as the source, press AUX. When you press the play button for a particular source (FM/AM, DISC 3/8, TAPE-A 2 3, TAPE-B 2 3 and AUX), the unit turns on (and the unit starts playing the source... -
Page 93: Selecting The Sound Modes
Selecting the Sound Modes You can select one of the 3 SEA (Sound Effect Amplifier) modes. This function only affects the playback sound, but does not affect your recording. On the unit: Press the sound mode button you want to get the effect of ROCK, POP, or CINEMA. -
Page 94: Listening To Fm And Am Broadcasts
Listening to FM and AM Broadcasts Tuning in a Station Press FM/AM. The unit automatically turns on and tunes in the previously tuned station (either FM or AM). • Each time you press the button, the band alternates between FM and AM. Start searching for stations. -
Page 95: Playing Back Cds (Cd/Cd-R/Cd-Rw)
Playing Back CDs (CD/CD-R/CD-RW) This unit has been designed to playback the following CDs: • CD (Audio CD) • CD-R (CD-Recordable) • CD-RW (CD-ReWritable) Continuous use of irregular shape CDs (heart-shape, octagonal, etc.) can damage the System. General Notes In general, you will have the best performance by keeping your CDs and the mechanism clean. -
Page 96: Playing Back The Entire Discs - Continuous Play
Playing Back the Entire Discs — Continuous Play Load CDs. Press one of the disc number buttons (DISC 1, DISC 2 and DISC 3) for the disc you want to play. CD starts playing from the first track of the selected disc. Elapsed playing time Selected disc indicator Track number... -
Page 97: Programming The Playing Order Of The Tracks - Program Play
Programming the Playing Order of the Tracks — Program Play You can arrange the order in which tracks play before you start playing. You can program up to 32 tracks. • To use Repeat play (see page 16) for Program play, press REPEAT after starting Program play. -
Page 98: Playing At Random - Random Play
Playing at Random — Random Play The tracks of all loaded CDs will play at random. • To use Repeat play for Random play, press REPEAT after starting Random play. Load CDs. • If the current playing source is not the CD player, press DISC 3¥8, then 7 before going to the next step. -
Page 99: Playing Back Video Cds
Playing Back Video CDs Selecting Video Output (PAL, PAL AUTO, NTSC) You can set this setting in Standby mode. Before playing a VCD, use the buttons on the unit to select a video output mode to match your TV system. Video output is preset for PAL. -
Page 100: Playing Video Cds With Pbc Function - Menu Play
Playing Video CDs with PBC Function — Menu Play This System provides Playback Control (PBC) which utilizes a procedure (menu selection) programmed in a video CD. The playback operation procedure may differ depending on the disc you use. For Menu Play, use the following buttons: (PBC mode must be turned on before operating Menu Play.) On the unit: NEXT + (¢) ... -
Page 101: Playing Video Cds Without Pbc - Continuous Play
Cancelling PBC • After cancelling PBC, you can Continuously Play more than one video CD without PBC. • When PBC is cancelled, some images such as still play pictures may not be played back. • You cannot change from PBC OFF to PBC ON while CD is playing. Reminder! Do not pause Video CD for more than 10 minutes to prevent screen burns. -
Page 102: Playing A Multiplex Sound Cd
The TV screen will show the following: 08/10 00:07 DISC 2 VIDEO INTRO ¢ Press the number button for the video intro you want to select. Playback starts from the selected track. To stop and cancel the video intro play, press 7. Viewing the Highlights of a Video CD You can view highlight scenes of the selected track on a video CD only when PBC is off. -
Page 103: Mp3 Disc Playback
MP3 Disc Playback About MP3 discs An MP3 disc can have several folders (albums). Tracks are contained within the albums. The player will only recognize up to 76 albums. Total number of tracks recognizable is 999. Recording your own MP3 discs •... - Page 104 Select a track from the CD selected in the above step. On the unit Press PRESET NEXT + (¢) or PREV. – (4), then press SET button. On the remote control: Press ¢ (NEXT ¡) or 4 (PREV. 1), then press ENTER button or SET button.
-
Page 105: Playing Back Tapes
Playing Back Tapes You can playback type I, type II and type IV tapes without changing any settings. Playing Back a Tape Press EJECT (0) for the deck you want to use. For Deck A Put a cassette in with the exposed part of the tape down. -
Page 106: Recording
Recording IMPORTANT: • It may be unlawful to record or play back copyrighted material without the consent of the copyright owner. • The recording level is automatically set correctly, so it is not affected by the VOLUME, the ACTIVE BASS EX., the SOUND TURBO, and the SOUND MODE. -
Page 107: Dubbing Tapes
To record on both sides — Reverse Mode Press REVERSE MODE so that the Reverse Mode indicator lights up – • When using Reverse Mode for recording, start recording in the forward direction first. Otherwise, recording will stop when recording is done only on one side (reverse) of the tape. -
Page 108: Using The Microphones
Using the Microphones You can enjoy singing along (Karaoke) and microphone mixing using a microphone. IMPORTANT: • Always set MIC LEVEL to MIN when connecting or disconnecting the microphone. • When not using the microphone, keep it disconnected. Singing along — Karaoke Karaoke Karaoke reduces the lead vocal of the playing source, and allows you to replace it by singing into the microphone as the... -
Page 109: Recording Your Singing
Recording Your Singing You can adjust the music key using the remote control. Follow the steps in “Singing Along with Multiplex Karaoke Discs (MPX)” on page 26. Follow the steps in “Recording a Tape on Deck B” on page 24 to record your singing. Adjusting the Music Key Control (for CD play only) On the remote control ONLY:... -
Page 110: Using The Timers
Using the Timers There are three timers available — Daily Timer, Recording Timer and Sleep Timer. Before using the timers, you need to set the clock built in the unit. (See page 9.) Using Daily Timer and Recording Timer With Daily Timer, you can wake to your favorite music or radio program. - Page 111 Select the timer (Daily Timer or Recording Timer) with the source to play. On the unit: Press 4 PREV. or ¢ NEXT to select the timer, then press CLOCK/TIMER. • Each time you press (¢) or (4), the timer mode and the source change as follows: TUNER DAILY TAPE...
-
Page 112: Using Sleep Timer
Using Sleep Timer With Sleep Timer, you can fall asleep to music. You can set Sleep Timer only while the unit is turned on. How Sleep Timer actually works The unit automatically turns off after the specified time length passes. On the remote control ONLY: Press SLEEP. -
Page 113: Maintenance
Maintenance To get the best performance of the unit, keep your discs, tapes, and mechanism clean. Handling discs • Remove the disc from its case by holding it at the edge while pressing the center hole lightly. • Do not touch the shiny surface of the disc, or bend the disc. -
Page 114: Troubleshooting
Troubleshooting If you have a problem with your unit, check this list for a possible solution before calling for service. If you cannot solve the problem from the hints given here, or the unit has been physically damaged, call a qualified person, such as your dealer, for service. -
Page 115: Specifications
Specifications Amplifier section Output Power MAIN SPEAKERS: 64 W per channel, min. RMS, both channels driven into 6 Ω at 1 kHz with no more than 0.9% total harmonic distortion. Audio input sensitivity/Impedance (Measured at 1 kHz, with tape recording signal 300 mV) AUX: 400 mV/50 kΩ... - Page 116 Mains (AC) Line Instruction (not applicable for Europe (except Turkey), U.S.A., Canada, Australia, and U.K.) 110V 220V IMPORTANT for mains (AC) line BEFORE PLUGGING IN, do check that your mains (AC) line voltage corresponds with the position of the voltage selector switch provided on the outside of this equipment and, if different, reset the voltage selector switch, to prevent from damage or risk of fire/electric shock.