Table of Contents
Advertisement
Quick Links
Advertisement
Table of Contents

Related Manuals for Kenwood TS-480


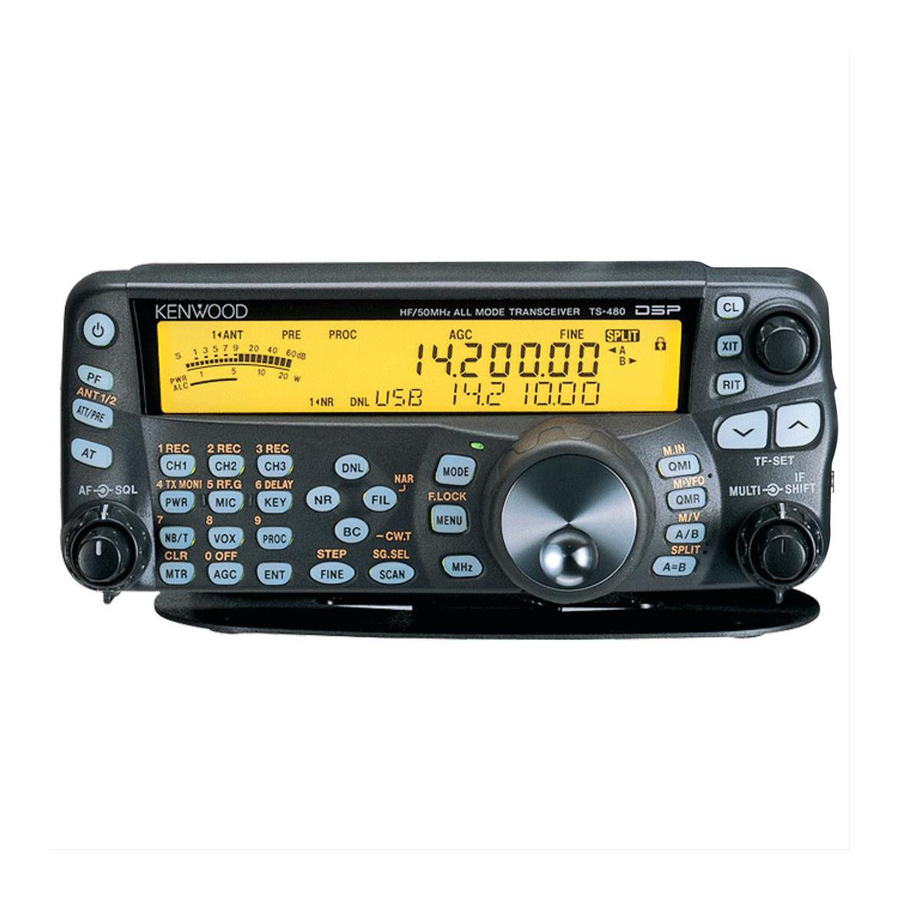
Summary of Contents for Kenwood TS-480
-
Page 2: Structural Features
It is our hope that this guide will serve to convey the joys of HF and all the benefits of owning and using the TS-480 to whoever reads this guide – whether you have already purchased a TS-480, an accomplished operator, thinking of buying a transceiver, or just thinking of taking up Amateur Radio as a hobby. - Page 3 Design Objectives Determination to create a unique transceiver The concept of a compact HF transceiver first saw the light of day with Kenwood’s TS-50. From then on, such equipment has become an essential part of the Amateur Radio world. Equipment has now evolved with the appearance of multi-band models.
- Page 4 Standalone control panel For mobile operations, a separate control panel is ideal, but what if the transceiver is also to be used as a base station? This was the problem we faced. With a large desktop rig, it is no easy matter to shift things around to find the best position, so perhaps it would be a good idea to have a separate control panel that could be moved easily.
- Page 5 It was with this in mind that Kenwood came up with the idea of an Internet remote-controlled transceiver. You may be away on a business trip, but you want to operate, or you may want to use a large Yagi antenna out in the suburbs from your downtown apartment.
- Page 6 In 1996, when on a visit to the US to promote the TS-570 a local salesman asked whether we were next going to put an AT into the TS-50. Well, perhaps that was where the TS-480 got its start! Achieving 200W output in a compact transceiver In achieving our goal of 200W there was one major constraint –...
- Page 7 In this genre, price is an important factor, so by limiting the TS-480 to HF, we developed what is in fact a compact transceiver that stands apart from the competition. The TS-480 is designed to ensure not only excellent TX performance but also...
- Page 8 ● 200W final section Explained here is the circuitry for the 200W final section, the crown jewel of the TS-480 Series. This circuit is responsible for developing 200W output with a DC 13.8V power supply. Of course, various approaches are possible. The typical one would be to use a high voltage (28V or more) with the FETs in a push-pull arrangement.
- Page 9 Fig. 1 illustrates TX IM characteristics with 200W output at 14MHz, while the second graph (Fig. 2) charts high-frequency spurious emissions. Fig. 1: TX IMD (output 200W) Fig. 2: TX Spurious emissions...
- Page 10 It is possible for them to make use of the 100W unit in their possession. The PS-53 power supply is specified for the TS-480; however, as long as it can produce 20.5A or more continuously at 13.8V, other power supplies can be used. Also, it is possible to operate this transceiver using a single power supply that can produce at least 41A continuously;...
- Page 11 It should be pointed out that it is possible to increase the output of these models: the 50W model to 100W, and the 10W model to 50W or 100W. A TS-480 owner who acquires a more advanced license and wants to make use of this capability should go to the nearest service center. Note that it is not possible to upgrade to 200W output.
- Page 12 Fig. 4: 200W final section Fig. 5: 100W final section with antenna tuner...
- Page 13 10.695MHz crystal, or the modulation was performed by the VCO on the 2nd OSC. The latter was not an option for the TS-480, and since the whole transceiver had to be compact, we did not adopt the former approach. How then is FM...
- Page 14 HF~V/UHF that are designed to cover all frequency bands with a single mixer. Since HF~50MHz is the “home turf” for the TS-480 Series, it has an advantage as in regards to the operating conditions for the mixer. Since developing the TS-950, Kenwood has exclusively employed J-FET quad mixers, and the TS-480 is no exception.
- Page 15 Fig. 8 corresponds to these conditions. Under these conditions, if there were interfering signals that were faintly picked up by the other transceivers in this comparison, the strength of those interfering signals would have to rise by 10~15dB for the TS-480 to begin suffering the same effects.
- Page 16 As with previous models, sensitivity is set to switch at 21.5MHz with the pre-amp on. However, there is a difference: previously the pre-amp itself was switched, but in the case of the TS-480 this is managed by switching the pre-amp’s NFB gain.
- Page 17 Jumpers for joy As with the TS-2000, something special has been provided for both the BPF ATT in the BC band and the regular ATT: The BPF has been equipped with an ATT in order to cope with powerful local broadcasting stations in the BC band.
- Page 18 Circuitry after the roofing filter Except for FM, the TS-480 has a double super: 1st IF is 73.095MHz and the 2nd IF is 10.695MHz. For FM, there is also a triple super as low as 455kHz. This is followed by analog detection and signal processing performed by the AF DSP in a standard arrangement.
- Page 19 Whereas the TS-570 provided only a single slot for installing an optional filter, the TS-480 has two slots, meaning that two of the three filters can be installed at the same time. And the process of installation itself is quite easy: there is no need to remove the main unit, since the option installation unit has been designed to be separately removable.
- Page 20 Features useful for 50MHz operations ● You discover a DX CW signal during a USB band search! The TS-480 has a feature that is perfect for such times: you can automatically switch to CW transmission by just keying the transmitter (key down) with your CW key, keyer or CW computer program.
- Page 21 TX tuning is a handy feature to have. It outputs a low-power continuous carrier for adjusting a screw-drive or similar antenna. It allows you to transmit a continuous carrier that is independent of the mode and power of your current operations. Simply assign a PF key to this function. No paddle, but you want to give CW a try? No problem.
- Page 22 Fig.13 is a block diagram illustrating in principle how the DNL operates. Fig. 13: Principle of DNL operation The digital signal processor equipped on the TS-480 is the 16-bit fixed-point TMS320VC5402 from Texas Instruments, which offers excellent value for the money. Running at 100MHz, it...
-
Page 23: Noise Reduction
DSP. Because the TS-480 will be often used for mobile operations, DNL parameters have been tuned so as to have maximum effect on ignition noise. However, even when used as a fixed station, it can be very effective on irregular, unanticipated noise, so we recommend that you try making use of it, in combination with the noise blanker as well. - Page 24 Fig. 15: NR OFF Fig. 16: NR1 ON Fig. 17: NR2 ON...
- Page 25 Beat cancel ● Beat cancel (BC), as its name implies, is designed to cancel unpleasant beat interference. Like NR1, it uses adaptive filter technology, tracking a beat and canceling it by shaping. It is very similar to a band elimination filter. Even if there are multiple beats, BC can track and cancel them all. However, since BC operates at the AF stage, should powerful beat interference be experienced during DX operations, even though beat cancel works properly, by then the AGC has already attenuated both the interference and the target signal.
- Page 26 RX DSP filters ● In SSB, AM and FM modes, you can independently set high- and low-cut frequencies for the AF filters to suit operating conditions (slope tune). Fig. 20 illustrates how slope tune works. When there are interfering signals in proximity to the target signal, you can use a high-cut filter and a low-cut filter to remove the signals above and below the target.
- Page 27 WIDTH 250 500 1000 1500 When the optional CW filters are installed, the TS-480 will automatically select the optimum IF filter in accordance with the DSP filter bandwidth. Also available are filters for PSK31 and RTTY data mode operations. From the menu, if you select ON for the “Available data communications filters”, these data communications filters can be used...
- Page 28 If you use the RX equalizer it is easy to adjust RX audio quality. Take your pick from flat (default), high boost, Formant pass, bass boost, and conventional settings. As a new feature, the TS-480 actually offers two types of high boost and two types of bass boost.
- Page 29 As with other Kenwood HF transceivers, the TS-480 provides menu access to its many features. By selecting and adjusting these features, you can customize the TS-480 so that it fits perfectly into your way of operating a radio. Introduced here are tips on how to get the most out of the various items listed in the menus.
- Page 30 Transverter. Unlike the TS-570, you can set any frequency. Transverter output is fixed at 5W for the TS-570, but with the TS-480 you can choose output freely (within the transmitter’s capability).
- Page 31 S-meter. It can also reduce low-frequency interference. If you own an AT-300, you can connect it to the TS-480; however, operation is limited by the capabilities of the AT-300. You can control the linear amp independently for the HF and 50MHz bands.
- Page 32 You can adjust FM mic gain (3 levels) This enables you to pick the appropriate DSP filter for data communications using the filter switch on the control panel. Adjust input and output levels independently when the TS-480 is connected to a SoundBlaster™ card or other external device.
- Page 33 PF keys Assign PF keys on the control panel Mic PF1 key Mic PF2 key Mic PF3 key Mic PF4 key Split Split frequency transfer frequency Permit to write #54 to target transfer VFOs TX inhibit TX inhibit PC data rate 56 COM port communication speed External...
- Page 34 The squelch can be forced open for as long as the PF key is depressed. Useful for monitoring when setting CTCSS, etc. The TS-480 will receive using the widest passband available in that mode for as long as the PF key is depressed. This is a quick way to check on nearby interference.
- Page 35 TF-SET Q MR Q MI SPLIT SCAN M >V M.IN CW TUNE FINE ANT 1/2 You can assign a function you often use to a PF key on the mic. Also, a function defined by pressing the key for 1 second can be called up instantly.
- Page 36 Consequently, the menu system can be a little inconvenient when you need to change several settings at once. To solve this problem, the TS-480 offers two sets of menus: A and B. Switching between these can greatly simplify operations – for example, when switching from DX to local, from regular to data communications, or from fixed station to mobile operations.
- Page 37 Structural Features Internal structure of the main unit ● The internal structure of the main unit is straightforward: employing a die-cast aluminum chassis, it is designed so that the circuit boards are attached from both above and below. From above one can see the TX/RX unit, the filter unit and the relay unit;...
- Page 38 As you can tell from this diagram, the cooling fans located at the rear must be powerful enough to be able to suck in fresh air through the intakes on the front panel. In order to make the TS-480 as compact as possible the mounting density of the internal components has been increased;...
- Page 39 In the case of the TS-480, in order to make the transceiver compact we provided a single row of tall, highly efficient cooling fins right above the final transistors. This compensated for the lack of cooling fins dictated by the design restrictions.
- Page 40 Now let’s have a look at the rise in temperature of the different parts when the TS-480HX transmits continuously (14MHz) for 30 minutes at 200W. To provide a comparison, plotted on the same graph is test data compiled for a compact 100W model (designed so as not to power-down during continuous transmission at 100W).
- Page 41 Despite the fact that the TS-480 Series is compact, it has the same heavy-duty specifications as the previous, fixed station model. Nevertheless, electronic components, whether from Kenwood or another manufacturer, are generally susceptible to heat: the higher the temperature, the shorter is their working life.
- Page 42 As explained in the section on development objectives, we started out with the premise that the TS-480 would not be limited to mobile applications but that it would be able to serve as a reasonably priced 200W fixed station. So rather than going for a simple appearance, we decided on a standalone control panel in order to provide true operating ease.
- Page 43 There is thus no need to sit in front of the mic and actually repeat your message over and over again. Even when you use a microphone with low sensitivity to record a message, the TS-480 is designed to set the appropriate recording level. Normally, this recording level is automatically linked to the mic gain setting, so if you wish to adjust recording level manually, you should adjust mic gain while recording is in standby.
- Page 44 (using menu #48) to #62, by switching to Voice2 you can hear the S-meter level being read out. Introduced here are a few of the benefits of the TS-480 Voice Guide. Some of these are automatic, while others are accessed by the PF keys.
- Page 45 1 – 3 Other features This is not connected with the Voice Guide, but the TS-480 is also equipped with a feature that has proved popular on previous models – namely, it issues a beep that serves as an SWR alert when an error is detected in Morse mode with AT tune.
- Page 46 Click Enc./Step. (Step no.) Note that if the TS-480 is currently in a configuration mode, these actions will effectively change the settings. But in this case a message is displayed, so you can exit from configuration mode before continuing.
- Page 47 2. Changing memory and registered details You can change any registration data from the appropriate window. You use this window when storing new data in memory. Display the frequency you wish to register and press M.IN. Then pick the channel (0-89) you want to write to and press DISP: the memory window (right) will open.
- Page 48 2 computers, the remote one having ARCP installed and the host computer having ARHP installed. The basic arrangement is to connect the TS-480 to a host computer, which is on a LAN, and to install ARHP-10 on this computer. ARCP-480 is then installed on the remote computer.
- Page 49 TS-480 installed on the host end might go into continuous transmission accidentally. By setting the time-out timer on the TS-480, it is possible to ensure that, after the set time period has passed, the transceiver will automatically switch back to RX mode. The timer count always starts with the commencement of transmission, so even in the case of a prolonged but intentional transmission, after the set period has passed it will switch back to RX;...
- Page 50 communications and the operating system on either end is compatible, check the Voice box. (It is possible to enter the description using double-byte characters. For the address, it is also possible to enter the domain name, provided that it can be resolved by DNS.) Once you have finished, return to the setup window, select the other computer in the To: combo box, and check the box labeled Use...
- Page 51 Using a broadband router Many people using the Internet today use a broadband router (hereafter referred to simply as a router), but in order to use KNS in a setup that has routers installed at both the host and remote ends, you need to configure each end separately.
- Page 52 For the MIC terminal wiring diagram, please refer to the instruction manual. If using the MIC terminal, you will need a cable in order to hear the audio received by the TS-480; this connects the transceiver’s EXT-SP terminal to the input terminal on the PC sound card.
- Page 53 This completes the setup: the host is now ready for the remote PC user to make a connection. Once the audio cable has been made up, connect the various cables to your PC as illustrated below. In addition, connect your PC to the TS-480 with an RS-232 cable.
-
Page 55: Troubleshooting
Troubleshooting ● Listed below are typical problems that you might encounter. Network & Operations Problem Is it possible to use an analog dial-up connection? I have broadband but is it compatible? Can I use my router with KNS? With a high-speed modem connected directly to my PC running Windows®... - Page 56 I cannot get KNS to work over the Internet connection that is provided as a collective service to my apartment block. Can I use a software-based firewall? I want to time-out TX after a set time. Is KNS compatible with digital communications (PSK31, SSTV, etc.)? Is KNS compatible with full...
- Page 57 Sound Problem The sound does not get through (host PC). The sound does not get through (remote PC). Solution First check that the audio cable is connected properly. Check what audio input method (MIC/EXP-SP or DATA) has been selected for the transceiver. •...
- Page 58 TX/RX audio breaks up, is distorted or faint. Check that the computer can produce sound; update drivers as necessary. Connect a microphone to the computer and bring up the recording control window. Check that the input terminal you are using is active and that it is set to an appropriate level.
- Page 59 TS-480 In-Depth Manual Published in April 2004 by Kenwood Corporation Communications Equipment Division Unauthorized reproduction is forbidden. Copyright © 2004 KENWOOD CORPORATION...