HP J3128A AdvanceStack 10Base-T Hub-8E Installation And Reference Manual
Hide thumbs
Also See for J3128A AdvanceStack 10Base-T Hub-8E:
- Manual (194 pages) ,
- Installation and reference manual (138 pages) ,
- Quick setup manual (4 pages)
Table of Contents
Advertisement
Advertisement
Table of Contents

Related Manuals for HP J3128A AdvanceStack 10Base-T Hub-8E


Summary of Contents for HP J3128A AdvanceStack 10Base-T Hub-8E
- Page 3 HP J3128A AdvanceStack 10Base-T Hub-8E Installation and Reference Guide...
- Page 4 Corporation. Ethernet is a registered the product. A copy of the specific trademark of Xerox Corporation. warranty terms applicable to your Hewlett-Packard product and replace- ment parts can be obtained from your HP Sales and Service Office or authorized dealer.
-
Page 5: Hp J3128A Advancestack 10Base-T Hub-8E
HP J3128A AdvanceStack 10Base-T Hub-8E Use the Hub-8E to connect computers, printers, and servers together to allow users to share resources and data. The steps to set up your network are: 1. Verify included parts 2. Verify that the hub works 3. -
Page 6: Verify That The Hub Works
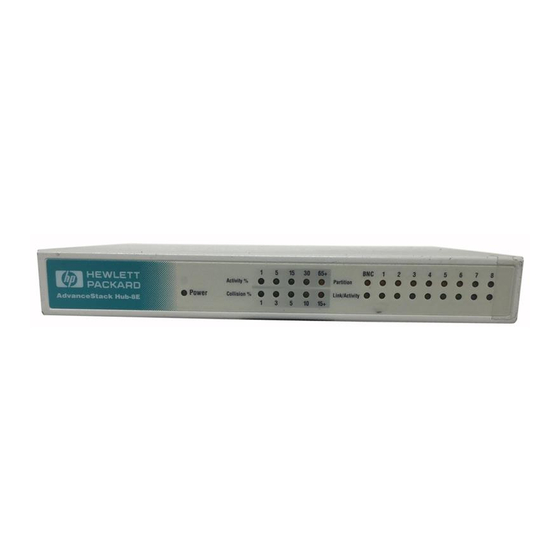
Note If your installation requires a different AC adapter than the one supplied with the hub, contact your HP-authorized LAN dealer or your local HP sales office. 2. Plug the AC adapter into an AC power source. When installing the Hub-8E, note that the AC outlet must be located near the equipment and should be easily accessible. - Page 7 3. Check the LEDs on the hub’s front panel. When the hub is powered on, it performs a 10 second self- diagnostic test. During the test, each LED is lit momentarily. When the self-test completes successfully, the following events occur: The BNC Partition LED will remain lit unless a properly terminated thin coax segment is attached.
-
Page 8: Mount The Hub
3 inches (76 mm) of space for twisted-pair cables and the AC adapter. Ensure that the HP AdvanceStack hub(s) do not overload the power circuits, wiring, and over-current protection. To deter- mine the possibility of overloading the supply circuits, add... -
Page 9: Connect Devices To The Hub
Marking the Location I m p o r t a n t A hub should be mounted only to a wall or wood surface that is at least 1/2-inch (12.7 mm) plywood or its equivalent. 1. Mark the screw hole locations 5 11/16 inches (14.5 cm) apart on the mounting surface. -
Page 10: Adding More Users To Your Network
Adding More Users To Your Network You can add more users to your network by joining two or more hubs together using either thin coaxial cable or twisted-pair cable. Using Thin Coaxial Cable You can connect up to 30 hubs together on a common thin coax segment. - Page 11 Using Twisted-Pair Cable To expand your network, the hub can be cascaded to another hub by using the Cascade port. You can connect up to 4 hubs together by using this port. The following illustration shows two hubs chained together. Standard twisted-pair cable.
-
Page 12: Troubleshooting
Try a different electrical outlet. If the problem persists, return the hub and AC adapter to your HP-authorized dealer or reseller following the instructions in the warranty booklet. If you are replacing your hub, remove the cables connected to the hub before returning it to Hewlett-Packard. -
Page 13: Customer Support Services
1-800-752-0900 to receive a copy by mail. HP FIRST Fax Retrieval Service HP FIRST is an automated fax retrieval service that is available 24 hours a day, seven days a week. HP FIRST provides information on... -
Page 14: Specifications
Specifications Physical Dimensions: 19 cm by 13.2 cm by 2.6 cm (7.5 in by 5.25 inches by 1 inch) Weight: 635 grams (1.40 pounds) Electrical AC voltage: 100–250 volts (Voltage tolerance of +/- 10%) Hub maximum current: 0.8 A max Frequency range: 50/60 Hz (The above specifications are AC adapter specific.) -
Page 15: Acoustic Noise
Electromagnetic Emissions FCC part 15 Class A EN 55022 Class A / CISPR-22 Class A VCCI Level I Complies with Canadian EMC Class A requirements. Immunity See the Declaration of Conformity for details at the end of the Regulatory Statements. Acoustic Noise Not applicable Safety and Regulatory Statements... -
Page 16: Regulatory Statements
Considerazioni sulla sicurezza Nessun componente di questo prodotto può essere riparato dall’utente. Qualsiasi la- voro di riparazione, messa a punto, manutenzione o assistenza va effettuato esclusi- vamente da personale specializzato. Questo apparato non possiede un commutatore principale; si mette scotto tensione all’inserirsi il cavo d’alimentazione. - Page 17 VCCI Class 1 (For Japan Only) N o t e This is a class A product. In a domestic environment, this product may cause radio interference, in which case the user may be required to take adequate measures.
-
Page 18: Declaration Of Conformity
Declaration of Conformity The following Declaration of Conformity for the HP AdvanceStack 10Base-T Hub-8E complies with ISO/IEC Guide 22 and EN 45014. The declaration identifies the product, the manufacturer’s name and address, and the applicable specifications that are recognized in the... - Page 20 Technical information in this document is subject to change without notice. All rights reserved. Reproduction, adaptation, or translation without prior written permission is prohibited except as allowed under the copyright laws. © Copyright 1996 Hewlett-Packard Company Printed in U.S.A. 2/96 Manual Part Number J3128-90001, Edition 1 *J3128-90001*...