Canon DC100 Instruction Manual
Dvd camcorder
Hide thumbs
Also See for DC100:
- Instruction manual (86 pages) ,
- Specifications (2 pages) ,
- Instruction manual (83 pages)
Table of Contents
Advertisement
Advertisement
Table of Contents

Related Manuals for Canon DC100


Summary of Contents for Canon DC100
-
Page 1: Instruction Manual
PUB.DIE-262 English DVD Camcorder English Instruction Manual Introduction Preparations Basic Functions Advanced Functions Editing Functions Disc Finalization External Connections Trouble? Do’s & Don’ts Additional Information Downloaded From VideoCamera-Manual.com Manuals... -
Page 2: Important Usage Instructions
WEEE scheme or your household waste disposal service. For more information regarding return and recycling of WEEE products, please visit www.canon-europe.com/environment. (EEA: Norway, Iceland and Liechtenstein) Downloaded From VideoCamera-Manual.com Manuals... -
Page 3: Introduction The Advantages Of Dvds
The Advantages of DVDs RECORDING With a DVD you just press the recording start/ stop button and the camcorder will find the empty space on the disc ( 22). Don’t waste time fast forwarding and rewinding a tape to find from where to start a new recording. -
Page 4: An Introduction To Dvds
An Introduction to DVDs You have probably heard of DVD discs and they come in various types and in two sizes - the more common 12 cm DVDs and 8 cm Mini DVDs. This camcorder uses commercially available 8 cm DVD-R or DVD-RW discs. So... -
Page 5: Differences In Available Features Depending On The Disc
Differences in Available Features Depending on the Disc The camcorder’s features and functions available will differ depending on the type of disc you use and the disc specification selected when initializing it. Disc Type/Specification DVD-R DVD-RW Feature VIDEO mode VIDEO mode VR mode Editing scenes with this camcorder –... -
Page 6: Table Of Contents
Table of contents Introduction The Advantages of DVDs ................3 An Introduction to DVDs ..................4 Differences in Available Features Depending on the Disc.......5 About this Manual....................8 Checking the Supplied Accessories ..............10 Components Guide..................11 Screen Displays.....................13 Preparations Getting Started....................15 Step 1: Preparing the Power Supply ............15 Step 2: Preparing the Camcorder ............17 Step 3: Adjusting the LCD Screen ............17 Step 4: Changing the Display Language ..........18... - Page 7 Manually Adjusting the Focus................42 Changing the Autofocus Mode ..............43 Using the Self Timer ..................44 Setting the White Balance ................45 Applying Image Enhancing Effects ..............47 Using the Digital Effects.................48 Selecting the Size and Quality of Still Images........51 Editing Functions Editing the Scenes (DVD-RW in VR mode only) Adding Scenes to the Playlist ................52 Moving Scenes in the Playlist................52 Deleting Scenes ....................53...
-
Page 8: About This Manual
About this Manual Thank you for purchasing the Canon DC100/DC95. Please read this manual carefully before you use the camcorder and retain it for future reference. Should your camcorder fail to operate correctly, refer to the Troubleshooting table ( 65). -
Page 9: About The Operating Modes
Selecting MENU options MENU 1. Press 2. Select ( ) the desired menu from the left side column and press ( The title of the selected menu appears on top of the screen and under it the list of settings. 3. -
Page 10: Checking The Supplied Accessories
To change the operating mode In addition to turning the camcorder on and off, the power switch also toggles the camcorder’s operating mode. From the ON position, slide down the power switch momentarily towards MODE and release it. This action will toggle the operation mode in the following sequence: with [STILL IMAGES] with [STILL IMAGES] set to [ON]... -
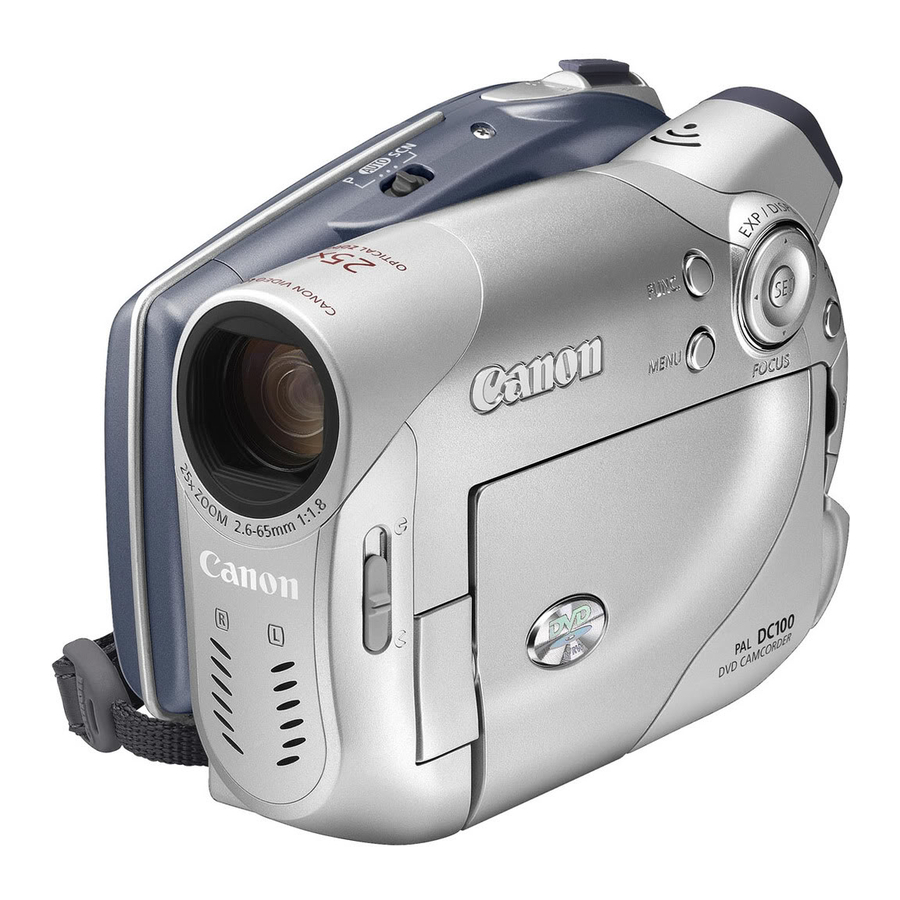
Page 11: Components Guide
Components Guide Left side view Right side view Front view FUNC. button ( AV OUT terminal ( MENU button ( Serial number Lens cover switch ( 22, 24) BATTERY RELEASE switch ( - open, - closed) RESET button ( EXP (Exposure) switch ( 41) / Disc compartment cover ( DISPLAY button (... -
Page 12: Top View
Top view Bottom view Back view Mode switch ( LCD screen ( Zoom lever ( (record review) button ( 23) / Speaker ( (fast reverse) button ( 26) / Tripod socket ( Index screen – button ( OPEN (disc cover) switch ( (fast forward) button ( 26) / Strap mount... -
Page 13: Screen Displays
Screen Displays Recording Movies Operating mode ( Recording program ( Self timer ( White balance ( Image effect ( Digital effects ( Recording mode ( Disc type DVD-R, DVD-RW ( Disc specification (VIDEO mode, VR mode) ( Finalized disc mark ( Recording reminder Manual focus ( Recording Still Images... - Page 14 Number of still images Remaining battery charge available flashing in red: No disc in green: 6 or more images in yellow: 1 to 5 images • When “ ” starts flashing in red in red: No more images can be replace the battery pack with a fully recorded charged one.
-
Page 15: Getting Started
Getting Started Preparations Step 1: Preparing the Power Supply The camcorder can be powered with a battery pack or directly using the compact power adapter. Charge the battery pack before use. 1. Turn off the camcorder. CHG. (charge) indicator 2. Attach the battery pack to the DC IN terminal camcorder. - Page 16 Max. Typical Recording Mode Playback Time Recording Time Recording Time* Viewfinder 80 min. 45 min. LCD [NORMAL] 80 min. 45 min. 85 min. LCD [BRIGHT] 75 min. 40 min. Viewfinder 95 min. 50 min. LCD [NORMAL] 90 min. 50 min. 95 min.
-
Page 17: Step 2: Preparing The Camcorder
Step 2: Preparing the Camcorder 1. Turn on the camcorder. 2. Adjust the viewfinder. Keep the LCD panel closed to use the viewfinder and adjust the dioptric adjustment lever as necessary. 3. Fasten the grip belt. Adjust the grip belt so that you can reach the zoom lever with your index finger, and the start/ stop button with your thumb. -
Page 18: Step 4: Changing The Display Language
Step 4: Changing the Display Language MENU DISPLAY SETUP LANGUAGE ENGLISH Options [DEUTSCH] [ENGLISH] [ESPAÑOL] [FRANÇAIS] [ITALIANO] [POLSKI] MENU 1. Press 2. Select ( ) [DISPLAY SETUP] and press ( 3. Select ( ) [LANGUAGE ] and press ( 4. Select ( ) the desired option and press ( 5. -
Page 19: Step 6: Setting The Date And Time
Time Zones Once you have set the time zone, date and time, you do not need to reset the clock every time you travel to another time zone. Select the time zone referring to the date and time displayed on the screen. Time Zones and Difference from GMT/UTC London GMT/UTC Wellington (WELLINGTN) -
Page 20: Step 7: Loading And Removing A Disc
Step 7: Loading and Removing a Disc Use only 8 cm mini DVD discs marked with the DVD-R or DVD-RW logo. Before inserting the disc be sure to check that the recording surface is clean. If necessary, use a soft lens-cleaning cloth to remove any fingerprints, dirt buildup or smudges from the disc surface. - Page 21 A confirmation message will appear on the screen. Select ( ) [YES] and press ) to start the disc initialization. • The disc initialization will take approximately one minute. Avoid moving the camcorder while the operation is in progress. • You can start recording movies once the record pause indication appears.
-
Page 22: Recording
Recording Basic Functions Recording Movies Before You Begin Recording Make a test recording first to check if the camcorder operates correctly. Since recordings made on a DVD-R cannot be deleted, we recommend you use a DVD-RW disc to make the test recordings. To change the operating mode, refer to About the Operating Modes ( 1. -
Page 23: Selecting The Aspect Ratio Of Your Recordings (16:9 Widescreen Or 4:3)
power switch towards MODE and release it, or move the power switch to and back to ON. About the LCD and viewfinder screen: The screens are produced using extremely high-precision manufacturing techniques, with more than 99.99% of the pixels operating to specification. Less than 0.01% of the pixels may occasionally misfire or appear as black, red, blue or green dots. -
Page 24: Recording Still Images
Recording Still Images To use the still images functions, you will need to set [STILL IMAGES] to [ON] beforehand ( only. To change the operating mode, refer to About the Operating Modes ( 1. Open the LCD panel and the lens cover (move the lens cover switch down to Start/Stop... -
Page 25: Zooming
Zooming only. To change the operating mode, refer to About the Operating Modes ( : In addition to the 25x optical zoom, the 1000x ( ) /770x ( digital zoom is also available ( 31). Zoom out Zoom in 25x Optical Zoom Move the zoom lever toward W to zoom out (wide- angle). -
Page 26: Playback
Playback Playing Back Movies To change the operating mode, refer to About the Operating Modes ( The scene index screen appears with the selection frame on the first scene. 1. Move ( ) the selection frame to the scene you want to play back. -
Page 27: Adjusting The Volume
Slow Forward Playback / Slow Reverse Playback During playback pause, press . Repeatedly press the button to increase the playback speed. Slow playback: 1/16 → 1/8 → 1/4 → 1/2 the normal speed. Skipping Scenes During normal playback, push the multi selector ( ) to skip to the beginning of the next scene. -
Page 28: Viewing Still Images
Viewing Still Images To use the still images functions, you will need to set [STILL IMAGES] to [ON] beforehand : You can view still images already recorded on a disc (with another camcorder). However, playback cannot be guaranteed for all still images. To change the operating mode, refer to About the Operating Modes ( Use the multi selector ( ) to move... -
Page 29: Magnifying The Image
Image Jump Function You can also quickly locate a specific image without having to browse all of them one by one. Push the multi selector ( ) and keep it pressed down. Image numbers will quickly run in sequence. When you release the multi selector the image corresponding to the number selected will be displayed. -
Page 30: Selecting The Recording Data Display
Selecting the Recording Data Display The camcorder keeps a data code containing the recording date and time and other camera data such as shutter speed and exposure (f-stop). To change the operating mode, refer to About the Operating Modes ( : [DATE], [TIME], [DATE&TIME] only. -
Page 31: Options Lists - Menu / Func
Options Lists – MENU / FUNC. Advanced Functions Menu items not available appear in black on the screen. For details about how to select an item, refer to Selecting an Option - MENU/FUNC . ( only available with the MENU Options Camera Setup (Digital Zoom, Image Stabilizer, etc.) CAMERA SETUP A.SL SHUTTER. -
Page 32: Still Image Operations (Erase All Images)
FOCUS PRI. ON], [ OFF] The camcorder records the still image only after the focus has been adjusted. Set it to [ OFF] if you wish to record a still image as soon as you press Start/Stop . When set to [ OFF], no focusing frame appears. -
Page 33: Display Setup (Lcd Brightness, Language, Etc.)
PLAYLST ALL DEL [NO], [YES] This option is available only in the playlist index screen. DISC PROTECT [NO], [YES] PHOTOMOVIE [NO], [YES] DISC TITLE Display Setup (LCD Brightness, Language, etc.) DISPLAY SETUP BRIGHTNESS Adjusts the brightness of the LCD screen. Use the multi selector ( ) to adjust the brightness to your preference. -
Page 34: System Setup (Volume, Beep, Etc.)
DEMO MODE ON], [ OFF] The demonstration mode displays the camcorder’s main features. It starts automatically when the camcorder is powered with the power adapter if you leave it turned on without loading a disc for more than 5 minutes. To cancel the demo mode once it started, press any button, turn off the camcorder or load a disc. -
Page 35: Date/Time Setup
TV TYPE NORMAL TV], [ WIDE TV] In order to display the picture in full and in the correct aspect ratio, select the setting according to the type of television to which you will connect the camcorder. [NORMAL TV]: TV sets with 4:3 aspect ratio. [WIDE TV]: TV sets with 16:9 aspect ratio. - Page 36 D.EFFECT OFF], [ BLK&WHT] Recording mode HIGH QUALITY], [ STANDARD PLAY], [ LONG PLAY] Approximate recording times with a brand new DVD-R disc are as follows: XP: 20 minutes, SP: 30 minutes, LP: 60 minutes. Recording in LP mode gives you a longer recording time; however, depending on the condition of the disc (long usage, imperfections, etc.) the picture and sound recorded in LP mode may be distorted.
-
Page 37: Using The Recording Programs
Using the Recording Programs Recording Programs only. To change the operating mode, refer to About the Operating Modes ( Auto The camcorder adjusts focus, exposure and other settings automatically, allowing you to just point and shoot. Program AE ( Shutter-Priority AE ( Aperture-Priority AE ( Portrait Snow... -
Page 38: Selecting The Recording Program
Selecting the Recording Program only. To change the operating mode, refer to About the Operating Modes ( Move the mode switch between the recording categories. Automatic mode Select [ PROGRAM AE], [ SHUTTER-PRIO. AE], [ APERTURE-PRIO. AE] Select [ PORTRAIT], [ SPORTS], [ NIGHT], [ SNOW], [... -
Page 39: Using The Shutter-Priority Ae Mode
If the optimal exposure cannot be obtained, try the following actions. Manually adjust the exposure ( 41). Change the metering method ( 41). Using the Shutter-Priority AE Mode You can select a shutter speed, and the camcorder automatically sets the aperture setting most appropriate for the subject. -
Page 40: Using The Aperture-Priority Ae Mode
Using the Aperture-Priority AE Mode You can select an aperture value, and the camcorder automatically sets the shutter speed most appropriate for the subject. Use low aperture values (large aperture) to blur the background for a portrait, or high aperture values (small aperture) to achieve a broad depth of field for recording landscapes. -
Page 41: Manually Adjusting The Exposure
Manually Adjusting the Exposure More Recording Options Adjust the exposure when a subject is underexposed (for example, when backlit subjects appear too dark in the image) or overexposed (for example, when recording subjects under very strong light and they appear too bright or glaring in the image). only. -
Page 42: Manually Adjusting The Focus
Manually Adjusting the Focus Autofocus may not work well on the following subjects. In such case, focus manually. Subjects with low Through Reflective Fast Moving Night Scenes contrast or without dirty or wet surfaces Subjects vertical lines windows only. To change the operating mode, refer to About the Operating Modes ( Mode switch: 1. -
Page 43: Changing The Autofocus Mode
Changing the Autofocus Mode You can change the AF (autofocus) frame selection mode. only. To change the operating mode, refer to About the Operating Modes ( Options 9 Point AiAF Depending on the shooting conditions, one or more AF Mode switch: frames out of the nine frames available are automatically selected and focused on. -
Page 44: Using The Self Timer
Using the Self Timer only. To change the operating mode, refer to About the Operating Modes ( : Set the camcorder in record pause mode. MENU CAMERA SETUP SELF TIMER MENU “ ” appears. Start/Stop Press The camcorder starts recording after a 10-second countdown. The countdown appears on the screen. -
Page 45: Setting The White Balance
Setting the White Balance You can choose one of the preset settings to reproduce colors more accurately, or set a custom white balance to obtain the setting best suited to your specific recording conditions. only. To change the operating mode, refer to About the Operating Modes ( Mode switch: AUTO Options... - Page 46 Custom white balance may provide better results in the following cases: - Changing lighting conditions - Close-ups - Subjects in a single color (sky, sea or forest) - Under mercury lamps and certain types of fluorescent lights Downloaded From VideoCamera-Manual.com Manuals...
-
Page 47: Applying Image Enhancing Effects
Applying Image Enhancing Effects You can record with different color saturation and contrast effects. only. To change the operating mode, refer to About the Operating Modes ( Mode switch: IMAGE EFFECT OFF Options IMAGE EFFECT OFF] Records with no image enhancing effects. VIVID] Emphasizes the contrast and color saturation. -
Page 48: Using The Digital Effects
Using the Digital Effects FADER] Faders Begin or end scenes with a fade to or from black. You can preview the effect on the display. [FADE-T] [WIPE] [CORNER] (fade trigger) (corner wipe) [JUMP] [FLIP] [PUZZLE] [ZIGZAG] [BEAM] [TIDE] EFFECT] Effects Add flavor to your recordings. -
Page 49: Using The Multi-Image Screen
Setting Digital Effects icon FUNC. FADER / EFFECT Press ( Desired fader/effect. Press ( FUNC. * You can preview the effect on the screen before pressing ( ** The selected effect icon appears. Applying D.EFFECTS 1. Press to activate the fader/effect. D.EFFECTS •... - Page 50 Setting Digital Effects icon FUNC. MULTI-S Press ( S.SPEED ) Desired transition speed S.SPLIT ) Desired number of images Press ( FUNC. “ ” appears. Applying D.EFFECTS 1. Press to capture the images. Start/Stop 2. Press to record the multi-image screen displayed.
-
Page 51: Selecting The Size And Quality Of Still Images
Selecting the Size and Quality of Still Images Still images are recorded on the disc using the JPEG (Joint Photographic Experts Group) compression. As a general rule select a larger image size for higher quality. only. To change the operating mode, refer to About the Operating Modes ( 1024x768/FINE Options and number of still images that can be recorded on a disc: Number of Images... -
Page 52: Editing The Scenes (Dvd-Rw In Vr Mode Only)
Editing the Scenes Editing Functions (DVD-RW in VR mode only) Creating a Playlist Create a playlist to easily edit your movies (for example, change the order in which the scenes you recorded will be played back or edit scenes including only the best parts and cutting out the rest) without affecting your original recordings. -
Page 53: Deleting Scenes
Deleting Scenes You can delete those scenes that you are not interested in keeping. Remember that when you delete scenes in the playlist, you do not affect your original recordings; However, when you delete an original recording, it will be deleted also from the playlist. Be careful when deleting original recordings. -
Page 54: Dividing A Scene
MENU DISC OPERATIONS MOVIES ALL DEL MENU * When you are deleting the playlist, this menu option will be replaced by [PLAYLST ALL DEL]. Dividing a Scene You can divide your recordings in order to leave only the best parts and later cut out the rest. -
Page 55: Disc Options
Disc Options Protecting the Disc You can protect the whole disc to prevent the accidental erasure of important recordings. Initializing the disc ( 55) will permanently erase all recordings, even if the disc is protected. To change the operating mode, refer to About the Operating Modes ( Disc type: DVD-RW initialized in VR mode. -
Page 56: Changing The Disc Title
Changing the Disc Title Before you finalize your disc, you can give it a title. The disc title will be displayed on the index screen when playing the finalized disc in most DVD players. To change the operating mode, refer to About the Operating Modes ( MENU DISC OPERATIONS DISC TITLE... -
Page 57: Erasing Still Images
Erasing Still Images Still Image Options Be careful when erasing images. Erased images cannot be recovered. Still images on a protected disc cannot be erased. Erasing a Single Image To change the operating mode, refer to About the Operating Modes ( Disc type: DVD-RW initialized in VR mode. -
Page 58: Converting Still Images Into Photomovie Scenes
Converting Still Images into Photomovie Scenes Still images are recorded using JPEG compression, but a DVD player only recognizes the MPEG standard. Thus, to play back your still images with your DVD player, first you need to create a Photomovie scene – a slide show of all still images on the disc, where each image will be displayed for approx. -
Page 59: Preparing Your Disc For Playing On A Dvd Player - [Finalize]
Preparing your Disc for Playing on a Disc Finalization DVD Player – [FINALIZE] To play the disc you recorded on a DVD player, a computer’s DVD drive or other digital device, you need to finalize it first. You do not need to finalize the disc to play back your recordings with the camcorder connected to the TV. -
Page 60: Playing Back Your Disc On A Dvd Player Or A Computer's Dvd Drive
Finalizing the Disc The length of the finalization process depends on the scenes recorded and the remaining free space on the disc. DISC OPERATIONS MENU FINALIZE MENU * During the disc finalization a progress bar is displayed. Close the menu only after the screen display returns to the [DISC OPERATIONS] menu. -
Page 61: Recording Additional Movies On A Finalized Disc - [Unfinalize]
Recording Additional Movies on a Finalized Disc – [UNFINALIZE] You can record additional movies after the finalization by unfinalizing an already finalized DVD-RW disc in VIDEO mode. Disc type: DVD-RW initialized in VIDEO mode. Be sure to unfinalize the disc in normal room temperatures. If the procedure was not completed correctly due to high temperature, let the camcorder cool off before resuming operation. -
Page 62: External Connections Connecting To A Tv And Vcr
Playing Back on a TV Screen External Connections Connecting to a TV and VCR Selecting the Type of TV To change the operating mode, refer to About the Operating Modes ( Before connecting the camcorder, select the [TV TYPE] setting according to the TV set to which you will connect the camcorder - [WIDE TV]: TV sets with 16:9 aspect ratio or [NORMAL TV]: TV sets with 4:3 aspect ratio ( 35). - Page 63 Connection Diagram: TVs with SCART terminal Signal flow STV-250N Stereo Video Cable PC-A10 SCART Adapter (Supplied) Open the terminal cover 1. Turn off all devices before starting the connections. 2. Connect the STV-250N Stereo Video Cable to the camcorder’s AV terminal and the terminals on the TV or VCR.
-
Page 64: Recording To A Vcr
Recording to a VCR You can copy your recordings by connecting the camcorder to a VCR or a digital video device. For a connection diagram showing how to connect the camcorder to a VCR see the previous section Playing Back on a TV Screen ( 62). -
Page 65: Troubleshooting
Troubleshooting Trouble? If you have a problem with your camcorder, refer to this checklist. Consult your dealer or a Canon Service Center if the problem persists. Power Source Problem Solution • Camcorder will not turn on. Battery pack is exhausted. Replace or charge the battery •... - Page 66 Problem Solution • The disc’s rotation can be The disc is activated from time to time. This is not a – faintly heard. malfunction. • Occasionally the operation sound can be heard. After using the camcorder for This is not a malfunction. Turn the camcorder off and let it cool –...
- Page 67 Playback/Editing Problem Solution Pressing the playback button Check that the disc contains recorded scenes. – does not start playback. Load a disc. Set the camcorder to You may not be able to play with this camcorder discs – recorded or edited with other DVD recorders or computer DVD drives.
-
Page 68: List Of Messages
Playing Back the Disc in an External DVD Device External DVD device refers to DVD players, DVD recorders, computer’s DVD drives and other digital devices. Problem Solution There is a brief stop between Depending on the DVD player, there might be a very short –... - Page 69 Message Explanation CANNOT DIVIDE THE Photomovie scenes cannot be divided. SCENE You may not be able to divide very short scenes. – Scenes cannot be divided when the disc already contains 999 – scenes. You may not be able to further divide scenes shorter than 5 –...
-
Page 70: Handling Precautions
Handling Precautions Do’s & Don’ts Camcorder Do not subject the camcorder to vibrations or strong impacts while the DISC access indicator is on or flashing. The data may not be correctly recorded on the disc, and the recording may be permanently lost. Do not touch the pick up lens. - Page 71 Although the battery pack’s operating temperature range is from 0 °C to 40 °C, the optimal range is from 10 °C to 30 °C. At cold temperatures, performance will temporarily decline. Warm it in your pocket before use. Replace the battery pack if the usable time after full charge diminishes substantially at normal temperatures.
-
Page 72: Maintenance/Others
Maintenance/Others Storage If you do not intend to use the camcorder for a long time, store it in a place free of dust, in low humidity, and at temperatures not higher than 30 °C. Cleaning Camcorder Body Use a soft, dry cloth to clean the camcorder body. Never use chemically treated cloth or volatile solvents such as paint thinner. -
Page 73: Using The Camcorder Abroad
You can use the compact power adapter to operate the camcorder and to charge battery packs in any country with power supply between 100 and 240 V AC, 50/60 Hz. Consult the Canon Service Center for information on plug adapters for overseas use. Playback on a TV Screen You can only play back your recordings on TVs compatible with the PAL system. -
Page 74: System Diagram
System Diagram Additional Information (Availability differs from area to area) WS-20 Wrist Strap BP-208 CG-300E Battery Pack Battery Charger Shoulder Strap CA-570 Compact Mini DVD Disc Power Adapter DVD-R/RW BP-208 Battery Pack PC-A10 SCART Adapter STV-250N Stereo Video Cable DVD player/ recorder Mini DVD Disc DVD-R/RW... -
Page 75: Optional Accessories
Use of genuine Canon accessories is recommended. This product is designed to achieve excellent performance when used with genuine Canon accessories. Canon shall not be liable for any damage to this product and/or accidents such as fire, etc., caused by the malfunction of non-genuine Canon accessories (e.g., a leakage and/or explosion of a battery pack). - Page 76 A handy camcorder bag with padded compartments and plenty of space for accessories. This mark identifies genuine Canon video accessories. When you use Canon video equipment, we recommend Canon-brand accessories or products bearing the same mark. Downloaded From VideoCamera-Manual.com Manuals...
-
Page 77: Specifications
Specifications DC100/DC95 System Disc Recording System Video: DVD-VIDEO (VIDEO mode) DVD-VR (VR mode) only with 8 cm DVD-RW Video Compression: MPEG2 Audio Compression: Dolby Digital 2ch Still Images: Exif 2.2 compliant with JPEG compression Television System CCIR standard (625 lines, 50 fields) PAL color signal Image Sensor 1/6-inch CCD, approx. - Page 78 CA-570 Compact Power Adapter Power supply 100 – 240 V AC, 50/60 Hz Power consumption 17 W Rated output 8.4 V DC, 1.5 A Operating temperature 0 – 40 °C Dimensions 52 x 90 x 29 mm Weight 135 g BP-208 Battery Pack Battery type Rechargeable Lithium Ion Battery...
-
Page 79: Index
Index only. 16:9 screen ratio ....23 9 Point AiAF* ....43 Image enhancing effects . - Page 80 Recording - Movies ....22 Recording - Still images* ... 24 XP mode ......36 Recording data .
- Page 81 P.O. Box 2262, 1180 EG Amstelveen, the Netherlands Canon UK Ltd. CCI Service Centre, Unit 130 Centennial Park, Borehamwood, Hertfordshire, WD6 3SE, England Telephone 0870-241-2161 Canon Australia Pty. Ltd. Info-Line: 131383 www.canon.com.au Canon New Zealand Ltd. Customer Care: (09) 489 0470 www.canon.co.nz...