Philips Pocket Memo Digital Recorder User Manual
Pocket memo digital recorder & speechexec pro dictate software
Hide thumbs
Also See for Pocket Memo Digital Recorder:
- Quick reference manual (6 pages) ,
- Manual (184 pages) ,
- Manual (184 pages)
Table of Contents
Advertisement
Philips Pocket Memo Digital Recorder
Philips SpeechExec Pro Dictate Software
Download a copy of this manual:
http://www.tncourts.gov/docs/documents/administrative-office-courts/dcr-handheld-recorder-install-
procedures
Download a copy of the Quick Reference:
http://www.tncourts.gov/docs/documents/administrative-office-courts/dcr-handheld-recorder-cheat-sheet-
roxio-users
&
User Manual
(Revised June 14, 2012)
For More Information, please contact
Administrative Office of the Courts
Technology Division
(800) 448-7980
(615) 741-2687
Advertisement
Table of Contents

Related Manuals for Philips Pocket Memo Digital Recorder


Summary of Contents for Philips Pocket Memo Digital Recorder
-
Page 1: User Manual
Philips Pocket Memo Digital Recorder & Philips SpeechExec Pro Dictate Software User Manual (Revised June 14, 2012) Download a copy of this manual: http://www.tncourts.gov/docs/documents/administrative-office-courts/dcr-handheld-recorder-install- procedures Download a copy of the Quick Reference: http://www.tncourts.gov/docs/documents/administrative-office-courts/dcr-handheld-recorder-cheat-sheet- roxio-users For More Information, please contact Administrative Office of the Courts... -
Page 2: Table Of Contents
Table of Contents About the Philips Digital Pocket Memo Recorder ............... 3 Understanding the Parts of the DPM Recorder ................4 Getting Started ........................... 5 Install the batteries ......................... 5 Memory Card .......................... 5 Recharge the batteries ......................5 Using the docking station: ....................5 Using the USB Cable and Computer ................... -
Page 3: About The Philips Digital Pocket Memo Recorder
The CD may then be burned using Roxio. Go to a different computer that does not have the Philips software installed on it and verify that the recording may be heard. If you can hear the recording, this verifies that all settings are appropriately set and no one has changed them. -
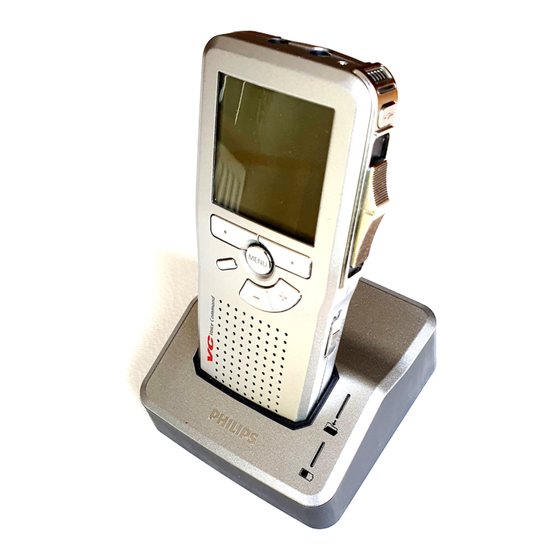
Page 4: Understanding The Parts Of The Dpm Recorder
Understanding the Parts of the DPM Recorder Microphone Socket Headphone Socket Fast Forward Button EOL (End of Letter) Button Display Slide Switch Smart Buttons Menu Button +/-, Menu Navigation and Volume Control Function Button On/Off Switch Download Indicator LED Charge Indicator LED Docking Station Smart Buttons The button function is represented directly above the button in the display. -
Page 5: Getting Started
Getting Started Install the batteries 1. The On/Off switch on the recorder is in the OFF position. 2. Open the battery compartment on the back side of recorder. Slide cover outwards. 3. Insert the two AAA batteries matching the polarity as indicated. -
Page 6: Using The Usb Cable And Computer
Using the USB Cable and Computer 1. Locate the USB cable and connect the small flat end into the back of the charging station. 2. Plug the larger flat end of the cable into the USB port on the front of the computer. 3. -
Page 7: Recording Format
13. Once settings are correct then press the [Menu] button to save those changes. Lastly, press the [Back] smart button to get out of the submenu and main menu. Recording format The recording format determines the audio quality of recordings and affects the number of audio files that can fit on the memory card. -
Page 8: Power Save Mode
7. Press the [OK] smart button to save settings. 8. Press the [Back] smart button to get out of the submenu and main menu lists. Philips SpeechExec Software The software program will guide the User through device configurations and settings for the DPM recorder. - Page 9 1. Insert the installation DVD software that came with the recorder in the CD/DVD- ROM drive. 2. The computer should automatically detect the set-up program and prompt you to begin the installation process. If the program does not start to install automatically after a minute or so, click on the My Computer icon on the computer’s desktop.
- Page 10 6. Accept the license agreement, and then click [Next]. 7. Enter the product key found inside the Software CD case. 8. Enter TNDCR in the First name field and then click [Next]. Page 10 of 33...
- Page 11 9. Verify that Typical is selected as the Setup Type and then click [Next]. 10. Click on the [Install] button. 11. Click on the [Finish] button. Page 11 of 33...
- Page 12 12. Double click on this icon on your desktop to open the program or you can go to Start Programs Philips SpeechExec Philips SpeechExec Pro Dictate. The program is looking for an Internet connection, but will not find it therefore you will see the following message.
- Page 13 15. The system will attempt again to connect to the Internet. It will generate the following error message. Check the checkbox to ‘Show other activation options’. Then click [OK]. 13. Locate ‘Other activation options’. ‘Select an offline option for activation’ from the drop down options.
- Page 14 @ 1-800-448-7980 and they will help you with this activation process. 20. Open Internet Explorer and on the address bar enter: http://www.license.dictation.philips.com/ 21. First you will enter the product key found in the Software CD case below the bar code. Then click on the [Login] button.
- Page 15 22. Verify license information displays PERMANENT, and then click on the ‘Activate license’. 23. Enter the Activation short code that you wrote in the white space above the Product Key in the case. Do not fill out any of the personal information, just click on the [Activate] button.
- Page 16 24. The system will generate that activation is successful. It will display an activation response key that will have to be entered on the DCR computer where you are installing the software program. Write this number down on the inside of the Software CD case on the white space below the Product Key.
-
Page 17: Configure Additional Settings
29. Open the software program if not already opened. Double click on this icon on your desktop to open the program or you can go to Start Programs Philips SpeechExec Philips SpeechExec Pro Dictate. Configure Additional Settings... - Page 18 3. Click on the DPM/DT Configuration menu option. a. Then click on DPM Wizard. b. Click on the Start Wizard link found in the right pane. c. Click on DPM 9600 as the Select DPM device type. Next click [Ok]. 9.
- Page 19 11. Verify or select the ‘Recording Format and Microphone Sensitivity’ settings. Set the microphone sensitivity on high for conference. Select Classic DSS mode and checkmark to enable the noise reduction. Then click [Next] to continue. 12. At the DMP File names screen, verify the settings: File name is set to Author and Dictation number is set to ‘Continue existing sequence’.
-
Page 20: Dictation
20. At the Additional Information screen, do not select to ‘Start the New User Wizard’ when you open the program. Click [Next] to continue. The wizard configuration settings are complete but there are other settings you need to confirm and establish. General Settings Menu List Dictation Click on Dictation General Configuration from the General Settings menu. -
Page 21: Rules
3. When these settings have been set then unmark both check boxes as shown below. Click the [Apply] button to save settings made. Rules Click on Rules Author Profiles from the General Settings menu. Author Profiles 1. Verify the author is TNDCR. To change the author name, click once on the name to highlight then click the [Modify] button. -
Page 22: Delivery
Delivery Click on Delivery Manual Sending from the General Settings menu. 1. Uncheck the check boxes by Email and FTP. 2. Click the [Apply] button to save changes made. DPM/DT Configuration Click on DPM/DT Configuration Download from the General Settings menu. Download 1. -
Page 23: Automatic Conversion
4. At the Downloaded dictations section, check the checkboxes: ‘Create the SpeechExec properties at DPM download’ and ‘Set < Transcription Pending> state for all DPM files’. 5. Next click the [Apply] button to save settings made. Automatic conversion Click on Automatic conversion from the DPM/DT Configuration submenu. 1. -
Page 24: Program Options
Name new folder Court Hearings – DPM and click the [OK] button. b. The path will display: C:\Court Hearings - DPM. c. Check the checkbox to ‘Delete the downloaded dictations from original path’. d. Click the [Apply] button to save changes made. Program Options Click on Program Options from the DPM/DT Configuration submenu. -
Page 25: Recording
Recording Click on Recording from the Recorder/Player submenu. 1. Verify the dictation audio format is set to WAV with PCM as the format type and 8,000 kHz, 16 Bit, Mono for the attribute. If not set this way then click the Configure…... -
Page 26: Transfer Of Settings To Your Dpm Device
Transfer of Settings to your DPM Device This step is very important so that the disc copy will playback on any computer. 1. Click on the DPM/DT Configuration option from the General Settings menu. 2. Click on the DPM Settings submenu option. a. -
Page 27: Understanding The Display Indicators And Symbols
Understanding the Display Indicators and Symbols Recording format Battery level indicator Device is recording Recording / Playback time Current position in recording Position bar Recording number Slide Switch positions Current function of the Current function of the left Smart button right Smart button Moving Between Recordings 1. -
Page 28: Finish (Lock) A Recording
Finish (Lock) a Recording EOL button When you are finished with a recording file and there are no additional changes to be made then perform a lock on your file. This will protect the file from being deleted accidently. 1. With the slide switch on the ‘Stop’ position then press the [EOL] End of Letter button on the top right side of the recorder. -
Page 29: Using Philips Speechexec Software
Programs Phillips SpeechExce Phillips SpeechExce Pro Dicatate. This will open the program. 2. To exit Philips SpeechExec program select from the menu bar File Exit. If you use the X in the upper right corner it minimizes the program but places it in your system tray at the bottom of your computer. - Page 30 4. The system will prompt you to choose a download source. Select ‘From connected DPM device’ and click the [Download] button. You are selecting to download the file from the recording device. 5. The DPM File Download dialog box opens displaying your file as being selected for download.
-
Page 31: Using Roxio To Burn A Copy On A Cd
Using Roxio to Burn a Copy on a CD 1. Insert a CD-R disk into the disc drive on your computer. 2. Open Roxio by clicking StartProgramsRoxio Easy Media Creator 9DataCreator Classic. 3. Go to the Select Source section. You have three icons below Select Source, click on the folder icon. - Page 32 6. The files will appear in the bottom half of the screen in the Data Disc Project section. 7. Look at the menu bar and click on Burn. 8. The Burn Setup dialog opens, just click the [OK] button. This starts the burning of the CD process.
- Page 33 9. When the progress bar finishes it will automatically close the dialog box and the CD drive opens so you can remove your disk. 10. You can play this CD in a CD player or computer using Media Player to playback the court hearing for transcription.