HP Z820 Workstation Series User Manual
Hide thumbs
Also See for Z820 Workstation Series:
- Specification (76 pages) ,
- Instruction manual (24 pages) ,
- Brochure & specs (2 pages)
Table of Contents
Advertisement
Advertisement
Table of Contents
Troubleshooting

Related Manuals for HP Z820 Workstation Series


Summary of Contents for HP Z820 Workstation Series
- Page 1 HP Z220 SFF, Z220 CMT, Z420, Z620, and Z820 Workstation Series User Guide...
- Page 2 The warranties for HP products are set forth in the express limited warranty statements accompanying such products. Nothing herein should be construed as constituting an additional warranty.
-
Page 3: About This Guide
About this guide This guide provides setup and troubleshooting information for the HP Z Workstation series. It includes these topics: Guide topics Locating HP resources on page 1 Workstation features on page 7 Setting up the workstation on page 20... - Page 4 About this guide...
-
Page 5: Table Of Contents
Z220 SFF Workstation front panel ..................8 Z220 SFF Workstation rear panel ..................9 HP Z220 CMT Workstation components .................... 10 HP Z220 CMT Workstation front panel ................10 HP Z220 CMT Workstation rear panel ................11 HP Z420 Workstation components ..................... 12 HP Z420 Workstation front panel .................. - Page 6 HP Installer Kit for Linux (HPIKL) ....................... 43 Setting up Red Hat Enterprise Linux ....................43 HPIKL driver disc ....................... 44 Installing with the HP Red Hat Linux driver disc ..............44 Warranty ..........................44 Setting up SUSE Linux Enterprise Desktop (SLED) ................45 Setting up preloaded SLED ....................
- Page 7 8 Diagnostics and Minor Troubleshooting ......................49 Calling support ........................... 49 Locating ID labels ..........................50 Locating warranty information ......................50 HP troubleshooting resources and tools .................... 50 HP Support Assistant (HPSA) ................... 50 Online support ........................51 Troubleshooting a problem ................52 Instant Support and Active Chat ...............
- Page 8 viii...
-
Page 9: Locating Hp Resources
Locating HP resources This section provides information on the following resources for your HP workstation: Topics Product information on page 1 Technical specifications ● HP Cool Tools ● Regulatory information ● Accessories ● System board ● Serial number, Certificate of Authenticity, and Genuine ●... - Page 10 To access these applications: Click the HP Cool Tools icon on the desktop, or ● Open the HP Cool Tools folder by selecting Start > All Programs > HP > HP ● Cool Tools. To learn more about these applications, click HP Cool Tools—Learn More.
-
Page 11: Support
HP Care Pack Services offer upgraded service levels to extend and expand a standard product warranty. You can find the expressly provided HP Limited Warranty applicable to your product in the start menu on your PC and/or in the CD/DVD provided in the box. For some countries/regions, a printed HP Limited Warranty is provided in the box. -
Page 12: Product Documentation
To learn how to remove and replace workstation components, go to videos http://www.hp.com/go/sml. Product notifications Subscriber's Choice is an HP program that allows you to sign up to receive driver and software alerts, proactive change notifications (PCNs), the HP newsletter, customer advisories, and more. Sign up at www.hp.com/united-states/subscribe/ gateway/?jumpid=go/subscribe-gate1. -
Page 13: Product Diagnostics
Product diagnostics Table 1-4 Product diagnostics Topic Location Windows 7 Diagnostics tools: The HP Vision Diagnostics utility is pre-installed on select Windows 7 workstations. HP Vision Diagnostics ● (Z420, Z620, Z820) HP PC Hardware ● The HP PC Hardware Diagnostics tool is pre-installed on Windows 7 workstations. -
Page 14: Product Updates
F10 Setup utility. Go to File > System Information. Note the BIOS version and date and compare it with the BIOS versions that appear on the HP website. For Windows 7, you can also find the BIOS version number, as follows: Go to Start >... -
Page 15: Workstation Features
For complete and current information on supported accessories and components for your workstation, see http://partsurfer.hp.com. Topics HP Z220 SFF Workstation components on page 8 HP Z220 CMT Workstation components on page 10 HP Z420 Workstation components on page 12 HP Z620 Workstation components on page 14... -
Page 16: Hp Z220 Sff Workstation Components
HP Z220 SFF Workstation components This section describes the HP Z220 Small Form Factor (SFF) Workstation components. For complete and current information on supported accessories and components for the computer, see http://partsurfer.hp.com. Z220 SFF Workstation front panel Figure 2-1 Front panel components... -
Page 17: Z220 Sff Workstation Rear Panel
Simultaneous usage of integrated Intel HD graphics and discrete graphics cards (in order to drive more than two displays) can be enabled using the Computer (F10) Setup Utility. However, HP recommends using only discrete graphics cards when attaching three or more displays. -
Page 18: Hp Z220 Cmt Workstation Components
HP Z220 CMT Workstation components This section describes the HP Z220 Convertible Mini Tower (CMT) Workstation components. For complete and current information on supported accessories and components for the computer, see http://partsurfer.hp.com. HP Z220 CMT Workstation front panel Figure 2-3... -
Page 19: Hp Z220 Cmt Workstation Rear Panel
Simultaneous usage of integrated Intel HD graphics and discrete graphics cards (in order to drive more than two displays) can be enabled using the Computer (F10) Setup Utility. However, HP recommends using only discrete graphics cards when attaching three or more displays. -
Page 20: Hp Z420 Workstation Components
HP Z420 Workstation components HP Z420 Workstation front panel Figure 2-5 Front panel components Table 2-5 Component descriptions Optical drive USB 3.0 ports (2, blue) Power button Headphone connector Hard drive activity light Microphone connector IEEE–1394a FireWire connector USB 2.0 port (1, black) -
Page 21: Hp Z420 Workstation Rear Panel
HP Z420 Workstation rear panel Figure 2-6 Rear panel components Table 2-6 Component descriptions Power supply Built-In Self Test Audio line-out connector (green) (BIST) LED Universal chassis clamp opening Microphone connector (pink) AMT-enabled RJ-45 network PS/2 mouse connector (green) connector (orange) USB 2.0 ports (4, black) -
Page 22: Hp Z620 Workstation Components
HP Z620 Workstation components HP Z620 Workstation front panel Figure 2-7 Front panel components Table 2-7 Component descriptions Optical drive USB 3.0 ports (2, blue) Power button Headphone connector Hard drive activity light Microphone connector USB 2.0 port (black) IEEE–1394a FireWire connector... -
Page 23: Hp Z620 Workstation Rear Panel
HP Z620 Workstation rear panel Figure 2-8 Rear panel components Table 2-8 Component descriptions Power cord connector Audio line-out connector (green) PS/2 mouse connector (green) Microphone connector (pink) USB 2.0 ports (4, black) USB 3.0 ports (2, blue) RJ-45 network connectors (orange) -
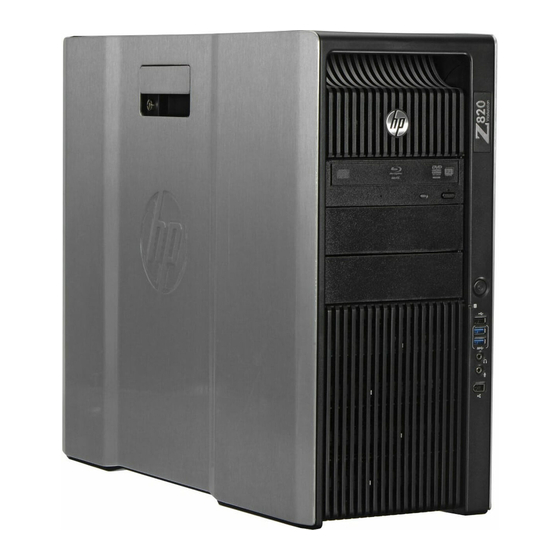
Page 24: Hp Z820 Workstation Components
HP Z820 Workstation components HP Z820 Workstation front panel Figure 2-9 Front panel components Table 2-9 Component descriptions Optical drive USB 3.0 ports (2, blue) Power button Headphone connector Hard drive activity light Microphone connector USB 2.0 port (1, black) IEEE–1394a FireWire connector... -
Page 25: Hp Z820 Workstation Rear Panel
HP Z820 Workstation rear panel Figure 2-10 Rear panel components Table 2-10 Component descriptions Power cord connector USB 3.0 ports (2, blue) PS/2 mouse connector (green) USB 2.0 ports (4, black) Audio line-in connector (blue) Audio line-out connector (green) RJ-45 network connectors (2, orange) -
Page 26: Product Specifications
Product specifications Workstation weights and dimensions HP Z220 HP Z220 Characteristic HP Z420 HP Z620 HP Z820 Standard 7.5 kg 11.6 kg 13.2 kg 17.9 kg 26.6 kg configuration (16.53 lb.) (25.57 lb) (29.10 lb) (39.46 lb) (58.64 lb) Minimum 6.6 kg... -
Page 27: Environmental Specifications
Environmental specifications Table 2-11 HP Workstation environmental specifications Characteristic HP Z220 SFF, Z220 CMT, Z420, Z620, and Z820 Workstations Operating: 5°C to 35°C (40°F to 95°F) Non-operating: -40°C to 60°C (-40°F to 140°F) Temperature NOTE: Derate by 1°C (1.8°F) for every 305 m (1,000 ft) altitude over 1,524 m (5,000 ft). -
Page 28: Setting Up The Workstation
Setting up the workstation This chapter describes how to set up your workstation. Topics Ensuring proper ventilation on page 20 Setup procedures on page 22 Adding monitors on page 23 Converting to desktop configuration (Z220 CMT and Z420) on page 29 Ensuring proper ventilation Proper ventilation for the system is important for workstation operation. - Page 29 NOTE: The ambient upper limit of 35°C (95°F) only good up to 1524 m (5000 ft) elevation. There is a 1°C (33.8°F) per 304.8 m (1000 ft) derating above 1524 m (5000 ft). So, at 3,048 m (10,000 ft), the upper ambient air temperature limit is 30°C (86°F). For cabinet installation, ensure adequate cabinet ventilation and ensure that the ambient ●...
-
Page 30: Setup Procedures
(for example, by attaching a two-pin adapter). The grounding pin is an important safety feature. NOTE: An HP Z820 Workstation with a 1125 W power supply might require more power than the Site Preparation Guide typical office environment can supply. For details, see the for the workstation at http://www.hp.com/support/workstation_manuals. -
Page 31: Adding Monitors
● Determine the kind of graphics performance you want. ● Note the type of graphics connector used by each monitor. HP provides graphics cards with ● DisplayPort (DP) and DVI interfaces, but you can use adapters and third-party cards to interface to other graphics formats, including DVI-I, HDMI, or VGA. - Page 32 If you want to add a new graphics card or cards: Determine which graphics card HP supports that will best fit your needs in terms of number of monitors, compatibility with the monitors you plan to use, and performance. See...
-
Page 33: Finding Supported Graphics Cards
This interface is a dual-monitor graphics interface card that supports two VGA or two DVI monitors. NOTE: HP graphics cards include monitor cable adapters unless otherwise indicated. DisplayPort cards have the highest performance; VGA graphics cards have the lowest. Identifying monitor connection requirements The following are various scenarios for connecting monitors. -
Page 34: Connecting And Configuring Monitors
Adapters are available to connect the DMS-59 output to two DVI or two VGA monitors. Connecting and configuring monitors NOTE: The graphic cards that HP supports typically allow at least two monitors, as shown in this section; some supported cards allow more monitors. Refer to the graphics card documentation for details. - Page 35 Connect the other ends of the graphics cables to the monitors. Figure 3-5 Connecting cables to the monitors Connect one end of the monitor power cord to the monitor and the other end to a grounded power outlet. Configure the monitor. For details, refer to Microsoft Help or to http://www.microsoft.com, or to your Linux Help or website.
-
Page 36: Using A Third-Party Graphics Configuration Utility
Refer to your graphics card documentation for more information. NOTE: Monitor configuration utilities are also often available on the HP support website. Customizing the monitor display (Windows) You can manually select or change the monitor model, refresh rates, screen resolution, color settings, font sizes, and power management settings. -
Page 37: Converting To Desktop Configuration (Z220 Cmt And Z420)
This workstation can be operated in mini-tower or desktop configuration. Follow these steps to convert to desktop configuration: NOTE: See a video of this task at http://www.hp.com/go/sml. Prepare the workstation for component installation. Remove the front bezel from the workstation. - Page 38 On the back of the front bezel, squeeze the HP logo mounting tabs (1) and press the logo outward (2). Figure 3-8 Rotating the HP logo Rotate the HP logo 90 degrees counterclockwise, then release the logo and press it back into place.
-
Page 39: Installing Optional Components
Security Some HP workstations have a lock on the side access panel. The key for this lock is shipped attached to the back panel of the workstation chassis. Additional security features reduce the risk of theft and warn of chassis intrusion. Refer to the... -
Page 40: Setting Up, Backing Up, Restoring, And Recovering Windows 7
Backing up, restoring, and recovering Windows 7 ● CAUTION: Do not add optional hardware or third-party devices to the HP workstation until the operating system is successfully installed. Adding hardware might cause errors and prevent the operating system from installing correctly. -
Page 41: Transferring Files And Settings
In case of system failure, you can use the backup files to restore the contents of your workstation. See Backing up your information on page NOTE: HP recommends that you print the recovery procedures and save them for later use, in case of system instability. Backing up your information NOTE: Windows includes the User Account Control feature to improve the security of your workstation. -
Page 42: System Restore
NOTE: For detailed instructions on various backup and restore options, perform a search for these topics in Help and Support. To access Help and Support: select Start and then select Help and Support. You can back up your information to an optional external hard drive, a network drive, or discs. Note the following when backing up your information: Store personal files in the Documents library, and back it up regularly. -
Page 43: System Recovery
CAUTION: System Recovery deletes all data and programs that you have created or installed. A Windows system from the HP factory ships with a recovery partition. You can use the recovery partition to recover the factory operating system. Turn off the workstation. If necessary, press and hold the power button until the workstation turns off. -
Page 44: Using Hp Recovery Disc Operating System Discs
NOTE: For more information on using the restore media, refer to the white paper “Restoring Windows 7 on the HP Z420, Z620 and Z820: Using HP OS DVD and Driver DVD.” This white paper can be found on http://www.hp.com/support. Chapter 4 Setting up, backing up, restoring, and recovering Windows 7... -
Page 45: Setting Up And Restoring Windows 8
Internet, Microsoft activates your operating system. This process takes about 15 to 30 minutes. Carefully read and follow the instructions on the screen. We recommend that you register your computer with HP; so you can receive important software updates, facilitate support questions, and sign up for special offers. You can register your computer with HP using the Register with HP app on the Start screen. -
Page 46: Downloading Windows 8 Updates
For detailed instructions on various backup and restore options, perform a search for these topics in Help and Support. From the Start screen, type help, and then select Help and Support. In case of system instability, HP recommends that you print the recovery procedures and save them for later use. -
Page 47: Performing A System Recovery
Help and Support. From the Start screen, type help, and then select Help and Support. If possible, back up all personal files. If possible, check for the presence of the HP Recovery partition and the Windows partition: From the Start screen, type e, and then click Windows Explorer. – or –... -
Page 48: Using F11 Recovery Tools
The recovery tool reinstalls the operating system and HP programs and drivers that were installed at the factory. Software not installed at the factory must be reinstalled. -
Page 49: Using Hp Windows 8 Restore Media (Purchased Separately)
Using HP Windows 8 restore media (purchased separately) To order HP Windows 8 restore media, go to http://www.hp.com/support, select your country or region, and follow the on-screen instructions. You can also order the media by calling support. CAUTION: Using HP Windows 8 restore media completely erases hard drive contents and reformats the hard drive. -
Page 50: Setting Up And Restoring Linux
Setting up and restoring Linux HP offers a variety of Linux solutions for HP workstation customers: HP certifies and supports Red Hat Enterprise Linux (RHEL) on HP workstations. ● HP certifies and supports SUSE® Linux Enterprise Desktop (SLED) on HP workstations. -
Page 51: Hp Installer Kit For Linux (Hpikl)
HP Installer Kit for Linux (HPIKL) The HP Installer Kit for Linux helps users install certified versions of RHEL or SLED on HP workstations. It is available as an operating system option on all HP workstations. The kit: Contains tested drivers that augment and/or replace those found in RHEL or SLED to enable ●... -
Page 52: Hpikl Driver Disc
The driver disc is used during this phase. All content added by HP is in the /HP directory on the disc. You can use it to build your own image or to browse the HP content. -
Page 53: Setting Up Suse Linux Enterprise Desktop (Sled)
Setting up SUSE Linux Enterprise Desktop (SLED) HP offers a 64-bit SLED 11 preload on some Z series Workstations and supports 64-bit SLED 11 on other workstations. Various versions of SLED are certified and supported by SUSE on HP workstations. For more information, refer to the SUSE certification bulletin search page at http://developer.novell.com/... -
Page 54: Restoring Sled (Preloaded Systems Only)
Proprietary graphics drivers supported by HP and the graphics vendors are available with the HP Installer Kit for Linux, with the SLED 11 preload on Z series Workstations, and from HP Workstation Support at http://www.hp.com/go/workstationsupport. -
Page 55: Updating The Workstation
Updating the workstation HP is constantly working on improving your total workstation experience. To ensure that the workstation leverages the latest enhancements, HP recommends that you install the latest BIOS, driver, and software updates on a regular basis. Updating the workstation after first boot... -
Page 56: Upgrading Bios
HP workstation. If you did not purchase your device from HP, HP recommends visiting the HP website first to see if your device and its drivers have been tested for HP workstation compatibility. If no driver is available, visit the device manufacturer's website to download the latest drivers. -
Page 57: Diagnostics And Minor Troubleshooting
(tower and desktop configurations) or on a pull-out card on the side of the display (all-in-one configurations). For a listing of all worldwide support phone numbers, go to http://www.hp.com/support, select your region, and click Connect with HP in the upper-right corner. -
Page 58: Locating Id Labels
HPSA provides automated updates, onboard diagnostics, product information, and guided assistance to help maintain optimum workstation performance. To access HPSA, click Start > All Programs > HP Help and Support > HP Support Assistant. Chapter 8 Diagnostics and Minor Troubleshooting... -
Page 59: Online Support
— technical support information for workstations ● http://welcome.hp.com/country/us/en/wwcontact_us.html — worldwide support: chat with a ● technician, obtain email support, find support numbers, or locate an HP service center http://www.hp.com/support/workstation_swdrivers — software and drivers for workstations ● HP troubleshooting resources and tools... -
Page 60: Troubleshooting A Problem
Active Chat enables you to electronically submit a support ticket to HP over the Internet. When you submit a support ticket, Active Chat collects information about the computer and passes it to an online support specialist. -
Page 61: Helpful Hints
If you recently added new hardware, remove the hardware and verify if the workstation functions ● properly. If you recently installed new software, uninstall the software and verify if the workstation ● functions properly. If the monitor connected to a tower, desktop or all-in-one computer is blank: ● HP troubleshooting resources and tools... -
Page 62: Customer Self Repair
NOTE: Some components are not eligible for customer self-repair and must be returned to HP for service. Call HP Support for further instructions before attempting to remove or repair these components. Other troubleshooting options... -
Page 63: Routine Care
Routine Care General cleaning safety precautions Never use solvents or flammable solutions to clean the computer. ● Never immerse any component in water or cleaning solutions; apply any liquids to a clean cloth ● and then use the cloth on the component. Always unplug the computer before cleaning the keyboard, mouse, or air vents. -
Page 64: Cleaning The Keyboard
Cleaning the keyboard CAUTION: Use safety glasses equipped with side shields before attempting to clean debris from under the keys. If the keyboard has an on/off switch, turn it off. ● Maintenance and Service Guide Follow the safety precautions in the for your workstation before ●... -
Page 65: Cleaning The Mouse
Cleaning the mouse Maintenance and Service Guide Follow the safety precautions in the for your workstation before cleaning the computer. If the mouse has an on/off switch, turn it off. Wipe the body of the mouse with a damp cloth. If the mouse has a: Laser or LED: use a cotton swab dampened with cleaning solution to gently brush out any ●...