Motorola AP-7131N-FGR Installation Manual
Hide thumbs
Also See for AP-7131N-FGR:
- Installation manual (58 pages) ,
- Product reference manual (708 pages)
Table of Contents
Advertisement
Advertisement
Table of Contents

Related Manuals for Motorola AP-7131N-FGR


Summary of Contents for Motorola AP-7131N-FGR
- Page 1 Motorola Solutions AP-7131N-FGR Access Point INSTALLATION Installation Guide...
-
Page 3: Table Of Contents
3. Basic Configuration .................... 26 3.1 Configuring Your Browser for AP-7131N-FGR Support ......26 3.2 Configuring the Access Point . -
Page 5: Introduction
GUI applet. The AP-7131N-FGR enables you to configure one radio for 802.11a/n support, and the other for 802.11b/g/n support. The model available to the AP-7131N-FGR series include: •... -
Page 6: Document Conventions
Motorola Solutions AP-7131N-FGR Access Point Installation Guide 1.1 Document Conventions The following graphical alerts are used in this document to indicate notable situations: Tips, hints, or special requirements that you should take note of. NOTE Care is required. Disregarding a caution can result in data loss or CAUTION equipment malfunction. - Page 7 Introduction • Assign installation responsibility to the appropriate personnel. • Identify and document where all installed components are located. • Provide a sufficient number of power drops for your equipment. • Ensure adequate, dust-free ventilation to all installed equipment. • Identify and prepare Ethernet and console port connections. •...
-
Page 8: Hardware Installation
2.1 Precautions Before installing the AP-7131N-FGR, verify the following: • Do not install in wet or dusty areas without additional protection. Contact a Motorola Solutions representative for more information. • Verify the environment has a continuous temperature range between -20° C to 50° C. -
Page 9: Access Point Placement
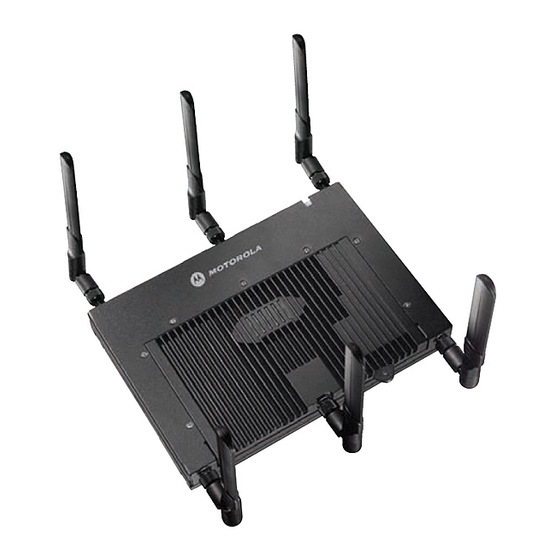
Hardware Installation Contact the Motorola Solutions Support Center to report missing or improperly functioning items. Some access points ship with a protective cover (facade) or a 6-element NOTE MIMO antenna. The cover disconnects from the access point as illustrated on the next page. When attached, LEDs continue to illuminate through the cover. -
Page 10: Antenna Options
Motorola Solutions AP-7131N-FGR Access Point Installation Guide • Point the access point antennas downward if attaching to the ceiling. To maximize the access point’s radio coverage area, Motorola Solutions recommends conducting a site survey to define and document radio interference obstacles before installing the access point. - Page 11 Antenna Module ML-2452-PTA3M3-036 3 Port MIMO Antenna An additional adapter is required to use ML-2499-11PNA2-01R and NOTE ML-2499-BYGA2-01R model antennas. Please contact Motorola Solutions for more information. The 5 GHz antenna suite includes the following models: Part Number Antenna Type...
-
Page 12: Power Injector System
2.4.2 Power Injector System The AP-7131N-FGR can receive power via an Ethernet cable connected to the GE1/POE (LAN) port. When users purchase a WLAN solution, they often need to place access points in obscure locations. In the past, a dedicated power source was required for each access point in addition to the Ethernet infrastructure. - Page 13 Hardware Installation The Power Injector can be installed free standing, on an even horizontal surface or wall mounted using the power injector’s wall mounting key holes. The following guidelines should be adhered to before cabling the Power Injector to an Ethernet source and an access point: •...
-
Page 14: Mounting The Access Point
Power Injector for a description of the device’s LEDs. 2.5 Mounting the Access Point The AP-7131N-FGR can attach to a wall, mount under a suspended T-Bar or above a ceiling (plenum or attic) following the same installation instructions. Choose one of the following mounting options based on the physical environment of the coverage area. - Page 15 Hardware Installation The hardware and tools (customer provided) required to install the access point on a wall consists of: • Two Phillips pan head self-tapping screws (ANSI Standard) #6-18 X 0.875in. Type A or AB Self-Tapping screw, or (ANSI Standard Metric) M3.5 X 0.6 X 20mm Type D Self-Tapping screw •...
- Page 16 Motorola Solutions AP-7131N-FGR Access Point Installation Guide...
- Page 17 Hardware Installation To mount the access point on a wall using the provided template: 1. Xerox copy the template (on the previous page) to a blank piece of paper. Do not reduce or enlarge the scale of the template. If printing the mounting template (on the previous page) from an CAUTION electronic PDF, dimensionally confirm the template by measuring each value for accuracy.
- Page 18 Ensure you are placing the antennas on the correct connectors to CAUTION ensure the successful operation of the AP-7131N-FGR access point. It is recommended the access point be mounted with the RJ45 cable NOTE connector oriented upwards or downwards to ensure proper operation.
- Page 19 To install the access point on a ceiling T-bar: 1. Motorola Solutions recommends you loop a safety wire — with a diameter of at least 1.01 mm (.04 in.), but no more than 0.158 mm (.0625 in.) — through the tie post (above the access point’s console connector) and secure the loop.
- Page 20 Motorola Solutions AP-7131N-FGR Access Point Installation Guide c. Ensure the cable length from the Ethernet source (host) to the Power Injector and access point does not exceed 100 meters (333 ft). The Power Injector has no On/Off power switch. The Power Injector receives power as soon as AC power is applied. For...
- Page 21 If the access point is utilizing remote management antennas, a wire NOTE cover can be used to provide a clean finished look to the installation. Contact Motorola Solutions for more information. 2.5.3 Above the Ceiling (Plenum) Installations An above the ceiling installation requires placing the access point above a suspended ceiling and installing the provided light pipe under the ceiling tile for viewing the rear panel status LEDs of the unit.
- Page 22 Motorola Solutions AP-7131N-FGR Access Point Installation Guide The mounting hardware required to install the access point above a ceiling consists of: The AP-7131N-FGR is Plenum rated to UL2043 and NEC1999 to support NOTE above the ceiling installations. To ensure UL compliance and proper...
- Page 23 5. Create a light pipe path hole in the target position on the ceiling tile. 6. Use a drill to make a hole in the tile the approximate size of the access point LED light pipe. Motorola Solutions recommends care be taken not to damage the CAUTION finished surface of the ceiling tile when creating the light pipe hole and installing the light pipe.
- Page 24 Motorola Solutions AP-7131N-FGR Access Point Installation Guide 12. Motorola Solutions recommends attaching safety wire to the access point safety wire tie point or security cable (if used) to the access point’s lock port. 13. Align the ceiling tile into its former ceiling space.
-
Page 25: Led Indicators
Hardware Installation 2.6 LED Indicators An AP-7131N-FGR access point has six LEDs on the top of the access point housing, and one optional LED light pipe at the bottom of the unit. However, an AP-7131N-FGR model access point does not use LED 6, as no third radio is available. - Page 26 Motorola Solutions AP-7131N-FGR Access Point Installation Guide 2.6.1 Dual Radio (2.4/5 Ghz) LEDs A dual radio (2.4/5 Ghz) AP-7131N-FGR access point has the following unique LED behavior: LED 1 LED 2 (LAN) LED 3 (WAN) LED 4 - 5 GHz LED 5 - 2.4 GHz...
-
Page 27: Configuration Options
Hardware Installation 2.6.2 Rear AP-7131N-FGR LED The LED on the rear (bottom) of the access point is optionally viewed using a single (customer installed) extended light pipe, adjusted as required to suit above the ceiling installations. The LED light pipe has the following color display and functionality LED 7 Blinking Red (160 msec) indicates a failure condition. -
Page 28: Initially Connecting To The Access Point
Motorola Solutions AP-7131N-FGR Access Point Installation Guide Few acronyms used in the MIB files: Table 1.1 Acronyms Portal Radio of an AP Management Information Base Local Area Network Wide Area Network Power Over Ethernet WLAN Wireless LAN Access Point Switch... - Page 29 4. Press <ESC> or <Enter> to access the access point CLI. 5. Enter the default username of “admin” and the default password of “motorola.” As this is the first time you are logging into the access point, you are prompted to enter a new password and set the county code.
-
Page 30: Basic Configuration
An AP-7131N-FGR model access point is compliant with the FIPS140-2 standard. The AP-7131N-FGR is only accessible using browsers that support the TLS 1.0 protocol. The AP-7131N-FGR is not accessible by browsers supporting the SSL 2.0 or SSL 3.0 protocols. Additionally, ensure JRE (version 1.6) is installed on the computer accessing the AP-7131N-FGR GUI applet. -
Page 31: Configuring The Access Point
Basic Configuration 3.1.2 Accessing the AP-7131N-FGR Using Mozilla Firefox To define the browser settings needed to access the AP-7131N-FGR using Mozilla Firefox: 1. Open the Mozilla Firefox browser and open the Tools > Options menu. 2. Select the Advanced tab, then select either the... - Page 32 Motorola Solutions AP-7131N-FGR Access Point Installation Guide 1. Start a browser and enter the following IP address in the address field: https://192.168.0.1 2. Log in using admin as the default Username and motorola as the default Password. Use your new password if it has been updated from default.
-
Page 33: Resetting The Access Point's Password
3. If the default login is successful, the Change Admin Password window displays. Change the 8-19 character password to ensure the AP-7131N-FGR is using a secure password different from the default password. Enter the current password and a new admin password in fields provided. Click Apply. Once the admin password has been updated, a warning message displays stating the access point must be set to a country. -
Page 34: Configuring "Basic" Device Settings
Motorola Solutions AP-7131N-FGR Access Point Installation Guide To contact Motorola Solutions Support in the event of a password reset requirement, go to https://portal.motorolasolutions.com/Support/US-EN Only a qualified installation professional should set or restore the CAUTION access point’s radio and power management configuration in the event of a password reset. - Page 35 Basic Configuration 3. Refer to the AP-71xx System Settings field to define the following parameters: a. Assign a System Name to define a title for this access point. The System Name is useful if multiple devices are being administered. b. Select the Country for the AP-7131’s country of operation.
- Page 36 Radio Configuration field to define how WLAN and WIPS are supported by the access point’s radio(s). A dual radio AP-7131N-FGR access point displays 7 configuration options. Refer to the following table for the options available to AP-7131N-FGR models. Radio Button AP-7131N-FGR Dual Radio SKU 2.4 GHz WLAN,...
- Page 37 Basic Configuration 5. Select the Quick Setup screen’s Network Configuration tab to define a minimum set of WAN or LAN configuration values. The WAN tab displays by default. a. Select the Enable WAN Interface checkbox to enable a connection between the access point and a larger network or outside world through the WAN port.
- Page 38 DHCP server to a host. Some of these parameters are IP address, network mask, and gateway. Motorola Solutions recommends the WAN and LAN ports should not both NOTE be configured as DHCP clients.
- Page 39 DHCP server over the LAN connection. Select the Bootp client option to enable a diskless system to discover its own IP address. Motorola Solutions recommends that the WAN and LAN ports should not NOTE be configured as DHCP clients at the same time. c. Enter the network-assigned IP Address of the access point.
- Page 40 WLAN from within the Quick Setup screen. Policies can be defined over time and saved to be used as needed as the access point’s security requirements change. Motorola Solutions recommends you familiarize yourself with the security options...
-
Page 41: Configuring Basic Security
By default, WPA2/CCMP Pre-Shared Key is enabled as a basic security scheme sufficient to protect the AP-7131N-FGR’s transmissions. For details on configuring other authentication and encryption options available to the access point, refer to the AP-7131N-FGR Access Point Product Reference Guide. The guide is available on the Motorola Solutions Web site, at https://portal.motorolasolutions.com/Support/US-EN... - Page 42 Motorola Solutions AP-7131N-FGR Access Point Installation Guide 3. Select the WPA2/CCMP (802.11i) option. 4. Configure the Key Rotation Settings as required to set Broadcast Key Rotation and the update interval. Broadcast Key Select the Broadcast Key Rotation checkbox to enable or disable Rotation broadcast key rotation.
-
Page 43: Excluding Mus From Association
Basic Configuration 5. Configure the Key Settings to set an 256-bit key. 256-bit Key Use a hexadecimal value, and enter 16 hexadecimal characters into each of the four fields displayed. Default (hexadecimal) 256-bit keys for WP2A/CCMP include: 1011121314151617 18191A1B1C1D1E1F 2021222324252627 28292A2B2C2D2E2F 6. - Page 44 Echo Test screen to specify a target MU and configure the parameters of the ping test. The WNMP ping test only works with Motorola Solutions MUs. Only use a Motorola Solutions MU to test connectivity using WNMP. To ping a specific MU to assess its connection with an access point:...
-
Page 45: Firmware Update
• Verify that there are three tamper evident labels on the appliance. The three tamper evident labels are applied over the panels and sides of the module at the factory to provide evidence of tampering. The tamper label has the Motorola logo printed on it. • Verify the firmware version. - Page 46 Motorola Solutions AP-7131N-FGR Access Point Installation Guide b. Set the username for the SFTP server login. admin(system.config)>set user myadmin c. Specify the name of the target firmware file. admin(system.config)>set file config.txt d. If the target firmware file resides within a directory, specify a complete path for the file.
-
Page 47: Where To Go From Here
This step is required as the earlier FIPS configuration is non-compliant with Common Criteria specification. 3. Login to the AP using the default username ‘admin’ and default password ‘motorola’. You will be asked to change your password. 4. To import the previously exported configuration, go to admin(system.config) -
Page 48: Specifications
Motorola Solutions AP-7131N-FGR Access Point Installation Guide Specifications 4.1 Physical Characteristics An AP-7131N-FGR access point has the following physical characteristics: Dimensions 5.50 in. Depth x 7.88 in. Width x 1.38 in. Height 14 cm Depth x 20.32 cm Width x 3.5 cm Height... - Page 49 Specifications Wireless Medium Direct Sequence Spread Spectrum (DSSS), Orthogonal Frequency Division Multiplexing (OFDM) Spatial multiplexing (MIMO) Network Standards 802.11a, 802.11b, 802.11g, 802.3, 802.11n Maximum Available Maximum available conducted transmit power per chain: 2.4Ghz: + 23dBm Transmit Power Maximum available conducted transmit power all chains: 2.4GHz: + 27.7dBm Maximum available conducted transmit power per chain: 5.2Ghz: + 20 dBm Maximum available conducted transmit power all chains: 5.2GHz: + 24.7dBm Transmit Power...
-
Page 50: Regulatory Compliance
All Motorola Solutions devices are designed to be compliant with rules and regulations in locations they are sold and will be labeled as required. Any changes or modifications to Motorola Solutions equipment, not expressly approved by Motorola Solutions, could void the user's authority to operate the equipment. -
Page 51: Health And Safety Recommendations
20 cm from all persons. Power Supply Use only a Motorola Solutions approved power supply output rated at 48Vdc and minimum 0.75A. The power supply shall be Listed to UL/CSA 60950-1; and certified to IEC60950-1 and EN60950-1 with... - Page 52 Motorola Solutions AP-7131N-FGR Access Point Installation Guide Use only a Motorola Solutions approved power supply. Use of alternative power supply will invalidate any approval given to this device and may be dangerous. Wireless Devices - Countries Country Selection Select only the country in which you are using the device. Any other selection will make the operation of this device illegal.
- Page 53 Regulatory Compliance Radio Frequency Interference Requirements – Canada This Class B digital apparatus complies with Canadian ICES-003. Cet appareil numérique de la classe B est conforme à la norme NMB-003 du Canada. Devices using the 5.470 – 5.725 GHz band shall not be capable of transmitting in the band 5.60-5.65 GHz in Canada, make sure that Canada is the country selected during setup to ensure compliance.
- Page 54 • Italy requires a user license for outside usage. Statement of Compliance Motorola Solutions hereby, declares that this device is in compliance with the essential requirements and other relevant provisions of Directive 1999/5/EC. A Declaration of Conformity may be obtained from https://portal.motorolasolutions.com/Support/US-EN.
- Page 55 Regulatory Compliance Note: The certification mark applied to the AP7131N is for Restrict Radiation Equipment. This equipment operates on a secondary basis and does not have the right for protection against harmful interference from other users including same equipment types. Also this equipment must not cause interference to systems operating on primary basis.
- Page 56 Motorola Solutions AP-7131N-FGR Access Point Installation Guide Wireless device operate in the frequency band of 5.25-5.35 GHz, limited for Indoor use only. 5.25-5.35 Korea For a radio equipment using 2400~2483.5MHz or 5725~5825MHz, the following two expression should be displayed; 1. This radio equipment can be interfered during operation.
-
Page 57: Waste Electrical And Electronic Equipment (Weee)
Waste Electrical and Electronic Equipment (WEEE) Waste Electrical and Electronic Equipment (WEEE... - Page 58 Motorola Solutions AP-7131N-FGR Access Point Installation Guide...
- Page 59 Waste Electrical and Electronic Equipment (WEEE)
- Page 60 Motorola Solutions AP-7131N-FGR Access Point Installation Guide...
-
Page 61: Motorola Solutions Support Center
• Model number or product name • Software type and version number Motorola Solutions responds to calls by email, telephone or fax within the time limits set forth in support agreements. If you purchased your Enterprise Mobility business product from a Motorola Solutions business partner, contact that business partner for support. -
Page 62: Rohs Compliance
Motorola Solutions AP-7131N-FGR Access Point Installation Guide ROHS Compliance (Parts) (Pb) (Hg) (Cd) (PBB) (PBDE) (Metal Parts) (Circuit Modules) (Cables and Cable Assemblies) (Plastic and Polymeric Parts) (Optics and Optical Components) (Batteries) SJ/T11363-2006 SJ/T11363-2006... - Page 63 ROHS Compliance @ This table was created to comply with China RoHS requirements for Motorola Solutions’ AP-7131N- FGR model access point.
- Page 64 Motorola Solutions AP-7131N-FGR Access Point Installation Guide...
- Page 66 MOTOROLA, MOTO, MOTOROLA Solutions and the Stylized M logo are trademarks or registered trademarks of Motorola Trademark Holdings, LLC and are used under license. All other trademarks are properties of their owners. ©2014 Motorola Solutions, Inc. All rights reserved.