Pioneer XDJ-RX Operating Instructions Manual
Quick start guide
Hide thumbs
Also See for XDJ-RX:
- Operating instructions manual (34 pages) ,
- Service manual (205 pages)
Table of Contents
Advertisement
Quick Links
DJ SYSTEM
XDJ-RX
http://pioneerdj.com/support/
The Pioneer DJ support site shown above offers FAQs, information on software and various other types of
information and services to allow you to use your product in greater comfort.
http://rekordbox.com/
For inquiries on rekordbox™, please see the online support site indicated above.
Operating Instructions (Quick Start Guide)
Advertisement
Table of Contents

Related Manuals for Pioneer XDJ-RX


Summary of Contents for Pioneer XDJ-RX
- Page 1 DJ SYSTEM XDJ-RX http://pioneerdj.com/support/ The Pioneer DJ support site shown above offers FAQs, information on software and various other types of information and services to allow you to use your product in greater comfort. http://rekordbox.com/ For inquiries on rekordbox™, please see the online support site indicated above.
- Page 2 IMPORTANT CAUTION RISK OF ELECTRIC SHOCK DO NOT OPEN CAUTION: The lightning flash with arrowhead symbol, The exclamation point within an equilateral within an equilateral triangle, is intended to TO PREVENT THE RISK OF ELECTRIC triangle is intended to alert the user to the alert the user to the presence of uninsulated SHOCK, DO NOT REMOVE COVER (OR presence of important operating and...
- Page 3 WARNING AVERTISSEMENT This equipment is not waterproof. To prevent a fire or Cet appareil n’est pas étanche. Pour éviter les risques shock hazard, do not place any container filled with d’incendie et de décharge électrique, ne placez près de liquid near this equipment (such as a vase or flower lui un récipient rempli d’eau, tel qu’un vase ou un pot pot) or expose it to dripping, splashing, rain or de fleurs, et ne l’exposez pas à...
- Page 4 (2) this device must accept any interference received, including interference that may cause undesired operation. Product Name: DJ SYSTEM Model Number: XDJ-RX Responsible Party Name: PIONEER ELECTRONICS (USA) INC. SERVICE SUPPORT DIVISION Address: 1925 E. DOMINGUEZ ST. LONG BEACH, CA 90810-1003, U.S.A. Phone: 1-800-421-1404 URL: http://www.pioneerelectronics.com...
-
Page 5: Table Of Contents
Thank you for buying this Pioneer product. Be sure to read this booklet and the “Operating Instructions” pro- vided on the Pioneer DJ support site. Both include important infor- mation that should be fully understood before using this product. After you have finished reading the instructions, put them away in a safe place for future reference. -
Page 6: Before Start
The unit is a DJ system integrating a DJ player and DJ mixer in a single unit and carrying over the high operability of Pioneer’s DJ products — the world standard for club equipment. You can play it like a real DJ About the driver software using the music stored on your USB device or computer. -
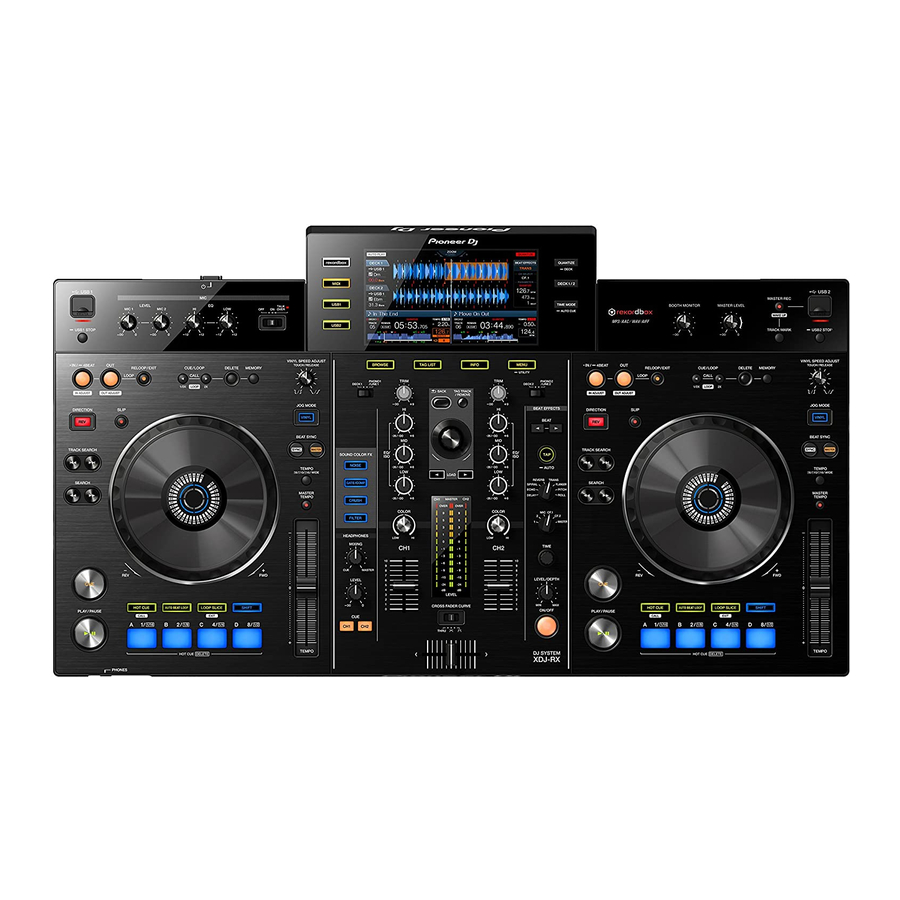
Page 7: Names Of Parts
Deck section Names of Parts For more information, please refer to the operational instruction of this product published on the Pioneer DJ support site. 1 Power section (page 7 ) 2 USB device section (page 7 ) 3 Deck section (page 7 ) -
Page 8: Browse Section
o LOOP SLICE/EXIT button p SHIFT button q Performance buttons Browse section 1 rekordbox button 2 MIDI button 3 USB1 button, USB2 button 4 BROWSE button 5 TAG LIST button 6 INFO button 7 MENU (UTILITY) button 8 QUANTIZE (DECK) button 9 DECK1/2 button a TIME MODE (AUTO CUE) button b Main unit display... -
Page 9: Main Unit Display
Main unit display Normal playback screen 1 Information display section p QUANTIZE (For deck) 2 DECK1 information q ZOOM and GRID ADJUST mode display 3 DECK2 information r Parameter display section (msec, BEAT) 4 AUTO PLAY s BPM (for effects) display section 5 DECK t QUANTIZE (for effects) 6 DECK... -
Page 10: Mixer Section
Mixer section Effect section 1 Main unit display 1 MIC1, 2 LEVEL controls 2 SOUND COLOR FX (NOISE, GATE/COMP, CRUSH, FILTER) buttons 2 MIC EQ (HI, LOW) controls 3 COLOR control 3 MIC (OFF, ON, TALK OVER) selector switch 4 BEAT , buttons 4 MIC (OFF, ON, TALK OVER) indicator 5 TAP (AUTO) button... -
Page 11: Connections
Connections Connect the power cord after all the connections between devices have been completed. Be sure to turn off the power and unplug the power cord from the power outlet whenever making or changing connections. Refer to the operating instructions for the component to be connected. Be sure to use the included power cord. - Page 12 Basic style Playback on this unit is performed mainly using tracks prepared with rekordbox installed on a computer. For rekordbox operations, see the rekordbox (Mac/Windows) user’s manual. You can see the rekordbox (Mac/Windows) user’s manual from [Help] menu of rekordbox (Mac/Windows). PRO DJ LINK (USB Export) rekordbox music files and data can be exchanged with this unit using a memory device (flash memory, hard disk, etc.), eliminating the need to take a computer into the DJ booth.
- Page 13 This product is compatible with iPhone 6 Plus, iPhone 6, iPhone 5s, iPhone 5c, iPhone 5, iPhone 4s, iPhone 4, iPhone 3GS, and iPod touch (3rd, 4th, 5th generation). For the latest supported devices, see the below-mentioned Pioneer support DJ site. http://pioneerdj.com/support/...
-
Page 14: Operation
For more information, please refer to the operational instruction of this Music files are displayed in the categories (album, artist, etc.) set with product published on the Pioneer DJ support site. rekordbox. 1 Press the [rekordbox] button. -
Page 15: Monitoring Sound With Headphones
6 Turn the [MASTER LEVEL] control clockwise. Sound is output from the speakers. The master level indicator lights. Adjust the [MASTER LEVEL] control so that the orange indicator lights where the track’s volume is highest (at the climax, etc.). Adjust the master level indicator (red color) to ensure that it does not light, or the sound could be distorted. -
Page 16: Additional Information
Sometimes the problem may lie in another component. Inspect the other components and electrical appliances being used. If the problem cannot be rectified, ask your nearest Pioneer authorized service center or your dealer to carry out repair work. The unit may not operate properly due to static electricity or other external influences. If this happens, normal operation can be sometimes restored by removing the power cord after turning the power off, and turning the power back on after inserting the power cord into the power outlet. -
Page 17: Error Messages
When this unit cannot operate normally, an error code appears on the display. Check the table below and take the measures indicated. If an error code not shown on the table below is displayed, or if the same error code is displayed again after taking the indicated action, contact your store of purchase or a nearby Pioneer service station. Error code... -
Page 18: Changing The Settings
Tolerable operating temperature ..+5 °C to +35 °C (+41 °F to +95 °F) trademarks Tolerable operating humidity ...... 5 % to 85 % (no condensation) Pioneer and rekordbox are trademarks or registered trademarks of Audio Section the PIONEER CORPORATION. - Page 19 Within 40 days of receiving your complaint, Pioneer will investigate the dispute and will either: (1) respond to your complaint in writing informing you what action Pioneer will take, and in what time period, to resolve the dispute; or (2) respond to your complaint in writing informing you why it will not take any action.
- Page 20 URL suivantes : In the USA & Canada/Aux Etats-Unis & Canada http://www.pioneerelectronics.com S018_B1_EnFr_PSV © 2014 PIONEER CORPORATION. All rights reserved. PIONEER CORPORATION 1-1, Shin-ogura, Saiwai-ku, Kawasaki-shi, Kanagawa 212-0031, Japan PIONEER ELECTRONICS (USA) INC.