Motorola PM400 User Manual
Motorola two-way radio user guide pm400
Hide thumbs
Also See for PM400:
- Service manual (352 pages) ,
- User manual (96 pages) ,
- Basic service manual (70 pages)

Related Manuals for Motorola PM400


Summary of Contents for Motorola PM400
- Page 1 PM400 ™ Commercial Series Two-Way Radio User Guide Manuel de l'utilisateur de la radio bidirectionnelle...
-
Page 2: Computer Software Copyrights
Motorola. Furthermore, the purchase of Motorola products shall not be deemed to grant either directly or by implication, estoppel, or otherwise, any license under the copyrights, patents or patent... -
Page 3: Table Of Contents
LTR Trunked Systems ....7 PM400 Radio Features ....8 Radio-Wide Features . - Page 4 Send a Call Alert Page (Conventional Operation Only) ..31 Repeater Access .....31 Radio Check .
- Page 5 Cables ......66 Control Station ..... . 66 Data - CES Wireless Technologies.
- Page 6 Notes: English...
-
Page 7: Safety
RF Exposure booklet enclosed with your radio (Motorola Publication part number 68P81095C99) to ensure compliance with RF energy exposure limits. For a list of Motorola-approved antennas, batteries, and other accessories, visit the following web site which lists approved accessories: http://www.motorola.com/cgiss/ index.shtml. - Page 8 Notes: English...
-
Page 9: Introduction
INTRODUCTION Your PM400™ radio can operate on both LTR trunked and conventional radio systems. This radio combines the very latest in two-way technology while delivering outstanding functionality at the touch of a button. CONVENTIONAL RADIO SYSTEMS Conventional typically refers to radio-to-radio communications through a single channel. -
Page 10: Pm400 Radio Features
The radio uses the “go to” repeater for transmission. Once the transmission has ended, this repeater is available for other users. PM400 RADIO FEATURES Radio-Wide Features • 64 Conventional Channels • Up to 10 Sites and 100 Talkgroups •... - Page 11 • Quik-Call II Signaling - Call Alert - Radio Call List Encode/Decode - Call Tone - Selective Call Tagging Encode/Decode • DTMF Signaling - DTMF PTT ID - DTMF Encode Selective Call - DTMF Call Alert Encode Encode English...
- Page 12 Notes: English...
-
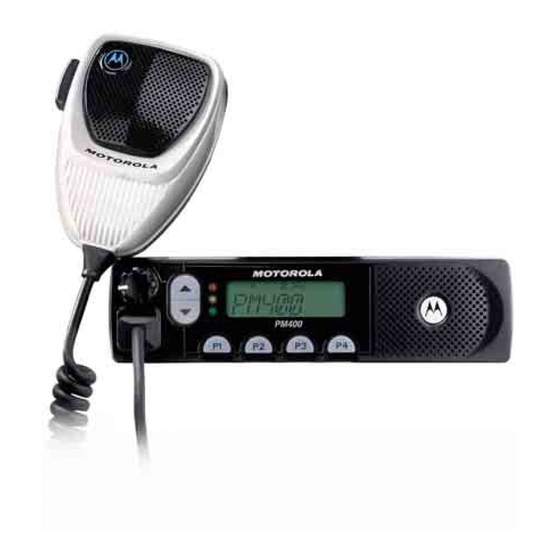
Page 13: Radio Overview
RADIO OVERVIEW Channel Selector/ Menu Scroll Buttons Red/Yellow/Green LED Indicators On/Off/Volume Knob PERS4 Menu Buttons Microphone Programmable Buttons (P1, P2) Jack Push-To-Talk (PTT) Button Speaker Display PM400 (P1, P2, P3, P4) English... -
Page 14: Led Indicators
LED INDICATORS Indicates power up, transmit, receive, scan, monitor status, channel/talkgroup busy, Call Alert™ receive/transmit, and Selective Call receive/transmit. LED State/Color Radio Call Flashing Red Flashing Red Scan Flashing Green Call Alert Flashing Yellow Yellow Selective Call Flashing Yellow Yellow Sticky Monitor/Open Squelch Yellow English... -
Page 15: Optional Enhanced Keypad Microphone
Symbol Indication Indicates scan has stopped and landed on an active Priority 1 Scan Priority 1 channel/talkgroup. • flashing) Indicates scan has stopped and landed on an active Priority 2 Scan Priority 2 channel/talkgroup. • steady) You are not transmitting through a repeater Talkaround A Selective Call or Call Alert... - Page 16 The keypad is used for: • Dialing a phone number. • Entering information when programming phone lists. • Directly accessing preprogrammed features (see page 17). Each key can generate several different characters. For example, to enter the character “C,” press the 2 button three times.
-
Page 17: Indicator Tones
INDICATOR TONES High pitched tone Low pitched tone Self Test Pass Tone Self Test Fail Tone Positive Indicator Tone Negative Indicator Tone Good Key Press Bad Key Press Some programmable buttons use tones to indicate one of two modes: Programmable Positive Negative Buttons... -
Page 18: Programmable Buttons
Programmable Buttons Indicator Tone Phone Mode Option Board Escalert PROGRAMMABLE BUTTONS Your radio has four programmable buttons. Your dealer/programmer can program these buttons as shortcuts to various radio features. Check with your dealer/programmer for a complete list of functions your radio supports. Programmable buttons include: •... - Page 19 Function Indicator Short Press Menu Mode — button enters Menu Mode and selects menu options. assigned to exit Menu Mode. Volume Set — — Monitor Toggle silent monitor operation (also turn off open squelch monitor when it has been acti- vated).
- Page 20 Function Indicator Local/Distance Voice Oper- ated Transmis- sion (VOX) Radio Call Scan/ Nuisance Channel/ Talkgroup Delete Edit Scan List Phone Speed Dial Escalert On/Off Squelch Power Level Option Board † This function is activated by EITHER a short OR a long press, but not both. English Programmable Features (Continued) Short Press...
-
Page 21: Menu Buttons
MENU BUTTONS Menu Button If preprogrammed by your dealer/programmer, the two front buttons ( ) can be used, in conjunction with other programmable features, to access and select menu options ); and exit menu mode ( button can be preprogrammed by your dealer/programmer to either a short or long press to access the Menu Mode. - Page 22 Notes: English...
-
Page 23: Getting Started
GETTING STARTED TURN THE RADIO ON OR OFF On/Off/Volume Control Knob PERS4 Rotate the On/Off/ Rotate the On/Off/ Volume Control knob Volume Control knob clockwise. If power-up counterclockwise until is successful, you will you hear a click and hear the Self-Test Pass both the display and Tone ( ) and... -
Page 24: Select An Ltr Channel/Talkgroup
SELECT AN LTR CHANNEL/ TALKGROUP Your PM400 radio can be programmed with up to 10 LTR sites and a maximum of 100 talkgroups, in total, across one or more sites (up to a total of 10 sites). To select an LTR Channel/Talkgroup: to select the appropriate LTR channel/ talkgroup. -
Page 25: Monitor
MONITOR It is important to monitor traffic before transmitting to ensure that you do not “talk over” someone who is already transmitting. Silent Monitor A short press of the preprogrammed Monitor button places the radio in Silent Monitor mode. • You hear a high-pitched tone. -
Page 26: Transmit An Ltr Call
TRANSMIT AN LTR CALL to select the appropriate LTR channel/talkgroup. Hold the microphone in a vertical position at a distance of about 1 to 2 inches (2.5 to 5 cm) from your mouth. Press and hold the PTT button. –or– Press and release the PTT button and wait 3 seconds. -
Page 27: Repeater Or Talkaround Mode
REPEATER OR TALKAROUND J MODE Talkaround Mode enables you to communicate with another radio when either: • The repeater is not operating. – or – • Your radio is out of the repeater’s range but within communicating distance of another radio. -
Page 28: Home Revert Autokey (1 & 2)
HOME REVERT AUTOKEY (1 & 2) If a Revert Memory Channel is an LTR talkgroup, the Home Revert AutoKey feature automatically keys-up and transmits an MDC PTT ID. If a Revert Memory Channel is programmed as a Conventional channel, the radio will not key-up (see page 17). -
Page 29: Program Pl/Dpl Codes
You can select channels/talkgroups to enable or disable VOX as preprogrammed by your dealer/programmer. to select a channel/talkgroup that has been preprogrammed to enable VOX. Note: Pressing the PTT button disables VOX. to select a channel/talkgroup that has not been preprogrammed to disable VOX. - Page 30 Notes: English...
-
Page 31: Radio Calls
RADIO CALLS SELECTIVE RADIO INHIBIT Your radio is equipped with a security feature that can temporarily render the unit inoperative when an inhibit signal is sent from the base station. This feature is commonly used to disable radios: • In case of theft •... -
Page 32: Send A Selective Call (Conventional Operation Only)
SEND A SELECTIVE CALL (CONVENTIONAL OPERATION ONLY) You can send a Selective Call to a particular radio or to a group of radios, as programmed by your dealer/programmer. Press the preprogrammed Radio Call button (see page 18), and proceed to step 4. –... -
Page 33: (Conventional Operation Only)
SEND A CALL ALERT PAGE (CONVENTIONAL OPERATION ONLY) You can alert another person by sending a Call Alert page. Press the preprogrammed Radio Call button (see page 18) and proceed to step 4. – or – to enter menu mode until RAD CALL RAD CALL... -
Page 34: Radio Check
RADIO CHECK Radio Check allows you to determine if a radio is within the range of the trunked system and turned on, without disturbing the user of that radio. This feature can also be used when attempts with Selective Call and Call Alert fail. EMERGENCY ALERTS E Your radio offers choices for initiating and responding to Emergency Alert... -
Page 35: Scan
SCAN Your radio is equipped with the Scan feature, which allows you to search for, lock onto, and monitor voice activity on channels/talkgroups. Scan lists are assigned per channel/talkgroup, by your dealer/programmer. Your radio automatically switches to a channel/talkgroup, within that scan list, when it detects activity. You can also edit these lists through your radio’s menu (see page 36). -
Page 36: Start System Scan
START SYSTEM SCAN G Press the preprogrammed Scan button to start System Scan (see page 18). – or – to select a channel/talkgroup that contains a Scan list. to enter menu mode. until to select The display shows the current scan status. until to select the current setting. -
Page 37: Start Auto Scan
START AUTO SCAN G Auto Scan automatically starts scanning once a channel/talkgroup with Auto Scan enabled is selected. to select a channel/talkgroup that has been preprogrammed for Auto Scan by your dealer/programmer. STOP AUTO SCAN to select a channel/talkgroup that has not been preprogrammed for Auto Scan by your dealer/programmer. -
Page 38: Restore Channels/Talkgroups To The Scan List
Restore Channels/Talkgroups to the Scan List Power off the radio. Once the radio is powered on again, the deleted nuisance channels/talk- groups are restored to the scan list. – – Press the preprogrammed Scan button to stop the scan. Press the preprogrammed Scan button again to start scanning again. -
Page 39: Add Or Delete Channels/Talkgroups In A Scan List
ADD OR DELETE CHANNELS/ TALKGROUPS IN A SCAN LIST to select a channel/talkgroup that contains a Scan list you want to edit. to enter menu mode. PROG LST until to select PROG LST until SCAN LST Note: One Scan list per channel/talkgroup is available. -
Page 40: List
PRIORITIZE A CHANNEL/ TALKGROUP IN A SCAN LIST You may want to check the activity on one or two channels/talkgroups more frequently than others. You can do this by prioritizing them: Priority Channel/ Talkgroup None specified Channel/ Talkgroup 2 (Priority 1) Channel/ Talkgroup 2 (Priority 1) and... - Page 41 until you see the channel/talkgroup you want to prioritize. SELECTED – or – until to select the current channel/talkgroup the radio is on. DISABLED – or – until to de-prioritize the current channel/talk- group the radio is on. to prioritize that channel/talkgroup. SAVED you see: EDIT PRI...
- Page 42 Notes: English...
-
Page 43: Phone
PHONE Your radio allows you to place and receive telephone calls through a repeater (depending on phone line availability). You can edit the phone list through your radio’s menu (see page 44). The phone feature is available in both conventional and LTR systems. •... - Page 44 Your dealer/programmer can preprogram your radio in one of three ways to enter your access code to the repeater. Immediate Auto – automatically sends the access code. Delayed Auto – your radio will transmit the access code upon a PTT button press. Manual - Enter your access code using the DTMF microphone keypad and press the PTT button.
-
Page 45: Make A Phone Call
MAKE A PHONE CALL D Press the preprogrammed Phone button (see page 18), and skip to step 6. – or – Press the PTT button, and if the Hot Keypad feature has been preprogrammed by your dealer/programmer, do the following: to select a channel/talkgroup that has been programmed for telephone. -
Page 46: Edit The Phone List
a. Press and release the preprogrammed Speed Dial button. b. Press the key (0 to 9) corresponding to the number you want to call. Note: To redial the last number dialed (if not using Speed Dial), press and release the PTT button immediately after the access code is sent. -
Page 47: Add An Entry
Add an Entry to enter menu mode. PROG LST until PROG LST to select PHN LST until PHN LST to select ADD ITEM until ADD ITEM to select, NAME you see: Use the DTMF microphone keypad to enter the name (see Entering Characters Using the DTMF Microphone Keypad on page 14). -
Page 48: Edit An Entry
until to select until to select until you see the entry you want to delete. to select the entry, you see: again to confirm the deletion, you see: to return to – or – until you exit menu mode. English Edit an Entry PHN LST to enter menu mode. -
Page 49: Edit Access/Deaccess Codes
NAME until (to edit the name), – or – until NUMBER (to edit the phone number), – or – until (to edit the location in the phone list). to confirm your selection. Use the DTMF microphone keypad to edit the entry (see Entering Characters Using the DTMF Microphone Keypad on page 14), –... - Page 50 until – or – until to select the current setting. Enter the number using the DTMF keypad microphone. to select the entry. you see: to edit another code. until you exit menu mode. English ACCESS DEACCESS SAVED...
-
Page 51: Tone Preferences
TONE PREFERENCES You can use the radio’s menu to access user- adjustable settings to customize the tones on your radio by: to enter menu mode. TONES until TONES to select until you see the feature you want to change (see the table on page 50). to select the feature. - Page 52 Feature TONE KPD TONE TONE TAG ESCALERT English Tone Settings What it Does Turns all alert tones on or off. Turns the keypad tones on or off. Assigns a specific tone when receiving a specific type of radio call. Increases the volume of the alarm tones when a radio call is not answered.
-
Page 53: Tones On/Off
TONES ON/OFF You can program your radio to enable or disable all alert tones. to enter Menu mode. TONES until TONES to select TONE until TONE to select until – or – until to select the desired setting. KEYPAD ON/OFF TONES You can program your radio to enable or disable all keypad tones. -
Page 54: Call Tone Tagging (Conventional Operation Only)
CALL TONE TAGGING (CONVENTIONAL OPERATION ONLY) You can program your radio to sound a particular alert tone when receiving a Selective Call or Call Alert (call tone tagging). Note: Seven alert tones are available to select from in the list. to enter menu mode. -
Page 55: Operation Only)
ESCALERT (CONVENTIONAL OPERATION ONLY) You can program your radio to increase the volume of the alarm tones when a radio call is not answered. Press the preprogrammed Escalert button (see page 18) and proceed to step 5. – – to enter menu mode. TONES until TONES... - Page 56 Notes: English...
-
Page 57: User Settings
USER SETTINGS You can use the radio’s menu to access user- adjustable settings to customize some of your radio features by: to enter menu mode. UTILITY until UTILITY to select until you see the feature you want to change (see the table on page 56). to select the feature. - Page 58 Feature SQUELCH PWR LVL OPT BRD BKLT INT SOFTWARE English Utilities Features What it Does Changes the squelch of the radio to tight or normal. Changes the power level of the radio to high or low. Enables or disables an option board. Changes the brightness of the backlight.
-
Page 59: Set Squelch Level
SET SQUELCH LEVEL Use this feature to filter out nuisance (unwanted) calls and/or background noise. However, tightening squelch could cause calls from remote locations to be filtered out as well. In this case, normal squelch may be more desirable. Press the preprogrammed Squelch button (see page 18) to toggle between tight and normal squelch. -
Page 60: Option Board On/Off
– or – to enter menu mode. until to select until to select until -or - until to select the current setting. English OPTION BOARD ON/OFF Use this feature to enable or disable an option board. UTILITY • symbol appears on the display when the option board feature is On. -
Page 61: Set The Backlight Intensity
SET THE BACKLIGHT INTENSITY Use this feature to change the brightness of the backlight. to enter menu mode. UTILITY until UTILITY to select until BKLT INT BKLT INT to select HIGH until -or- until -or- until to select the current setting. DISPLAY THE SOFTWARE VERSION Use this feature to view the current software version of your radio. - Page 62 Notes: English...
-
Page 63: Warranty
Two (2) Years Product Accessories One (1) Year Motorola, at its option, will at no charge either repair the Product (with new or reconditioned parts), replace it (with a new or reconditioned Product), or refund the purchase price of the... - Page 64 Product item, transportation and insurance prepaid, to an authorized warranty service location. Warranty service will be provided by Motorola through one of its authorized warranty service locations. If you first contact the company which sold you the Product (e.g., dealer or communication service...
- Page 65 Product. K) Normal and customary wear and tear. VI.PATENT AND SOFTWARE PROVISIONS: MOTOROLA will defend, at its own expense, any suit brought against the end user purchaser to the extent that it is based on a claim that the...
- Page 66 A) that MOTOROLA will be notified promptly in writing by such purchaser of any notice of such claim; B) that MOTOROLA will have sole control of the defense of such suit and all negotiations for its settlement or compromise; and C) should the Product or parts become, or in MOTOROLA’s opinion be likely to become,...
-
Page 67: Accessories
ACCESSORIES Motorola offers a number of accessories to enhance the productivity of your two-way radio. Many of the available accessories are listed below. ANTENNAS HAD4006 VHF 136-144 MHz, 1/4 Wave Roof Mount HAD4007 VHF 144-150.8 MHz, 1/4 Wave Roof Mount HAD4008 VHF 150.8-162 MHz, 1/4 Wave... -
Page 68: Cables
RMN5029 Enhanced Keypad Microphone RMN5018 Mag One Microphone (Low Cost) (6 months warranty only) RMN5019 Mag One Keypad Microphone (Low Cost) (6 months warranty only) AAREX4617 Telephone Style Handset Kit GMMN4065 Visor Microphone (Omni-Direction) AARMN4027 Visor Microphone - High Noise (Uni-Direction) RSN4001 External Speaker 13 W... -
Page 69: Mounting
RDN7371 Credit Card Reader RDN7738 Serial Breakout Unit (multiple modems) RDN7739 Flying Lead Cable, 3 ft. RDN7740 Flying Lead Cable, 15 ft. MOUNTING GLN7324 Low Profile Mounting Bracket GLN7317 High Profile Mounting Bracket FTN6083 DIN Mount HLN8097 Removable Slide Mount with Mini-U Connector HLN9227 8 in. - Page 70 Notes: English...
- Page 71 1. While radio is on a nuisance channel/talkgrop, hold down the prepro- grammed Nuisance Delete button until you hear a tone. 2. Release Nuisance Delete button. PM400 ™ Quick Reference Card Record the functions for your radio’s programmable buttons in the table provided below.
- Page 72 Restore Channels/Talkgroups to the Scan List Power off the radio then turn it on. – OR – Press the preprogrammed Scan button to stop the scan. The Deleted Nuisance channels/talkgroups are restored to the scan list. – OR – to select a channel/talkgroup that has not been preprogrammed by your dealer/programmer.
-
Page 73: Menu Navigation Chart
Menu Navigation Chart (Refer to Menu Navigation guidelines— lower, left-hand corner of this page) Rptr/ System Talkarnd Radio Call Scan (p. 25) (p. 34) on/off repeater mode/ talkarnd mode Selective Call Alert Call select/enter select/enter Menu Navigation to enter menu mode to scroll through the list to select menu item to return to previous menu level... - Page 76 © Motorola, Inc. 2004. All rights reserved. Printed in U.S.A. MOTOROLA et le logotype au M stylisé sont enregistrés auprès du Bureau des marques et brevets des États-Unis. Tous les autres noms de produits et de services sont la propriété de leurs titulaires respectifs.