Siemens Gigaset A58h Manual
Hide thumbs
Also See for Gigaset A58h:
- Mode d'emploi (41 pages) ,
- User manual (37 pages) ,
- Instructions manual (36 pages)
Table of Contents
Advertisement
Quick Links
Download this manual
See also:
User Manual
Advertisement
Table of Contents

Related Manuals for Siemens Gigaset A58h


Summary of Contents for Siemens Gigaset A58h
-
Page 3: The Handset At A Glance
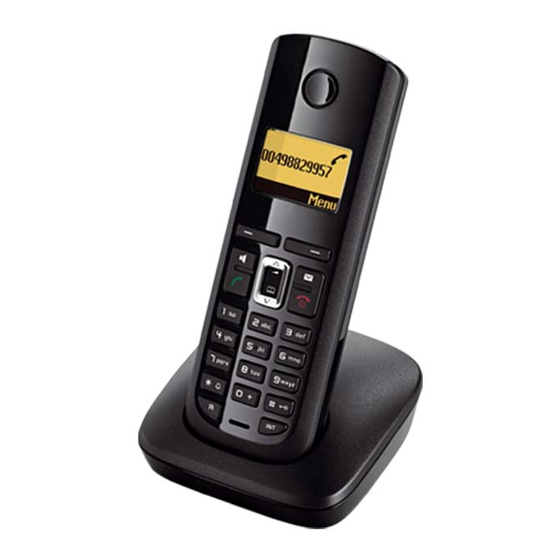
The handset at a glance The handset at a glance ¢ 1 Display in idle status (example) ¢ 2 Charge status of the batteries ( page 8) ¢ 3 Display keys ( page 14) 4 Message key ( page 24) Access to calls and message lists;... -
Page 4: Safety Precautions
Safety precautions Safety precautions Warning Read the safety precautions and the user guide before use. Explain them and the potential hazards associated with using the telephone to your chil- dren. Only use the power adapter supplied, as indicated on the underside of the base sta- tion or charging cradle. -
Page 5: Table Of Contents
Contents Contents The handset at a glance ..........1 Safety precautions . - Page 6 Contents Handset settings ..........27 Changing date and time .
-
Page 7: First Steps
First steps First steps Check the package contents One handset One charging cradle One power adapter for charging cradle Two batteries One battery cover One user guide Setting up the charging cradle The charging cradle is designed for use in dry rooms in a temperature range of +41°F to +113°F. -
Page 8: Connecting The Charging Cradle (If Included)
First steps Please note: Never expose the telephone to heat sources, direct sunlight, or other electrical devices. Protect your telephone from moisture, dust, and corrosive liquids and fumes. Connecting the charging cradle (if included) ¤ Connect the flat plug of the power adapter 1. -
Page 9: Setting Up The Handset For Use
First steps Setting up the handset for use Carry out the following steps for each handset. The display is protected by a plastic film. Please remove the protective film! Inserting the batteries and closing the battery cover Warning Use only rechargeable nickel-metal hydride (NiMH) UL-approved AAA batteries. Never use a conventional (non-rechargeable) battery or other battery types, as this could result in significant health risks and personal injury. - Page 10 First steps Registering the handset to the base station Before you can use the phone, you must first register the handset to the base sta- tion. The actual registration procedure will depend on the type of base station. Automatically register the handset to the Gigaset A580/A585 base station ¤...
- Page 11 First steps The following is displayed after successful automatic or manual handset registration: the strength of the reception signal between base Ð station and handset: – good to poor: Ð i Ñ Ò – no reception: | flashes Þ Menu battery charge status: –...
- Page 12 First steps Setting the date and time Set the date and time so that the correct date and time can be assigned to incoming calls, and so that the alarm can be used. When registering the handset to an A580 IP base station, the date and time are set automatically via the Internet.
- Page 13 First steps ¤ The active line is marked [...]. Enter Date: Enter month, day and year as an [10.01.2009] 8-digit number using the handset (e.g. QQ 2QQO Ç for 10/1/09). If you want to correct an entry, press the top or bottom of the Control key to toggle between fields.
- Page 14 First steps Area codes ¢ To return calls using the incoming caller ID list ( page 24), your phone's area code ("local area code") must be stored. If your phone is in a "multiple area code" area, the extra codes for this area must also be stored. Local Area Code ¢...
-
Page 15: What Would You Like To Do Next
First steps What would you like to do next? Now that you have successfully started your A58H, you will probably want to adapt it to your personal requirements. Use the following guide to quickly locate the most important topics. If you are unfamiliar with menu-driven devices, such as other Gigaset telephones, ¢... -
Page 16: Using The Phone
Using the phone Using the phone Control key In the following description, the side of the Control key you need to press for each operation is indicated accordingly, (e.g. t for "press the top of the Control key." The Control key has a number of different functions: When the handset is in idle status Open the directory ¢... -
Page 17: Keys On The Keypad
Using the phone Keys on the keypad c / Q / *, etc. Press the matching key on the handset. Enter digits or letters. Correcting incorrect entries You can correct incorrect characters in the text by navigating to the incorrect entry using the Control key. -
Page 18: Activating/Deactivating The Handset
Using the phone Activating/deactivating the handset With the phone in idle status, press and hold the End Call key (confir- mation tone) to switch off the handset. Press and hold the End Call key again (confirmation tone) to switch the handset on. -
Page 19: Illustration Of Operating Steps In The User Guide
Using the phone Illustration of operating steps in the user guide The operating steps are shown in abbreviated form. Example: The illustration: ¢ ¢ ¢ §Menu§ Settings Handset Auto Answer means: Þ Menu ¤ §Menu§ Press the display key to open the main menu. -
Page 20: Menu Tree
Menu tree Menu tree Instead of scrolling to locate a menu function, you can select a function more quickly by opening the menu and keying in a digit combination (or shortcut). M 2 2 for "Set ringer melody volume." §Menu§ Example: §Menu§... -
Page 21: Making Calls
Making calls Making calls Answering a call The handset indicates an incoming call in three ways: by ringing, by a display on the screen, and by the flashing Speaker key d. Making an external call You can answer the call by: ¤... -
Page 22: Handsfree Talking
Making calls Display with CID Handsfree talking If you have CID, then the name that is regis- In handsfree mode, instead of holding the tered with your network provider for the handset to your ear, you can place it, for caller's number will also be displayed. -
Page 23: Muting
Making calls Muting CID 2.5 services (network services) You can deactivate the microphone in your handset during an external call. If CID is activated and a waiting call is dis- §Mute§ Press the display key to mute played, 4 different CID 2.5 services (network the handset. -
Page 24: Using The Directory And Lists
Using the directory and lists Using the directory and Storing a number in the directory ¢ ¢ §Menu§ New Entry lists §OK§ Enter the number and press §OK§ Enter the name and press The options are: Directory Order of directory entries Last number redial list Directory entries are usually sorted in alpha- Call history... - Page 25 Using the directory and lists Managing directory entries Using shortcut keys ¢ q (Select entry) You can assign directory entries to the keys 0 and 2–9: ¢ ¢ q (select entry) Editing entries ¢ §Menu§ ¢ ¢ ~ (press the key you want §Menu§...
-
Page 26: Last Number Redial List
Using the directory and lists Copying a displayed number to the Opening lists with the directory message key You can copy numbers displayed in a list (e.g. An advisory tone sounds as soon as a the calls list or redial list) to the directory. new message arrives in a list. -
Page 27: Using The Network Mailbox
Using the network mailbox Using the network Viewing the network mailbox report mailbox When a message is recorded, you receive a The network mailbox is your network pro- call from the network mailbox. If you have vider's answering machine within the net- requested caller ID, the network mailbox work. -
Page 28: Eco Dect
ECO DECT ECO DECT Setting the alarm clock You are helping to protect the environment Precondition: The date and time have ¢ with your Gigaset handset. already been set ( page 10). Reducing energy consumption Activating/deactivating the alarm clock By using an energy-saving power supply, ¢... -
Page 29: Handset Settings
Handset settings Handset settings Changing the display language Your handset is preconfigured, but you can change the settings to suit your individual You can view the display texts in different requirements. languages. ¢ ¢ §Menu§ Settings Handset ¢ Changing date and time Language The current language is indicated by ‰. -
Page 30: Changing The Handsfree/Earpiece Volume
Handset settings Changing the handsfree/ Setting the ringer volume earpiece volume The ringer volume is the same for all types of ringer melodies. ¢ ¢ You can adjust the volume for handsfree §Menu§ Settings Audio Settings ¢ Š talking to one of five settings (1–5, e.g. vol- Ringer Volume ume 3 = ) and the earpiece volume to... -
Page 31: Advisory Tones
Handset settings Advisory tones Restoring the handset to the factory settings Your handset uses "advisory tones" to tell you about different activities and statuses. You can reset any individual settings and The following advisory tones can be acti- changes you have made. This will not affect vated and deactivated independently of entries in the directory, calls list, or the hand- each other:... -
Page 32: Troubleshooting
Troubleshooting Troubleshooting The number of the caller is not displayed despite CID. Caller ID is not enabled. ¥ If you have any questions about the use of The user must ask the telephone network pro- your telephone, you can contact us at any vider to activate Caller ID (CID). -
Page 33: Specifications
Appendix Specifications General specifications DECT 6.0 Supported Recommended batteries GAP standard Supported Technology: Nickel-metal hydride (NiMH) No. of channels 60 duplex channels Size: AAA (Micro, HR03) Radio frequency 1920–1930 MHz Voltage: 1.2 V range Capacity: 550–1000 mAh Duplex method Time multiplex, 10 ms frame length We recommend the following battery types because these are the only ones that guar-... -
Page 34: Writing And Editing Text
Appendix Writing and editing text Setting uppercase/lowercase or digits Press the Pound key # briefly to switch The following rules apply when writing text: from "Abc" mode to "123," from "123" to Use t s to move the cursor to the left or "abc,"... -
Page 35: Industry Canada Certification
FCC / ACTA Information Industry Canada Certification FCC / ACTA Information Operation is subject to the following two condi- Warning: Changes or modifications to this unit tions (1) this device may not cause interference, not expressly approved by Gigaset Communica- and (2) this device must accept any interference, tions USA LLC could void the FCC authority to including interference that may cause undesired... -
Page 36: Power Outage
FCC / ACTA Information Notice for Direct Inward Dialing until the problem has been corrected or until you are sure that the equipment is not malfunction- ("DID") ing. ALLOWING THIS EQUIPMENT TO BE OPERATED IN If trouble is experienced with this equipment, for SUCH A MANNER AS TO NOT PROVIDE FOR repair or warranty information, please contact PROPER ANSWER SUPERVISION IS A VIOLATION... -
Page 37: Safety Precautions
FCC / ACTA Information Safety precautions d.) If the product does not operate normally by fol- lowing the operating instructions. Adjust only those controls that are covered by the operating Before using your telephone equipment, basic instructions because improper adjustment of safety instructions should always be followed to other controls may result in damage and may reduce the risk of fire, electric shock and injury to... -
Page 38: Service (Customer Care)
FCC / ACTA Information Service (Customer Care) Customer Care Warranty for Cordless Products To obtain Customer Care Warranty service, product operation information, or for problem resolution, call: 1-866 247-8758 Toll Free: End-user limited warranty – Products which have been repaired, main- tained or modified (including the antenna) by This product is covered by a one year limited war- anyone other than Gigaset NAM or a Gigaset... - Page 39 FCC / ACTA Information – Payments for labor or service to representa- ENTITLED TO ANY DAMAGES, INCLUDING BUT tives or service centers not authorized to per- NOT LIMITED TO CONSEQUENTIAL DAMAGES, form product maintenance by Gigaset NAM. if the Product does not meet the limited warranty , and, to the maximum extent allowed by applica- –...
- Page 40 TO THE USE OF OR INABILITY TO USE THE PROD- Manufactured by Gigaset Communications GmbH UCT, THE PROVISION OF OR FAILURE TO PROVIDE under trademark license of Siemens AG. SUPPORT SERVICES, OR OTHERWISE UNDER OR IN CONNECTION WITH ANY PROVISION OF THIS LIM- ©...
-
Page 41: Mounting The Charging Cradle On The Wall
Mounting the charging cradle on the wall Mounting the charging cradle on the wall 21 mm approx. 2.5 mm... -
Page 42: Index
Index Index Confirmation tone ..........Control key . - Page 43 Index ..... . . Fast access Key 1 (fast access) .....
- Page 44 Index ....... . . Network services (CID 2.5 services) Talk key Number .