Table of Contents
Advertisement
Available languages
Available languages
Quick Links
Advertisement
Chapters
Table of Contents

Related Manuals for Motorola RVA50UL


Summary of Contents for Motorola RVA50UL
- Page 1 Two-Way Radios User Guide RVA50UL & RVA50VL Non-Display models...
- Page 2 Open Source Software Legal Notices: This Motorola product contains Open Source Software. For information regarding licenses, acknowledgements, required copyright notices and other usage terms, refer to the documentation for this Motorola product at: http://businessonline.motorolasolutions.com Go to: Resource Center > Product Information > Manual > Accessories.
-
Page 3: Table Of Contents
Installing the Lithium-Ion (Li-Ion) CONTENTS Battery ......15 Removing the Lithium-Ion (Li-Ion) Contents......1 Battery . - Page 4 Microphone Gain....30 Other Programming Features ... 38 Hands Free without Accessories Scan......38 (iVOX) .
- Page 5 LACR UHF Frequencies Chart ...54 RVA50UL – UHF Default Frequencies Chart ......56 LACR VHF Frequencies Chart .
-
Page 6: Product Safety
For a list of Motorola-approved antennas, PRODUCT SAFETY batteries and other accessories, visit the following website which lists approved PRODUCT SAFETY AND RF accessories: EXPOSURE COMPLIANCE www.motorolasolutions.com/RVAseries Before using this product, read the operating instructions and RF energy awareness information... -
Page 7: Introduction
Thank you for purchasing the Motorola® RVA 8000 West Sunrise Boulevard Series Radio. This radio is a product of Plantation, Florida 33322 Motorola's 80 plus years of experience as a world leader in the designing and PACKAGE CONTENTS manufacturing of communications equipment. - Page 8 For a copy of a large-print version of this user guide or for product-related questions, contact 1-800-448-6686 in the USA 1-800-461-4575 in Canada 1-888-390-6456 on TTY (Text Telephone) For product related information, visit us at: www.motorolasolutions.com/RVAseries English...
-
Page 9: Fcc Licensing Information
Motorola Product Services at: 1-800-448-6686 Changes or modifications not expressly approved by Motorola may void the user’s authority granted by the FCC to operate this radio and should not be made. To comply with FCC requirements, transmitter adjustments... - Page 10 Notes English...
-
Page 11: Batteries And Chargers Safety
Use of accessories not recommended by To reduce risk of electric shock, unplug the Motorola may result in risk of fire, electric charger from the AC outlet before attempting shock, or injury. -
Page 12: Operational Safety Guidelines
OPERATIONAL SAFETY located at the bottom of the charger. GUIDELINES • Make sure that the cord is located where it will not be stepped on, tripped over, or subjected to • Turn the radio OFF when charging battery. water, damage, or stress. •... -
Page 13: Radio Overview
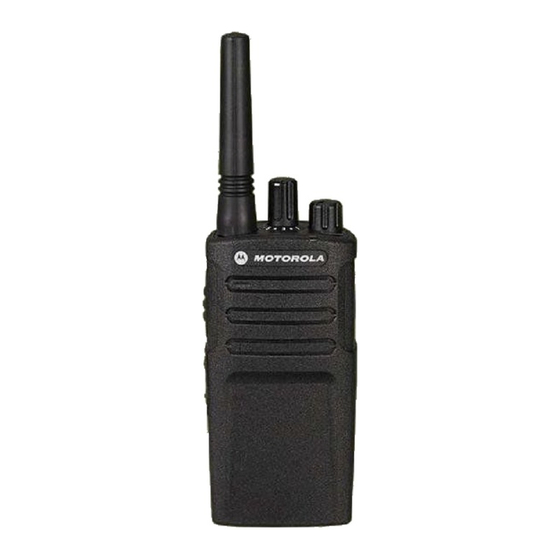
RADIO OVERVIEW PARTS OF THE RADIO Channel Selector Knob Antenna On/Off/Volume Knob Microphone Audio Accessory 2 Pin Connector Indicator PTT (Push-To- Talk) Button Battery SB1 - Monitor Button Model Label SB2 - Scan/ RVA50UL Nuisance Channel Delete English... -
Page 14: On/Off/Volume Knob
The Lithium-Ion (Li-Ion) Battery sending a message. RVA Series comes with a Standard Capacity Antenna Li-Ion battery. Other batteries may be available. For models RVA50UL, and RVA50VL the For more information, see “Battery Features” antennas are non-removable. on page 14. LED Indicator Used to give battery status, power-up status, radio call information and scan status. - Page 15 The radio’s model is shown on the bottom of the radio and provides the following information: Table 1: RVA Series Radio Specifications Transmit Number of Frequency Model Power Antenna Band Channels (Watts) RVA50UL Non-removable RVA50VL Non-removable English...
-
Page 16: Battery Features
Motorola batteries are designed specifically to the battery life. be used with a Motorola charger and vice About the Li-Ion Battery versa. Charging in non-Motorola equipment may lead to battery damage and void the The RVA Series radio comes equipped with a battery warranty. -
Page 17: Removing The Lithium-Ion (Li-Ion)
Slots Turn OFF the radio. Turn OFF the radio. With the Motorola logo side up on the battery Push down the battery latch and hold it while pack, fit the tabs at the bottom of the battery removing the battery. -
Page 18: Holster
Holster Power Supply, Adaptor and Drop-in Tray Charger Drop-in Tray Charger Power Supply The radio is equipped with one Drop-in Tray Charger and one Power Supply with Adaptor. For more information, refer to “Chargers” on Insert the radio into the base of the holster at an page 70. -
Page 19: Battery Life Information
Battery Life Information When the Battery Save feature is set to ON (enabled by default), the battery life lasts longer. The following table summarizes battery life estimations: Table 2: Li-Ion Battery Life with Tx Power 2 Watts Battery Type Battery Save OFF Battery Save ON Standard 12.0 Hours... -
Page 20: Charging The Battery
Note: The radio comes with a Standard Power Supply. To charge the battery (with the radio attached), place it in a Motorola-approved Drop-in Tray Single Unit Charger or Drop-in Tray Multi Unit Charger. Drop-in Tray SUC Place the Drop-in Tray Charger on a flat surface. - Page 21 OFF to ensure a full alignment ribs in the Drop-in Tray Single Unit charge. See “Operational Safety Guidelines” Charger. on page 10 for more information. Table 3: Motorola Authorized Batteries Charging A Stand-Alone Battery Part Number Description PMNN4434_R...
-
Page 22: Drop-In Tray Charger Led Indicators
Drop-in Tray Charger LED Indicators Table 4: Charger LED Indicator Status LED Indicator Comments Green for approximately 1 second Power On Steady Red Charging Steady Green Charging Complete Red Fast Flash Battery Fault (*) Amber Slow Flash Waiting to Charge (**) Battery empty Flash Red 1 Time Battery low... -
Page 23: Estimated Charging Time
If there is NO LED indication: Check if the radio with battery, or the battery alone, is inserted correctly. (refer to step 4 of "Charging with the Drop-in Tray Single Unit Charger (SUC)" on page 18) Ensure that the power supply cable is securely plugged into the charger socket using an appropriate AC outlet and there is power to the outlet. - Page 24 Charging a Radio and Battery using Place the Multi-Unit Charger on a flat surface. a Multi Unit-Charger - MUC (Optional Insert the power cord plug into the MUC’s dual Accessory) pin connector at the bottom of the MUC. Plug the power cord into an AC outlet. Turn the radio OFF.
-
Page 25: Multi-Unit Charger Led Indicators
Multi-Unit Charger LED Indicators Table 6: Charger LED Indicator Status LED Indicator Comments Green for approximately 1 second Power On Steady Red Charging Steady Green Charging Complete Red Fast Flash Battery Fault (*) Amber Slow Flash Waiting to Charge (**) Battery empty Flash Red 1 Time Battery low... - Page 26 If there is NO LED indication: Check if the radio with battery or the battery alone, is inserted correctly (refer to step 5 of "Charging a Radio and Battery using a Multi Unit-Charger - MUC (Optional Accessory)" on page 22). Make sure the power cord is securely plugged into the MUC and the appropriate AC outlet.
-
Page 27: Getting Started
Note: Do not hold the radio too close to the ear GETTING STARTED when the volume is high or when adjusting the volume For the following explanations, refer to “Parts Of The Radio” on page 11. SELECTING A CHANNEL To select a channel, turn the Channel Selector TURNING RADIO ON/OFF Knob until you reach the desired channel. -
Page 28: Receiving A Call
RECEIVING A CALL RVA50UL Up to 250,000 Sq. Ft. Up to 20 Floors Select a channel by rotating the Channel Selector Knob until you reach the desired channel. An audible voice indicates the RVA50VL Up to 220,000 Sq. - Page 29 To establish a proper two-way communication, Scramble Code: Codes that make the the channel, frequency, and interference transmissions sound garbled to anyone eliminator codes must be the same on both listening who is not set to that specific code. radios. This depends on the stored profile that Bandwidth: Some frequencies have selectable has been preprogrammed on the radio: channel spacing, which must match other...
-
Page 30: Radio Led Indicators
RADIO LED INDICATORS RADIO STATUS LED INDICATION Channel Busy Solid Orange Cloning Mode Double Orange Heartbeats Cloning In Progress Solid Orange One Green Blink, One Orange Blink, One Green Blink, then repeat for 4 Fatal Error at Power up seconds Low Battery Orange Heartbeat Low Battery Shutdown... -
Page 31: Hands-Free Use/Vox
Accessory Accessory Port/ VOX can be temporarily disabled by pressing Connector the PTT button or by removing the audio Motorola RVA Series radios can operate accessory. hands-free (VOX) when used with compatible Note: To order accessories, refer to: VOX accessories. -
Page 32: Microphone Gain
Default value is OFF. If you want to use the Toggle Voice Prompt in User Mode VOX feature, VOX level should be set at a Short press the SB1 Button while turning ON different level. the radio to enable/disable the Voice Prompt in User Mode. -
Page 33: Programming Features
• Auto-Scan, PROGRAMMING • Bandwidth, and FEATURES • Active Channels To easily program all the features in your radio, The Frequencies Select feature allows you to it is recommended to use the Customer choose frequencies from a pre-defined list. Programming Software (CPS) and the The Interference Eliminator Code (CTCSS/ programming cable. -
Page 34: Entering Advanced Configuration
Entering Advanced Configuration Mode Once you are in the ‘Idle’ Programming Mode, you will be able to hear the Frequencies, Note: Before configuring the features, make sure Codes, Auto-Scan, Active Channels and your radio is set to the channel you wish to Weather Channel settings by short pressing program. -
Page 35: Reading Ctcss / Dpl Values
Reading CTCSS / DPL Values Bandwidth Cycle through the features available for While in Auto-Scan mode, short pressing the configuration by short pressing the PTT button PTT button shifts the radio to ‘Bandwidth’ until you hear the current code. The radio feature. - Page 36 Programming Mode FAQ Programming Mode and return to the normal radio operation. I got distracted while programming and forgot Note: which feature I was programming. What should • To exit the programming mode without saving, I do? turn OFF the radio. Return to ‘Idle’...
- Page 37 codes pool. For example, if you try to program • Turn OFF the radio and start over. code 220, the radio would not accept it as the I just programmed the value I wanted. How do I maximum value allowed is 219. Same goes for exit the Programming Mode? the frequencies.
-
Page 38: Programming Values Example
PROGRAMMING VALUES EXAMPLE Example of Programming a Code Assuming the current code value is set to Example of Programming a Frequency factory default ‘001’, and you want to change it Assuming current frequency value is set to to CTCSS/DPL Code = 103. Follow the Channel 1, with the UHF default frequency set sequence indicated below: to ‘02’... -
Page 39: Example Of Programming Auto-Scan
Example of Programming Auto-Scan Example of Programming Bandwidth Auto-Scan is the third available feature in the Bandwidth is the fourth Programming Mode. It Programming Mode and can be set to either allows you to modify the bandwidth assigned to ON or OFF on a particular channel. a channel. -
Page 40: Example Of Programming Active Channels
Example of Programming Active Channels OTHER PROGRAMMING FEATURES Active Channels is the last Programming Scan Mode. It allows you to modify the number of Scan allows you to monitor other channels to active channels the radio is programmed to detect conversations. When the radio detects a support. -
Page 41: Editing Scan List
Nuisance Channel Delete activated. If no transmission occurs within 5 seconds, scanning resumes. Nuisance Channel Delete allows you to • If you want to scan a channel without the temporarily remove channels from the Scan Interference Eliminator Codes (CTCSS/DPL), set List. -
Page 42: Customer Programming Software (Cps)
CUSTOMER PROGRAMMING SOFTWARE To program, connect the RVA Series radio via (CPS) the Drop-in Charger Tray and CPS Programming Cable as shown in Figure 1 on page 40. Toggle the cable switch of the CPS Programming Cable to ‘CPS Mode’. Radio to be programmed CPS allows you to program frequencies, PL/... -
Page 43: Time-Out Timer
Scramble separately. Please contact your Motorola point of purchase for more information. The Scramble feature makes transmissions Time-Out Timer sound garbled to anyone listening without the same code. Scramble default value is OFF. To This timer sets the amount of time that the change the scramble code during radio’s... -
Page 44: Text-To-Speech (Changing Pre-Defined Voice Aliases)
Text-to-Speech Import Voice File (Changing Pre-Defined Voice Aliases) This field allows the user to upload a Enable User Pre-Defined Voice pre-existing wave (.wav) file from the local hard Prompt (Checkbox) drive. The first eight characters of the wave files are used to populate the channel “Name”. Check the box to enable user-defined voice on the selected channel. -
Page 45: Cloning Radios
CLONING RADIOS To clone radios using the MUC, there must be at least two radios: You can clone RVA Series radio profiles from one Source radio to a Target radio by using any • a Source radio (radio which profiles will be cloned one of these 3 methods: or copied from) and •... - Page 46 • MUC pockets numbers should be read from left to announce either “successful” (cloning is right with the Motorola logo facing front. successful) or “fail” (cloning has failed). If the Source radio is a display model, it will either show ‘Pass’ or ‘Fail’ on the display (a voice announcement will be played within 5 seconds).
-
Page 47: Cps And Cloning Cables (Optional Accessory)
CPS and Cloning Cables (Optional CPS Cable Accessory) • Both CPS and Cloning Cables are made to work either with RVA Series radios or EP150 Series radios. Cloning cable supports a mix of RVA and EP150 series radios. • CPS cable programs RVA series radios. Make Cloning Cable sure the cable switch is in “Flash”... -
Page 48: Cloning Radio Using The Radio To Radio (R2R) Cloning Cable (Optional Accessory)
Cloning Radio using the Radio to Radio Plug one side of the cloning cable mini USB (R2R) Cloning Cable (Optional Accessory) connector to the first SUC and the other end to the second SUC. Note: During the cloning process, no power is being applied to the SUC. - Page 49 Note: This cloning cable is designed to operate The radio audible voice will announce “Fail” only with compatible Motorola SUC indicating that the cloning process has failed. In RLN6175 and PMLN6394. the event that the cloning fails, perform each of...
-
Page 50: Cloning Using The Customer Programming Software (Cps)
Cloning using the Customer Programming Software (CPS) When cloning using this method, you need the Radio to be CPS software, a Drop-In Tray Charger and the programmed CPS Programming Cable. To order the CPS Programming Cable, please refer to P/N# HKKN4028_. Information on how to clone using the CPS is USB Ports available either in:... -
Page 51: Troubleshooting
TROUBLESHOOTING Symptom Try This... Recharge or replace the Li-Ion battery. No Power Extreme operating temperatures may affect battery life. Refer to “About the Li-Ion Battery” on page 14 Confirm Interference Eliminator Code is set. Frequency or Interference Eliminator Code may be in use. Hearing other noises or Change settings: either change frequencies or codes on all radios. - Page 52 Symptom Try This... Steel and/or concrete structures, heavy foliage, buildings or vehicles decrease range. Check for clear line of sight to improve transmission. Wearing radio close to body such as in a pocket or on a belt decreases range. Change location of radio. To increase range and coverage, you can reduce Limited talk range obstructions or increase power.
- Page 53 Symptom Try This... Radios are too close; they must be at least five feet apart. Heavy static or interference Radios are too far apart or obstacles are interfering with transmission. Refer to “Talking and Monitoring” on page 25. Recharge or replace Li-Ion battery. Low batteries Extreme operating temperatures affect battery life.
- Page 54 Symptom Try This... VOX feature might be set to OFF. Use the CPS to ensure that the VOX Sensitivity level is not set to ‘0’. Cannot activate VOX Accessory not working or not compatible. Refer to “Hands-Free Use/VOX” on page 29. Check drop-in tray charger is properly connected and correspond to a compatible power supply.
-
Page 55: Use And Care
USE AND CARE Use a soft damp cloth to Do not immerse in water Do not use alcohol or clean the exterior cleaning solutions If the radio is submerged in water... Turn radio OFF and Dry with soft cloth Do not use radio until remove batteries completely dry English... -
Page 56: Frequency And Code Charts
FREQUENCY AND CODE CHARTS LACR UHF FREQUENCIES CHART UHF Frequencies – LACR Bandwidth Bandwidth Frequency # Frequency (MHz) Frequency # Frequency (MHz) (kHz) (kHz) 1(*) 462.5750 12.5 / 25.0 464.3250 12.5 / 25.0 2(*) 462.6250 12.5 / 25.0 464.4875 12.5 / 25.0 3(*) 462.6750 12.5 / 25.0... - Page 57 UHF Frequencies – LACR (Continued) Frequency # Frequency (MHz) Bandwidth Frequency # Frequency (MHz) Bandwidth 467.8875 12.5 / 25.0 468.8500 12.5 / 25.0 467.9000 12.5 / 25.0 468.8750 12.5 / 25.0 467.9125 12.5 / 25.0 468.9000 12.5 / 25.0 467.9250 12.5 / 25.0 468.9250 12.5 / 25.0...
-
Page 58: Chart
RVA50UL – UHF DEFAULT FREQUENCIES CHART RVA UHF 8CH Radios Default Frequencies – RVA50UL Frequency Channel Frequency # (MHz) 462.5750 462.6250 462.6750 463.5500 463.6250 463.7625 463.7750 463.8250 English... -
Page 59: Lacr Vhf Frequencies Chart
LACR VHF FREQUENCIES CHART VHF Frequencies – LACR Frequency Bandwidth Frequency Bandwidth Frequency # Frequency # (MHz) (kHz) (MHz) (kHz) 1(*) 151.1350 12.5 / 25.0 151.9250 12.5 / 25.0 151.1750 12.5 / 25.0 151.9550 12.5 / 25.0 151.3750 12.5 / 25.0 17(*) 152.3700 12.5 / 25.0... - Page 60 VHF Frequencies – LACR (Continued) Frequency Bandwidth Frequency Bandwidth Frequency # Frequency # (MHz) (kHz) (MHz) (kHz) 153.1875 12.5 / 25.0 159.0250 12.5 / 25.0 153.2000 12.5 / 25.0 159.0500 12.5 / 25.0 153.2150 12.5 / 25.0 159.0625 12.5 / 25.0 153.2250 12.5 / 25.0 159.0750...
-
Page 61: Chart
RVA50VL – VHF DEFAULT FREQUENCIES CHART RVA VHF 8CH Radios Default Frequencies – RVA50VL Frequency Channel Frequency # (MHz) 151.1350 152.3700 158.1950 158.2150 151.6125 158.9400 159.2000 161.0500 English... -
Page 62: Ctcss And Pl/Dpl Codes
CTCSS AND PL/DPL CODES CTCSS Codes CTCSS CTCSS CTCSS 67.0 107.2 167.9 71.9 110.9 173.8 74.4 114.8 179.9 77.0 118.8 186.2 79.7 192.8 82.5 127.3 203.5 85.4 131.8 210.7 88.5 136.5 218.1 91.5 141.3 225.7 94.8 146.2 233.6 97.4 151.4 241.8 100.0 156.7... - Page 63 PL/DPL Codes Code Code Code English...
- Page 64 PL/DPL Codes (Continued) Code Code Code Customized PL Customized PL Customized PL Customized PL Customized PL Customized PL Inverted DPL 39 Inverted DPL 40 Inverted DPL 41 Inverted DPL 42 Inverted DPL 43 Inverted DPL 44 Inverted DPL 45 Inverted DPL 46 Inverted DPL 47 English...
- Page 65 PL/DPL Codes (Continued) Code Code Code Inverted DPL 48 Inverted DPL 65 Inverted DPL 82 Inverted DPL 49 Inverted DPL 66 Inverted DPL 83 Inverted DPL 50 Inverted DPL 67 Inverted DPL 84 Inverted DPL 51 Inverted DPL 68 Inverted DPL 85 Inverted DPL 52 Inverted DPL 69 Inverted DPL 86...
- Page 66 PL/DPL Codes (Continued) Code Code Code Inverted DPL 99 Inverted DPL 109 Inverted DPL 119 Inverted DPL 100 Inverted DPL 110 Inverted DPL 120 Inverted DPL 101 Inverted DPL 111 Inverted DPL 121 Inverted DPL 102 Inverted DPL 112 Inverted DPL 123 Inverted DPL 103 Inverted DPL 113 Customized DPL...
- Page 67 Notes English...
-
Page 68: Motorola Limited Warranty For The United States, Canada And
This limited warranty is a consumer's exclusive remedy, and applies as follows to new Motorola Products, Accessories and Software purchased by consumers in the United States, which are accompanied by this written warranty. - Page 69 (c) use of the Products or Accessories for nonconforming or non-Motorola housings, or commercial purposes or subjecting the Product or parts, are excluded form coverage. Accessory to abnormal usage or conditions; or (d) other acts which are not the fault of Motorola, are excluded from coverage. English...
- Page 70 Accordingly, any copyrighted software third parties, that the operation of the software contained in the Motorola products may not be products will be uninterrupted or error free, or that modified, reverse-engineered, distributed, or...
- Page 71 United States of America. The any license under the copyrights, patents, or Governments of the United States of America may patent applications of Motorola or any third party restrict the exportation or re-exportation of this software provider, except for the normal, non- product to certain destinations.
-
Page 72: Accessories
BATTERY ACCESSORIES Part No. Description AUDIO ACCESSORIES PMNN4434_R Standard Li-Ion Battery Part No. Description PMNN4453_R High Capacity Li-Ion Battery 53815 Headset w/Boom Mic BR CABLES HMN9026_R Remote Speaker Mic BR Part No. Description HKLN4477_ Surveillance Earpiece BR HKKN4028_ Radio to Radio Cloning Cable 53865 Headset w/Swivel Boom Mic HKKN4027_... -
Page 73: Carry Accessories
82012694001 Software (CPS) MOTOROLA, MOTO, MOTOROLA SOLUTIONS and the Stylized M logo are trademarks or registered trademarks of Motorola Trademark Holdings, LLC and are used under license. All other trademarks are the property of their respective owners. © 2014 Motorola Solutions, Inc. - Page 74 Avisos legales del software de código abierto: Este producto Motorola contiene software de código abierto. Para obtener información sobre licencias, reconocimientos, avisos de derechos de autor obligatorios y otros términos de uso, consulte la documentación de este producto Motorola en: http://businessonline.motorolasolutions.com...
- Page 75 Acerca de la batería de ion de litio ..14 CONTENIDO Instalación de la batería de ion de litio (Li-Ion) ....15 Contenido.
- Page 76 Uso de manos libres/VOX ....29 Ejemplo de la programación de una Con accesorios VOX compatibles ..29 frecuencia ..... . . 36 Configuración de la Ejemplo de la programación sensibilidad de VOX .
- Page 77 Diagramas de frecuencias y códigos ..56 Diagrama de frecuencias UHF LACR ..56 RVA50UL: diagrama de frecuencias predeterminadas UHF ....58 Diagrama de frecuencias VHF LACR .
-
Page 78: Seguridad Del Producto
Comunicaciones (FCC). Para obtener una lista de las antenas, las Antes de utilizar este baterías y otros accesorios aprobados por producto, lea las Motorola, visite el siguiente sitio web que instrucciones de detalla los accesorios aprobados: funcionamiento y la Precaución www.motorolasolutions.com/RVAseries... -
Page 79: Introducción
Mailstop 1C15, Motorola Gracias por comprar el radio serie RVA 8000 West Sunrise Boulevard Motorola®. Este radio es producto de más de Plantation, Florida 33322 80 años de experiencia de Motorola como líder mundial en el diseño y fabricación de equipos CONTENIDO DEL PAQUETE de comunicaciones. - Page 80 Para obtener una copia en una versión con texto grande de esta guía del usuario o para realizar preguntas relacionadas con el producto, comuníquese al 1-800-448-6686 en EE. UU. 1-800-461-4575 en Canadá 1-888-390-6456 en TTY (Teléfono de texto) Para obtener información relacionada con el producto, visítenos en: www.motorolasolutions.com/RVAseries Español...
-
Page 81: Información De Licencia De La Fcc
Motorola: 1-800-448-6686 Los cambios o las modificaciones que no estén expresamente aprobados por Motorola, pueden anular la autoridad del usuario que otorga la FCC para operar este radio y no se deben realizar. Para cumplir con los requisitos de la FCC, los ajustes del transmisor solo se deben hacer bajo la supervisión de una... - Page 82 Notas Español (Latinoamérica)
-
Page 83: Información De Seguridad De Bateríasy Cargadores
No desarme el cargador; no se puede reparar y Motorola. Otras baterías pueden explotar, lo no hay repuestos disponibles. Desarmar el que puede causar lesiones personales y daños. cargador puede provocar el riesgo de descarga El uso de accesorios no recomendados por eléctrica o incendio. -
Page 84: Pautas De Seguridad Operativa
Para reducir el riesgo de descarga eléctrica, • Para los equipos que usan fusibles, los repuestos desenchufe el cargador de la toma de corriente deben cumplir con el tipo y el valor nominal de CA antes de intentar realizar cualquier especificados en las instrucciones de los mantenimiento o limpieza. -
Page 85: Información General Del Radio
Perilla selectora de canal Perilla de Antena Encendido/ Apagado/Volumen Conector de dos Micrófono Indicador clavijas de accesorios de audio Botón Push-to- Talk (PTT) Batería SB1: botón para monitorear Etiqueta del modelo SB2: rastrear/ RVA50UL eliminar canal no deseado Español (Latinoamérica) -
Page 86: Perilla De Encendido/Apagado/Volumen
El Botón lateral 2 es un botón general que se mensaje. puede configurar mediante el CPS. La Antena configuración predeterminada del SB2 es para “rastrear/eliminar canal no deseado”. Para los modelos RVA50UL y RVA50VL, las antenas no se pueden quitar. Español (Latinoamérica) -
Page 87: La Batería De Ion De Litio (Li-Ion)
“Funciones de la batería” en la página 14. Tabla 1: Especificaciones del radio serie RVA Potencia de Número de Banda de Modelo transmisión Antena frecuencia canales (Watts) RVA50UL No extraíble RVA50VL No extraíble Español (Latinoamérica) -
Page 88: Funciones De La Batería
Motorola y viceversa. Realizar la Acerca de la batería de ion de litio carga en equipos que no sean Motorola puede El radio serie RVA viene equipada con una provocar daños en la batería y anular su batería recargable de ion de litio. -
Page 89: Instalación De La Batería De Ion De Litio (Li-Ion)
Ranuras APAGUE el radio. Con el lado de la batería que tiene el logotipo de Motorola hacia arriba, haga calzar las lengüetas de la parte inferior de la batería con APAGUE el radio. las ranuras de la parte inferior del cuerpo del Empuje hacia abajo el seguro de la batería y... -
Page 90: Funda
Funda Cable de alimentación, Adaptador y Bandeja de carga directa Bandeja de carga directa Fuente de alimentación El radio viene equipado con una bandeja de carga directa y un cable de alimentación con adaptador. Para obtener más información, Incline el radio para insertarlo en la base de la consulte “Cargadores”... -
Page 91: Información De Duración De La Batería
Información de duración de la batería Cuando la función de Ahorro de batería está ACTIVADA (activada de manera predeterminada), la duración de la batería será mayor. La siguiente tabla resume los cálculos estimados de duración de la batería: Tabla 2: Duración de la batería de ion de litio con potencia de transmisión 2 watts Ahorro batería Ahorro de batería Tipo de baterías... -
Page 92: Carga De La Batería
Para cargar la batería (con el radio conectado), colóquela en una bandeja de carga directa para una sola unidad o en una bandeja de carga directa para varias unidades, aprobados por Motorola. SUC de la bandeja de carga directa Ponga la bandeja de carga directa sobre una superficie plana. - Page 93 Alinee las ranuras de la batería Carga de una batería independiente con los rebordes de alineación de la bandeja de carga directa para una sola unidad. Tabla 3: Baterías autorizadas por Motorola Número de Descripción pieza Batería de ion de litio PMNN4434_R estándar...
-
Page 94: Indicadores Led De La Bandeja De Carga Directa
Indicadores LED de la bandeja de carga directa Tabla 4: Indicador LED del cargador Estado Indicador LED Comentarios Verde durante 1 segundo Encendido aproximadamente Rojo fijo Cargando Verde fijo Carga completa Rojo intermitente rápido Falla en la batería (*) Esperando para cargar Ámbar intermitente lento (**) Batería vacía... -
Page 95: Tiempo De Carga Estimado
Si NO hay una indicación LED: Verifique que el radio con batería, o la batería sola, esté insertada correctamente. (Consulte paso 4 de “Carga con la bandeja de carga directa para una sola unidad (SUC)” en la página 18). Asegúrese de que el cable de la fuente de alimentación esté bien conectado a la toma del cargador con una toma de corriente de CA adecuada y de que la toma de corriente tenga energía. - Page 96 Carga de un radio y una batería con Ponga el cargador para varias unidades en una un cargador para varias unidades, superficie plana. MUC (accesorio opcional) Inserte el conector del cable de alimentación en el conector de dos clavijas del MUC, que se encuentra en la parte inferior.
-
Page 97: Indicadores Led Del Cargador Para Varias Unidades
Indicadores LED del cargador para varias unidades Tabla 6: Indicador LED del cargador Estado Indicador LED Comentarios Verde durante 1 segundo Encendido aproximadamente Rojo fijo Cargando Verde fijo Carga completa Rojo intermitente rápido Falla en la batería (*) Ámbar intermitente lento Esperando para cargar (**) Batería vacía Rojo intermitente 1 vez... - Page 98 Si NO hay una indicación LED: Compruebe que el radio con la batería, o la batería sola, esté insertada correctamente (consulte paso 5 de “Carga de un radio y una batería con un cargador para varias unidades, MUC (accesorio opcional)” en la página 22). Asegúrese de que el cable de alimentación esté...
-
Page 99: Primeros Pasos
Nota: No sostenga el radio muy cerca del oído PRIMEROS PASOS cuando ajuste el volumen o si el volumen está muy alto. Para ver las siguientes explicaciones, consulte “Partes del radio” en la página 11. SELECCIÓN DE UN CANAL Para seleccionar un canal, gire la perilla ENCENDER/APAGAR EL RADIO selectora de canal hasta llegar al canal Gire la perilla de encendido/apagado/volumen... -
Page 100: Recepción De Una Llamada
• (*) Supone que el botón SB1 no se programó para otro modo. Hasta 250.000 pies RVA50UL Hasta 20 pisos cuadrados. RECEPCIÓN DE UNA LLAMADA Seleccione un canal al girar la perilla selectora Hasta 220.000 pies RVA50VL Hasta 13 pisos cuadrados. - Page 101 Para establecer una comunicación de dos vías Código de codificación: códigos que permiten adecuada, el canal, la frecuencia y el código que las transmisiones se escuchen confusas eliminador de interferencia debe ser los para quienes no tengan ese código específico. mismos en ambos radios.
-
Page 102: Indicadores Led Del Radio
INDICADORES LED DEL RADIO ESTADO DEL RADIO INDICACIÓN DEL LED Canal ocupado Naranjo fijo Modo de clonación Parpadeo doble constante en naranja Clonación en curso Naranjo fijo Un parpadeo en verde, un parpadeo en naranjo, un parpadeo en verde, Error grave al encender luego se repite durante 4 segundos Batería Baja Parpadeo constante en naranja... -
Page 103: Uso De Manos Libres/Vox
Los radios Motorola serie RVA pueden llame al 1 (800) 448-6686 o póngase en funcionar con manos libres (VOX) cuando se contacto con un punto de venta de Motorola usan con accesorios VOX compatibles. Configuración de la sensibilidad de VOX Con accesorios VOX compatibles La sensibilidad del accesorio o el micrófono del... -
Page 104: Ganancia Del Micrófono
indicación de voz en el modo de usuario. (Está • 1 = Alto nivel de entrada de audio activará la Tx ACTIVADO de forma predeterminada). • 2 = Sensibilidad media • 3 = Bajo nivel de entrada de audio activará la Tx Nota: En forma predeterminada esta configuración se ajusta en ACTIVADO y se... -
Page 105: Funciones De Programación
• Códigos (CTCSS/DPL) FUNCIONES DE • Rastreo automático PROGRAMACIÓN • Ancho de banda, y Para programar fácilmente todas las funciones • Canales activos del radio, se recomienda utilizar el software de La función Selección de frecuencia le permite programación para el cliente (CPS) y el cable elegir las frecuencias de una lista predefinida. -
Page 106: Ingresar Al Modo De Configuración Avanzada
Ingresar al modo de configuración avanzada Una vez que esté en el modo de programación “inactivo”, podrá escuchar las configuraciones Nota: Antes de configurar las funciones, de las frecuencias, los códigos, el rastreo asegúrese de que el radio esté ajustado en automático, los canales activos y el canal del el canal que desea programar. -
Page 107: Lectura De Los Valores De Ctcss/Dpl
Lectura de los valores de CTCSS/DPL Ancho de banda Desplácese por las funciones disponibles para Mientras está en el modo de rastreo la configuración al presionar brevemente el automático, si presiona brevemente el botón botón PTT hasta que oiga el código actual. El PTT cambia el radio a la función “Ancho de radio cambia al modo de programación de banda”. - Page 108 • Presionar dos veces en forma prolongada el botón PTT para salir del Modo de programación y volver al funcionamiento normal del radio. Nota: • Para salir del modo de programación sin guardar, APAGUE el radio. • Si “da la vuelta” hasta el principio del modo de programación “inactivo”, escuchará...
- Page 109 Preguntas frecuentes del modo de El radio no le permite programar ningún valor programación que no esté disponible en el conjunto de frecuencias y códigos. Por ejemplo, si intenta Me distraje mientras programaba y olvidé qué programar el código 220, el radio no lo función estaba programando.
-
Page 110: Ejemplo De Los Valores De Programación
Si programó un valor incorrecto, puede: Presionar brevemente y varias veces el botón PTT hasta que escuche el mensaje “Channel • Desplazarse por el radio hasta el principio. El Number”. Cambie el canal al girar la perilla radio se desplaza hasta el principio cada vez que selectora de canal. -
Page 111: Ejemplo De La Programación De Un Código
Presione brevemente el botón PTT para Presione dos veces brevemente el botón PTT. ingresar al modo de frecuencia. El mensaje de El mensaje de voz del radio anuncia el “Code voz del radio anuncia que el valor actual es “2”. Number”... -
Page 112: Ejemplo De La Programación Del Rastreo Automático
Ejemplo de la programación del rastreo • Vuelva a presionar en forma prolongada el botón automático PTT para salir modo de programación o APAGUE el radio. El rastreo automático es la tercera función disponible en el modo de programación y se Ejemplo de la programación del ancho de puede ajustar como ACTIVADO o banda... -
Page 113: Ejemplo De La Programación De Los Canales Activos
• Presione en forma prolongada el botón PTT. El • Presione brevemente el botón SB1 o SB2 hasta indicador LED parpadea en forma constante en que obtenga el número de canales que desea. verde para indicar que está en el modo de •... -
Page 114: Otras Funciones De Programación
OTRAS FUNCIONES DE PROGRAMACIÓN • Para detener el rastreo, vuelva a presionar brevemente el botón SB1 o SB2 (programado Rastreo para rastrear). Rastrear le permite monitorear otros canales • Si presiona el botón PTT mientras el radio está para detectar conversaciones. Cuando el radio rastreando, el radio transmitirá... -
Page 115: Eliminación De Canal No Deseado
Eliminación de canal no deseado SOFTWARE DE PROGRAMACIÓN PARA EL CLIENTE (CPS) La eliminación de canales no deseados le permite eliminar canales temporalmente de la lista de rastreo. Esta función es útil cuando conversaciones irrelevantes en un canal “no Radio que desea programar deseado”... -
Page 116: Temporizador De Desconexión
Comuníquese con su punto de programación CPS, como se muestra en la de venta Motorola para obtener más Figura 1 de la página 41. Cambie el switch del información. -
Page 117: Tonos De Llamada
Tonos de llamada Ráfaga invertida La función de tonos de llamada le permite La ráfaga invertida elimina el ruido no deseado transmitir un tono audible a otros radios que (cola del silenciador) durante la pérdida de estén en el mismo canal para avisarles que detección del portador. -
Page 118: Lector De Textos (Cambiando Alias De Voz Predefinidos)
Lector de textos Importar el archivo de voz (Cambiando alias de voz predefinidos) Este campo permite que el usuario cargue un Habilitación del comando de voz archivo wave ( .wav) preexistente desde la predefinido por el usuario (Casilla unidad de disco duro local. Los ocho primeros de verificación) caracteres del archivo wave se utilizan para Marque la casilla para habilitar la voz definida... -
Page 119: Clonación De Radios
CLONACIÓN DE RADIOS Para clonar radios con el MUC, debe haber al menos dos radios: Puede clonar los perfiles del radio serie RVA desde un radio Fuente a un radio Destino • un radio Fuente (radio desde el cual se clonarán usando cualquiera de los siguientes 3 métodos: o copiarán los perfiles) y •... - Page 120 “successful” (la clonación se realizó deben leer de izquierda a derecha con el logotipo correctamente) o “fail” (la clonación falló). Si el de Motorola orientado hacia adelante. radio Fuente es un modelo con pantalla, mostrará el mensaje “Pass” o “Fail” en la pantalla (se escuchará...
-
Page 121: Cps Y Cables De Clonación (Accesorio Opcional)
CPS y cables de clonación (accesorio Cable CPS opcional) • El CPS y los cables de clonación están hechos para funcionar con radios serie RVA o serie EP150. El cable de clonación admite una combinación de radios serie RVA y EP150. •... -
Page 122: Clonación Del Radio Con El Cable De Clonación De Radio A Radio (R2R) (Accesorio Opcional)
Clonación del radio con el cable de Desconectar todos los cables (cables de clonación de radio a radio (R2R) (Accesorio alimentación o USB) de los SUC. opcional) Conecte un extremo del conector mini-USB del cable de clonación al primer SUC y el otro extremo al segundo SUC. - Page 123 El radio emitirá un mensaje de voz “fail” que funcionar únicamente con SUC RLN6175 y indica que el proceso de clonación falló. En el PMLN6394 compatibles de Motorola. caso de que la clonación falle, realice los Al pedir el Cable de clonación, consulte el P/N# siguientes pasos antes de intentar iniciar HKKN4028_.
-
Page 124: Clonación Con El Software De Programación Para El Cliente (Cps)
Clonación con el software de programación para el cliente (CPS) Al clonar usando este método, necesitará el Radio que desea software CPS, una bandeja de carga directa y programar el cable de programación CPS. Para solicitar el Cable de programación CPS, consulte el P/N# HKKN4028_. -
Page 125: Solución De Problemas
SOLUCIÓN DE PROBLEMAS Síntoma Pruebe con... Recargar o reemplazar la batería de ion de litio. Las temperaturas extremas de funcionamiento pueden afectar la duración de la Sin alimentación batería. Consulte “Acerca de la batería de ion de litio” en la página 14. Confirme que el código del eliminador de interferencias esté... - Page 126 Síntoma Pruebe con... Las estructuras de acero o concreto, la vegetación densa, los edificios o los vehículos disminuyen el rango. Busque un área despejada para mejorar la transmisión. Llevar el radio junto al cuerpo, como en un bolsillo o en el cinturón disminuye el Rango de conversación rango.
- Page 127 Síntoma Pruebe con... Los radios están demasiado cerca; deben estar al menos cinco pies de distancia. Mucha estática o interferencia Los radios están muy lejos o hay obstáculos que interfieren con la transmisión. Consulte “Hablar y monitorear” en la página 25. Recargue o reemplace la batería de ion de litio.
- Page 128 Síntoma Pruebe con... La función VOX puede estar configurada en DESACTIVADO. Utilice el CPS para asegurarse de que el nivel de sensibilidad de VOX no está No se puede activar VOX ajustado en “0”. El accesorio no funciona o no es compatible. Consulte “Uso de manos libres/VOX”...
-
Page 129: Uso Y Cuidado
USO Y CUIDADO Utilice un paño suave humedecido No lo sumerja en el agua No utilice alcohol ni para limpiar el exterior soluciones de limpieza Si sumerge el radio en el agua... APAGUE el radio y Seque con un paño suave No utilice el radio hasta que retire las baterías esté... -
Page 130: Diagramas De Frecuencias Y Códigos
DIAGRAMAS DE FRECUENCIAS Y CÓDIGOS DIAGRAMA DE FRECUENCIAS UHF LACR Frecuencias UHF – LACR No. de Ancho de No. de Ancho de Frecuencia (MHz) Frecuencia (MHz) frecuencia banda (kHz) frecuencia banda (kHz) 1(*) 462,5750 12,5 / 25,0 464,3250 12,5 / 25,0 2(*) 462,6250 12,5 / 25,0... - Page 131 Frecuencias UHF – LACR (Continuación) No. de Ancho de No. de Ancho de Frecuencia (MHz) Frecuencia (MHz) frecuencia banda frecuencia banda 467,8875 12,5 / 25,0 468,8500 12,5 / 25,0 467,9100 12,5 / 25,0 468,8750 12,5 / 25,0 467,9125 12,5 / 25,0 468,9000 12,5 / 25,0 467,9250...
-
Page 132: Rva50Ul: Diagrama De Frecuencias Predeterminadas Uhf
RVA50UL: DIAGRAMA DE FRECUENCIAS PREDETERMINADAS UHF Frecuencias predeterminadas para radios de 8 canales RVA UHF; RVA50UL No. de Frecuencia Canal frecuencia (MHz) 462,5750 462,6250 462,6750 463,5500 463,6250 463,7625 463,7750 463,8250 Español (Latinoamérica) -
Page 133: Diagrama De Frecuencias Vhf Lacr
DIAGRAMA DE FRECUENCIAS VHF LACR Frecuencias UHF – LACR No. de Frecuencia Ancho de No. de Frecuencia Ancho de frecuencia (MHz) banda (kHz) frecuencia (MHz) banda (kHz) 1(*) 151,1350 12,5 / 25,0 151,9250 12,5 / 25,0 151,1750 12,5 / 25,0 151,9550 12,5 / 25,0 151,3750... - Page 134 Frecuencias UHF – LACR (Continuación) No. de Frecuencia Ancho de No. de Frecuencia Ancho de frecuencia (MHz) banda (kHz) frecuencia (MHz) banda (kHz) 153,1875 12,5 / 25,0 159,0250 12,5 / 25,0 153,2000 12,5 / 25,0 159,0500 12,5 / 25,0 153,2150 12,5 / 25,0 159,0625 12,5 / 25,0...
-
Page 135: Rva50Vl: Diagrama De Frecuencias Predeterminadas Vhf
RVA50VL: DIAGRAMA DE FRECUENCIAS PREDETERMINADAS VHF Frecuencias predeterminadas para radios de 8 canales RVA VHF; RVA50VL No. de Frecuencia Canal frecuencia (MHz) 151,1350 152,3700 158,1950 158,2150 151,6125 158,9400 159,2000 161,0500 Español (Latinoamérica) -
Page 136: Códigos Ctcss Y Pl/Dpl
CÓDIGOS CTCSS Y PL/DPL Códigos CTCSS CTCSS CTCSS CTCSS 67.0 107.2 167.9 71.9 110.9 173.8 74.4 114.8 179.9 77.0 118.8 186.2 79.7 192.8 82.5 127.3 203.5 85.4 131.8 210.7 88.5 136.5 218.1 91.5 141.3 225.7 94.8 146.2 233.6 97.4 151.4 241.8 100.0 156.7... - Page 137 Códigos PL/DPL Código Código Código Español (Latinoamérica)
- Page 138 Códigos PL/DPL (Continuación) Código Código Código PL personalizada PL personalizada PL personalizada PL personalizada PL personalizada PL personalizada DPL 39 invertida DPL 40 invertida DPL 41 invertida DPL 42 invertida DPL 43 invertida DPL 44 invertida DPL 45 invertida DPL 46 invertida DPL 47 invertida Español (Latinoamérica)
- Page 139 Códigos PL/DPL (Continuación) Código Código Código DPL 48 invertida DPL 65 invertida DPL 82 invertida DPL 49 invertida DPL 66 invertida DPL 83 invertida DPL 50 invertida DPL 67 invertida DPL 84 invertida DPL 51 invertida DPL 68 invertida DPL 85 invertida DPL 52 invertida DPL 69 invertida DPL 86 invertida...
- Page 140 Códigos PL/DPL (Continuación) Código Código Código DPL 99 invertida 200 DPL 109 invertida DPL 119 invertida DPL 100 invertida DPL 110 invertida DPL 120 invertida DPL 101 invertida DPL 111 invertida DPL 121 invertida DPL 102 invertida DPL 112 invertida DPL 123 invertida DPL 103 invertida DPL 113 invertida...
- Page 141 Notas Español (Latinoamérica)
-
Page 142: Garantía Limitada De Motorola Para Ee. Uu., Canadá Y América Latina
MOTOROLA PARA EE. UU., los nuevos productos, accesorios y software CANADÁ Y AMÉRICA Motorola que hayan comprado los consumidores en Estados Unidos y que estén acompañados por LATINA esta garantía escrita. - Page 143 (d) cubiertas o piezas que no sean de Motorola alimentos; (c) uso de los productos o accesorios o no cumplan sus normativas.
- Page 144 ¿CÓMO OBTENER SERVICIO DE cubiertos cobertura GARANTÍA U OTRA INFORMACIÓN? Software. Se aplica solo a Comuníquese con el punto de venta de Motorola. los defectos físicos en los medios que soportan la Noventa (90) días a partir copia del software (por de la fecha de compra.
- Page 145 Los productos Motorola descritos en este manual pueden incluir software protegido por derechos de 5896277 5894292 5864752 5699006 5742484 autor de Motorola y de terceros almacenado en D408396 D399821 D387758 D389158 5894592 las memorias de los semiconductores u otros 5893027 5789098 5734975 5861850 D395882 medios.
-
Page 146: Accesorios
BATERÍA ACCESORIOS N° de pieza Descripción ACCESORIOS DE SONIDO PMNN4434_R Batería de ion de litio estándar N° de pieza Descripción Batería de ion de litio de alta PMNN4453_R Auriculares con micrófono con capacidad 53815 brazo BR CABLES HMN9026_R Altavoz remoto Mic BR N°... -
Page 147: Cargadores
(CPS) MOTOROLA, MOTO, MOTOROLA SOLUTIONS y el logotipo de la M estilizada son marcas comerciales o marcas comerciales registradas de Motorola Trademark Holdings, LLC y se utilizan bajo licencia. Todas las demás marcas comerciales pertenecen a sus respectivos dueños. - Page 148 Motorola Solutions, Inc. 1301 E. Algonquin Rd. Schaumburg, IL 60196-1078, U.S.A. http://www.motorolasolutions.com *6801009074* 68012009074-A...