Silvercrest SPU 900 A1 Operating Manual
Hide thumbs
Also See for SPU 900 A1:
- Operating manual (14 pages) ,
- Operating instructions manual (28 pages)
Table of Contents
Advertisement
Available languages
Available languages
5
KOMPERNASS GMBH
BURGSTRASSE 21 ⋅ D-44867 BOCHUM
www.kompernass.com
ID-Nr.: SPU 900 A1-05/11-V6
H O M E T E C H
Despertador proyector
Sveglia con proiezione ora
Despertador proyector
Instrucciones de uso
Sveglia con proiezione ora
Istruzioni per l'uso
Despertador com projecção da hora
Manual de instruções
Projection Alarm Clock
Operating manual
SPU 900 A1
Projektionswecker
Bedienungsanleitung
Advertisement
Chapters
Table of Contents

Related Manuals for Silvercrest SPU 900 A1


Summary of Contents for Silvercrest SPU 900 A1
- Page 1 H O M E T E C H Despertador proyector SPU 900 A1 Sveglia con proiezione ora Despertador proyector Projektionswecker Instrucciones de uso Bedienungsanleitung Sveglia con proiezione ora Istruzioni per l‘uso Despertador com projecção da hora Manual de instruções KOMPERNASS GMBH Projection Alarm Clock BURGSTRASSE 21 ⋅ D-44867 BOCHUM www.kompernass.com Operating manual ID-Nr.: SPU 900 A1-05/11-V6...
- Page 2 SPU 900 A1...
-
Page 3: Table Of Contents
ÍNDICE PÁGINA Uso conforme al previsto Volumen de suministro Datos técnicos Indicaciones de seguridad Las piezas del aparato Puesta en funcionamiento del aparato Funcionamiento de la radio Limpieza Ayuda de errores Indicación sobre la conformidad Importador Evacuación Garantía & servicio posventa Lea atentamente estas instrucciones antes del primer uso y consérvelas para posteriores utilizaciones. -
Page 4: Uso Conforme Al Previsto
Si no puede evitarse la situación, pueden producirse daños Volumen de suministro materiales. Deben seguirse las instrucciones de 1 Despertador proyector SPU 900 A1 esta advertencia para evitar daños materiales. 1 Instrucciones de uso Advertencia Datos técnicos Una indicación advierte de informaciones... - Page 5 • Mantenga a los niños alejados de la • La clavija de red deberá quedar fácil- línea de alimentación y del aparato. Los mente accesible, de modo que en caso niños a veces menosprecian los riesgos de emergencia se pueda separar el que pueden tener los aparatos eléctri- aparato de manera rápida de la red.
-
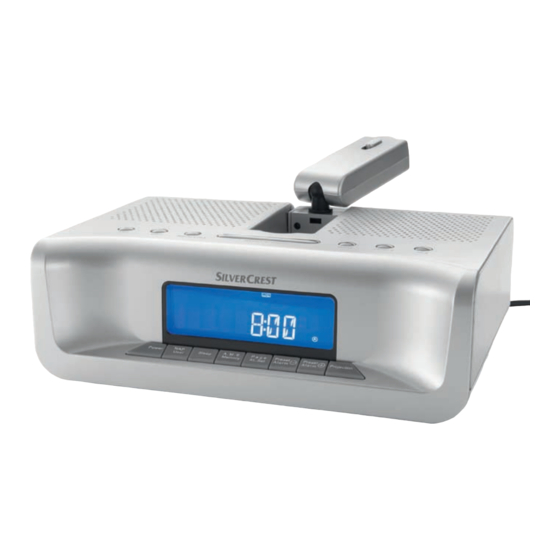
Page 6: Las Piezas Del Aparato
• No coloque fuentes de fuego abiertas, Indicación sobre la tensión de como velas encima del o junto al apa- choque (EFT/proceso de paso rato. eléctrico rápido) y descargas electroestáticas: ¡Atención en caso de tormentas! En caso de un fallo de función debido •... -
Page 7: Puesta En Funcionamiento Del Aparato
Alimentación de corriente d PRESET/ALARM – - M emoria de alarma/ • Inserte la clavija de red en una base de estación descendente enchufe. En la pantalla g aparece el f PAGE/AL.SET - v a cambiando las pági- mensaje de bienvenida „PLEASE WAIT nas de memoria/activa FOR SETTING THANKS“. Mientras tan- la función de alarma to el Radio despertador intenta actuali- g Display... - Page 8 para la abreviatura de la ciudad debajo Abr. Diff. Ciudad de la indicación de „WORLD CITY“. -10 Honolulu / EE.UU 2. Pulse las teclas DOWN/UP i/o, para -9 Anchorage / EE.UU ajustar la hora mundial deseada. El man- -8 Vancouver / Canadá tenimiento de unas teclas modifica la -8 Los Ángeles / EE.UU indicación de forma rápida.
- Page 9 4. Si desea programar otros datos adiciona- Atenuador de pantalla automático les, pulse la tecla PAGE/AL.SET f, para 1. Pulse de nuevo la tecla MODE/LOCK e. seleccionar la posición de memoria 2-10. La pantalla g muestra „DIM-T OFF“. 5. Proceda con los demás datos correspon- 2. Pulse la tecla UP o, si desea atenuar dientemente. automáticamente la pantalla a determina- 6. Para desactivar la función de recordato- das horas. La pantalla g muestra ahora rio, programe una fecha que quede en el „DIM-T ON“.
- Page 10 Función de despertador cla SNOOZE/DIMMER y. Orientese en (Alarma 1 hasta 4) este proceso en la indicación del día de En su Radio despertador puede programar la semana en la parte superior derecha hasta cuatro temporizaciones de desper- del display: tador.
-
Page 11: Funcionamiento De La Radio
definitivo, pulse una vez brevemente la tecla Conexión/desconexión de la función de PAGE/AL.SET f. Radio 1. Pulse la tecla l. En el display g se La función de recordatorio muestra la frecuencia actual y el símbolo El aparato le advierte acerca de una fecha de encendido . Al lado parpadea el que ha ajustado con la función de recorda- símbolo de la hora, indicando que el apa- torio. - Page 12 Memorizar la emisora soras con una buena sintonización y las Puede memorizar para 2 usuarios 20 emiso- memoriza una tras otra. ras de FM para cada uno y 12 emisoras AM Acceder a la emisora para cada uno en el aparato como favoritas. 1.
-
Page 13: Limpieza
Limpieza Si pulsa en modo radio brevemente la tecla MODE/LOCK e cambiara entre indicación de frecuencia y de hora. ¡Advertencia! ¡Antes de proceder a la limpieza extraiga Proyección la clavija de red. ¡Si penetra humedad en Puede proyectar la hora del aparato contra el aparato, existe riesgo de una descarga una pared o techo. Esta función ha sido dise- eléctrica! Además el aparato podría sufrir ñada para la lectura de la hora en la oscuri- daños irreparables. -
Page 14: Importador
Importador Garantía & servicio posventa KOMPERNASS GMBH Este aparato tiene 3 años de garantía desde BURGSTRASSE 21 la fecha de compra. El aparato ha sido fa- 44867 BOCHUM, GERMANY bricado cuidadosamente y ha sido probado antes de su entrega. Guarde el comprobante www.kompernass.com de caja como justificante de compra. - Page 15 INDICE PAGINA Uso conforme Volume di fornitura Dati tecnici Avvertenze di sicurezza Componenti dell'apparecchio Messa in funzione dell'apparecchio Funzionamento della radio: Pulizia Eliminazione dei guasti Avvertenza sulla conformità Importatore Smaltimento Garanzia & assistenza Leggere attentamente le istruzioni per l'uso prima del primo utilizzo e conservarle per il successivo impiego.
-
Page 16: Uso Conforme
Volume di fornitura tare danni materiali. Qualora sia impossibile 1 Sveglia con proiezione ora SPU 900 A1 evitare tale situazione pericolosa, essa può 1 manuale di istruzioni per l'uso dare luogo a danni materiali. Seguire le... - Page 17 • Tenere i bambini lontano dal cavo di gare rapidamente l'apparecchio dalla connessione e dall'apparecchio. I bam- rete elettrica in caso di emergenza. bini spesso sottovalutano i rischi collega- • Questo prodotto non è indicato per l'uso ti all'uso di apparecchi elettrici. da parte di persone (inclusi bambini) •...
-
Page 18: Componenti Dell'apparecchio
ripristinarne il normale funzionamento. Attenzione in caso di temporale! Si consiglia di scollegare l'alimentazio- • In caso di temporale, gli apparecchi col- ne elettrica e collegarla di nuovo. Le legati alla rete elettrica potrebbero subi- pile (se presenti) devono essere estratte re dei danni. -
Page 19: Messa In Funzione Dell'apparecchio
funzione Timer Impostazione dell'ora - interruttore On/Off Per poter impostare l'orario e i seguenti pa- della funzione radio rametri, è necessario che la modalità radio 1( Regolatore di - per la messa a fuoco del- sia disattivata. Se non si preme alcun tasto messa a fuoco la proiezione dell’orario entro circa 15 secondi, l'apparecchio salva... - Page 20 3. Premere ripetutamente il tasto SNOOZE/ Abbr. Diff. Città DIMMER y, per impostare l‘ora legale Caracas / Venezuela per l‘orario mondiale selezionato. Rio De Janeiro / Brazil Buenos Aires / Argentina Sposta- mento Display Spiegazione Universal Time orario Coordinated London / UK OFFSET Nel fuso orario dell'utente (Local City) è...
- Page 21 1. Premere nuovamente il tasto MODE/ 3. Premere il tasto DOWN i per disattivare LOCK e. Nel display g appare l'indica- nuovamente questa funzione. zione della data „UPDATE ON“. Impostare l’orario di dimmer per il di- 2. Premere il tasto DOWN i, per disat- splay tivare la funzione di aggiornamento.
- Page 22 1. Con la radio spenta premere il tasto = Venerdì = Sabato PAGE/AL.SET f, per richiamare la funzione di sveglia. Con i tasti PRESET/ = Domenica ALARM +/– s/d selezionare la posizio- 6. Per ritornare alla selezione dei giorni fe- ne di memoria allarme desiderata.
-
Page 23: Funzionamento Della Radio
ogni ora, dalle 8:00 alle 23:00, con una 2. Premere nuovamente il tasto l per in- durata di 10 minuti. Inoltre, nel display g terrompere la funzione radio e impostare lampeggia il messaggio SDA. l'apparecchio nella modalità di Standby. Impostazione manuale delle emittenti Premere un qualsiasi tasto per disattivare l'al- 1. - Page 24 1. Con la radio accesa premere il tasto PAGE Impostazione del volume • In modalità radio premere ripetutamente il /AL.SET f, per richiamare la pagina di memoria 1-5 desiderata. Nel display g tasto Vol. — q, per diminuire il volume. A appare il numero della pagina di memo- destra nel display g viene rappresentato il rizzazione selezionata, alla voce „PAGE“.
-
Page 25: Pulizia
Eliminazione dei guasti bile poter utilizzare tale funzione. Con la pro- iezione attivata, il simbolo della proiezione L'apparecchio non funziona. compare nel display g. > La spina del cavo di rete 2! è stata salda- 1. Aprire in tal caso il proiettore t. mente inserita nella presa di rete? 2. Attivare la funzione con il tasto PROJEC- >... -
Page 26: Smaltimento
Smaltimento Garanzia & assistenza Non gettare per alcun motivo Questo apparecchio è garantito per tre anni l'apparecchio insieme ai normali a partire dalla data di acquisto. L'apparec- rifiuti domestici. Questo prodotto chio è stato prodotto con cura e debitamente è soggetto alla Direttiva Europea collaudato prima della consegna. - Page 27 ÍNDICE PÁGINA Utilização correcta Material fornecido Dados técnicos Indicações de segurança Peças do aparelho Colocação do aparelho em funcionamento Modo de rádio Limpeza Eliminação de erros Indicação de conformidade Importador Eliminação Garantia & Assistência Técnica Leia atentamente o manual de instruções antes da primeira utilização e guarde-o para con- sulta futura.
-
Page 28: Utilização Correcta
Material fornecido situação não for evitada, existe perigo de danos materiais. Siga as indicações neste 1 Despertador com projecção da hora aviso para evitar danos materiais. SPU 900 A1 1 manual de instruções Nota A nota fornece informações adicionais para Dados técnicos facilitar o manuseamento do aparelho. - Page 29 • Nunca mergulhe o aparelho em água. • Este aparelho não deve ser utilizado por Limpe-o apenas com um pano ligeira- pessoas (incluindo crianças) com capa- mente humedecido. cidades físicas, sensoriais ou mentais • Não exponha o aparelho a chuva, limitadas ou falta de experiência e/ou nem o utilize em ambientes húmidos de conhecimento, a não ser que estas...
-
Page 30: Peças Do Aparelho
danos. Por isso, neste caso, retire sem- regressar ao modo de funcionamento pre a ficha de rede da tomada. normal. Poderá ser necessário desligar a alimentação de tensão e voltar a ligá-la. Atenção durante a substituição As pilhas (caso existam) devem ser re- das pilhas movidas e novamente colocadas. -
Page 31: Colocação Do Aparelho Em Funcionamento
hora e data com a ajuda do sinal RDS. k NAP/USER - Alterna o de utilizador, Caso pretenda cancelar este processo, função de prima qualquer tecla. Caso a actualiza- temporizador ção automática falhe, efectue as configu- - Interruptor para ligar/ desligar a função de rações mencionadas manualmente. - Page 32 tendo uma das teclas premida, altera a Abr. Dif. Cidade indicação rapidamente. Também aqui se -7 Denver / EUA aplica a vista geral acima exibida das -6 Chicago / EUA cidades ajustáveis e diferenças horárias. -6 Cidade do México / México 3.
- Page 33 6. Para desactivar a função de lembrança, 3. Prima o botão DOWN i para desactivar programe uma data passada. esta função novamente. Ajustar função de actualização Ajustar o tempo de regulação de luz Através desta função o aparelho pode actua- do visor lizar as configurações de hora automatica- 1.
- Page 34 1. No caso de rádio desligado, prima o = Sexta-feira = Sábado botão PAGE/AL.SET f para aceder à função de despertar. Os botões PRESET/ = Domingo ALARM +/– s/d permitem-lhe selec- 6. Para retroceder à selecção de dias úteis, cionar a posição de memória de alarme fim-de-semana ou semana completa, pretendida.
-
Page 35: Modo De Rádio
Ajustar indicações do visor alternáveis 2. Prima a tecla UP o para procurar por Caso o aparelho se encontre em Standby, emissoras com uma frequência mais prima a tecla DOWN i. No visor é exibido elevada do que a exibida no visor. D–... - Page 36 algarismo e a indicação da posição de • Prima repetidamente a tecla Vol. + w memória "MEM". para aumentar o volume. 4. Com os botões PRESET/ALARM +/— s/ Temporizador de desactivação d seleccione então a posição na qual O aparelho dispõe e um temporizador de a emissora deve ser memorizada.
-
Page 37: Limpeza
Eliminação de erros 3. Dirija o projector u para o local preten- dido. Antes de poder rodar o projector O aparelho não trabalha. t para o lado pretendido, deve retirar > A ficha do cabo de alimentação 2! cuidadosamente a sua base da estrutura está... -
Page 38: Eliminação
Eliminação Garantia & Assistência Técnica Nunca deposite o aparelho no Este aparelho tem 3 anos de garantia a lixo doméstico comum. Este pro- partir da data de compra. Este aparelho foi duto está em conformidade com fabricado com o máximo cuidado e escrupu- a Directiva Europeia 2002/96/ losamente testado antes da sua distribuição. - Page 39 INDEX PAGE Intended Use Items supplied Technical Data Safety information The appliance components Putting the appliance into use Radio operation Cleaning Troubleshooting Notice regarding conformity Importer Disposal Warranty & Service Read the operating instructions carefully before using the appliance for the first time and pre- serve this booklet for later reference.
-
Page 40: Intended Use
Items supplied Notice 1 Projection Alarm Clock SPU 900 A1 A notice signifies additional information that 1 Operating manual assists in the handling of the appliance. Technical Data Warning: Risk of electric shocks. - Page 41 • Do not expose the appliance to rain and lectual abilities or deficiences in experi- never use it in a humid or wet environ- ence and/or knowledge unless they are ment. supervised by a person responsible for • Always take hold of the power cable by their safety or receive from this person the plug.
-
Page 42: The Appliance Components
nected from the power supply and then Warnings about interaction with reconnected. The batteries (if present) batteries must be removed and then reinserted. The appliance uses batteries for memory Notice storage. When handling batteries, please observe the following: No liability/warranty claims will be con- sidered for damage to the appliance •... -
Page 43: Putting The Appliance Into Use
approx. 15 seconds, the appliance saves the 1( Focus adjuster - for focussing the time adjustment and then leaves the programming projection mode. 2) Wire aerial - for VHF reception 2! Power cable 1. Press theMODE/LOCK button e. The 2@ Battery time display blinks. - Page 44 Abbr. Diff. City Time offset Display Explanation Universal Time Coordinated OFFSET 1 In your time zone (local London / UK city) it is winter time and in the adjusted world time it +1 Berlin / Germany is currently summer time. +1 Paris / France OFFSET 0 In your time zone (local +1 Rome / Italy...
- Page 45 2. Press the buttons DOWN / UP i/o to 2. Press the button DOWN i to deactivate set a different time. the up-date function. The display g then 3. Press the button MODE/LOCK e once shows "UPDATE OFF". more. The display g shows “DT 6:00 OFF” 3.
- Page 46 8. If needed, programme the other memory i/o changes the alarm time in quick suc- positions for alarm times as detailed cession. above. 3. Press the button PAGE/AL.SET f until the desired alarm function (see table) is indi- When the alarm signal sounds... cated in the display g.
-
Page 47: Radio Operation
Radio operation Automatic station search You can also let the appliance search for The technical data of the appliance makes radio stations. The radio alarm then searches possible an adjustable frequency range wider the selected frequency range until it has than the permitted frequency ranges of 87,5 - found a radio station. -
Page 48: Adjusting The Volume
Should the second user be activated, the 5. On expiry of the time period the ap- pliance switches itself off. “B” indicator appears in the display g. 6. Repeat the steps 1 - 4 (for both users) until 6. To switch the timer off prematurely, all desired radio stations have been saved. -
Page 49: Cleaning
Notice regarding conformity SNOOZE/DIMMER button y retains its func- tion as a snooze button. To disable the button This appliance has been tested against, and lock function, press and hold the MODE/ found to be in compliance with, the funda- LOCK button e once again until the key mental requirements and other relevant stipu- symbol extinguishes. -
Page 50: Warranty & Service
this obligation is to ensure that batteries Service Great Britain are disposed of in a non-polluting man- Tel.: 0871 5000 720 (£ 0.10/Min.) ner. E-Mail: kompernass@lidl.co.uk • Only dispose of batteries when they are IAN 67087 fully discharged. Service Malta Tel.: 80062230 Disposal of packaging E-Mail: kompernass@lidl.com.mt... - Page 51 INHALTSVERZEICHNIS SEITE Bestimmungsgemäßer Gebrauch Lieferumfang Technische Daten Sicherheitshinweise Die Geräteteile Das Gerät in Betrieb nehmen Radiobetrieb Reinigen Fehlerhilfe Hinweis zur Konformität Importeur Entsorgen Garantie & Service Lesen Sie die Bedienungsanleitung vor der ersten Verwendung aufmerksam durch und heben Sie diese für den späteren Gebrauch auf. Händigen Sie bei Weitergabe des Gerätes an Dritte auch die Anleitung aus.
-
Page 52: Bestimmungsgemäßer Gebrauch
Gerätes resultieren, wird keine Gewährleis- diesem Warnhinweis befolgen, um Sachschä- tung übernommen! den zu vermeiden. Hinweis Lieferumfang Ein Hinweis kennzeichnet zusätzliche Infor- 1 Projektionswecker SPU 900 A1 mationen, die den Umgang mit dem Gerät 1 Bedienungsanleitung erleichtern. Technische Daten Warnung: Gefahr durch Netzanschluss: 220–240 V ~ , 50 Hz... - Page 53 • Tauchen Sie das Gerät niemals in Was- • Der Netzstecker muss immer leicht zu- ser ein. Wischen Sie es nur mit einem gänglich sein, so dass im Notfall das leicht feuchten Tuch ab. Gerät schnell vom Stromnetz getrennt • Setzen Sie das Gerät nicht dem Regen werden kann.
-
Page 54: Die Geräteteile
• Decken Sie niemals die Lüftungsschlitze Hinweis zu Stoßspannungen des Gerätes ab, wenn es eingeschaltet ist. (EFT/elektrischer schneller • Stellen Sie keine offenen Brandquellen, Übergangsvorgang) und wie z. B. Kerzen auf oder neben das elektrostatischen Entladungen: Gerät. Im Falle einer Fehlfunktion aufgrund Achtung bei Gewitter! elektrischer schneller Übergangsvor- gänge (Stoßspannung) bzw. -
Page 55: Das Gerät In Betrieb Nehmen
wecker, seine Einstellungen für Uhrzeit f PAGE/AL.SET - schaltet die Speicher- und Datum mit Hilfe des RDS-Signals zu seiten um/ruft die Alarm- aktualisieren. Falls Sie diesen Vorgang Funktion auf abbrechen wollen, drücken Sie eine g Display - Anzeige beliebige Taste. Sollte die automatische h A.M.S. - Page 56 2. Drücken Sie die Tasten DOWN/UP i/o, Abk. Diff. Stadt um die gewünschte Weltzeit einzustellen. -8 Los Angeles / USA Das Gedrückthalten einer der Tasten än- -7 Denver / USA dert die Anzeige schnell. Auch hier gilt -6 Chicago / USA die oben gezeigte Übersicht über die ein- -6 Mexico City / Mexico stellbaren Städte und der Zeitdifferenzen.
- Page 57 6. Um die Erinnerungsfunktion zu deaktivie- ten gedimmt werden soll. Das Display g ren, programmieren Sie ein Datum, das in zeigt dann „DIM-T ON“. der Vergangenheit liegt. 3. Drücken Sie die DOWN-Taste i, um die- se Funktion wieder zu deaktivieren. Update-Funktion einstellen Über diese Funktion kann das Gerät die Display-Dimmerzeit einstellen...
- Page 58 1. Drücken Sie bei ausgeschaltetem Radio 6. Um wieder zurück zur Auswahl von Werk- die PAGE/AL.SET-Taste f, um die Weck- tagen, Wochenende oder ganzer Woche funktion aufzurufen. Mit den PRESET/ zu gelangen, halten Sie die SNOOZE/ ALARM +/– s/d Tasten wählen Sie den DIMMER-Taste y erneut 2 Sekunden lang gewünschten Alarmspeicherplatz aus.
-
Page 59: Radiobetrieb
Wechselnde Displayanzeigen einstellen Sender manuell einstellen Wenn das Gerät im Standby-Zustand ist, 1. Mit der BAND-Taste u wählen Sie das drücken Sie die Taste DOWN i. Im Display gewünschte Radioband aus, MW (AM) D– erscheint „ “ (für Uhrzeit und Datum). oder UKW (FM). - Page 60 „PAGE“ die Nummer der gerade ange- Lautstärke einstellen wählten Speicherseite. • Drücken Sie im Radiobetrieb wiederholt 2. Stellen Sie den gewünschten Sender ein. die Taste VOL. — q, um die Lautstärke zu 3. Drücken Sie kurz die Taste A.M.S. ME- verringern.
-
Page 61: Reinigen
1. Klappen Sie dazu den Projektor t aus. Fehlerhilfe 2. Schalten Sie die Funktion mit der PROJEC- Das Gerät arbeitet nicht. TION-Taste a ein. > Steckt der Stecker des Netzkabels 2! fest 3. Richten Sie den Projektor t auf die in der Steckdose? gewünschte Stelle aus. -
Page 62: Entsorgen
Entsorgen Die Garantieleistung gilt nur für Material-oder Fabrikationsfehler, nicht aber für Transport- Werfen Sie das Gerät keinesfalls schäden, Verschleißteile oder für Beschädigun- in den normalen Hausmüll. Die- gen an zerbrechlichen Teilen, z. B. Schalter ses Produkt unterliegt der euro- oder Akkus. päischen Richtlinie 2002/96/EC.