Dell S520 User Manual
Hide thumbs
Also See for S520:
- Setup manual (242 pages) ,
- User manual (130 pages) ,
- Replacing manual (42 pages)
Table of Contents
Advertisement
Quick Links
Advertisement
Table of Contents

Related Manuals for Dell S520


Summary of Contents for Dell S520
- Page 1 Dell™ Interactive Projector S520 User’s Guide...
- Page 2 Reproduction of these materials in any manner whatsoever without the written permission of Dell Inc. is strictly forbidden. Trademarks used in this text: Dell and the DELL logo are trademarks of Dell Inc.; DLP and DLP logo are trademarks of T ;...
-
Page 3: Table Of Contents
Contents Your Dell Projector ..... . . Connecting Your Projector .... - Page 4 ......Contacting Dell ..... . .
-
Page 5: Your Dell Projector
Your Dell Projector Your projector comes with all the items shown below. Ensure that you have all the items, and contact Dell if anything is missing. Package Contents Power cable 5 m VGA cable (VGA to VGA) Remote control AAA Batteries (2) - Page 6 Package Contents Passive Pen (2 pcs) Interwrite Workspace CD WorkSpace Alignment bar (3 pcs) Screw for laser curtain Wall mount kit Your Dell Projector...
- Page 7 About Your Projector Top View Bottom View 163.00 IR receivers Lamp cover Camera 10 W speaker Lens Focus ring Mounting holes for wall mount: Screw hole M4 x 8 mm depth. Recommended torque <10 kgf-cm Your Dell Projector...
- Page 8 •Recommended Projector Wall Mount Kit (P/N: 7XY53). For more information, see the Dell Support website at dell.com/support. •For more information, see the Safety Information that shipped with your projector. •The S520 projector can only be used indoors. Your Dell Projector...
-
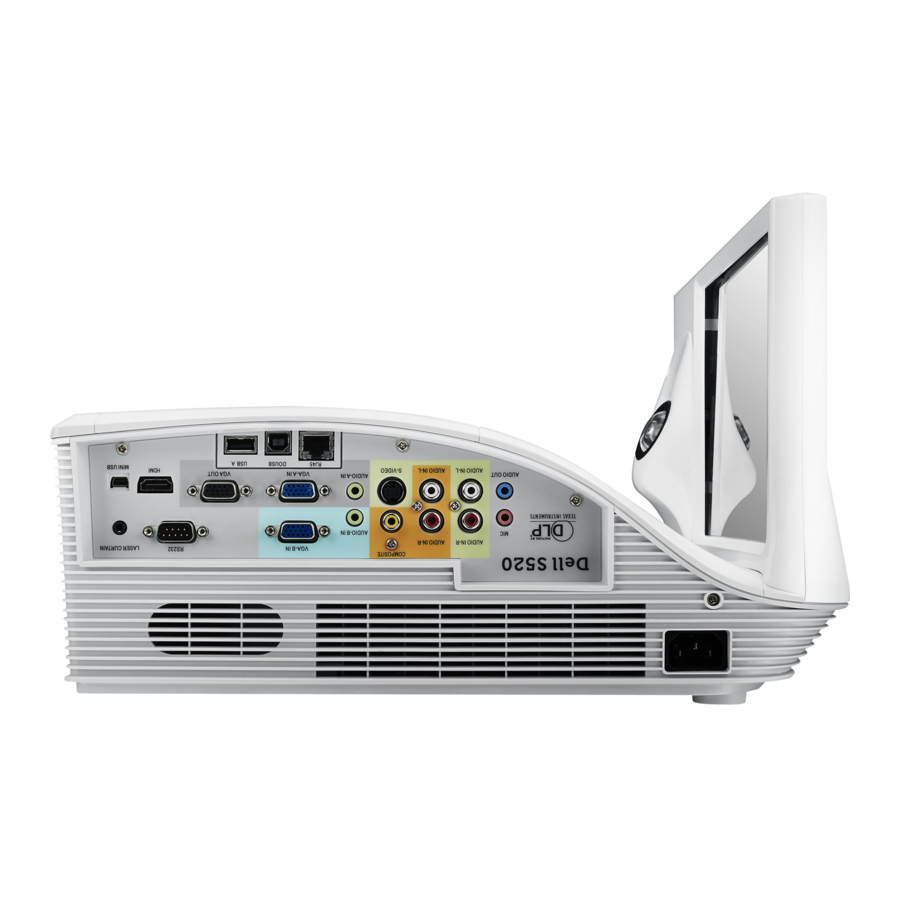
Page 9: Connecting Your Projector
Connecting Your Projector 8 9 10 11 12 5 6 7 Mini USB (Mini Type B) Audio output connector connector for remote mouse, firmware upgrade, and laser curtain touch HID HDMI connector Power cord connector VGA output (monitor loop Microphone connector through) connector USB Type A connector for USB Audio-B right-channel input... - Page 10 Audio-A left-channel input Laser curtain connector connector Audio-B left-channel input connector CAUTION: Before you begin any of the procedures in this section, follow the Safety Instructions as described on page 8. Connecting Your Projector...
-
Page 11: Connecting To A Computer
Connecting to a Computer Connecting a Computer Using a VGA Cable M O L E X Power cord VGA to VGA cable USB-A to Mini USB-B cable NOTE: The Mini USB cable must be connected if you want to use the Page Up and Page Down features on the remote control. - Page 12 Monitor Loop-Through Connection Using VGA Cables Power cord VGA to VGA cable NOTE: Only one VGA cable is shipped with your projector. An additional VGA cable can be purchased on the Dell website at www.dell.com. Connecting Your Projector...
- Page 13 Connecting a Computer Using a RS232 cable Power cord RS232 (9-pin D-sub female to female pin2-3 swap) cable NOTE: The RS232 (9-pin D-sub female to female pin2-3 swap) cable is not shipped with your projector. Consult a professional installer for the cable and RS232 remote control software.
- Page 14 M O L E X Power cord USB-A to USB-B cable NOTE: Plug and Play. Only one USB cable is shipped with your projector. An additional USB cable can be purchased on the Dell website at www.dell.com. Connecting Your Projector...
- Page 15 ® Connecting a Computer Using Wireless or Intel WiDi NOTE: Your computer should be equipped with a wireless connector and properly configured to detect another wireless connection. Refer to your computer’s documentation on how to configure a wireless connection. ® NOTE: To connect a computer via Intel WiDi, your computer must...
- Page 16 After installing and launching the application on your mobile device, enable Wi-Fi on your mobile device and connect to the projector network, Dell S520. For more Information, please visit go to Dell Support site at dell.com/support.
-
Page 17: Connecting A Dvd Player
HDMI STANDBY/ON ENTER DVD/USB HOME RETURN MENU Power cord S-Video cable NOTE: The S-Video cable is not shipped with your projector. You can purchase the S-Video extension (50 ft/100 ft) cable on the Dell website at www.dell.com. Connecting Your Projector... - Page 18 DVD/USB HOME RETURN MENU Power cord Composite Video cable NOTE: The Composite Video cable is not shipped with your projector. You can purchase the Composite Video Extension (50 ft/100 ft) cable on the Dell website at www.dell.com. Connecting Your Projector...
- Page 19 VGA to Component Video cable NOTE: The VGA to Component Video cable is not shipped with your projector. You can purchase the VGA to Component Video Extension (50 ft/100 ft) cable on the Dell website at www.dell.com. Connecting Your Projector...
- Page 20 TOP MENU MENU HDMI OPEN/CLOSE STANDBY/ON ENTER DVD/USB HOME RETURN MENU Power cord HDMI cable NOTE: The HDMI cable is not shipped with your projector. You can purchase the HDMI cable on the Dell website at www.dell.com. Connecting Your Projector...
-
Page 21: Connecting To Local Area Network
To project an image and control the projector that is connected to a network through a RJ45 cable. Local Area Network (LAN) Power cord RJ45 cable NOTE: The RJ45 cable is not shipped with your projector. You can purchase the RJ45 cable on the Dell website at www.dell.com. Connecting Your Projector... - Page 22 Connection With Commercial RS232 Control Box Power cord RS232 (9-pin D-sub female to female pin2-3 swap) cable Commercial RS232 control box NOTE: The RS232 (9-pin D-sub female to female pin2-3 swap) cable is not shipped with your projector. Consult a professional technician to obtain the cable.
- Page 23 Connecting With Your Laser Curtain for Interactivity Power cord VGA to VGA cable USB-A to Mini USB-B cable DC to DC cable Laser curtain Whiteboard NOTE: The Laser Curtain is shipped with your whiteboard. The Laser Curtain should be installed 2 cm higher than the upper edge of the projection screen.
- Page 24 Complies with 21 CFR 1040.10 and 1040.11 except for deviations pursuant to Laser Notice No. 50, dated June 24, 2007. IEC 60825-1:2007 CAUTION: Laser Precautions • This product is a Class 1 laser device that conforms with IEC 60825- 1:2007. •...
-
Page 25: Using Your Projector
Using Your Projector Turning Your Projector On NOTE: Turn on the projector before you turn on the source (computer, DVD player, etc.). The Power button light blinks white until pressed. Connect the power cord and appropriate signal cables to the projector. For information about connecting the projector, see "Connecting Your Projector"... -
Page 26: Adjusting The Projector Focus
NOTE: Before you turn on the projector again, wait for 60 seconds to allow the internal temperature to stabilize. Disconnect the power cord from the electrical outlet and the projector. Adjusting the Projector Focus Rotate the focus ring until the image is clear. The projector focuses at distances ranging between 1.96 ft to 2.4 ft (0.597 m to 0.731 m). -
Page 27: Adjusting Projection Image Size
Adjusting Projection Image Size 0.597’ (18.2 cm) 70" (177.8 cm) 80" (203.2 cm) 87.2" (221.49 cm) 90" (228.6 cm) 100" (254 cm) Using Your Projector... - Page 28 Projector Image size Projection Projection Projector base to Distance Distance base to top of Diagonal bottom of (cm) (cm) image (cm) Height (cm) (inch/cm) image (cm) Width (cm) 51.7 18.2 70"/ 177.8 cm 60.1 26.6 80"/203.2 cm 65.5 87.2"/221.4 cm 67.7 34.2 90"/228.6 cm...
-
Page 29: Using The Remote Control
Using the Remote Control Aspect Ratio Page Up Page Down Freeze Video S-Video Auto Blank Blank Video Source Adjust Screen Screen Mode Turns the projector on or off. For more Power information, see "Turning Your Projector On" on page 25 and "Turning Your Projector Off"... - Page 30 Point the remote control at the screen, Laser press and hold the laser button to activate the laser light. CAUTION: Do not look at the laser point when it is active. Avoid directing the laser light on your eyes. Press to change the aspect ratio of a Aspect Ratio Aspect Ratio...
- Page 31 Press to navigate through the On-Screen Left Display (OSD) Menu items. Press to activate the OSD. Menu Press to mute or un-mute the projector Mute speaker. Press to increase the volume. Volume up Zoom + Press to increase the image. Press to decrease the volume.
-
Page 32: Installing The Remote Control Batteries
Installing the Remote Control Batteries NOTE: Remove the batteries from the remote control when not in use. Press the tab to lift the battery compartment cover. Check the polarity (+/-) marking on the batteries. Insert the batteries and align their polarity correctly according to the marking in the battery compartment. -
Page 33: Operating Range With Remote Control
Operating Range with Remote Control Operating range Angle ±40° Distance 7 m/22.97 feet Angle Angle Aspect Ratio Page Up Page Down Freeze Video S-Video Auto Blank Blank Video Source Adjust Screen Screen Mode NOTE: Actual operating range may slightly differ from the diagram. Weak batteries will also prevent the remote control from properly operating the projector. -
Page 34: Using The On-Screen Display
Using the On-Screen Display • The projector has a multi-language On-Screen Display (OSD) Menu that can be displayed with or without an input source. • Press the Menu button on the remote control to enter the Main Menu. • To navigate through the tabs in the Main Menu, press the buttons on the remote control. - Page 35 INPUT SOURCE WIRELESS/USB The Input Source Wireless/USB menu allows you to activate the Wireless Display, USB Display, USB Viewer, Intel® WIDI and Internal Memory. — Press to access the projector's Wireless Guide IRELESS ISPLAY screen. See "Wireless Guide screen" on page 69. USB D —...
- Page 36 AUTO ADJUST Auto Adjust automatically adjusts the projector's Horizontal, Vertical, Frequency, and Tracking in PC mode. BRIGHTNESS/CONTRAST The Brightness/Contrast menu allows you adjust the brightness/contrast settings of your projector. — to adjust the brightness of the image. RIGHTNESS — to adjust the display contrast. ONTRAST NOTE: If you adjust the settings for Brightness and Contrast the...
- Page 37 VIDEO MODE The Video Mode menu allows you to optimize the display image: Presentation, Bright, Movie, sRGB (provides more accurate color representation), and Custom (set your preferred settings). AUDIO VOLUME The Audio Volume menu allows you adjust the Audio, Microphone, Master volume settings of your projector.
- Page 38 AUDIO EQ The Audio EQ menu allows you adjust the audio to boost or reduce (attenuating) the levels of different frequencies in a signal. ADVANCED SETTINGS The Advanced Settings menu allows you to change settings for Image, Display, Projector, LAN, Wireless, Menu, Power, Interactive, and Information.
- Page 39 —Allows you to adjust the color temperature. The OLOR EMPERATURE screen appears cooler at higher color temperatures and warmer at lower color temperatures. When you adjust the values in the Color Adjust menu, the Custom mode is activated. The values are saved in the Custom mode.
- Page 40 —Press to increase the sharpness and to decrease HARPNESS the sharpness. —Press to increase the amount of green in the image and to decrease the amount of green in the image. —Press and use to display white HITE NTENSITY intensity. —Allows you to select the color space.
- Page 41 settings. The display settings menu provides the following options: —Press to move the image right and ORIZONTAL OSITION move the image left. —Press to move the image up and to move ERTICAL OSITION the image down. —Allows you to change the display data clock frequency to REQUENCY match the frequency of your computer’s graphics card.
- Page 42 3D F —Allows you to select the 3D format. Options are: Side By ORMAT Side, Side By Side Full, Frame Sequential, Field Sequential, Top/Bottom, and Top/Bottom Full. 3D S —If you see a discrete or overlapping image while NVERT wearing DLP 3D goggles, you may need to execute 'Invert' to get best match of left/right image sequence to get the correct image.
- Page 43 •Origin — Select Origin to maintain the aspect ratio of image projector according to the input source. •16:10 — The input source scales to fit the width of the screen to project a 16:10 screen image. •4:3 — The input source scales to fit the screen and projects a 4:3 image.
- Page 44 Closed caption option is available for NTSC only. Closed captioning can only be enabled via S-Video and Composite Video inputs. —Default is Dell logo as wallpaper. You can also select TARTUP CREEN Capture Screen option to capture the screen display. The following message appears on the screen.
- Page 45 NOTE: To capture a full image, ensure that the input signal connected to the projector is at 1280 x 800 resolution. —Test Pattern is used to test focus and resolution. ATTERN You can enable or disable the Test Pattern by selecting Off, 1, or 2. Test Pattern 1: Test Pattern 2: —Select Confirm and press...
- Page 46 LAN S — Select and press to activate LAN settings. The LAN ETTINGS settings menu provides the following options: LAN—Select Enabled to activate the Wireless and LAN IRELESS function. DHCP—If a DHCP server exists in the network to which the projector is connected, the IP address will automatically be acquired when you select DHCP On.
- Page 47 After the IP Address, Subnet Mask, Gateway, and DNS is set up, select Store and press button to store the settings. If you select Store without pressing the Enter button, the system will keep the original settings. —Press to reset network configuration. ESET —...
- Page 48 button to set the value. After the setup is complete, press the button to exit. After the IP Address, Subnet Mask, Gateway, and DNS is set up, select Store and press button to store the settings. If you select Store without pressing the Enter button, the system will keep the original settings.
- Page 49 If you have entered an incorrect password, you will be given two more chances. After three invalid attempts, the projector will automatically turn off. NOTE: If you forget your password, contact DELL or a qualified service person. To disable the password function, select the Disabled option to close the function.
- Page 50 —Key in the original password. Then, enter the new HANGE ASSWORD password and confirm the new password again. — Select and press to activate power settings. The OWER ETTINGS power settings menu provides the following options: Using Your Projector...
- Page 51 —Select On to turn off the projector with a single UICK HUTDOWN press of the Power button. This function allows the projector to quickly power off with an accelerated fan speed. Slightly higher acoustic noise is expected during quick power off. NOTE: Before you turn on the projector again, wait for 60 seconds to allow the internal temperature to stabilize.
- Page 52 NTERACTIVE —Allows you to set the laser touch connector selection ONNECTION as Mini USB or Wireless/LAN. — The information menu displays the current S520 projector NFORMATION settings. LANGUAGE Allows you to set the language for the OSD. Press to activate the Language menu.
- Page 53 HELP If you encounter problems with your projector, you can access the help menu for troubleshooting. Using Your Projector...
-
Page 54: Multimedia Introduction
Multimedia Introduction Multimedia format supported: Photo Format Image Type (Ext Name) Sub Type Encode Type Max Pixels 8000 x 8000 8000 x 8000 8000 x 8000 JPEG/JPG Baseline YUV420 8000 x 8000 YUV422 YUV440 YUV444 Progressive YUV420 8000 x 8000 YUV422 YUV440 YUV444... - Page 55 Music Format Music Type (ext Name) Max. Sample Rate (KHz) Max. Bit Rate (Kbps) LPCM 48 KHz 320 Kbps MPEG-1 Layer 3 48 KHz 320 Kbps 48 KHz 320 Kbps 48 KHz 320 Kbps 48 KHz 320 Kbps Using Your Projector...
-
Page 56: How To Set-Up File Type For Multimedia With Usb
How to set-up File Type for Multimedia with USB NOTE: A USB flash disk must be plugged into the projector if you want to use the multimedia USB function. Follow these steps to playback the Photo, Video, or Music files on your projector: Connect the power cable and turn on the projector by pressing the power button. - Page 57 Access the Input Source menu, select Wireless/USB and then select USB Viewer on the sub-menu. The USB Screen shown below appears: Select the multimedia files: Photo, Video, Music, or Office Viewer, and then press the to start playing. Or select the Setup option to change multimedia settings.
-
Page 58: How To Set-Up File Type For Multimedia With Internal Memory
How to set-up File Type for Multimedia with Internal Memory Follow these steps to playback the Photo, Video, or Music files on your projector: Connect the power cable and turn on the projector by pressing the power button. Press the Menu button on the remote control. Aspect Ratio Page Up... - Page 59 The Internal Memory Screen shown below appears: Select the multimedia files: Photo, Video, Music, or Office Viewer, and then press the to start playing. Or select the Setup option to change multimedia settings. See "Multimedia Setup" on page 61. Using Your Projector...
-
Page 60: Office Viewer For The Usb And Internal Memory
Office Viewer for the USB and Internal Memory The Office Viewer feature allows you to use MS Excel, MS Word, MS PowerPoint, and PDF files. Buttons Introduction Use the up, down, left, and right buttons for navigation and button on the remote control to select. -
Page 61: Multimedia Setup For Usb And Internal Memory
Multimedia SETUP for USB and Internal Memory The multimedia setup menu allows you to change settings for Photo, Video, and Music. NOTE: Multimedia setup menu and set are the same for the USB and internal memory. SLIDESHOW DURATION—Press to select slideshow display interval. The image will automatically switch to the next photo after the time out. -
Page 62: Intel ® Wireless Display (Widi) Installation
® Intel Wireless Display (WiDi) Installation ® NOTE: Your computer must have the following Intel Wireless Display system requirements: System Requirement Component Processor ONE of the following mobile processors: ® 3rd generation Intel Core™ Processor: all mobile processors ® 3rd Generation Intel Core™... - Page 63 Wireless ONE of the following: ® ® Intel Centrino Wireless-N 1000, 1030, 2200, or 2230 ® ® Intel Centrino Wireless-N 2200 for Desktop ® ® Intel Centrino Advanced-N 6200, 6205, 6230, or 6235 ® ® Intel Centrino Advanced-N 6205 for Desktop ®...
-
Page 64: Enable Intel ® Widi On The Projector
® Enable Intel WiDi on the Projector Connect the power cable and press the power button. Press the Menu button on the remote control. Aspect Ratio Page Up Page Down NOTE: , and buttons to navigate and to select. Access the Input Source menu, select Wireless/USB and then select ®... - Page 65 WiDi on Your Computer Type WiDi in your Windows search bar. If your computer has built-in ® ® Intel WiDi, you will see the “Intel WiDi” application in your search results. Connect your computer to Dell S520. Using Your Projector...
- Page 66 Login ® Login with the PIN Code provided in Step 4 of Intel Wireless Display (WiDi) Installation, then click OK. Using Your Projector...
-
Page 67: Wireless Display Or Lan Display Installation
Wireless Display or LAN Display Installation NOTE: Your computer must have the following minimum system requirements: Operating System: • Windows Microsoft Windows XP Home or Professional Service pack 2 (32-bit recommended), Windows Vista 32-bit, and Windows 7 Home or Professional 32-bit or 64-bit, Windows 8 32-bit or 64-bit •... -
Page 68: Enable Wireless Or Lan On The Projector
Enable Wireless or LAN on the Projector Connect the power cable and press the power button. Press the Menu button on the remote control. Aspect Ratio Page Up Page Down NOTE: buttons to navigate and select. Access the Input Source menu, select Wireless/USB and then select Wireless Display on the sub-menu. - Page 69 Connect your computer to the Dell S520 abcd wireless network. NOTE: • Your computer must have wireless network function to detect the connection. • When you connect to the Dell S520 abcd wireless network, you will lose wireless connectivity with other wireless networks. Using Your Projector...
- Page 70 Vista: Click Control Panel Internet Options Connections LAN Settings) Open your internet browser. You will be automatically directed to the S520 Web Management web page. NOTE: If the web page does not load automatically, enter the IP address (default IP address is 192.168.100.10) noted from the...
- Page 71 The S520 Web Management page opens. For first-time use, click Download. Select the appropriate operating system, then click Download. Using Your Projector...
- Page 72 Windows XP. If your computer does not have the driver installed, a pop-up message will appear on-screen prompting you to install the required driver. You can download the “Audio Projection Driver” from the Dell Support site at dell.com/support NOTE:...
- Page 73 NOTE: For LAN display, connect the LAN cable to the projector and the computer. Using Your Projector...
- Page 74 Launch the Dell Projector Connection Manager (for Wireless Display) Once the installation is complete, the program will launch and search automatically. If the program does not launch automatically, you can double-click the icon on the desktop to start the application.
- Page 75 Launch the Dell Projector Connection Manager (for LAN Display) Once the installation is complete, the program will launch and search automatically. If the program does not launch automatically, you can double-click the icon, on the desktop to start the application.
- Page 76 Understanding the Buttons After a successful log in, the following screen appears: Item Description Status Bar Settings Click to activate the application settings. Minimize button Click to minimize the application. Close button Click to exit the application. Controls Toolbar Information Click to display SSID, IP, and Access Code information.
- Page 77 Using the Settings Click to display the settings menu. — Allows you to setup the resolution. ESOLUTION — Allows you to setup the default projection mode. ISPLAY Using Your Projector...
- Page 78 — Allows you to change the audio settings. UDIO USB D — Allows you to create USB dongle. See "Make Application ONGLE Token" on page 106. Using Your Projector...
- Page 79 — Display the application version. BOUT Using Your Projector...
-
Page 80: Audio Projection Installation
Windows XP, If your computer does not have the driver installed, a pop-up message will appear on-screen prompting you to install the required driver. You can download the “Audio Projection Driver” from the Dell Support site at dell.com/support. NOTE: Audio Projection function needs installed extra driver in MAC operating system. - Page 81 NOTE: Ports / Protocol for connection to the projector for projection via Ethernet: UDP: 1047, (backup: 1048, 1049) TCP: 3268, 515, 1688, 1041 (backup: 389, 8080, 21) Using Your Projector...
- Page 82 Enable Wireless or LAN on the Projector. Connect the power cable and turn on the projector by pressing the power button Press the Menu button on the remote control. Aspect Ratio Page Up Page Down Access the Input Source menu, select the Wireless/USB and then select the Wireless Display on the sub-menu.
- Page 83 Code. You will need this information to log in later. Install the Dell Projector Connection Manager on Your Computer "Dell Projector Connection Manager" is required if the Wireless or LAN is used for the Audio Projection set-up. Please download and install the software the first time you use Audio Projection.
- Page 84 Once the installation is complete, the program will launch and search automatically. If the program does not launch automatically, you can double-click the icon on the desktop to start the application. Select the Dell S520 abcd and then click the OK. Using Your Projector...
- Page 85 Login with the Access Code provided in Step 4 of Audio Projection Installation, then click OK. Go to Step 10. Launch the Dell Projector Connection Manager with LAN Audio Projection Once the installation is complete, the program will launch and search automatically.
-
Page 86: Using The Audio Projection
Using the Audio Projection You are now logged into the Dell Projector Connection Manager. Click the "Play" button in the application to starting the LAN or wireless audio projection. Click the "Audio Projection" button in the application to enable audio... - Page 87 Executing the Windows Media Player or others audio player software (example: Winamp player...) on your computer. Using Your Projector...
-
Page 88: Managing The Projector From Web Management
Managing the Projector From Web Management Configuring the Network Setting If the projector is connected to a network, you can access the projector using a web browser. For configuring the network setting, refer to "LAN Settings" on page 46. Accessing Web Management Use Internet Explorer 6.0 and above or Firefox 2.0 and above and enter the IP address. - Page 89 Download the Dell Projector Connection Manager See also "Wireless Display or LAN Display Installation" on page 67. Click the Download button of the corresponding operating system of your computer. Using Your Projector...
- Page 90 Managing Properties Admin An administrator password is required to access the Admin page. Admin Password: Enter the administrator password and then click • Login. The default password is "admin". To change the password, see "Change Passwords" on page 95. Using Your Projector...
- Page 91 System Status Displays the Network Status, Connection Status, and Projector Status information. Using Your Projector...
- Page 92 Network Status See OSD section on page 46. IP Setup • Choose Obtain an IP address automatically to assign an IP address to the projector automatically, or Use the following IP address to assign an IP address manually. DHCP Server Setup Choose Auto to automatically set up the Start IP, End IP, Frequency •...
- Page 93 Wireless Setup • Choose Enable to set up the Region, SSID, SSID Broadcast, Frequency Band, Channel, Encryption, and Key. Choose Disable to disable the wireless set up. SSID: Up to maximum length of 32 characters. Encryption: You can disable WPA key or select one of 64-bit or 128- bit in ASCII or HEX string.
- Page 94 Projection Setup Projection Setup • Resolution: Allows you to select the resolution. Options are: XGA (1024 x 768) and WXGA (1280 x 800). • Login Code: Select how you want the login code to be generated by the projector. There are three options: •...
- Page 95 This page allows you to change the administrator password. Enter New Password: Enter the new password. • Confirm New Password: Enter the password again and click Apply. • NOTE: Contact Dell if you forget your administrator password. Using Your Projector...
- Page 96 Reset to Default Click the Apply button to restore the wireless/network setup to its factory default settings. Using Your Projector...
- Page 97 To start firmware update, follow these steps: You can download the firmware files from dell.com/support. Press Browse to select the file to update. Click the Update button to start. Wait while the system updates the firmware in your device.
- Page 98 Projector Control Panel Projector Information • Projector Status: There are five states: Lamp On, Standby, Power Saving, Cooling, and Warming up. Click Refresh to refresh the status and control settings. • Power Saving: Power Saving can be set to Off, 30, 60, 90, or 120 minutes.
- Page 99 Image Control • Projector Mode: Allows you to select the projector mode, depending on how the projector is mounted. There are two projection modes: Front Projection-Wall Mount and Rear Projection-Wall Mount. Source Select: The Source Select menu allows you to select your •...
- Page 100 Alert Setting E-mail Alert • E-mail Alert: You can set whether to be notified by email (Enable) or not (Disable). • To/Cc/From: You can enter email address of sender (From) and recipients (To/Cc) to receive notification when an abnormality or warning occurs.
- Page 101 Reboot System Click Reboot to reboot the system. Crestron For Crestron function. Using Your Projector...
- Page 102 FAQS: I would like to remotely To have the best setting for the browser, access the projector via the please follow the below steps: Internet. What is the best Open Control Panel Internet setting for the browser? Options General tab Temporary Internet Files Settings...
- Page 103 Some SMTP servers will check whether the mail address of "From" correlates with the "User name" and "Password". For example, you use test@dell.com as the mail address in "From". You should also use test@dell.com account information for the User name and the password to log in the SMTP server.
- Page 104 Programs > McAfee > McAfee Security Center). On the personal firewall plus tab, click View the Internet Applications List. Find and select Dell S520 Projector from the list. Right-click on its Permissions column. Select Allow Full Access from the pop-up menu.
- Page 105 On the General tab, uncheck Don’t allow exceptions. On the Exceptions tab, click the Add Program... button. Find and select Dell S520 Projector from the list of programs, then click OK. Click OK to confirm exceptions settings. Zone Alarm Open Zone Alarm Firewall (Start > All Programs >...
-
Page 106: Make Application Token
Make Application Token The Application Token lets you perform Plug and Show using a USB token. From the application software, click > USB Dongle The following screen appears. Click Next. Plug a flash drive into any of the USB ports on your computer. Select the drive from the list, then click Next. -
Page 107: Troubleshooting Your Projector
Troubleshooting Your Projector If you experience problems with your projector, see the following troubleshooting tips. If the problem persists, contact Dell (see Contacting Dell on page 122). Problem Possible Solution • Ensure that you have chosen the correct No image appears on the... - Page 108 Partial, scrolling, or Press the Auto Adjust button on the incorrectly displayed image remote control. If you are using a Dell laptop computer, set the resolution of the computer to WXGA (1280 x 800): Right-click the unused portion of your ®...
- Page 109 Problem (continued) Possible Solution (continued) • If the display receives the wrong signal Image color is incorrect output from the graphics card, please set the signal type to RGB in the OSD Image Settings of the Advanced Settings tab. • Use Test Pattern in the Projector Settings of the Advanced Settings menu.
- Page 110 The projector has overheated. The display automatically shuts down. Turn the display on again after the projector cools down. If the problem persists, contact Dell. TEMP light is blinking If the projector fan fails, the projector will amber automatically shut down. Try to clear the projector mode by pressing and holding the Power button for 10 seconds.
- Page 111 Problem (continued) Possible Solution (continued) • Windows DoUSB not displaying Display over USB Should run automatically. To manually run USB display, go to My Computer and run "USB_Display.exe". • MAC Go to CDROM: USB_DISPLAY and run "MAC_USB_Display.pkg". Follow the on-screen instruction to complete installed.
-
Page 112: Guiding Signals
Dell. One of the fans has failed. The AMBER breakdown projector automatically shuts down. Flashing If the problem persists, contact Dell. Lamp driver The lamp driver has failed. The breakdown projector automatically shuts down. Unplug the power cord after three... -
Page 113: Laser Curtain Led Guiding Signals
Laser Curtain LED Guiding Signals Status Description (White) (Red) Laser curtain isn't installed properly, yet Interlock Swtich isn't located correctly. InterLock switch fail Please check the installation position of Flash (0.5s) laser curtain. If the warning signal keeps operating, please contact Service Center. Normal status Laser Curtain is functioning correctly. -
Page 114: Changing The Lamp
Replace the lamp when the message "Lamp is approaching the end of its useful life in the operation. Replacement suggested! www.dell.com/lamps" appears on the screen. If this problem persists after replacing the lamp, contact Dell. For more information, see "Contacting Dell"... - Page 115 LAMP(S) INSIDE THIS PRODUCT CONTAIN MERCURY AND MUST BE RECYCLED OR DISPOSED OF ACCORDING TO LOCAL, STATE, OR FEDERAL LAWS. FOR MORE INFORMATION, GO TO WWW.DELL.COM/HG OR CONTACT THE ELECTRONIC INDUSTRIES ALLIANCE AT WWW.EIAE.ORG. FOR LAMP-SPECIFIC DISPOSAL INFORMATION, CHECK WWW.LAMPRECYCLE.ORG.
-
Page 116: Specifications
Specifications Light Valve 0.65" WXGA-800 S450 DMD, DarkChip3™ Brightness 3100 ANSI Lumens (Max.) Contrast Ratio Native: 2200:1 Typical High Contrast Ratio Mode: 8000:1 Typical Uniformity 85% Typical (Japan Standard - JBMA) Number of Pixels 1280 x 800 (WXGA) Aspect Ratio 16:10 Internal Flash 2 GB Memory (Max.) - Page 117 Power Consumption Normal mode: 345 W ± 10% @ 110 Vac (Network On) Eco mode: 285 W ± 10% @ 110 Vac (Network Standby mode: < 0.5 W Audio 2 speaker x 10 watt RMS Noise Level Normal mode: 36 dB(A) Eco mode: 32 dB(A) Projector Weight 18.74 lbs (8.5 kg)
- Page 118 S-Video input: One standard 4-pin min-DIN S-Video connector for Y/C signal. Composite Video input: One Yellow RCA jack for CVBS signal. HDMI input: One HDMI connector for supporting HDMI 1.4a. HDCP compliant. Analog Audio input: Two 3.5 mm stereo mini phone jack (Blue) and two pair of RCA connector (Red/White).
- Page 119 4-to-1 split screen. Allows four presentation slides to be projected on screen. Conference Control mode. Supports Audio Projection (driver installation may be required. Download from dell.com/support). Supports MobiShow and WiFi-Doc projection. Lamp OSRAM 280 W user-replaceable lamp Lamp life Normal mode: 3000 hours...
- Page 120 --> 0xBE, 0xEF, 0x10, 0x05, 0x00, 0xC6, 0xFF, 0x11, 0x11, 0x01, 0x00, 0x01 • Control Commands List To view the latest RS232 code, go to the Dell Support site at support.dell.com. To view the latest SNMP commands and list, go to the Dell Support site at support.dell.com. Specifications...
- Page 121 Compatibility Modes (Analog/Digital) Refresh Rate Hsync Frequency Resolution Pixel Clock (MHz) (Hz) (KHz) 640 x 350 70.087 31.469 25.175 640 x 480 59.940 31.469 25.175 720 x 480 p60 59.940 31.469 27.000 720 x 576 p50 50.000 31.250 27.000 720 x 400 70.087 31.469 28.322...
-
Page 122: Contacting Dell
Dell provides several online and telephone-based support and service options. Availability varies by country and product, and some services may not be available in your area. To contact Dell for sales, technical support, or customer service issues: 1 Visit go to www.dell.com/contactDell. -
Page 123: Contacting Einstruction
Phone: 480-443-2214 or 800-856-0732 Email: Techsupport@einstruction.com International eInstruction Software Technical Support, EMEA Phone: +33 1 58 31 1065 Email: EU.Support@einstruction.com Web-based Technical Support is available at: www.einstruction.com (in US) www.einstruction.de (in Germany) www.einstruction.fr (in France) www.einstruction.it (in Italy) www.einstruction.es (in Spain) Contacting Dell... -
Page 124: Contacting Crestron
Availability varies by country, but an e-mail to getroomview@crestron.com can be directed appropriately for users in any country. Technical Support In the US and Canada Phone: 877-516-5394 Email: roomviewsupport@crestron.com Outside the US and Canada Phone: +1 201-367-1037 Email: roomviewsupport@crestron.com Contacting Dell... -
Page 125: Appendix: Glossary
Appendix: Glossary ANSI Lumens — A standard for measuring the brightness. It is calculated by dividing a square meter image into nine equal rectangles, measuring the lux (or brightness) reading at the center of each rectangle, and averaging these nine points. Aspect Ratio —... - Page 126 average light output of the black rectangles to determine the ANSI contrast ratio. Full On/Off contrast is always a larger number than ANSI contrast for the same projector. dB — decibel — A unit used to express relative difference in power or intensity, usually between two acoustic or electric signals, equal to ten times the common logarithm of the ratio of the two levels.
- Page 127 Maximum Distance — The distance from a screen the projector can be to cast an image that is usable (bright enough) in a fully darkened room. Maximum Image Size — The largest image a projector can throw in a darkened room. This is usually limited by focal range of the optics. Minimum Distance —...
- Page 128 VGA-A output (monitor loop- through) 9 RS232 cable 13 VGA-B input (D-sub) S-Video cable 17 connector 9 To Computer 11 Contact Dell 5 USB to USB cable 11 USB-A to Mini USB-B cable 23 USB-A to USB-B cable 14 Index...
- Page 129 RS232 Protocol 120 LANGUAGE 52 Uniformity 116 Main Menu 34 Video Compatibility 116 VIDEO MODE 37 Weight 117 VOLUME 37 support contacting Dell 122 phone numbers 122 Powering On/Off the Projector telephone numbers 122 Powering Off the Projector 25 Index...
- Page 130 Troubleshooting 107 Contact Dell 107 Index...