Huawei EchoLife HG520 User Manual
Hide thumbs
Also See for EchoLife HG520:
- User manual (112 pages) ,
- User manual (75 pages) ,
- Quick manual (7 pages)

Related Manuals for Huawei EchoLife HG520


Summary of Contents for Huawei EchoLife HG520
- Page 1 Free Communication, Wonderful Life Thank you for purchasing EchoLife HG520 Home Gateway of Huawei. EchoLife HG520 Home Gateway User Manual Manual Version: T1-20060310-V1.10 Product Version: V100R001...
- Page 2 Copyright © 2006 Huawei Technologies Co., Ltd. All Rights Reserved No part of this manual may be reproduced or transmitted in any form or by any means without prior written consent of Huawei Technologies Co., Ltd. Trademarks , HUAWEI, EchoLife are trademarks of Huawei Technologies Co., Ltd.
- Page 3 Do not dismantle the equipment by yourself. In case of failure, send the equipment to an authorized maintainer. Without prior written consent from Huawei, no company or individual is allowed to decompile, disassemble, modify or reverse engineer the equipment and shall be solely responsible for any effect resulted from such action.
- Page 4 While plugging or unplugging the cables, keep your hands dry and do not touch the metallic part of a cable. Do not trample on, stretch, or over bend the equipment cables, to avoid equipment failure. Huawei Technologies Proprietary...
- Page 5 Keep the power socket clean and dry, to avoid electric shock or other dangers. Note: If the device is in use for a long time, temperature of the shell will go up. Please don’t worry. This is no exception and the device can work normally. Huawei Technologies Proprietary...
-
Page 6: About This Manual
Technical terms and abbreviations Abbreviations Environmental Protection This product has been designed to comply with the requirements on environmental protection. For the proper storage, use and disposal of this product, national laws and regulations must be observed. Huawei Technologies Proprietary... -
Page 7: Table Of Contents
4.2.2 Service Information ..........20 4.2.3 Traffic Statistics ............22 4.3 Basic Configurations ............24 4.3.1 ADSL Mode .............. 24 4.3.2 WAN Setting ............. 26 4.3.3 LAN Setting .............. 32 4.3.4 DHCP Setting ............33 4.3.5 DNS Settings ............35 Huawei Technologies Proprietary... - Page 8 4.5.7 Viewing Station Info..........74 4.6 Tools ................... 74 4.6.1 User Management ............ 74 4.7 System Diagnostics............. 75 4.7.2 Backup Settings............76 4.7.3 System Log............... 77 4.7.4 Alarm Setting ............79 4.7.5 Firmware Upgrade............ 80 4.7.6 Save & Reboot ............80 Huawei Technologies Proprietary...
- Page 9 5.2.2 PPPoE Dialup Mode..........83 5.2.3 MER Mode..............83 5.2.4 IPoA Mode..............84 5.2.5 Bridge Mode ............. 84 Chapter 6 Troubleshooting............86 6.1 Quick Troubleshooting ............86 Chapter 7 Technical Specifications ..........88 Chapter 8 Acronyms and Abbreviations ........93 Huawei Technologies Proprietary...
- Page 10 (2) this device must accept any interference received, including interference that may cause undesired operation. FCC Caution: Any changes or modifications not expressly approved by the party responsible for compliance could void the user's authority to operate this equipment. Huawei Technologies Proprietary...
- Page 11 20cm between the radiator & your body. This transmitter must not be co-located or operating in conjunction with any other antenna or transmitter. IEEE 802.11b or 802.11g operation of this product in the U.S.A. is firmware-limited to channels 1 through 11. Huawei Technologies Proprietary...
-
Page 12: Chapter 1 Introduction
Chapter 1 Introduction EchoLife HG520 Home Gateway (thereinafter referred to as HG520) is a kind of home gateway design for family and SOHO users. It provides high-speed ADSL and ADSL2+ interfaces for external broadband WAN access. It also provides WLAN, Ethernet and USB Client interfaces for internal connection with different family service terminals such as PC, STB, IAD and EPHONE. -
Page 13: Network Application
Figure 1-1 shows the network topology of HG520. Carrier's OSS IADMS/CPEMS N2000 NMS IPTV HG520 DSLAM Network Internet BRAS Figure 1-1 Network Topology of HG520 1.3 Appearance Figure 1-2 shows the appearance of HG520. Huawei Technologies Proprietary... -
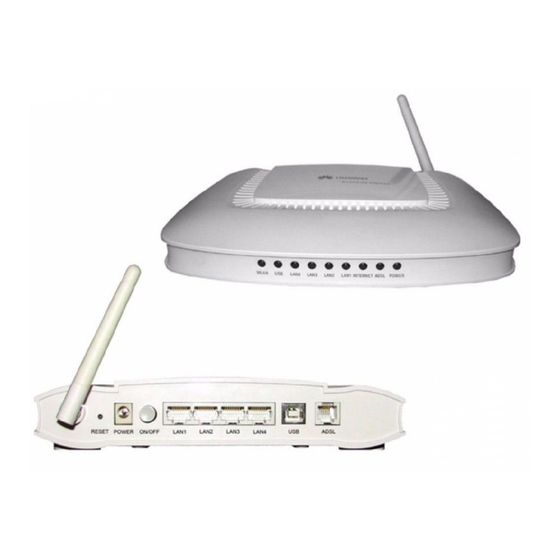
Page 14: Front Panel
Figure 1-2 HG520 1.1.1 Front Panel Figure 1-3 shows the front panel of HG520. Figure 1-3 Front panel of HG520 Table 1-1 describes the different LED behaviors on the front panel of HG520. Huawei Technologies Proprietary... -
Page 15: Rear Panel
ADSL connection is not established. Blinking The ADSL link is in the activation process. INTERNET Green Internet connection is established. Internet connection is not established. Blinking Data is being transmitted. 1.3.2 Rear Panel Figure 1-4 shows the rear panel of HG520. Huawei Technologies Proprietary... - Page 16 RJ-45 port for connection with the Ethernet port of a computer or a LAN hub. USB port for connection with other device via a USB cable. ON/OFF Switch on/off HG520 Power Connect to the power adapter Antenna Antenna for wireless Internet connection Huawei Technologies Proprietary...
-
Page 17: Chapter 2 Installation
I. Disconnect the power – Make sure you turn off the power for the computer and HG520. II. Connect the ADSL cable Use a telephone cable to connect the DSL interface of HG520 to either of the following interfaces: Huawei Technologies Proprietary... - Page 18 Please note that the cable supplied is the straight-through cable. Be sure that the cable connected between LAN and HG520 does not exceed 100 meters. Use crossover cable to connect HG520 and the uplink port of a switch or hub. Huawei Technologies Proprietary...
-
Page 19: Power On/Off Hg520
ISP in case of any need for changing the modem’s configurations. Be sure the device has to be stored, transported, and operated in a non-humid and dust-free environment. Be careful not to drop down the device. Huawei Technologies Proprietary... -
Page 20: Chapter 3 Configuration Preparation
Power on HG520 and start up the computer. Configure the computer to obtain IP address automatically. Or you can configure the computer IP address to be in the same network segment as HG520. The default IP address of HG520 is192.168.1.1. Huawei Technologies Proprietary... -
Page 21: Configure Ip Settings On Pc
1. Enter the IP address (192.168.1.1 by default) of HG520 in the address bar of IE browser. The dialog box of Figure 3-2 will appear. 2. Enter the user name and password. Both of them are admin by default as shown in Figure 3-2. Huawei Technologies Proprietary... - Page 22 Figure 3-2 Authentication 3. Click OK. After the authentication is completed, the browser will display the home page of HG520 as shown in Figure 3-3. Huawei Technologies Proprietary...
- Page 23 The left side is the navigation tree of the operation interface. Click a hyperlink and the corresponding page will appear on the right. You can configure the services according to the prompts. Note: If you have problems during configuration, contact your Internet service provider for help. Huawei Technologies Proprietary...
-
Page 24: Chapter 4 Configuring Hg520
Whenever you made a configuration, remember to save the changes and reboot so to activate the changes. 4.2 System Information HG520 provides you with the ADSL operation status and service information. To monitor the ADSL operation status you can click the Status link. Huawei Technologies Proprietary... - Page 25 Shows the name and model type of the device Physical Address Show the MAC address of the device Software Release Show the software release version of the device Firmware Version Show the firmware release version of the device Huawei Technologies Proprietary...
-
Page 26: Service Information
4.2.2 Service Information The second item under the System status is Service Information. You can view the information of IP address on the LAN port, subnet mask, MAC address, speed, duplex mode and status. It also shows Huawei Technologies Proprietary... - Page 27 In terms of network transmission, full duplex refers to duplex receive and transmit packages simultaneously, while half duplex means only receive or transmit. Status Show the Ethernet status. PVC/VPI/VCI Show the PVC the device is using when transmitting packet to remote router. Huawei Technologies Proprietary...
-
Page 28: Traffic Statistics
Show the protocol this device applies for connecting to the Internet. 4.2.3 Traffic Statistics This page provides the statistics of ATM, LAN and DSL. It also includes the packet transmitted and received from LAN and WAN ports. Click Renew to update the statistics. Huawei Technologies Proprietary... - Page 29 Figure 4-3 Traffic Statistics Huawei Technologies Proprietary...
-
Page 30: Basic Configurations
However, if your ISP requests you to modify the default ADSL configuration, you may select the proper ADSL mode in this section. Single click Submit to complete the configurations. Huawei Technologies Proprietary... - Page 31 International Telecommunication Union, with downstream speed up to 8Mbit/s, and upstream speed up to 896kbit/s. G.lite G.Lite mode (also called as G.992.2) is approved by the International Telecommunication Union, with downstream speed up to 1.5Mbit/s. Huawei Technologies Proprietary...
-
Page 32: Wan Setting
PVC. Single click the trashcan icon under the Actions to delete an existing PVC. Click Submit to activate the settings after you finish the setting up. All the settings will be activated only after you reboot HG520. Figure 4-5 WAN Settings Huawei Technologies Proprietary... - Page 33 PCV under the PPPoA mode, the default time would be 0. And if you set up the “Dial on demand, Inactivity Timeout”, the PVC will interrupt the Internet connection when you are not using the Internet. Huawei Technologies Proprietary...
- Page 34 Figure 4-6 ATM PVC Configuration under PPPoA Mode Huawei Technologies Proprietary...
- Page 35 It is recommended that you configure as being assigned an automatic IP address. If you want to manually configure to MER mode, please ask the WAN IP address, subnet mask, gateway address and DNS server address from your ISP. Huawei Technologies Proprietary...
- Page 36 HG520 will use the factory default settings for operation. Generally speaking, the default connection and service modes will satisfy your demand. However, you can configure settings based on Internet Service Provider’s request if there is such need. Figure 4-8 ATM PVC Configuration – MER Mode Huawei Technologies Proprietary...
- Page 37 If you want to manually configure to IPoA mode, please ask the WAN IP address, subnet mask, gateway address and DNS server address from your ISP. Figure 4-9 ATM PVC Configuration – IPoA Mode Huawei Technologies Proprietary...
-
Page 38: Lan Setting
IP address and subnet mask. Enter the proper IP address and subnet mask in the space as shown in Figure 4-11. Click Submit to activate the configuration. If you want to save the changes, go to Tool>Save and Reboot to make the changes permanent. Huawei Technologies Proprietary... -
Page 39: Dhcp Setting
Lease time refers to the time frame that you are allowed to use the assigned IP address. You will have to file application for a new IP address once the lease time expires. Click Refresh to renew the DHCP Server settings you just made. Huawei Technologies Proprietary... - Page 40 The DHCP relay takes care of this for the client. Enter the DHCP Server IP address and click “Submit” to activate the settings. This function does not work when the PVC setting of NAT feature is configured in the HG520. Huawei Technologies Proprietary...
-
Page 41: Dns Settings
DNS service must translate the name into the corresponding IP address. Enter the DNS server IP address provided by the ISP on the DNS Settings page and single click Submit to complete the settings. Figure 4-14 DNS Setting Huawei Technologies Proprietary... -
Page 42: Nat
Web servers, FTP servers and corporate bulletin are located. With the configuration of such DMZ feature, the internal networks are more securely protected. Figure 4-15 NAT — DMZ Setting Huawei Technologies Proprietary... - Page 43 This feature only works when the PVC settings of NAT feature are configured. Single click REDIRECT button as shown in Figure 4-17 and you will be prompted to the REDIRECT setting page as shown in Figure 4-18. Huawei Technologies Proprietary...
- Page 44 80, local IP as 192.168.1.2, Global Addresses From as 10.132.41.116, Global Addresses To as 10.132.41.126, and the Destination From/To port as 30-40. Single click Submit button to save the settings. You have to reboot the device to activate the settings. Huawei Technologies Proprietary...
-
Page 45: Ip Route Settings
IP Route settings include the setting of destination, netmask, next hop, IF name and route type. Single click New button on Figure 4-19 to create a new IP route. Enter the settings and single click Submit to complete the settings. Figure 4-19 IP Route Settings Huawei Technologies Proprietary... -
Page 46: Advanced Settings
IP Filter, Multinat, parental control setting and blocked protocol. 4.4.1 SCL (Service Control List) Setting This feature allows you to assign LAN port or WAN port as the interface when you visit the services (such as FTP, FTTP and ICMP, etc.). Huawei Technologies Proprietary... -
Page 47: Rip
Figure 4-21 SCL Setting 4.4.2 RIP RIP (Routing Information Protocol) is an Interior gateway protocol that specifies how routers exchange routing table information. With RIP, routers periodically exchange entire tables. Huawei Technologies Proprietary... -
Page 48: Qos Setting
Figure 4-22 RIP Setting 4.4.3 QoS Setting QoS (Quality of Service) refers to that the network guarantees the expected bandwidth, delay, delay fluctuation (延遲抖動), and rate of packet loss are reachable during the Internet communication process. Figure 4-23 QoS Setting Huawei Technologies Proprietary... - Page 49 IP address, subnet mask and UDP/TCP code. When you are done, single click Submit at the bottom of the page to save the changes. Figure 4-24 Add QoS Class Rule Huawei Technologies Proprietary...
-
Page 50: Acl (Access Control List) Setting
SNTP (Simple Network Time Protocol) is a simplified NTP, which remove the unnecessary internal algorithm in the servers. Just use the factory default settings of NTP during the selection of the first and second NTP time server. Huawei Technologies Proprietary... -
Page 51: Ip Filter
100 to port 200 of IP address 10.132.41.120 are not allowed to be forwarded to local port 100 to port 200 of IP address 192.168.1.100. You can add you own rules based on actual needs. Huawei Technologies Proprietary... - Page 52 Figure 4-26 IP Filter Single click New button to open the Rule Information setting page. Enter the parameters and single click Submit to save the configurations. Huawei Technologies Proprietary...
-
Page 53: Multinat Setting
IP addresses by your ISP. Instead of a many-to-one relationship, you can have a one-to-one relationship between a public IP address and an internal/private IP address. This means that you have the protection of NAT (Network Address Translation) but the PC can be Huawei Technologies Proprietary... - Page 54 192.168.1.166. Internet user can access the service provided on IP address 192.168.1.56 via 192.168.1.166. Figure 4-28 Multinat Setting Single click New button to open the configuration page. Enter the internal and external IP addresses. Figure 4-29 Multinat Setting -- Add Huawei Technologies Proprietary...
-
Page 55: Parental Control
When done, single Submit to activate the settings and the controlled days of the week and blocking time will be shown as in Figure 4-31. Figure 4-30 Parental Control Setting Huawei Technologies Proprietary... -
Page 56: Port Mapping
Single click Add button to activate this feature, create mapping groups of appropriate LAN and WAN interfaces. Single click Remove button to remove a group and add ungrouped interface to the default group. You can configure up to 16 entries. Figure 4-32 Port Mapping Huawei Technologies Proprietary... - Page 57 Figure 4-33 Port Mapping — Add Click Save/Apply to validate the modification. To remove a group, check the Remove box and click Remove. Note: The selected interfaces will be removed from the existing group and added to the new group. Huawei Technologies Proprietary...
-
Page 58: Protocol Block
Apart from the default protocols, there is a Customer Define option for you to add more protocols that you want to block. Select the protocols that you wish to block and click Submit to save the change. Figure 4-34 Blocked Protocol Huawei Technologies Proprietary... -
Page 59: Wireless Setup
Figure 4-36 Customer Define Add 4.5 Wireless Setup HG520 is designed with wireless function, which enables access to Internet without the need of deployment of cables if the environment does not allow or there are no cables available. Huawei Technologies Proprietary... -
Page 60: Configuring Basic Features
Select the Country that you are using the wireless. Check Enable Guest SSID so that when the main SSID does not work you can use the guest SSID to access WAN. Click Save/Apply to save the configuration. Huawei Technologies Proprietary... -
Page 61: Configuring Security
1. Set the following parameters to enable WEP: Select SSID Network Authentication: Shared WEP Encryption: Enabled Encryption Strength: 128-bit (recommended for higher security) or 64-bit 2. Configure WEP keys. You can configure from 1 to four network keys. Huawei Technologies Proprietary... - Page 62 Network Key. 4. Click Save/Apply to save the configuration. II. 802.1X configuration 802.1X authentication must be run on the Radius server to improve the security of WEP. Therefore, the Radius server must be running before you enable 802.1X. Huawei Technologies Proprietary...
- Page 63 5. Follow the same instruction on 4.5.2 I. Shared (WEP) configuration to configure the four network keys. 6. Click Save/Apply to save the configuration. III. WPA/WPA2 configuration WPA (Wi-Fi Protected Access) provides powerful wireless security protection. It improves the data encryption through the Huawei Technologies Proprietary...
- Page 64 1. Enable WPA. Follow the steps below to set the parameters: Select WPA from Network Authentication. WPA Group Rekey Interval: The interval is estimated in second. The default value is 0 (no re-keying). RADIUS Server IP Address/Port/Key: Make sure it matches the settings of your RADIUS server. Huawei Technologies Proprietary...
- Page 65 2. Click Save/Apply to save the configuration. Ensure that your wireless network adapter matches the security method before you decide which one to use. The following is the setup page for WPA2. Figure 4-41 Wireless Setup — Security — WPA2 Huawei Technologies Proprietary...
- Page 66 Follow the same instruction on 4.5.2 I. Shared (WEP) configuration to configure the four network keys. 2. Click Save/Apply to save the configuration. Ensure that your wireless network adapter matches the security method before you decide which one to use. Huawei Technologies Proprietary...
- Page 67 3. WPA Group Rekey Interval: The interval is estimated in second. The default value is 0 (no re-keying). 4. WPA Encryption: Select from TKIP, AES and TKIP+AES. 5. WEP Encryption: Default is disabled. Huawei Technologies Proprietary...
- Page 68 Figure 4-43 Wireless Setup — Security — WPA2-PSK V. Mixed WPA2/WPA configuration Mixed WPA2/WPA combines the features of the two functions to provide stronger data protection and network access control. It provides enterprise and consumer Wi-Fi users with a high level of Huawei Technologies Proprietary...
- Page 69 Follow the steps below to configure the mixed WPA2/WPA function. Figure 4-44 Wireless Setup — Security — Mixed WPA2/WPA 1. Select Mixes WPA2/WPA in Network Authentication to enable it. 2. The configuration method of the rest parameters is the same as WPA and WPA2. Huawei Technologies Proprietary...
-
Page 70: Configuring Mac Filter
2. The configuration method of the rest parameters is the same as WPA-PSK and WPA2. 3. When you are done, click Save/Apply to save the configuration. 4.5.3 Configuring MAC Filter Wireless MAC filter controls access by the MAC addresses. Huawei Technologies Proprietary... -
Page 71: Configuring Wireless Bridge
6. To delete a configuration rule, select the Remove check box. Then click Remove. 4.5.4 Configuring Wireless Bridge Wireless bridges have ports that connect two or more separate Ethernet LANs. The bridge receives packets on one port and Huawei Technologies Proprietary... - Page 72 2. Select Enabled (Scan) from Bridge Restrict will enable the wireless bridge restriction and only those bridges selected in Remote Bridges will be granted access. Select Disabled in Bridge Restrict which disables wireless bridge restriction and any wireless bridge will be granted access. Huawei Technologies Proprietary...
- Page 73 3. Enter the Remote Bridge MAC Addresses to tell which access point is connected as a group via your access point or wireless bridge. Figure 4-48 Huawei Technologies Proprietary...
-
Page 74: Configuring Advanced
Figure 4-49 Wireless Setup — Advanced In most cases, HG520 works with default settings. If you are not familiar with these parameters, modification is not recommended. AP Isolation: Prevents one wireless client communicating with another wireless client. Huawei Technologies Proprietary... - Page 75 This value specifies the maximum packet size after data fragmentation. If there is a high packet error rate, you can lower the fragmentation threshold. Setting the fragmentation too low may result in poor network performance. Only slight adjustment of this value is recommended. Huawei Technologies Proprietary...
- Page 76 It is 100 by default. XPress™ Technology: this technology can improve the data transmission rate. By default, it is disabled. 54g™ Mode: There are 3 options: Select 54g Auto for wide compatibility. Select 54g Performance for the fastest performance. Huawei Technologies Proprietary...
- Page 77 Transmit Power: The amount of power used by a radio transceiver to send the signal out. Transmit power is generally measured in milliwatts, which you can convert to dBm. The larger the percentage of transmit power, the clearer the signal sent. Huawei Technologies Proprietary...
-
Page 78: Quality Of Service Over The 802.11 Interface
First select Enabled for WMM, and Disabled for WMM No Acknowledgement and click Add QoS Entry to open a QoS configuration page as shown in Figure 4-51 Follow the step below to configure wireless QoS: Enter the Traffic Class Name. Do not use digit (1,2,3 etc.). Huawei Technologies Proprietary... - Page 79 HG520 for video conferencing. Select Protocol. Enter Source and Destination IP Address and Subnet Mask, UDP/TCP Source and Destination Port. When you are done, single click Save/Apply to save the change. Figure 4-51 Quality of Service -- Add Huawei Technologies Proprietary...
-
Page 80: Viewing Station Info
Management, Diagnostics, Backup Setting, System Management, Firmware Upgrade, Log, and Save & Reboot. 4.6.1 User Management Single click Tools from the navigation tree and the sub-items under it appear. You can change the user ID and privilege form the User Management page. Huawei Technologies Proprietary... -
Page 81: System Diagnostics
Enter the new user name and password and single click Add to add the new user. Figure 4-54 Add a new user 4.7 System Diagnostics This feature displays the connection status of HG520’s Ethernet and ADSL ports. Figure 4-55 shows that the ADSL connection is FAIL, Huawei Technologies Proprietary... -
Page 82: Backup Settings
Figure 4-55 System Diagnostics 4.7.2 Backup Settings If you select Backup Settings, a pop-up window appears and asks where you want the information to be backed up. Browse the route to tell where to save it and single OK button. Huawei Technologies Proprietary... -
Page 83: System Log
HG520 will restore to the settings you made previously. Figure 4-57 Backup Update Settings 4.7.3 System Log Select View System Log to check the system log page. Select Save System Log to save the log to the hardware. Figure 4-58 System Log Main Page Huawei Technologies Proprietary... - Page 84 Figure 4-59 View System Log If you single click Configure System Log, you may configure log level and the display level. When you are done with the settings, single Submit to save the changes. Huawei Technologies Proprietary...
-
Page 85: Alarm Setting
Set up the Alarm Setting in the four categories of the following figure to monitor the relevant connection status of HG520. In normal condition, we do not recommend the use of this feature in order to guarantee a better connection rate. Figure 4-61 Alarm Setting Huawei Technologies Proprietary... -
Page 86: Firmware Upgrade
Select Save and single click Submit to save the settings. Select Reboot and single click Submit to reboot HG520. If you want to restore to the default factory settings, select Factory Setting Reboot and single click Submit Huawei Technologies Proprietary... - Page 87 Figure 4-63 Save & Reboot Huawei Technologies Proprietary...
-
Page 88: Chapter 5 Connection Mode
WAN Connection Mode Select “PPP over ATM (PPPoA)”. ATM PVC Provided by the service provider. Configuration DHCP Configuration Recommended: Activate DHCP server. User PC Configuration IP Address and Subnet Recommend: Automatically obtain IP Mask address. DNS Configuration Recommend: Automatically obtain DNS server IP address. Huawei Technologies Proprietary... -
Page 89: Pppoe Dialup Mode
Provided by the service provider. Configuration IP Address Configure as obtain IP address automatically or provided by ISP according to actual situation. DHCP Configuration Recommended: Activate DHCP server. User PC Configuration IP Address and Subnet Recommend: Automatically obtain IP Mask address. Huawei Technologies Proprietary... -
Page 90: Ipoa Mode
IP Address and Subnet Recommend: Automatically obtain IP Mask address. DNS Configuration Recommend: Automatically obtain DNS server IP address. 5.2.5 Bridge Mode Parameter Description HG520 Configuration Parameter WAN Connection Mode Select “Bridging”. Provided by the service provider. ATM PVC Configuration Huawei Technologies Proprietary... - Page 91 IP address. Please install dialup software if you select Bridging mode as WAN connection mode. If your computer uses static IP address, please ask the IP address, subnet mask, and DNS server address from your ISP. Huawei Technologies Proprietary...
-
Page 92: Chapter 6 Troubleshooting
NIC in another slot. As a last resort, you have to replace the NIC. 1.Make sure you enabled the wireless function on the WLAN light is out HG520 Web UI and enter the correct authentication password; Huawei Technologies Proprietary... - Page 93 Internet, check if the Proxy server on your browser is set up correctly. The Proxy server must be disabled; 5. Try to connect to different web sites to make sure that it is not the problem of the web site server. Huawei Technologies Proprietary...
-
Page 94: Chapter 7 Technical Specifications
Access control based on MAC address III. Routing Features Support RIP1 (RFC 1058), RIP2 (RFC1389) and static routing Support NAT, NAPT and extended ALG Support DHCP Server/Client Support DNS Relay Support IGMP Proxy, IGMP Snooping Support Port Mapping Huawei Technologies Proprietary... - Page 95 Smurf attack Support DMZ VI. WAN protocols Multiple protocol over AAL5: LLC and VC-Mux (RFC 1483/2684) PPPoA (RFC 2364) PPPoE (RFC 2516) IPoA Bridged Static IP (RFC2684) RFC 2684 Routed RFC2684 Bridged Router+Bridged RFC Bridged DHCP Client Huawei Technologies Proprietary...
- Page 96 IPTV, VOD, and music downloading through the cooperation of service terminals IX. Data Transmission Rate G.dmt full rate: Downstream up to 8 Mbit/s, Upstream up to 896 Kbit/s G.lite: Downstream up to 1.5 Mbit/s, Upstream up to 512 Kbit/s Huawei Technologies Proprietary...
- Page 97 Input Power (max): 15 dBm (11g), 18 dBm (11b) Sensibility (typical): –87 dBm/11 Mbit/s; –74 dBm/54 Mbit/s Rate: 802.11b: 1 Mbit/s 2 Mbit/s 5.5 Mbit/s 11 Mbit/s 802.11g: 6 Mbit/s 9 Mbit/s 12 Mbit/s 18 Mbit/s 24 Mbit/s 36 Mbit/s 48 Mbit/s 54 Mbit/s Huawei Technologies Proprietary...
- Page 98 The input voltage is supplied according to the actual standards of different countries. The socket supports the standards of different delivery areas. Input voltage: 12V 1.2A XIV. Dimension L x W x H: 215mm x 172mm x 41mm Huawei Technologies Proprietary...
-
Page 99: Chapter 8 Acronyms And Abbreviations
Advanced Encryption Standard Asynchronous Transfer Mode BSSID Basic Service Set Identifier DHCP Dynamic Host Configuration Protocol Domain Name Server DSLAM Digital Subscriber Line Access Multiplex HTML Hypertext Markup Language Internet Protocols IPoA Internet Protocols Over ATM Internet Service Provider Huawei Technologies Proprietary... - Page 100 Pre-shared key Point to Point Protocol PPPoA PPP over ATM PPPoE PPP over Ethernet Permanent Virtual Connection Routing Information Protocol SNMP Simple Network Management Protocol SSID Service Set Identifier Transfer Control Protocol TKIP Temporal Key Integrity Protocol Huawei Technologies Proprietary...
- Page 101 Virtual Channel Identifier Virtual Path Identifier Wide Area Network Wired Equivalent Privacy Wi-Fi Protected Access Huawei Technologies Proprietary...