Table of Contents
Advertisement
Quick Links
Advertisement
Table of Contents

Related Manuals for Philips SIC 3608S/G7


Summary of Contents for Philips SIC 3608S/G7
- Page 1 SIC 3608S/G7 Digital camera with swivel lens User manual...
- Page 2 Thank you for purchasing the Philips SIC 3608S/G7 digital camera where we encourage you to... “do the swivel!” Capturing photos your way. Enjoy the independence of snapping perfect self-portraits the first time. Simply swivel the lens to the back to preview your shot in the LCD display to make sure everyone is in the frame, say cheese and snap away.
-
Page 3: Table Of Contents
Getting to know your camera Camera views Rear panel view Top and front camera view Monitor display icons Ii. Before you shoot – camera preparation & setup Batteries 3. 1 Insert the batteries External SD memory card Insert the memory card Camera setup Set the onscreen language Set the current date and time... - Page 4 Digital zoom Burst snapshot mode Exposure compensation Iii. Video & audio recording Video recording Video recording options Resolution Frame rate White balance Video with or without audio Audio recording Iii. Photo review & video playback Viewing photos on the camera lcd display 10.1 Viewing thumbnails 10.2 Zooming in on a photo How to delete photos, videos &...
- Page 5 17.1 Formatting an sd memory card Camera safe-handling Iv. Camera specifications & software minimum requirements: Camera specifications Pc-Cam software minimum requirements...
-
Page 6: Getting To Know Your Camera
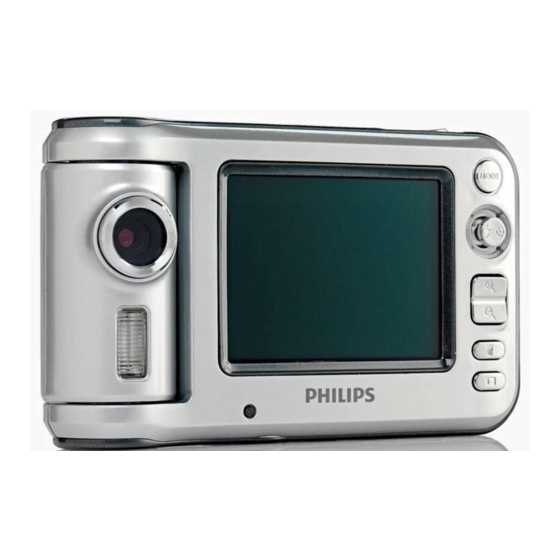
Getting To Know Your Camera 1. Camera Views 1.1 Rear Panel View Left navigation flash on/off stick OK button Photo/video mode button Up navigation stick Right navigation/selftimer stick Down navigation stick Zoom in rocker button Zoom out rocker button Delete button Playback button Connection for hand strap LCD display screen... -
Page 7: Monitor Display Icons
Battery Usage Selftimer Digital Zoom II. Setting Up Your Camera 3. Batteries The SIC 3608S/G7 uses three (3) AAA alkaline or rechargeable batteries. 3.1 Insert the Batteries Open the battery cover by sliding it to the outside of the camera. Load... -
Page 8: External Sd Memory Card
4. External SD Memory Card The SIC 3608S/G7 has 32 MB of internal memory so you can save a couple of photos on your camera, but you will want to be able to take many photos. To expand the number of photos you can shoot and store, use an external SD memory card. -
Page 9: B) Set The Current Date And Time
B) Set the Current Date and Time It is useful to have the correct date and time on the camera. When you transfer photos to your computer, the date and time is listed in each photo’s information data. 1) Press the OK button 2) Press the navigation stick to Right to display the Setup menu 3) Press navigation stick Up or Down to highlight Date/Time and press OK. -
Page 10: D) Play Logo
powers off (after 60 or 120 seconds). Choose Disable to stop the camera from turning off automatically. 5) Press OK. 6) Press the navigation stick to the Left TWICE to exit. D) Play Logo The camera will play a logo when powering on. You can choose to play the logo or to leave the display blank. -
Page 11: F) Adjusting The Light Frequency Setting
4) Press OK. 5) Press the navigation stick to the Left TWICE to exit. F) Adjusting the Light Frequency Setting Photos and video can be affected by the flickering of fluores- cent lights. It is best to make sure the camera is set to the right electrical frequency for your country. -
Page 12: G) Firmware Version & Updating The Camera
G) Firmware Version and Updating the Camera To display the firmware version: Video Setup Firmware Version 1) Press the OK button 2) Press the navigation stick to Right to display LEFT: Exit the Setup menu. 3) Press the navigation stick Up or Down to highlight Firmware version and press OK. -
Page 13: Photo Image Options
• If no buttons have been pushed on the camera for more than 30 seconds, the LCD display will turn off in order to prolong battery life. Press any button to restore the image on the LCD viewfinder display. 6. Photo Image Options 6.1 Photo Resolution Photos can be shot at various resolutions up to 5 megapixels (MP). -
Page 14: Photo Quality
6.2 Photo Quality Photos can be compressed so that you can save a larger quantity of photos to a memory card. However, the more the photo is compressed, the lower the image quality. To conserve memory, use a lower photo quality to create a smaller file size. Normal quality photos may also be appropriate for photos used only for the web, computers or mobile phones. -
Page 15: Datestamp
1) Press the OK button 2) Highlight the Image menu. 3) Press the navigation stick Up or Down to highlight White Balance and press OK to display the submenu. 4) Press the navigation stick Up or Down to highlight the desired quality: Day Light, Tungsten, Fluorescent, Cloudy, or to return the camera to Auto –... -
Page 16: Color Effects
6.5 Color Effects The Color Effects adjustment allows you to shoot black and white photos, or antique-looking Sepia toned photos. 1) Press the OK button. 2) Highlight the Image menu. 3) Press the navigation stick Up or Down to highlight Color Effect and press OK to display the submenu. - Page 17 To change the Flash Mode: While in PHOTO mode, press the navigation stick to the Left. Each press left will cycle through the Flash Modes. The flash mode will be displayed on the LCD viewfinder as follows: Auto: Automatically turn on/off Flash on: Force the flash on Flash off: Force the flash off Note:...
-
Page 18: Digital Zoom
7.2 Digital Zoom The SIC 3608S/G7 is equipped with a 4x digital zoom to enlarge distant images and make them appear closer. To zoom in or zoom out: While in PHOTO mode, Zoom In by pressing the zoom + button. To Zoom Out again, press the... -
Page 19: Burst Snapshot Mode
To take the photo using the self-timer: 1) Compose the picture in the LCD viewfinder. 2) Be sure that the camera is on a tripod or sturdy surface. 3) Press the shutter release button. 4) Get into the picture and wait for the picture to be taken. 7.4 Burst Snapshot Mode Use the Burst Snapshot Mode to rapidly shoot three photos in a row. -
Page 20: Exposure Compensation
7.5 Exposure Compensation The SIC 3608S/G7 automatically exposes each photograph by averaging the bright areas and dark areas in a photo. When a photo has a big range of bright light and dark shadows, details can disappear in bright or dark areas of the photo. -
Page 21: Video & Audio Recording
III. Video and Audio Recording 8. Video Recording To record video: 1) Press the Power button to turn on the camera then press Mode button to select VIDEO mode. 2) While in video mode, press the Shutter button to start recording video. -
Page 22: B) Frame Rate
To set the video resolution: While the camera is set to Video Mode, 1) Press the OK button by pressing in on the center of the navigation stick. 2) Highlight the Video menu. 3) Press the navigation stick Up or Down to highlight Resolution and press OK to display the submenu. -
Page 23: White Balance
5) Press OK. 6) Press the navigation stick to the Left TWICE to exit. 9. Audio Recording The SIC 3608S/G7 can also record audio without video. 1) Press the Power button to turn on the camera. 2) Press the Mode button to select AUDIO mode. -
Page 24: Photo Review & Video Playback
Note: When recording, the LCD viewfinder will blink red and start a recording timer. The timer will display until the recording is stopped. III. Photo Review and Video Playback 10. Viewing Photos on the Camera LCD Display To view the photos you have taken, Press the Playback button. -
Page 25: How To Delete Photos, Videos & Audio Recordings
2) Press the navigation stick UP/DOWN/LEFT/RIGHT to view different enlarged portions of the photo. 3) Press the Zoom out (-) button to return to normal viewing of the photo. 11. How to Delete Photos, Videos and Audio recordings While in PLAYBACK Mode: 1) Press the Delete button to enter the DELETE mode There are three options:... -
Page 26: Video Playback
• To delete all saved photos, videos & audios saved to the SD card. To format an SD Card: 1) Press the OK button 2) Press the navigation stick to Right to display the Setup menu 3) Press navigation stick Up or Down to highlight Format and press OK. -
Page 27: Watching Videos Or Listening To Audio Recordings On Your Television
12.2 Watching Videos or Listening to Audio Recordings on Your Television: Connect the SIC 3608S/G7 to your television to watch your videos or listen to your audio recordings so that you can share your recordings with others. To watch videos or view photos on your television: 1) Connect the camera to your TV using the AV cable. -
Page 28: A) Adjusting The Camera's Video Output
A) Adjusting the Camera’s Video Output Press the Mode button to change to VIDEO Mode. 1) Press the OK button 2) Highlight the Video menu. 3) Press the navigation stick Up or Down to highlight TV Output and press OK to display the submenu. 4) Press the navigation stick Up or Down to highlight NTSC for TVs in North America;... -
Page 29: Downloading Photos, Videos & Audio Recordings To A Pc
13.2 Downloading Photos, Videos and Audio Recordings to a PC With the camera set to USB mode (see above): 1) Press the Power button to turn on the camera. 2): Connect the USB cable to the computer THEN to the camera. - Page 30 3) Click on the icon for you camera on the desktop. 4) Click on DCIM to open the folder. 5) Click on the files you want to copy and drag them to your Pictures, Movies and/or Music folders. Note: • Removing the SD card or the batteries while copying files to your computer, may result in lost or corrupted files.
-
Page 31: Maintenance
III. Maintenance To prolong the life of the camera and ensure the best camera performance, keep the camera and accessories well maintained. 15. Camera Maintenance Use only a dry, soft and clean cloth to clean fingerprints, smudges and dust from the camera lens and LCD display. Do not use rough or abrasive cloths or household cleaning products, as they will scratch the lens and LCD display. -
Page 32: Batteries
16. Batteries The power status of the battery is displayed on LCD as shown: Half Full Factors that influence the lifetime of the batteries include: • LCD use—frequency, length of time in use; • Long periods of playback using the LCD display; •... -
Page 33: Sd Memory Card
17. SD Memory Card The camera uses an SD memory card with up to an 8GB storage capacity, and may not recognize memory cards with a larger storage capacity. It may be necessary to format the memory card in the following situations: •... -
Page 34: Camera Safe-Handling
• All data will be deleted and unable to be recovered after a card is formatted. Be sure to backup all pictures and saved data to your computer before formatting the SD card. 18. Camera Safe-Handling • To avoid the danger of electric shock, do not open the camera body or attempt to repair the camera. -
Page 35: Camera Specifications & Software Minimum Requirements
IV. Camera Specifications & Software Minimum Requirements: Camera Specifications File format Capture Video quality Shutter speed range Self timer Zoom White balance Exposture control Flash modes Illumination Interface TV output TFT monitior screen 2.36” TFT LCD monitor screen Power OSD language Focal range Aperture Auto power off... - Page 36 Philips and Philips Shield are used under license of Koninklijke Philips Electronics NV © 2010 GiiNii International All rights reserved...