Sony XAV-AX100 Operating Instructions Manual
Hide thumbs
Also See for XAV-AX100:
- Operating instructions manual (116 pages) ,
- Operating instructions manual (84 pages) ,
- Service manual (64 pages)
Table of Contents
Advertisement
AV RECEIVER
Owner's Record
The model and serial numbers are located on the bottom of the unit.
Record the serial number in the space provided below.
Refer to these numbers whenever you call upon your Sony dealer
regarding this product.
Model No. XAV-AX100
Serial No.
To cancel the demonstration (Demo) display, see page 15.
For the connection/installation, see page 23.
Pour annuler l'affichage de demonstration (Démo), reportez-
vous a la page 16.
Pour le raccordement/l'installation, reportez-vous à la page 25.
Para cancelar la pantalla de demostracion (Demostración),
consulte la página 15.
Para la conexión/instalación, consulte la página 24.
XAV-AX100
4-686-137-21(3)
Operating Instructions
Mode d'emploi
Manual de instrucciones
GB
FR
ES
Advertisement
Table of Contents

Related Manuals for Sony XAV-AX100


Summary of Contents for Sony XAV-AX100
- Page 1 Owner’s Record The model and serial numbers are located on the bottom of the unit. Record the serial number in the space provided below. Refer to these numbers whenever you call upon your Sony dealer regarding this product. Model No. XAV-AX100 Serial No.
-
Page 2: Warning
– Consult the dealer or an experienced radio/TV suspended, or terminated without prior notice. technician for help. Sony does not bear any responsibility in these sorts You are cautioned that any changes or of situations. modifications not expressly approved in this manual could void your authority to operate this equipment. -
Page 3: Important Notice
Important notice Caution IN NO EVENT SHALL SONY BE LIABLE FOR ANY INCIDENTAL, INDIRECT OR CONSEQUENTIAL DAMAGES OR OTHER DAMAGES INCLUDING, WITHOUT LIMITATION, LOSS OF PROFITS, LOSS OF REVENUE, LOSS OF DATA, LOSS OF USE OF THE PRODUCT OR ANY ASSOCIATED EQUIPMENT, DOWNTIME, AND PURCHASER’S TIME RELATED TO... -
Page 4: Table Of Contents
Table of Contents Warning ........2 Guide to Parts and Controls . -
Page 5: Guide To Parts And Controls
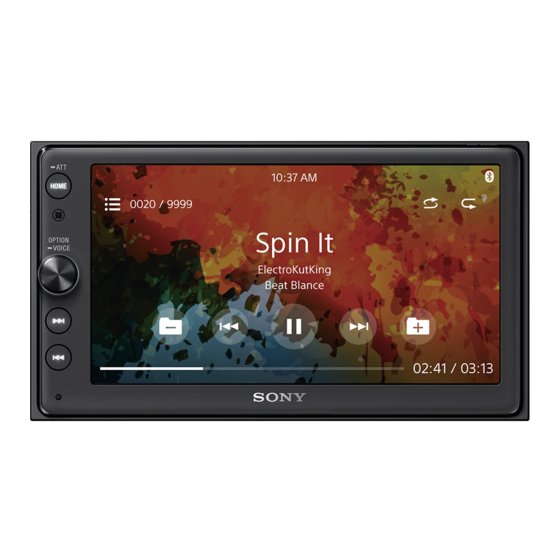
Guide to Parts and Controls Main unit HOME / (previous/next) – Open the HOME menu. – Move to the previous/next item. – Turn on the power. – Press and hold to fast-reverse/fast-forward. – Press and hold for more than 2 seconds to ... - Page 6 MODE RM-X170 remote commander Select the radio band. The remote commander can be used to operate the Remove the insulation film before use. audio controls. For menu operations, use the touch panel. Screen displays Playback screen: HOME screen: Note The white buttons in the illustration above are not supported.
-
Page 7: Getting Started
Status indication Lights up when the sound is attenuated. Getting Started Lights up when the audio device is playable by enabling the A2DP Performing Initial Settings (Advanced Audio Distribution Profile). You need to perform initial settings before Lights up when handsfree calling is operating the unit for the first time, after replacing available by enabling the HFP (Handsfree the car battery, or changing connections. -
Page 8: Connecting Rear View Camera
Perform pairing on the BLUETOOTH device so it detects this unit. Select [XAV-AX100] shown in the display of Press HOME, then touch [Settings]. the BLUETOOTH device. Touch If your model name does not appear, repeat from step 5. -
Page 9: Storing Manually
Storing manually Listening to the Radio While receiving the station that you want to store, press and hold the desired preset Listening to the Radio number. To listen to the radio, press HOME then touch Receiving stored stations [Tuner]. Reception controls/indications Select the band, then touch the desired preset number. -
Page 10: Playback
Searching and Playing Tracks Playback Repeat play and shuffle play Playing a USB Device During playback, touch (repeat) or MSC (Mass Storage Class) type USB devices (such as (shuffle) repeatedly until the desired play a USB flash drive, digital media player) compliant mode appears. -
Page 11: Other Settings During Playback
Other Settings During Playback Handsfree Calling Further settings are available in each source by touching . The available items differ depending on the source. To use a cellular phone, connect it with this unit. For details, see “Preparing a BLUETOOTH Device” Picture EQ (page 7). -
Page 12: Available Operations During A Call
(phonebook)* Select a contact from the name list/number list in the phonebook. To search for the Useful Functions desired contact in alphabetical order from the name list, touch Apple CarPlay (phone number input) Enter the phone number. Apple CarPlay lets you use your iPhone in the car in ... -
Page 13: Using Gesture Command
Using Gesture Command Settings You can perform frequently-used operations by swiping your finger on the reception/playback Basic Setting Operation display. Note You can set items in the following setup categories: The gesture commands explained below are not available General Settings, on the screens of Apple CarPlay and Android Auto. -
Page 14: Sound Settings
Touch Panel Adjust Rear View Camera Setting Adjusts the touch panel calibration if the Adjusts the length and/or position of the marker touching position does not correspond with the lines on the picture from the rear view camera by proper item. touching the arrow marks. -
Page 15: Visual Settings
Visual Settings Additional Information Demo Activates the demonstration: [OFF], [ON]. Updating the Firmware USB video framerate To update the firmware, visit the support site on the Selects the video frame rate on the unit’s display: back cover, then follow the online instructions. [60fps], [50fps]. -
Page 16: Notice On License
: 8 kHz – 96 kHz URL: http://www.sony.net/Products/Linux/ Bit per sample (Quantization bit): 8 bits, 12 bits, Please note that Sony cannot answer or respond to 16 bits, 20 bits, 24 bits any inquiries regarding the content of the source ... -
Page 17: Maintenance
Please note that the use of this accessory with iPhone may affect wireless performance. If you have any questions or problems concerning your unit that are not covered in this Operating Instructions, consult your nearest Sony dealer. -
Page 18: Specifications
Frequency band: Specifications 2.4 GHz band (2.4000 GHz – 2.4835 GHz) Modulation method: FHSS Compatible BLUETOOTH Profiles* FOR THE CUSTOMERS IN THE USA. NOT A2DP (Advanced Audio Distribution Profile) 1.2 APPLICABLE IN CANADA, INCLUDING IN THE AVRCP (Audio Video Remote Control Profile) 1.5 PROVINCE OF QUEBEC. -
Page 19: Troubleshooting
THIS PRODUCT IS LICENSED UNDER THE AVC PATENT trademarks owned by Bluetooth SIG, Inc. and any PORTFOLIO LICENSE AND VC-1 PATENT PORTFOLIO use of such marks by Sony Corporation is under LICENSE FOR THE PERSONAL AND NON- license. Other trademarks and trade names are COMMERCIAL USE OF A CONSUMER TO DECODE those of their respective owners. -
Page 20: Radio Reception
The monitor off function is activated (page 5, 6). Sound – Touch anywhere on the display to turn the display back on. There is no sound/sound skips/sound cracks. A connection has not been made correctly. The display does not respond to your touch ... - Page 21 Connection is not possible. The connected BLUETOOTH device cannot be Check the pairing and connection procedures in controlled during audio streaming. Check that the connected BLUETOOTH device the manual of the other device, etc., and perform the operation again. supports AVRCP.
-
Page 22: Messages
No Playable Data If these solutions do not help improve the situation, The USB device has no playable data. consult your nearest Sony dealer. – Load music data/files into the USB device. Cannot play this content. The currently selected content cannot be played back. -
Page 23: Connection/Installation
Parts List for Installation Connection/Installation Cautions 5 × max. 8 mm × max. • Run all ground (earth) leads to a common ground (earth) point. × 4 • Do not get the leads trapped under a screw or caught in moving parts (e.g., seat railing). -
Page 24: Connection
Connection Subwoofer* Power amplifier* * Smartphone* , iPhone* USB device from a wired remote control (not supplied) White White/black striped Front speaker* Gray Gray/black striped Green Green/black striped Rear speaker* Purple Purple/black striped Black Yellow Blue/white striped For details, see “Making connections”... -
Page 25: Making Connections
To the parking brake switch cord *1 Not supplied *2 Speaker impedance: 4 Ω – 8 Ω × 4 The mounting position of the parking brake *3 RCA pin cord (not supplied) switch cord depends on your car. *4 Depending on the type of car, use an adaptor for a wired Be sure to connect the parking brake lead (light remote control (not supplied). -
Page 26: Installation
You may not be able to install this unit in some • If airbags or any other shock-absorbing Japanese cars. In such a case, consult your Sony equipment are in your car, contact the store where dealer. - Page 28 If you have any questions/problems regarding this product, try the following: Read Troubleshooting in these Operating Instructions. Please contact (U.S.A. only); 1-800-222-7669 Call http://www.SONY.com http://www.sony.net/ ©2016 Sony Corporation Printed in China...
- Page 29 XAV-AX100 6.4” (16.3-cm) Media receiver with Bluetooth ® Apple CarPlay makes driving smarter Android Auto™ gives you all the help you need Control and view everything with the 6.4" touch screen 4 x 55 W amplification for clear, powerful sound Integrated Bluetooth ®...
- Page 30 Dynamic Stage Organizer creates virtual speakers on your dashboard Rotary dial for distraction-free control Rear camera ready for easy reversing Steering wheel control ready input Convenient wireless remote supplied Specifications...
- Page 32 ®...