Table of Contents
Advertisement
Quick Links
Advertisement
Table of Contents

Related Manuals for Zanussi ZKC44500


Summary of Contents for Zanussi ZKC44500
- Page 1 User Manual GETTING STARTED? EASY. ZKC44500 EN User Manual Microwave combi-oven...
-
Page 2: Safety Information
SAFETY INFORMATION Before the installation and use of the appliance, carefully read the supplied instructions. The manufacturer is not responsible for any injuries or damages that are the result of incorrect installation or usage. Always keep the instructions in a safe and accessible location for future reference. - Page 3 Do not use harsh abrasive cleaners or sharp metal scrapers to • clean the glass door since they can scratch the surface, which may result in shattering of the glass. If the mains power supply cable is damaged, it must be •...
-
Page 4: Safety Instructions
SAFETY INSTRUCTIONS INSTALLATION removed from the holder), earth leakage trips and contactors. WARNING! Only a qualified person • The electrical installation must have an isolation must install this appliance. device which lets you disconnect the appliance from the mains at all poles. The isolation device •... -
Page 5: Internal Light
– be careful when you remove or install the • Clean the appliance with a moist soft cloth. Only accessories. use neutral detergents. Do not use abrasive • Discoloration of the enamel has no effect on the products, abrasive cleaning pads, solvents or performance of the appliance. -
Page 6: Product Description
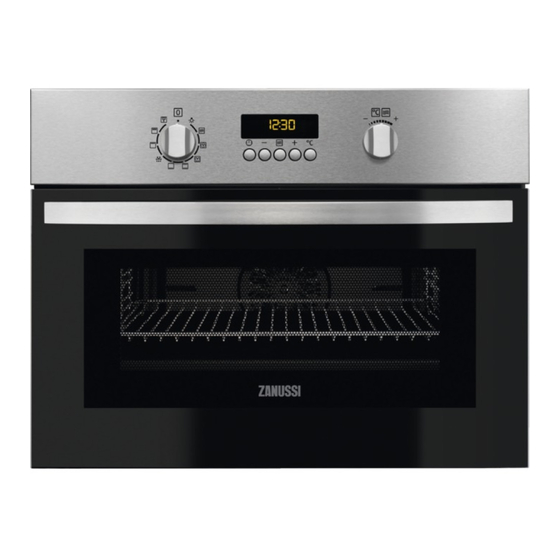
PRODUCT DESCRIPTION GENERAL OVERVIEW Control panel Power lamp / symbol Knob for the oven functions Electronic programmer Temperature and microwave power indicator / symbol Knob for the temperature / microwave power Heating element Microwave generator Lamp Shelf support, removable Shelf positions ACCESSORIES Baking tray Wire shelf... -
Page 7: Changing The Time
The display shows the new time. 2. Press to confirm. This is necessary only when you set the time for the first time. Later CHANGING THE TIME the new time will be saved automatically after 5 You can change the time of day only if the oven is seconds. - Page 8 Oven function Application Pizza Setting To bake food on 1 shelf position for a more intensive brown- ing and a crispy bottom. Set the temperature 20 - 40 °C low- er than for Top / Bottom Heat. Top / Bottom To bake and roast food on 1 shelf position.
-
Page 9: Heat-Up Indicator
Button Function Description TEMPERATURE To check the oven temperature or the temper- ature of the core temperature sensor (if appli- cable). Use only while an oven function is in operation. HEAT-UP INDICATOR When you activate an oven function, the bars in the display come on one by one. -
Page 10: Suitable Cookware And Materials
SUITABLE COOKWARE AND MATERIALS Microwave Grilling Cookware / Material Defrosting Heating Cooking Ovenproof glass and porcelain with no metal components, e.g. Pyrex, heat-proof glass Non-ovenproof glass and porcelain Grill shelf, glass and glass ceramic made of ovenproof / frost-proof material e.g. Ar- coflam Ceramic , earthenware... -
Page 11: Tips For The Microwave
TIPS FOR THE MICROWAVE Result Remedy You cannot find details for the amount of Find details for similar type of food. Increase or shorten food prepared. the length of the cooking time according to the follow- ing rule: double the amount - almost double the time, half the amount - half the time. -
Page 12: Examples Of Cooking Applications For Power Settings
time ends, an acoustic signal sounds again and the When you use the Microwave function oven function and Microwave function deactivates with the function Duration for more automatically. than 7 minutes and in Combi mode, 4. Turn the function knob to off position. the Microwave power cannot be more than 600 W. -
Page 13: Using The Accessories
Clock function Application To set when the appliance must deactivate. Use only when an oven function is set. You can use Duration and End at the same time (time delay), if the appliance is to be activate and deactivate automatically later. 2. -
Page 14: Additional Functions
Push the shelf between the guide bars of the shelf Wire shelf and baking tray together: support and make sure that the feet point down. Push the baking tray between the guide bars of the shelf support and the wire shelf on the guide bars above. -
Page 15: Cooling Fan
The Automatic switch-off does not Temperature (°C) Switch-off time (h) work with the functions: Light, Duration, End. 30 - 115 12.5 COOLING FAN 120 - 195 When the appliance operates, the cooling fan activates automatically to keep the surfaces of the 200 - 230 appliance cool. -
Page 16: Baking On One Oven Level
Baking results Possible cause Remedy The cake is too dry. The baking time is too long. The next time you bake, set a shorter baking time. The cake browns unevenly. The oven temperature is too Set a lower oven temperature high and the baking time is too and a longer baking time. - Page 17 Cakes / pastries / breads on baking trays Temperature Food Function Time (min) Shelf position (°C) Plaited bread / bread Top / Bottom 170 - 190 30 - 40 crown Heat Top / Bottom 160 - 180 50 - 70 Christmas stollen Heat Top / Bottom...
-
Page 18: Bakes And Gratins
Temperature Food Function Time (min) Shelf position (°C) Short bread / Short True Fan Cook- 20 - 35 bread / Pastry Stripes Short bread / Short Top / Bottom 20 - 30 Heat bread / Pastry Stripes Biscuits made with True Fan Cook- 150 - 160 15 - 20... -
Page 19: Multilevel Baking
Food Function Temperature (°C) Time (min) Shelf position Fish bakes Top / Bottom 180 - 200 30 - 60 Heat Stuffed vegeta- True Fan Cook- 160 - 170 30 - 60 bles 1) Preheat the oven. MULTILEVEL BAKING Use the function True Fan Cooking. Cakes / pastries / breads on baking trays Food Temperature (°C) -
Page 20: Roasting Tables
Food Temperature (°C) Time (min) Shelf position Tarts 180 - 200 40 - 55 Spinach flan 160 - 180 45 - 60 Quiche Lorraine (Savoury 170 - 190 45 - 55 flan) Swiss Flan 170 - 190 45 - 55 Cheesecake 140 - 160 60 - 90... - Page 21 Pork Power Temperature Shelf posi- Food Function Quantity (kg) Time (min) (Watts) (°C) tion Shoulder, Turbo 1 - 1.5 160 - 180 50 - 70 neck, ham Grilling joint Meat loaf Turbo 0.75 - 1 160 - 170 35 - 50 Grilling Pork Turbo...
- Page 22 Fish (steamed) Quantity Power Temperature Shelf posi- Food Function Time (min) (kg) (Watts) (°C) tion Whole fish Top / 1 - 1.5 210 - 220 30 - 45 Bot- Heat Dishes Quantity Power Temperature Shelf posi- Food Function Time (min) (kg) (Watts) (°C)
-
Page 23: Frozen Foods
Grilling Time (min) Food Temperature (°C) Shelf position 1st side 2nd side Roast beef, me- 210 - 230 30 - 40 30 - 40 dium Filet of beef, me- 20 - 30 20 - 30 dium Back of pork 210 - 230 30 - 40 30 - 40 Back of veal... - Page 24 Food Temperature (°C) Time (min) Shelf position Pizza, chilled 210 - 230 13 - 25 Pizza Snacks, frozen 180 - 200 15 - 30 210 - 230 20 - 30 French Fries, thin 210 - 230 25 - 35 French Fries, thick 210 - 230 20 - 35 Wedges / Croquettes...
-
Page 25: Preserving - Bottom Heat
Further de- Defrosting Food Quantity (kg) frosting time Comments time (min) (min) Chicken 100 - 140 20 - 30 Put the chicken on an upturned sau- cer in a big plate. Turn halfway through. Meat 100 - 140 20 - 30 Turn halfway through. -
Page 26: Drying - True Fan Cooking
Vegetables Cooking time until sim- Continue to cook at Food Temperature (°C) mering (min) 100 °C (min) 160 - 170 50 - 60 5 - 10 Carrots Cucumbers 160 - 170 50 - 60 Mixed pickles 160 - 170 50 - 60 5 - 10 Kohlrabi / Peas / As- 160 - 170... - Page 27 Standing time Food Power (Watts) Quantity (kg) Time (min) Comments (min) Mixed 10 - 15 10 - 15 Turn halfway minced meat through, re- move defros- ted parts. Goulash 10 - 15 10 - 15 Turn halfway through, re- move defros- ted parts.
- Page 28 Standing time Food Power (Watts) Quantity (kg) Time (min) Comments (min) Fish fillets 10 - 12 15 - 20 Turn halfway through. Defrosting sausage Standing time Food Power (Watts) Quantity (kg) Time (min) Comments (min) Sliced saus- 2 - 4 20 - 40 Turn halfway through.
- Page 29 Standing time Food Power (Watts) Quantity Time (min) Comments (min) Cake (ga- 1 piece 1 - 2 15 - 20 Turn plate teau) halfway through. Dry cake (e. 1 piece 2 - 4 15 - 20 Turn plate g. Pound halfway cake) through.
- Page 30 Defrosting heating Standing time Food Power (Watts) Quantity Time (min) Comments (min) Baby food in 0.2 kg 2 - 3 Stir halfway jars through, check tem- perature. Baby milk 1000 0.2 kg 0:20 - 0:40 Put spoon (bottle, 180 into bottle, stir and check tem- perature.
- Page 31 Standing time Food Power (Watts) Quantity Time (min) Comments (min) Fish fillets 0.5 kg 6 - 8 Cook cov- ered, turn container several times during cook- ing. Vegetables, 0.5 kg 12 - 16 Add approx. short cooking 50 ml water, cook cov- time, fresh ered, stir...
-
Page 32: Care And Cleaning
Power Tempera- Time Shelf Food Ovenware Comments (Watts) ture (°C) (min) position 2 chicken Glass dish with strainer Turn after 20 halves (2 x min, standing 0.6 kg) time 5 min. au gratin po- Gratin dish 10 min stand- tatoes (1 kg) ing time. -
Page 33: Troubleshooting
3. Replace the lamp with a suitable 300 °C heat- 4. Install the glass cover. resistant lamp. TROUBLESHOOTING WARNING! Refer to Safety chapters. WHAT TO DO IF... Problem Possible cause Remedy You cannot activate or operate The oven is not connected to Check if the oven is correctly the oven. -
Page 34: Environmental Concerns
SERVICE DATA the appliance cavity. Do not remove the rating plate from the appliance cavity. If you cannot find a solution to the problem yourself, contact your dealer or an Authorised Service Centre. The necessary data for the service centre is on the rating plate. - Page 36 WWW.ZANUSSI.COM/SHOP...