
Related Manuals for LG TWFB-R101D

Summary of Contents for LG TWFB-R101D
- Page 1 Inside your life ! PoE Wi-Fi Bridge Manual (PoE: Power over Ethernet) [Model Name : TWFB-R101D ] 2015. 03. 06...
- Page 2 1. Appearance Description for PoE Wi-Fi Bridge 1. Front Panel - The front panel has the 2-Button and status LEDs in the following figure. Button Description • To connect WPS to AP(Access Point) Buttons • Reboot Reset • Reset to Factory Default Reset Description LEDs...
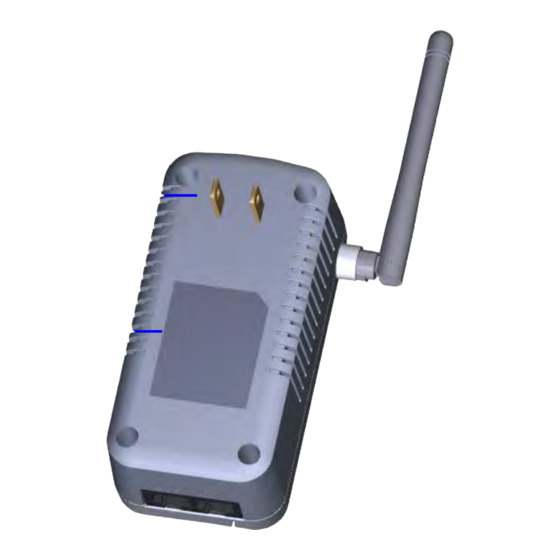
- Page 3 2. Back/side Panel & Label Information - The back/side panels have the wireless antenna, power plug and 2-Lan ports. - The label on the bottom shows the MAC address, serial Number. Wireless Antenna AC 110V Power Label DATA (DATA LED) CAMERA (CAMERA LED) Fig 2.
-
Page 4: Installation Guide
2. Installation Guide 1. Log in connection Camera & Wi-Fi Bridge 1) Make sure that your camera is connected to the Wi-Fi Bridge CAMERA port with an Ethernet cable(wired) 2) Turn on the Wi-Fi Bridge and verify the following - The power LED is On. - The CAMERA LED is on for the LAN port that is connected to your Power device camera. - Page 5 2. Log in to the PoE 1) After entering http://172.19.1.254 , you can show Realtek WLAN AP webserver. Fig 5. Realtek WLAN webserver 4 / 12 Copyrightⓒ. 2015. All Rights Reserved.
- Page 6 3. Wireless Site Survey 1) Please click “Wireless” in the webserver. 2) Please click “Site Survey” in the webserver( ①, ②), to fine AP list Click ② Click ① Fig 6. Wireless Site Survey 5 / 12 Copyrightⓒ. 2015. All Rights Reserved.
- Page 7 4. AP Connection 1) After “Site Survey”, you can show AP lists. 2) Please select wanted SSID(AP Name) and click “Next” Click Fig 7. SSID Selection 6 / 12 Copyrightⓒ. 2015. All Rights Reserved.
- Page 8 3) Please click “Connect” 4) After “Connect” click, You can show ”Please Wait” message 5) It will be connected. Please click ”Reboot Later” 6) Finally, Please close your web browser. Click Click Fig 8. SSID Connection 7 / 12 Copyrightⓒ. 2015. All Rights Reserved.
- Page 9 3. Regulation Information INFORMATION TO THE USER This equipment has been tested and found to comply with the limits for a Class B digital device, pursuant to part 15 of the FCC Rules. These limits are designed to provide reasonable protection against harmful interference in a residential installation. This equipment generates, uses and can radiate radio frequency energy and, if not installed and used in accordance with the instructions, may cause harmful interference to radio communications.
- Page 10 4. Regulation Information (French) Le présent appareil est conforme aux CNR d'Industrie Canada applicables aux appareils radio exempts de licence. L'exploitation est autorisée aux deux conditions suivantes: (1) l'appareil ne doit pas produire de brouillage, et (2) l'utilisateur de l'appareil doit accepter tout brouillage radioélectrique subi, même si le brouillage est susceptible d'en compromettre le fonctionnement.
- Page 11 5. Appendix 1. WPS Function - You can use WPS to connect AP without any password(WPA or WPA2). ① Push AP’ WPS button. ② Push PoE’ WPS Button(During 3 secs). Reset ③ When try to connect AP, WLAN LED is pulsing RED. ④...
- Page 12 4. PIN mode WPS Function of webserver ① Please click “Wireless” in the webserver. ② Please click “WPS” in the webserver. ③ If you use PIN mode WPS, first input Self-PIN Number to AP. After that click Start PIN. ④ Click ok. Click ①...
- Page 13 5. PIN mode WPS Function of webserver ① Please click “Wireless” in the webserver. ② Please click “WPS” in the webserver. ③ If you use PBC mode WPS in webserver, first push the WPS button of AP. After that click Start PBC. ④...