Silvercrest SKMK 1200 A1 Operating Instructions Manual
Monsieur cuisine édition plus
Hide thumbs
Also See for SKMK 1200 A1:
- Operating instructions manual (70 pages) ,
- Operating instructions manual (70 pages) ,
- Operating instructions manual (70 pages)

Related Manuals for Silvercrest SKMK 1200 A1


Summary of Contents for Silvercrest SKMK 1200 A1
- Page 1 MONSIEUR CUISINE ÉDITION PLUS SKMK 1200 A1 MONSIEUR CUISINE MONSIEUR CUISINE ÉDITION PLUS ÉDITION PLUS Instrukcja obsługi Operating instructions IAN 277740...
- Page 2 Polski ..................2 English................... 36...
- Page 3 Przegl d / Overview TIME TEMP. SPEED REVERSE SCALE/TARE AUTOMATIC PROGRAMS KNEAD STEAMER ROAST REVERSE TURBO START STOP...
-
Page 4: Table Of Contents
Spis tre ci 1. Przegl d................... 4 2. Wskazania na wy wietlaczu ............5 3. Przegl d funkcji................6 4. U ytkowanie zgodne z przeznaczeniem..........7 5. Wskazówki bezpiecze stwa ............. 8 6. Zakres dostawy ................12 7. Rozpakowanie i ustawienie ............12 8. - Page 5 14. Przypiekanie .................. 26 14.1 Ogólne informacje o programie .............26 14.2 Uruchomienie programu................26 15. Czyszczenie i konserwacja urz dzenia..........27 15.1 Czyszczenie urz dzenia g ównego ............27 15.2 Mycie w zmywarkach................27 15.3 Czyszczenie akcesoriów ...............28 15.4 Czyszczenie, sprawdzane i wymiana uszczelek ........28 15.5 Odkamienianie ..................29 15.6 Przechowywanie ..................29 16.
-
Page 6: Przegl D
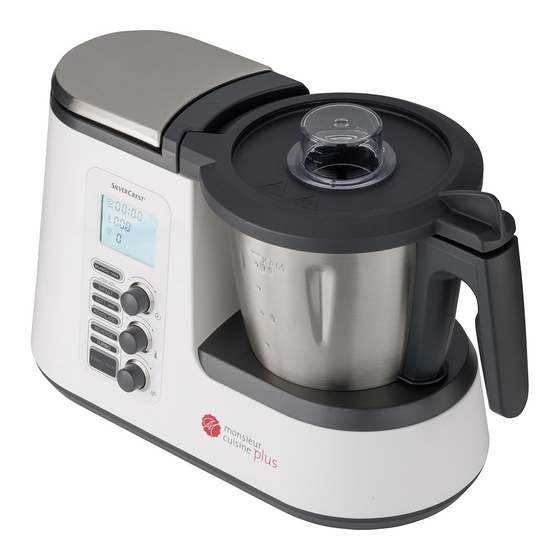
1. Przegl d Pokrywa do wk adek do gotowania na parze Wk adka do gotowania na parze, p aska Wk adka do gotowania na parze, g boka Uszczelka g bokiej wk adki do gotowania na parze (zwraca uwag na prawid ow pozycj ) Pojemnik miksuj cy Wy cznik g ówny Przewód zasilaj cy z wtyczk sieciow... -
Page 7: Wskazania Na Wy Wietlaczu
2. Wskazania na wy wietlaczu TIME TEMP. SPEED REVERSE Czas (od 1 sekundy do 90 minut) Pojemnik miksuj cy nie jest prawid owo za o ony lub zamkni ty Wybrana pr dko (1–4) nadaje si do nasadki mieszaj cej Temperatura produktów spo ywczych w pojemniku miksuj cym Wskazywanie ci aru w gramach do 5.000 g Wskazywanie pr dko ci 1–10 Kierunek obrotów w lewo nastawiony / aktywny... -
Page 8: Przegl D Funkcji
3. Przegl d funkcji Przycisk/narz dzie Funkcja Wskazówki Wa enie z dok adno ci do grama Do 5 kg SCALE/TARE 23 / z funkcj tarowania (ustawi na 0, Waga 14 aby zwa y nast pne sk adniki) Delikatne mieszanie produktów REVERSE 19 spo ywczych, które nie maj by rozdrabniane. -
Page 9: U Ytkowanie Zgodne Z Przeznaczeniem
Dzi kujemy za Pa stwa 4. U ytkowanie zgodne zaufanie! z przeznaczeniem Monsieur Cuisine s u y do miksowania, roz- Gratulujemy posiadania nowego robota ku- cierania, rozbijania, be tania, rozdrabniania, chennego z funkcj gotowania „Monsieur robienia puree, emulgowania, gotowania na Cuisine Édition Plus”. -
Page 10: Wskazówki Bezpiecze Stwa
5. Wskazówki bezpiecze stwa Wskazówki ostrzegawcze W miejscach wymagaj cych zwrócenia uwagi u yto w niniejszej instrukcji obs ugi nast pu- j cych wskazówek ostrzegawczych: NIEBEZPIECZE STWO! Wysokie ryzyko: zlekcewa enie tego ostrze enia mo e stanowi zagro enie dla zdrowia i ycia. OSTRZE ENIE! rednie ryzyko: zlekcewa enie tego ostrze enia mo e by przyczyn obra e cia a lub powa nych szkód materialnych. - Page 11 Podczas korzystania z funkcji turbo w pojemniku miksuj cym nie mog znajdowa si gor ce sk adniki. Mog yby zosta one wy- rzucone i spowodowa oparzenia. Wk ad no owy i nasadka mieszaj ca obracaj si jeszcze po wy- czeniu. Z odblokowaniem pojemnika miksuj cego i otwarciem pokrywy nale y zaczeka do ca kowitego zatrzymania si tych elementów.
- Page 12 Je li urz dzenie wpadnie do wody, na- Wtyczk sieciow nale y wyci gn le y natychmiast wyci gn wtyczk z gniazdka … gniazdka. Dopiero pó niej wyj urz - … w przypadku wyst pienia usterki, dzenie z wody. … kiedy urz dzenie Monsieur Cuisine nie jest u ywane, NIEBEZPIECZE STWO …...
- Page 13 NIEBEZPIECZE STWO Przycisk TURBO nie mo e by u ywany w przypadku u ycia nasadki mieszaj cej. obra e na skutek Pojemnik miksuj cy powinien by u y- oparzenia wany wy cznie z za o on pokryw , Powierzchnie urz dzenia podczas pra- poniewa bez pokrywy ciecz mog aby cy bardzo si nagrzewaj .
-
Page 14: Zakres Dostawy
6. Zakres dostawy czenie i konserwacja urz dzenia” na stronie 27). 1 robot kuchenny z funkcj gotowania 4. Doprowadzi jednorazowo do wrzenia „Monsieur Cuisine Édition Plus”, urz dze- 2,2 litra wody w pojemniku miksuj - nie g ówne 12 cym 5, a nast pnie j wyla (patrz „Usta- 1 pojemnik miksuj cy 5 z: wianie temperatury”... -
Page 15: Obs Uga Urz Dzenia
Wa enie z funkcj tarowania 9.1 Zasilanie Z funkcj tarowania mo na ustawi ci ar • Po czy przewód zasilaj cy 7 naj- znajduj cy si na wadze 14 na 0 gramów, a pierw z gniazdkiem sieciowym 8 urz - nast pnie doda nowy produkt do wa enia. -
Page 16: Pos Ugiwanie Si Przyciskami
9.4 Pos ugiwanie si przyciskami wiecenie/miganie Sytuacja Funkcja przycisku przycisków Ustawienia zosta y wprowa- Nacisn przycisk, aby roz- START/STOP 17 miga. dzone i mo na rozpocz pocz czynno . czynno . Czynno trwa. Nacisn przycisk, aby za- START/STOP 17 wieci. trzyma czynno . -
Page 17: Ustawianie Czasu
9.5 Ustawianie czasu 9.6 Ustawianie temperatury Za pomoc regulatora czasowego Obracaj c regulatorem temperatury obracaj c pokr t em nastawi dany czas mo na nastawi temperatur gotowania: gotowania lub obróbki: temperatura ta mo e wynosi od 37 °C • obracanie regulatorem czasowym 24 do 130 °C. -
Page 18: Ustawianie Pr Dko Ci
9.7 Ustawianie pr dko ci agodny rozruch Aby zapobiec wyrzuceniu gor cego pro- Obracaj c regulatorem pr dko ci duktu z pojemnika miksuj cego 5 podczas mo na nastawi pr dko : nag ego przyspieszenia, dost pna jest funk- Pr dko mo e by ustawiane w cja agodnego rozruchu dla wszystkich usta- 10 stopniach:... -
Page 19: Funkcja Turbo
9.9 Funkcja turbo 9.10 Przelew W mocowaniu pojemnika miksuj cego 9 znajduje si przelew 10. OSTRO NIE: Podczas miksowania p ynów w pojem- niku miksuj cym 5 mo e znajdowa si maksymalnie 1 litr – w innym razie ciecz mo e zosta wyrzucona. Nie wolno u ywa tej funkcji, gdy u y- wana jest nasadka mieszaj ca 29. -
Page 20: U Ywanie Pojemnika Miksuj Cego
10. U ywanie pojemni- WSKAZÓWKA: • Podczas niektórych prac ilo cieczy w ka miksuj cego pojemniku miksuj cym 5 nie mo e by zbyt ma a do prawid owej pracy urz - WSKAZÓWKA: W niniejszej instrukcji dzenia. Przyk adowo do ubijania mie- opisane s podstawowe funkcje, takie jak tany minimalna ilo wynosi 200 ml, do... -
Page 21: Wk Adanie Pojemnika Miksuj Cego
2. Pchn d wigni zwalniaj - c 34 na spodzie pojemnika WSKAZÓWKI: miksuj cego 5 tak, aby wska- • Je li pojemnika miksuj cego 5 nie mo - zywa a symbol otwartej k ód- na wcisn w dó , nale y go nieco „po- rusza ”, aby ko o z bate wk adki 3. -
Page 22: Zak Adanie Pokrywy Pojemnika Miksuj Cego
10.5 Zak adanie pokrywy • Je li pokrywa 32 nie jest pra- wid owo za o ona, na wy- pojemnika miksuj cego wietlaczu 25 pojawia si Pokryw pojemnika miksuj cego 32 mo - symbol z prawej strony. na za o y tylko wtedy, gdy pojemnik mie- szaj cy 5 zosta prawid owo za o ony. -
Page 23: U Ywanie Opatki
2. W o y potrawy do wk adki do goto- 10.8 U ywanie opatki wania 28. opatka 30 s u y do mieszania sk adników i do wyjmowania wk adki do gotowa- WSKAZÓWKA: Poziom nape nienia nie nia 28. mo e przekroczy znaku MAX. OSTRO NIE: 3. -
Page 24: Gotowanie Na Parze
11. Gotowanie na parze 11.2 Przygotowanie wk a- dek do gotowania na parze NIEBEZPIECZE STWO obra- e na skutek oparzenia! 1. W o y pojemnik miksuj cy 5 do mo- Podczas otwierania pokrywy 1 lub 32 cowania 9. podczas pracy mo e wydostawa si 2. -
Page 25: Rozpoczynanie Gotowania Na Parze
W czenie urz dzenia jest mo liwe tyl- 3. Nacisn przycisk START/STOP 17. ko po prawid owym za o eniu wk adki Rozpocznie si 10-minutowy czas na- do gotowania na parze 3. grzewania. W tym czasie - czas na wy wietlaczu 25 nie jest od- WSKAZÓWKI: liczany malej co;... -
Page 26: Sprawdzanie Punktu Gotowania
11.4 Sprawdzanie punktu 11.5 Gotowanie na parze z gotowania wk adk do gotowania Nie nale y zbyt d ugo gotowa produktów spo ywczych, poniewa warzywa b d WSKAZÓWKA: Program gotowania na zbyt mi kkie, a ryby i mi so zbyt suche i parze mo e by u ywany równie z wk ad- twarde. -
Page 27: Wskazówki Do Gotowania Na Parze
12. Wskazówki do 13. Ugniatanie gotowania na parze W maszynie mo na u y maksymalnie 500 g m ki. Program u ywa teraz tylko Gotowanie na parze jest jedn z najzdrow- wk adki no owej 27. szych mo liwo ci gotowania potraw. Potra- wy nie tylko zachowuj du sk adników od ywczych i kolorów –... -
Page 28: Przypiekanie
5. Nacisn migaj cy przycisk START/ 4. W czy urz dzenie za pomoc wy- STOP 17. cznika g ównego 6. Program zostanie uruchomiony. Ustawio- 5. Nacisn przycisk ROAST 20. Przy- ny czas jest odliczany malej co na wy- cisk ROAST 20 wieci si , a warto ci wietlaczu 25. -
Page 29: Czyszczenie I Konserwacja Urz Dzenia
15. Czyszczenie i konser- 15.1 Czyszczenie urz dzenia wacja urz dzenia g ównego 1. Do czyszczenia urz dzenia g ówne- NIEBEZPIECZE STWO pora- go 12 u ywa wilgotnej szmatki. Mo - enia pr dem elektrycznym! na doda odrobin rodka do mycia Przed ka dym czyszczeniem urz dze- naczy . -
Page 30: Czyszczenie Akcesoriów
15.3 Czyszczenie akcesoriów Wk adka no owa 1. Wyj wk adk no ow 27 z pojemni- 1. Pojemnik miksuj cy 5 wyp uka ciep ka miksuj cego 5 (patrz „Wk adanie i wod , nast pnie wyla wod . wyjmowanie wk adki no owej” na 2. -
Page 31: Odkamienianie
15.5 Odkamienianie 15.6 Przechowywanie Podczas gotowania na parze w wodzie za- • Urz dzenie nale y przechowywa w miejscu zabezpieczonym przed kurzem wieraj cej kamie , na u ywanych elemen- i brudem oraz dost pem dzieci. tach mo e osadza si kamie , zw aszcza w pojemniku miksuj cym 5. -
Page 32: Usterki, Przyczyny I Usuwanie
16. Usterki, przyczyny i usuwanie 16.1 Usterki podczas pracy Usterka Przyczyna Usuwanie W o y prawid owo pojemnik Pojemnik miksuj cy 5 nie jest miksuj cy 5 (patrz „Wk adanie prawid owo w o ony. pojemnika miksuj cego” na stronie 19). Pokrywa 32 lub g boka Urz dzenie nie uru- wk adka do gotowania na pa-... -
Page 33: Komunikaty O B Dach Na Wy Wietlaczu
Usterka Przyczyna Usuwanie Wybra stopie pr dko ci 0–3 Nie mo na ustawi Wybrano stopie pr dko ci (patrz „Ustawianie pr dko ci” na temperatury. 4–10. stronie 16). Niektóre produkty spo ywcze lub przyprawy (np. curry) Nie s wymagane adne dzia a- Elementy urz dzenia mog zabarwia tworzywa nia zaradcze, poniewa nie ma... -
Page 34: Utylizacja
W przypadku utylizacji opakowania nale y przestrzega odpowiednich przepisów do- tycz cych ochrony rodowiska w danym kraju. 18. Dane techniczne Model: SKMK 1200 A1 Napi cie sieciowe: 230 V ~ 50/60 Hz Klasa ochronno ci: I Moc: 1.200 W Mikser: 800 W Gotowanie: 1.000 W... -
Page 35: Gwarancja Firmy Hoyer Handel Gmbh
20. Gwarancja firmy Zakres gwarancji Urz dzenie wyprodukowano zgodnie suro- HOYER Handel GmbH wymi przepisami dotycz cymi jako ci i do- Drogi Kliencie, k adnie skontrolowano przed opuszczeniem Na niniejsze urz dzenie jest udzielana 3 -let- zak adu produkcyjnego. nia gwarancja obowi zuj ca od dnia jego wiadczenie gwarancyjne obejmuje zarów- zakupu. - Page 36 • Numery artyku ów znajduj si na ta- bliczce znamionowej, w grawerowa- nych oznaczeniach, na stronie tytu owej instrukcji (na dole po lewej) lub na naklejce z ty u lub na spodzie urz dzenia. • W przypadku wyst pienia usterek w dzia aniu lub pozosta ych usterek nale- y w pierwszej kolejno ci skontaktowa si telefonicznie lub za pomoc...
- Page 38 Contents 1. Overview ..................38 2. Display screens ................39 3. Functions in an overview ............... 40 4. Intended purpose ................41 5. Safety instructions ................. 42 6. Items supplied ................45 7. Unpacking und setting up .............. 46 8. Scale ..................... 46 9.
- Page 39 14. Browning ..................60 14.1 General programme information ............60 14.2 Starting the program................60 15. Cleaning and servicing the device ..........60 15.1 Cleaning the base unit ................. 61 15.2 Cleaning in the dishwasher ..............61 15.3 Cleaning the accessories ..............61 15.4 Cleaning, checking and replacing seals ..........
-
Page 40: Overview
1. Overview Lid for the steamer baskets Steamer basket, shallow Steamer basket, deep Seal of the deep steamer basket (ensure the correct position) Blender jug Main switch Power cable with mains plug Mains power socket Holder for blender jug (with gear ring) Overflow hole Locking system Base unit... -
Page 41: Display Screens
2. Display screens TIME TEMP. SPEED REVERSE Time display (1 second to 90 minutes) Blender jug has not been positioned or closed correctly Selected speed (1 - 4) is suited for the mixer attachment Temperature of the food in the blender jug Display of the weight in grams up to 5,000 g Display of the speed 1 - 10 Set to anti-clockwise / active... -
Page 42: Functions In An Overview
3. Functions in an overview Button/Component Function Notes Weighing accurately to the gram up to 5 kg SCALE/TARE 23 / with tare function (set to 0 to Scale 14 weigh additional ingredients) Gentle mixing of food not to be REVERSE 19 chopped Function is blocked if the Briefly switch to the highest... -
Page 43: Intended Purpose
Thank you for your trust! 4. Intended purpose Monsieur Cuisine is used to mix, whisk, beat, Congratulations on the purchase of your stir, chop, mash, emulsify, steam, stew, knead, new “Monsieur Cuisine Édition Plus” food brown, cook and weigh food. processor with cooking function. -
Page 44: Safety Instructions
5. Safety instructions Warnings If necessary, the following warnings will be used in these user instructions: DANGER! High risk: failure to observe this warning may result in injury to life and limb. WARNING! Moderate risk: failure to observe this warning may result in injury or serious material damage. - Page 45 After being switched off, the blade assembly and the mixer attach- ment will continue to rotate for a while. Please wait until all parts have come to a standstill before unlocking the blender jug and opening the lid. This device is not intended to be operated using an external timer clock or a separate remote control system.
- Page 46 Even after it has been switched off, the device has not been completely discon- FIRE HAZARD nected from the mains. In order to fully Before turning the device on, place it on disconnect it, pull out the mains plug. a level, stable, dry, heat-resistant sur- Ensure that the power cable never de- face.
-
Page 47: Items Supplied
6. Items supplied The button TURBO must not be used when using the mixer attachment. 1 food processor with cooking function Use the blender jug exclusively with the “Monsieur Cuisine Édition Plus“, lid in place, otherwise liquid might be base unit 12 ejected. -
Page 48: Unpacking Und Setting Up
7. Unpacking und 8. Scale setting up The installed kitchen scales allows accurate weighing to the gram up to 5 kg. During production, a thin film of oil is ap- The scale 14 is easy to operate and ready plied to protect many components. Prior to for use unless another cycle is in operation. -
Page 49: Operating The Device
5. Add the new object to be weighed to 9.2 Switching the device on the existing object to be weighed. and off On the display 25 the weight of the • Set the main switch 6 on the rear to I: added object to be weighed is shown in - All buttons light up briefly. -
Page 50: Operating The Buttons
9.4 Operating the buttons Illumination/Flashing of Situation Function of the button the button(s) Settings were performed, Press the button to start a cy- START/STOP 17 flashes. and a cycle can be started. cle. The cycle is in operation. Press the button to stop a cy- START/STOP 17 lights up. -
Page 51: Setting The Time
9.5 Setting the time 9.6 Setting the temperature Turn the timer 24 to set the time of the Turn the temperature controller 15 to set cooking process or the processing: the cooking temperature: • Turn the timer 24 in the direction “-”: The adjustable temperature ranges from reduce time 37 °C to 130 °C. -
Page 52: Setting The Speed
9.7 Setting the speed Soft start In order to avoid that during sudden acceler- Turn the speed controller 16 to set the ation of hot food liquid is ejected from the speed: blender jug 5 or the device starts wobbling, The speed can be adjusted in 10 incre- a soft start is provided for all settings except ments:... -
Page 53: Turbo Function
9.9 Turbo function 9.10 Overflow In the holder of the blender jug 9 there is an overflow hole 10. CAUTION: When mixing liquids, the blender jug 5 must not contain more than 1 litre, since otherwise liquid might be ejected. Never use this function when the mixer attachment 29 is used. -
Page 54: Using The Blender Jug
10. Using the blender NOTE: • For some applications, the blender jug 5 should not contain an insufficient amount of liquid, so that the device can NOTE: these user instructions describe the function properly. Thus, for whipping basic functions such as mixing, chopping cream, for instance, you should use at and steaming. -
Page 55: Insert Blender Jug
2. Press the unlocking lever 34 10.3 Insert blender jug on the underside of the blender 1. Place the blender jug 5 into the holder jug 5 so that it points to the for the blender jug 9. open lock symbol. 2. -
Page 56: Put On The Lid Of The Blender Jug
10.5 Put on the lid of the 10.6 Use the lid for the filler blender jug opening The lid for the blender jug 32 can only be Simultaneously, the measuring beaker 33 is placed on if the blender jug 5 was inserted used to close the lid of the blender jug 5 and correctly. -
Page 57: Using The Spatula
5. Use the main switch 6 to switch on the 10.8 Using the spatula device. The spatula 30 is used to stir the ingredients 6. Use the timer 24 to set the desired and to remove the cooking pot 28. time. -
Page 58: Steaming
11. Steaming DANGER! Risk of injury through scalding! When opening the lid 1 or 32 during operation, hot steam may escape. NOTE: these user instructions describe the basic functions such as mixing, chopping and steaming. For information on the prepa- ration of special dishes, refer to the recipe 3. -
Page 59: Starting The Steaming Process
• In order to facilitate the attaching of the steamer attachment 3 somewhat, put a NOTE: in order to start the programme before few drops of oil on a cloth and rub it on the 10 minutes elapsed, press the flashing but- the seal 4. -
Page 60: Steaming With The Cooking Pot
3. Check the condition of the food to be 11.6 Overheating protection cooked with a longer stick or a fork: The device has an overheating protection - Once the food to be cooked is done, system. As soon as there is no water left in press button START/STOP 17 and the blender jug 5 thus causing the device to then the main switch 6 to switch off... -
Page 61: Kneading
13. Kneading 6. After the time set elapsed, a short signal sounds, the buttons START/STOP 17 The appliance can be used to process up to and KNEAD 22 go off and the dis- max. 500 g of flour. The programme is only play 25 shows all values with 0 (except operated with the blade assembly 27. -
Page 62: Browning
14. Browning 6. Press the flashing button START/ STOP 17. With this programme, you can slightly The programme is started. The time set is brown up to 200 g meat, fish, vegetables, counted down on the display 25. The e.g. to release roasting flavours. Large piec- button ROAST 20 lights up. -
Page 63: Cleaning The Base Unit
CAUTION: 15.3 Cleaning the accessories Never use any abrasive, corrosive or 1. Rinse the blender jug 5 with warm wa- scratching cleaning agents. These might ter and dump the water. damage the device. 2. Remove the blade assembly 27 (see NOTE: “Using and removing the blade assem- •... -
Page 64: Descaling
3. Insert the cleaned seal or a new one. Major limescale deposits 4. Before using the device again, reinsert the blade assembly 27. CAUTION: Do not use commercially available des- Deep steamer basket caling agent, not even glacial acetic 1. Pull seal 4 off the underside of the deep acid or vinegar essence. -
Page 65: Malfunctions, Cause, Remedy
16. Malfunctions, Cause, Remedy 16.1 Malfunctions during operation Malfunction Cause Remedy Blender jug 5 is not posi- Insert blender jug 5 correctly (see tioned correctly “Insert blender jug” on page 53). Lid 32 or deep steamer bas- ket 3 have not been placed Place lid 32 or deep steamer bas- Device does not start. -
Page 66: Error Messages On The Display
16.2 Error messages on the display Display Cause Remedy • The appliance can be used to pro- The device is overloaded. cess up to max. 500 g of flour. Odour / smoke may devel- • Let the device cool down completely. Afterwards, it is ready for use again. -
Page 67: Disposal
When disposing of the packaging, make sure you comply with the environmental reg- ulations applicable in your country. 18. Technical specifications Model: SKMK 1200 A1 Mains voltage: 230 V ~ 50/60 Hz Protection class: Power rating: 1,200 watt Blender: 800 watt... -
Page 68: Warranty Of The Hoyer Handel Gmbh
20. Warranty of the Excluded from the warranty are wear parts subject to normal wear HOYER Handel GmbH and damages to fragile parts, e.g. Dear Customer, switches, batteries, lamps or other your device is provided with a 3 year war- parts manufactured from glass. - Page 69 Service Centre Service Poland Tel.: 22 397 4996 E-Mail: hoyer@lidl.pl IAN: 277740 Supplier Please note that the following address is no service address. First contact the afore- mentioned Service Centre. HOYER Handel GmbH Tasköprüstraße 3 DE-22761 Hamburg GERMANY...
- Page 70 HOYER HANDEL GMBH Tasköprüstraße 3 22761 Hamburg Germany Stan informacji · Status of information: 05/2016 · Ident.-Nr.: SKMK 1200 A1 IAN 277740...