Table of Contents
Advertisement
Quick Links
Advertisement
Table of Contents

Related Manuals for Motorola MOTOWI 4


Summary of Contents for Motorola MOTOWI 4
- Page 1 PTP 500 Series User Guide phn-1115-000v001...
-
Page 2: Copyright Information
Ref: PHN-1115-00.01 Copyright Information This document is the confidential property of Motorola, Inc. and without its prior written consent may not be copied or released to third parties. MOTOROLA, the stylized M Logo and all other trademarks indicated as such herein are trade- marks of Motorola, Inc. - Page 3 The system has been tested for compliance to both US (FCC) and European (ETSI) specifications. It has been shown to comply with the limits for emitted spurious radiation for a Class B digital device , pursuant to Part 15 of the FCC Rules in the USA and appropriate European ENs. These limits have been designed to provide reasonable protection against harmful interference.
- Page 4 Regulations applicable to 5.4GHz PTP 500 Series Bridge variant Examples of Regulatory Limits at 5.4GHz Under FCC Regulations, operation of this product is only allowed with a License Key for Region 12 (30dBm or 1W EIRP with Radar Detection) ETSI Under ETSI Regulations, operation of this product is only allowed with a License Key for Region 24 (30dBm or 1W EIRP with Radar Detection) Australia, Canada Under Australian Communications Authorities and Industry Canada...
- Page 5 Regulations applicable to 5.8GHz PTP 500 Series Bridge variant Examples of Regulatory Limits at 5.8GHz USA / Canada / Taiwan / Brazil Equipment can be operated in any mode, best results will be obtained using Region 1 settings China Operation of this product is only allowed with a License Key for Region 2 (33 dBm or 2W EIRP) Australia Operation of this product is only allowed with a License...
- Page 6 The company reserves the right to make alterations or amendments to the detail specification at its discretion. The publication of infor- mation in this document does not imply freedom from patent or other rights of Motorola, Inc. or others.
-
Page 7: Table Of Contents
Contents About This User Guide ........... . . 15 Interpreting Typeface and Other Conventions . - Page 8 6.1.4 Definitions ..............43 6.1.5 5.4 GHz Product Variant - Link Loss, Output Power and System Thresholds versus Modulation Mode .
- Page 9 Reboot ..............131 Fault Finding .
- Page 10 16.5.1 Motorola Inc. End User License Agreement ........
- Page 11 List of Figures Typical PTP 500 Series Bridge Deployment ........22 PTP 500 Series Bridge Outdoor Unit (ODU) with PTP-LPU .
- Page 12 5.8 GHz and 5.4 GHz Variants - Installation Wizard Confirm Configuration ..90 Reboot Confirmation Pop Up ..........91 5.8 GHz and 5.4 GHz Variant - Disarm Installation .
- Page 13 PTP LPU End Kit ............138 Simplified Circuit Diagram .
- Page 14 List of Tables Font types ..............15 Admonition types .
-
Page 15: About This User Guide
About This User Guide 1 About This User Guide This guide covers the installation, commissioning, operation and fault finding of the Motorola PTP 500 Series of Point-to-Point Wireless Ethernet Bridges. 1.1 Interpreting Typeface and Other Conventions This document employs distinctive fonts to indicate the type of information, as described in... -
Page 16: Getting Additional Help
In the Table of Contents for the topic. b. In the Adobe Reader search capability for keywords that apply. http://www.motorola.com/ptp 2. Visit the Motorola website at Reader is a registered trademark of Adobe Systems, Incorporated. -
Page 17: Sending Feedback
5. Escalate the problem to Motorola Technical Support as follows. You may either: a. Send e-mail to support.ptp@motorola.com b. Call our 24x7 Technical Support Center on +1 (0) 877 515 0400 (Worldwide) or +44 (0) 808 234 4640 (UK Customers). -
Page 18: Avoiding Hazards
Avoiding Hazards 2 Avoiding Hazards 2.1 Preventing Overexposure to RF Energy Caution To protect from overexposure to RF energy, install the radios for the 500 family of PTP wireless solutions so as to provide and maintain the minimum separation distances from all persons as shown in Table When the system is operational, avoid standing directly in front of the antenna. -
Page 19: Power Compliance Margins
Avoiding Hazards Rearranging terms to solve for distance yields 2.1.1.1 Calculated Distances and Power Compliance Margins Table 3 shows calculated minimum separation distances d, recommended distances and resulting power compliance margins for each frequency band and antenna combination. Band Antenna Variable Recom- Power... -
Page 20: Getting Started
Motorola as part of the system. 3.2 Welcome Congratulations on the purchase of the PTP 500 Series Bridge from Motorola. The PTP 500 Series Bridge is the latest innovation in high-speed wireless networking that lets you deploy wireless networks in areas previously unattainable. -
Page 21: Who Should Use This Guide
Table 4 Contact Information 3.2.3 Repair and Service For unit repair or service, contact your service provider or an authorized Motorola Point-to-Point Distributor for Return Material Authorization (RMA) and shipping instructions. Alternatively, contact the PTP Global Technical Support Center to process an RMA. -
Page 22: Product Description
Getting Started 3.3 Product Description This User Manual is specifically written for the 500 family of point-to-point broadband wireless solutions. The PTP 500 Series Bridge has been developed to provide Point-to-Point data connec- tivity via a 5.4 GHz or 5.8 GHz wireless Ethernet bridge operating at broadband data rates. The PTP 500 Series Bridge is aimed at a wide range of applications. - Page 23 Getting Started A pair of units is normally supplied pre-configured as a link. The network connection to a PTP 500 Series Bridge is made via a 100BaseT Ethernet connection. Power is provided to the ODU over the 100BaseT Ethernet connection using a patented non- standard powering technique.
-
Page 24: The Outdoor Unit (Odu)
PTP 500 Series Bridge should only be deployed using the supplied PTP 500 Series Bridge Figure 2 PIDU Plus. shows an installation example of a PTP 500 Series ODU with a Motorola lightning protection unit (PTP-LPU). Figure 2 PTP 500 Series Bridge... -
Page 25: Pidu Plus - Ptp 500 Series Bridge
Getting Started 3.3.2 PIDU Plus – PTP 500 Series Bridge The PTP 500 Series Bridge PIDU Plus is used to generate the ODU supply voltage from the mains supply and inject this supply voltage into the 1000BaseT Ethernet connection to the ODU. Connection uses a CAT5e cable using standard RJ45 wiring. -
Page 26: Ptp 500 Series Bridge Pidu Plus Power Input
Getting Started The Recovery switch is used to recover the unit from configuration errors or software image corrup- tion. To put a PTP 500 Series Bridge into Recovery mode the Recovery switch should be pressed then the power applied. The Recovery switch should be kept pressed for at least 30 seconds after the power has been applied. -
Page 27: Redundancy And Alternate Powering Configurations
Getting Started 3.3.3 Redundancy and Alternate Powering Configurations NOTE: The use of DC supplies of less than 55v will reduce the usable distance between the PIDU Figure Plus and ODU see Figure 6 PTP 500 Series Bridge PIDU Plus to ODU Cable Length Graph CAUTION: The maximum distance from the ODU to the connected network equipment is 100m (330 ft) when using 100BaseT. -
Page 28: External Dc Supply And Ac Supply
Getting Started 3.3.3.2 External DC Supply and AC Supply To give redundancy through the use of mains and DC supply. Figure 8 External DC Supply and AC Supply 3.3.3.3 External DC Supply and Redundant AC Supply To guard against mains failure, DC supply failure of PTP 500 Series Bridge PIDU Plus failure. Figure 9 External DC Supply and Redundant AC Supply... -
Page 29: Remote Leds And Recovery Switch
3.3.5 Cables and connectors The cable used to connect the PTP 500 Series Bridge PIDU Plus to the ODU can be any standard CAT5e type provided that it is suitable for outdoor deployment. Motorola recommends that cables to the specification below be used:... -
Page 30: Ptp And Lightning Protection
“Specifications”, but does not provide lightning or surge suppression. Installations will generally require lightning or surge suppression, a separate Ethernet surge suppressor must be used and appropriately earthed. Suitable surge suppressors can be sourced from your Motorola Point-to-Point Distributor or Solutions Provider. See Section 11 “Lightning Protection”. -
Page 31: Warranty
Getting Started 3.4 Warranty Motorola’s standard hardware warranty is for one (1) year from date of shipment from Motorola or a Motorola Point-to-Point Distributor. Motorola warrants that hardware will conform to the current relevant published specifications and will be free from material defects in material and workmanship under normal use and service. -
Page 32: Product Architecture
Product Architecture 4 Product Architecture The PTP 500 Series Bridge consists of an identical pair of units deployed one at each end of the link. The radio link operates on a single frequency channel in each direction using Time Division Duplex (TDD). -
Page 33: Ptp 500 Series Bridge Layer Diagram
The PTP 500 Series Bridge is fully software upgradeable. New software images are first downloaded http://www.motorola.com/ptp from the Motorola website to a convenient computer. The image is then uploaded to the ODU via the web management page described in Section 8.3.6... -
Page 34: General Considerations
General Considerations 5 General Considerations 5.1 Spectrum Planning The PTP 500 Series Bridge has four frequency variants in its product range. Band Definition Frequency Variable Channel Channel Coverage Width Raster 5.4 GHz ETSI 5 GHz band B, USA UNII 5470-5725 MHz 15 MHz 5 MHz Band 5.8 GHz USA ISM Band / ETSI 5 GHz... -
Page 35: Region Codes
General Considerations 5.2 Region Codes The PTP 500 Series Bridge uses a system of Region Codes to control the operation of the radio link. The Region Code is set by a License Key. Caution: To meet the regulatory requirements of your region you should set the correct Region Code by obtaining a new License Key from your reseller or distributor. - Page 36 General Considerations Region Frequency Regulatory Body EIRP Operational Code Band Limit Restrictions (see Countries Power Section 5.3 “Operational Restrictions”) 5.4 GHz Korea 20 dBm 43 dBm Band restricted : 5725 MHz to 5825 5.4 GHz 7 dBm 30 dBm Radar Avoidance Enabled 5.4 GHz Australia, Canada...
-
Page 37: Operational Restrictions
General Considerations Note: For Region Code 16, the EIRP limit is approximately 63 dBm + 10 x Log(360/Antenna Azimuth BW. When shipped from the factory units are configured as follows: PTP 500 Series Bridge 5.4 GHz – Region Code 26 PTP 500 Series Bridge 5.8 GHz –... -
Page 38: Rttt Avoidance And Other Channel Use Restrictions
General Considerations 5.3.2 RTTT Avoidance and Other Channel Use Restrictions Where regulatory restrictions apply to certain channels these channels are barred. The user should note that the number of channels barred is dependent on the channel raster selected. For example see the effect of the UK RTTT channel restrictions in Figure 12. -
Page 39: Ghz Specific Frequency Planning Considerations
General Considerations 5.5 5.4 GHz Specific Frequency Planning Considerations Adjustment of the lower centre frequency allows the operator to slide the available frequency settings up and down the 5.4 GHz band. See Figure Band Edge Band Edge 5470 MHz 5725 MHz 5480 5495 5510... -
Page 40: Ghz Specific Frequency Planning Considerations
General Considerations 5.6 5.8 GHz Specific Frequency Planning Considerations Adjustment of the lower center frequency allows the operator to slide the available frequency settings up and down the 5.8 GHz bands. Figure 14 shows the available spectrum. Band Edge Band Edge 5725 MHz 5850 MHz 5735... -
Page 41: Distance
These standard features may require some additional equipment to be configured as part of the system installation to be fully effective. Motorola recommends the use of screened cable and Lightning Protection units to protect connected equipment from nearby strikes. -
Page 42: Site Planning
Site Planning 6 Site Planning 6.1 Site Selection Criteria The following are guidelines for selecting the installation location of the ODU and PIDU Plus for a PTP 500 Series Bridge. 6.1.1 ODU Site Selection When selecting a site for the ODU the following should be taken into consideration: It is not possible for people to stand or walk inadvertently in front of the antenna Height and location to achieve the best radio path Height in relation to other objects with regard to lightning strikes... -
Page 43: Definitions
Site Planning 6.1.4 Definitions The equipment capability is given in Table Table 9 (IP Mode) and Table ??, Table 10 (TDM Mode). Each table gives Link Loss Output Power and System Thresholds for PTP 500 Series Bridge in all modulation modes for the channel bandwidth 15 MHz. Adaptive Modulation will ensure that the highest throughput that can be achieved instantaneously will be obtained taking account of propagation and interference. -
Page 44: Ghz Product Variant - Link Loss, Output Power And System Thresholds Versus Modulation Mode
Site Planning 6.1.5 5.4 GHz Product Variant - Link Loss, Output Power and System Thresholds versus Modulation Mode Table 7 Table 8 show respectively sensitivity figures for IP and TDM respectively. Modulation Mode Threshold Value (dBm) Output Power (dBm) Maximum Link Loss (dB) Channel Bandwidth (MHz) 15 MHz 256QAM 0.75 dual... -
Page 45: Ghz Product Variant - Link Loss, Output Power And System Thresholds Versus Modulation Mode
Site Planning 6.1.6 5.8 GHz Product Variant - Link Loss, Output Power and System Thresholds versus Modulation Mode Table 9 Table 10 show respectively sensitivity figures for IP and TDM respectively. Modulation Mode Threshold Value (dBm) Output Power (dBm) Maximum Link Loss (dB) Channel Bandwidth (MHz) 15 MHz 256QAM 0.75 dual... -
Page 46: Installation
Installation 7 Installation Motorola recommends that only qualified personnel undertake the installation of a PTP 500 Series Bridge solution. 7.1 Preparation Before proceeding with the installation you should: Check the contents of all packages against the parts lists shown in the packing list. -
Page 47: Legal Disclaimer
Installation 7.5 Legal Disclaimer IN NO EVENT SHALL MOTOROLA, INC. BE LIABLE FOR ANY INJURY TO ANY PERSONS OR ANY DAMAGE CAUSED DURING THE INSTALLATION OF THE MOTOROLA PTP 500 SERIES PRODUCT. 7.6 Mounting the ODUs The ODU mounting bracket is designed to ease installation by fixing the bracket to a pole and then bringing the ODU into position using a single bolt fixing. -
Page 48: Connecting Up
Installation The enclosure and mounting brackets of the PTP 500 Series Bridge product range are capable of withstanding wind speeds up to 151mph (242kph). The installer should ensure that the structure the bridge is fixed to is also capable of withstanding the prevalent wind speeds and loads. See Section 12 "Wind Loading". -
Page 49: Correct Cable Preparation For The Recommended Cable
Installation The cable should be assembled as shown in Figure Figure 17 Correct Cable Preparation for the Recommended Cable Both ends of the ODU cable are terminated in the same way. The above procedure should be repeated for the PIDU Plus end of the cable when the cable routing process is complete. This assumes that the installation uses PTP LPUs. -
Page 50: Making The Connections At The Odu
Installation Figure 18 shows a completed ODU to PIDU Plus cable. Figure 18 Completed ODU Connector CAUTION: Do not over tighten the glands as the internal seal and structure may be damaged. Figure 19 for an example of an over tightened cable gland. Figure 19 Warning Not To Over tighten Cable Gland 7.7.2 Making the Connections at the ODU... -
Page 51: Making The Ptp 500 Series Bridge Pidu Plus Connection At The Odu
Installation 7.7.3 Making the PTP 500 Series Bridge PIDU Plus Connection At The ODU The following procedure describes how connection is made at the ODU. It is often easier to carry out this procedure on the ground or a suitable surface prior to mounting the ODU. Ensure that no power is connected to the PIDU Plus or present on the cable before connecting the ODU. -
Page 52: Routing The Cable
Installation Should it be necessary to disconnect the PIDU Plus to ODU cable at the ODU, this can be achieved by removing the weather proofing gland and depressing the RJ45 locking tab with a small screwdriver as shown below: Figure 22 Disconnecting the ODU CAUTION: Ensure that power is removed from the system at the PIDU Plus to prevent damage to the ODU while making or breaking the connection. -
Page 53: Making The Odu Connection At The Ptp 500 Series Bridge Pidu Plus
Installation 7.7.7 Making the ODU Connection at the PTP 500 Series Bridge PIDU Plus The ODU is connected to the PIDU Plus by means of a concealed RJ45 connector. The RJ45 con- nection has been placed inside the PIDU Plus hinged cover to prevent the user from inadvertently plugging other equipment into the ODU RJ45 socket. -
Page 54: Making The Network Connection At The Pidu Plus - Ptp 500 Series Bridge
7.7.9 Mounting the PTP 500 Series Bridge PIDU Plus This step is optional. Motorola recommends that you mount the PIDU Plus on a wall or other suitable mounting surface. This prevents the unit from being knocked or kicked and can help maintain link availability. -
Page 55: Powering Up
Installation CAUTION: The PIDU Plus is not waterproof and should be mounted away from sources of moisture. If mounted outdoors, the unit should be mounted in a rain proof enclosure, preferably ventilated. It is also recommended that you fit a drip loop on the PIDU Plus to ODU cable to ensure that any moisture that runs down the cable into the cabinet or enclosure cannot enter the PIDU Plus. -
Page 56: Aligning The Ptp 500 Series Bridge Odus
Installation as a hub/switch (and auto-sensing MDI/MDIX cross over is employed), connection can be made directly to the computer using a standard CAT 5 patch cable. Before physical installation takes place the units to be installed should be set up as described in Section 8.3.4 "Install Pages". - Page 57 Installation may be suffering from interference or a fast fading link. Installing in this situation may not give a reliable link. The cause of the problem should be investigated. For the ease of alignment, both Master and Slave units use the install tones in the same way but with some small behavioral differences.
-
Page 58: Web
Web Page Reference 8 Web Page Reference The web user interface has three main sections. The home page presents to the operator a high level summary of the PTP 500 Series Bridge point-to-point wireless link. The status page presents a more detailed set of system parameters describing the performance of the wireless link together with other key system performance metrics. -
Page 59: Home Page - Ptp 500 Series Bridge
Web Page Reference 8.1 Home Page – PTP 500 Series Bridge The home page for the PTP 500 Series Bridge has been designed to display a high level summary of the status of the wireless link and associated equipment. The home page (Figure 26) normally displays four key system attributes:... -
Page 60: Alarm Warning Triangle
Web Page Reference Figure 27 Alarm Warning Triangle The following system alarms are defined: Region Code: The region code prohibits the wireless unit from operating outside the regulated limits. An invalid region code indicates a corrupted license key. Note that a change of state may generate an SNMP trap and/or SMTP email alert. -
Page 61: Systems Status Page
Web Page Reference Incompatible Master and Slave: A non-zero value indicates that the master and slave ends of the wireless link are different hardware products, or have different software versions. Note that it is very unusual to detect this because incompatible units will normally fail to establish a wireless link. -
Page 62: Status Page
Web Page Reference The page is subdivided into three main categories Equipment, Wireless and Ethernet/Internet. The ‘Equipment’ section contains the unit’s inventory and identification information. The ‘Wireless’ section presents the key wireless metrics, which are displayed as a series of measurements. The ‘Ethernet/Internet’... - Page 63 The region code is encoded in the product license key. If the operator wishes to change region code, a new license key must be obtained from Motorola or the local point-to-point distributor / system integrator.
- Page 64 Web Page Reference Receive Power: Receive power histogram is expressed in dBm and presented as: max, mean, min, and latest. The max, min and latest are true instantaneous measurements; the mean is the mean of a set of one second means. See footnote 10 “histograms”.
-
Page 65: System Administration
Web Page Reference Receive Modulation Mode: The modulation mode currently being used on the receive channel. Section 14 List of all the modulation modes can be found in where data rate calculations plots are given for each available modulation mode. Receive Modulation Mode Detail: This supplies the user with information regarding the receive modulation mode in use. -
Page 66: System Configuration
Web Page Reference Spectrum Management including DFS Remote management Diagnostics Plotter Password Management License Key Management Properties System Reboot 8.3.1 System Configuration The configuration of the 500 Series Bridge is organized into three sections: General configuration LAN configuration Telecoms Configuration Save and Restore The general configuration allows modification of high level administrative (descriptive) attributes and high level wireless configuration. -
Page 67: System Configuration Page
Web Page Reference Figure 30 System Configuration Page While the majority of the system configuration is entered during installation and should never require changing, this page offers the system administrator the ability to change the basic system parameters for both the wireless and Ethernet components. Link Name: User defined identity for the unit (max 63 characters). -
Page 68: Lan Configuration Page
Web Page Reference Why Reduce Transmit Power? If the link losses are low and the link data rate and availability targets are being easily achieved, the transmitted power level may be reduced with a consequent benefit to other users of the band, e.g. - Page 69 Web Page Reference VLAN High Priority Traffic Threshold: All packets with an 802.1P priority tag greater than or equal to the indicated value will be treated as a high priority packet for transmission over the wireless link. Use VLAN For Management Interfaces: This controls whether the management interfaces (WWW/SNMP/SMTP/SNTP) use 802.1Q VLAN tags or not.
-
Page 70: Configuration Reboot Page
Web Page Reference Figure 32 Configuration Reboot Page Figure 33 Configuration Reboot Page – Ethernet Auto Negotiation Disabled This will be followed by a pop-up dialogue box asking to confirm the action. Note: At this point you will lose connection to the unit. If you have just changed the IP Address you now have to reconnect to the unit using the address just set. -
Page 71: Vlan Configuration Fields
Web Page Reference Caution: You must ensure that you can access the VLAN which you configure here, otherwise you will be unable to access the unit following the next reboot. Caution: The PTP 500 is only compatible with single VLAN tagged packets. Any packet with two or more tags will be ignored. -
Page 72: Lan Configuration Page - Manual Ethernet Configuration
Web Page Reference 8.3.1.4 LAN Configuration Page – Manual Ethernet Configuration Figure 35 LAN Configuration Page – Manual Ethernet Configuration Force Configuration: This option allows the user to force the speed and duplex setting of the Ethernet interface. Warning: Over the air throughput will be capped to the rate of the Ethernet interface at the receiving end of the link... -
Page 73: Save And Restore Configuration Page
Web Page Reference 8.3.1.5 Save and Restore Configuration File The save and restore feature of a PTP 500 Series Bridge allows the system administrator to backup the operation configuration of the wireless unit. It is recommended that this facility is used immediately after a successful PTP 500 Series Bridge installation or prior to any software upgrade. -
Page 74: Save Configuration File Screen
Web Page Reference Figure 37 Save Configuration File Screen... -
Page 75: Ptp 500 Example Configuration File
This can be obtained either from the Quick Start Guide supplied with the replacement wireless unit or directly from Motorola. Note that the target MAC address at the other end needs to be changed to ensure that it is using the MAC address of the replaced unit. -
Page 76: Restore Configuration File Pop Up Screen
Web Page Reference Figure 39 Restore Configuration File Pop Up Screen Figure 40 Reset Configuration and Reboot Confirmation Pop-up... - Page 77 Web Page Reference On confirmation the PTP 500 Series Bridge will: Upload the configuration file Perform data integrity checking Erase previous configuration Apply the new configuration Restart After the unit has restarted the entire configuration from the configuration file will now be active. Note: The IP address of the unit may have also been changed.
-
Page 78: Statistics Page
Web Page Reference 8.3.2 Statistics Page The 500 Series bridge statistics page is designed to display some key statistics of the Ethernet Bridge and the underlying wireless performance. Figure 41 System Statistics Wireless Tx Packets: This displays the total number of good packets the bridge has sent for transmission by the wireless interface Wireless Rx Packets: This displays the total number of good packets the bridge has received from the wireless interface. - Page 79 Web Page Reference Ethernet Tx Packets: This displays the total number of good packets the bridge has sent for footnote 16 transmission by the local Ethernet interface. . See “number of packets”. Ethernet Rx Packets: This displays the total number of good packets the bridge has received from the local Ethernet interface.
- Page 80 Web Page Reference Restricted because Installation is armed Restricted because of byte errors on the wireless link Restricted because a DFS channel change is in progress Restricted due to the low Ethernet link speed Limited by the radio conditions Signal Strength Ratio: The Signal Strength Ratio is the ratio of the power received by the Vertical / Horizontal receivers and presented as: max, mean, min, and latest in an histogram format.
-
Page 81: Detailed Counters Page
Web Page Reference 8.3.3 Detailed Counters Page Figure 42 Detailed Counters Page The detailed counters page is subdivided into two columns. Column one presents the detailed statistics for the bridge’s Ethernet interface. Column two relates to the wireless interface. The Counters have the following definitions: Tx &... -
Page 82: Install
Web Page Reference Rx CRC and Align: Total number of packets with CRC or frame alignment errors. Rx Undersize: Total number of packets received that are less than 64 bytes and have a valid CRC. Rx Oversize: Total number of packets received that are greater than the maximum number of bytes with a valid CRC. -
Page 83: Series Bridge Factory Configuration Values
25 dBm. If the local regulatory regime limits the maximum transmit power (EIRP) to less than 25 dBm you should obtain a new license key containing the correct region code from your local distributor or direct from Motorola. Alternatively in the short term, Section 8.3.4.1 you should reduce the maximum transmit power by following the procedures in “Manually Configuring The Wireless Units”. -
Page 84: License Key Data Entry
Web Page Reference any other parameters require modification then it is recommended that the system administrator use the Installation Wizard. A detailed description of the Installation Wizard follows: The 500 Series bridge operational software requires a license key to enable the wireless bridging capability and programs region code specific parameters in to the unit. -
Page 85: Installation Wizard Internet Protocol Configuration
Web Page Reference Figure 44 Installation Wizard Internet Protocol Configuration IP Address:Internet protocol (IP) address. This address is used by the family of Internet protocols to uniquely identify this unit on a network. Subnet Mask:A subnet allows the flow of network traffic between hosts to be segregated based on a network configuration. -
Page 86: Vlan Warning
Web Page Reference Figure 45 VLAN Warning Once complete, click the ‘Submit Internet Protocol Configuration’ button or the ‘Next’ link. 8.3.4.3 Wireless Configuration Step 2 of the installation wizard requires the installer to enter the wireless configuration parameters. Figure 46 5.8 GHz and 5.4 GHz Variants - Installation Wizard Wireless Configuration... - Page 87 Web Page Reference Target MAC Address:It is the MAC Address of the peer unit that will be at the other end of the wireless link. This is used by the system to ensure the unit establishes a wireless link to the correct peer.
- Page 88 Web Page Reference Depending upon the link characteristic that the customer requires, this may very well be the best choice. It increases consistency of link performance and equality in each direction as a trade-off against maximum throughput. Tx Max Power:This attribute controls the maximum transmit power the unit is permitted to use when installing and executing the wireless link.
-
Page 89: Ghz And 5.4 Ghz Variants - Fixed Frequency Operation
Web Page Reference Figure 47 5.8 GHz and 5.4 GHz Variants - Fixed Frequency Operation Installation Tones:Where the use of audio installation tones is not required this control allows the installer to optionally disable the tone generator during the installation process. Once the installer is satisfied with the wireless configuration options then the “Submit Wireless Configuration”... -
Page 90: Ghz And 5.4 Ghz Variants - Installation Wizard Confirm Configuration
Web Page Reference Figure 48 5.8 GHz and 5.4 GHz Variants - Installation Wizard Confirm Configuration If the settings are correct and appropriate, click the “Confirm Configuration, Arm Installation and Reboot” button. The user will now be prompted to confirm the action (Figure 49). -
Page 91: Reboot Confirmation Pop Up
Web Page Reference Figure 49 Reboot Confirmation Pop Up All the attributes are committed to non-volatile memory. Immediately following the write to non- volatile memory the unit is reset. Note: If you have changed the Ethernet parameters you must reconnect using the correct network and address settings. -
Page 92: Ghz And 5.4 Ghz Variant - Disarm Installation
Web Page Reference 8.3.4.4 Disarm Step 5 of the installation wizard is the disarm phase. Figure 50 5.8 GHz and 5.4 GHz Variant - Disarm Installation... -
Page 93: Optional Post Disarm Configuration 2
Web Page Reference Section 8.3.4.3 Once “Wireless Configuration” is complete pressing the “Disarm Installation Agent” button completes the installation process and the audible installation tone will be switched off. If the installer wishes to modify the installation configuration then the ‘Back’ link can be used to access the installation wizard steps described above. -
Page 94: Graphical Install
Web Page Reference 8.3.5 Graphical Install To aid the installation of wireless links two graphical installation aids have been introduced in this 500 Series system version. A PDA installation screen A larger installation screen available from the main HTTP management interface. The design of the installation screen has been deliberately kept simple and uncluttered. -
Page 95: Software Upgrade
Motorola web site. The software image is delivered by Motorola as a compressed zip file. Once the zip file has been downloaded, the user should extract the PTP 500 Series Software image, identifiable by its ‘.dld’ file extension. -
Page 96: Software Upgrade Image Check
Web Page Reference The software image will now be uploaded to the unit. This upload should only take a few seconds. Once complete the image is verified and validated to ensure that no errors occurred during transfer and that the image is valid to run on the current platform. If there are any problems a warning screen will appear. -
Page 97: Software Download Progress Indicator
Web Page Reference Figure 56 Software Download Progress Indicator Figure 57 Software Upgrade Complete When the software image has been written to non-volatile memory Figure 57 will be displayed showing the status of the software upload. Reboot the unit by clicking the “Reboot Wireless Unit” button. You will be asked to confirm this action as shown in Figure Figure 58 Reboot Confirmation Pop Up... -
Page 98: Spectrum Management
Web Page Reference If you cannot communicate with the unit after 120 seconds, this could indicate a problem with the memory update process. Under these circumstances the user should enter “Recovery Mode”, see Section 9 “Recovery Mode”. After the reboot the user should check that the required software image is loaded and running. NOTE: Please ensure that you are upgrading the correct units. - Page 99 Web Page Reference Peak of Means 99.9% Percentile of the Means Mean of Means Peak of Means:is the largest mean interference measurement encountered during the quantization period. The peak of means is similar to the peak of peaks and is useful for detecting slightly longer duration spikes in the interference environment.
-
Page 100: Spectrum Management As Seen From The Master
Web Page Reference Figure 59 Spectrum Management as seen from the Master... -
Page 101: Spectrum Management As Seen From The Slave
Management webpage. It is recommended that the default values are maintained. If the user believes that the performance of the Spectrum Management algorithm requires some modifications this should only be done after consulting your Motorola Point-to-Point distributor or one of the system field support engineers. -
Page 102: Barring Channels
Web Page Reference Hopping Margin:Spectrum Management uses this margin when making a channel hop decision. The target channel has to have an interference level 3 dB (default) better than the current active channel. Hopping Period (not configurable):The Spectrum Management algorithm evaluates the met- rics every ‘Hopping Period’... -
Page 103: Example Spectrum Management Graphic
Web Page Reference Figure 61 Example Spectrum Management Graphic The X-axis shows a stylized view of the selectable wireless channels. It is important to note that adjacent channels on the display have a 10 MHz overlap. The display separates the display of channels to help the clarity of the resultant display. -
Page 104: Active Channel History Screen
Web Page Reference Green Active The channel is currently in use, hosting the Point-to-Point wireless link. Orange Interference The channel has interference above the intererence threshold Blue Available The channel has an interference level below the interference threshold and is considered by the Spectrum Management algorithm suitable for hosting the Point-to-Point link. -
Page 105: Spectrum Management (Fixed Frequency)
Web Page Reference 8.3.7.9 Viewing Historic Spectrum Management Metrics Spectrum Management allows the system administrator to view the results of previous measure- ment quantization periods. Holding down the shift key and clicking the appropriate channel on the local channel spectrum plots activates this feature. This feature is available on both the master and slave web page. -
Page 106: Spectrum Management Fixed Frequency Screen
Web Page Reference Figure 64 Spectrum Management Fixed Frequency Screen Channel barring is disabled in fixed frequency mode; it is not required as dynamic channel hopping is prohibited in this mode. The only controls available to the master are the Statistics Window and Interference Threshold attributes. -
Page 107: Spectrum Management Control - With Operational Restrictions
Web Page Reference Figure 65 Spectrum Management Help Page (Fixed Frequency) 8.3.9 Spectrum Management Control – With Operational Restrictions When operating with Radar Avoidance enabled the following variances in operation apply: The words “Radar Avoidance” are appended to the “Spectrum Management” title at the top Figure 66 Figure of the screen. -
Page 108: Spectrum Management Master Screen With Operational Restrictions
Web Page Reference Figure 66 Spectrum Management Master Screen With Operational Restrictions... -
Page 109: Spectrum Management Slave Screen With Operational Restrictions
Web Page Reference Figure 67 Spectrum Management Slave Screen With Operational Restrictions The colored bar represents the following channel state:... -
Page 110: Spectrum Management Change State Key With Operational Restrictions
Web Page Reference Green Active The channel is currently in use hosting the Point-to-Point wireless link Orange Interference The channel has interference above the interference threshold Blue Available The channel has an interference level below the interference threshold and is considered by the Spectrum Management algorithm suitable for hosting the Point-to-Point link Grey Barred... -
Page 111: Remote Management Page
Web Page Reference 8.3.10 Remote Management Page The Remote Management page (Figure 68) allows the system administrator to configure the remote management of the PTP 500 Series Bridge. 8.3.10.1 Control Access to HTTP Interface The attribute HTTP Access Enabled allows a user to stop any access to a unit via the web interface. -
Page 112: Remote Management
Web Page Reference Figure 68 Remote Management... -
Page 113: Warning When Disabling Http Interface
Web Page Reference Figure 69 Warning when disabling HTTP Interface 8.3.10.5 Diagnostics Alarms A number of diagnostics alarms have been added to allow SNMP agents to receive traps and Section 8.1.1 emails if required. Refer to “Home Page Alarm Display” for a description of all these alarms. -
Page 114: Remote Management - Diagnostic Alarms
Web Page Reference Figure 70 Remote Management – Diagnostic Alarms For a copy of the Motorola proprietary version 1 and version 2 MIB RFCs please consult the installation CD 8.3.10.6 SNMP Configuration SNMP State:The SNMP state attribute controls the creation of the SNMP features. Changing the SNMP state attribute requires a mandatory reboot of the unit. - Page 115 Web Page Reference SNMP Community String:The SNMP community string acts like a password between the networks SNMP management entity and the distributed SNMP clients (600 Series bridge). Only if the community string is configured correctly on all SNMP entities can the flow of management information take place.
-
Page 116: Diagnostics
Web Page Reference SNTP IP Address:The IP Address of the networked SNTP Server. SNTP Port Number:The port number of the networked SNTP server. By convention the default value for the port number is 123. SNTP Poll Interval:The period at which the SNTP client polls the server for time correction updates. -
Page 117: Diagnostic Plotter
Web Page Reference For example, when histogram 1 fills up and starts to overflow the first minute of overflow is analyzed and the maximum, minimum and mean over that minute are computed and inserted into histogram 2. When histogram 2 fills up and starts to overflow the first hour of overflow is analyzed and the maximum, minimum and mean over that hour is computed and inserted into histogram 3. -
Page 118: Csv Download
Web Page Reference Tx Data Rate Aggregate Data Rate The diagnostic plotter uses a novel time representation in the x-axis which compresses the timeline of the plot without sacrificing resolution. The trace selection allows the user to control which traces are plotted. As with other management pages the page refresh period can be used to interactively monitor the wireless link. -
Page 119: Change System Administration Password
Web Page Reference 255784 entries comprises 3600 entries for the first hour, 1440 entries for the next 24 hours and 744 entries for the next 31 days. 8.3.12 Change System Administration Password This page (Figure 73) is used to change the password for the system administration (The factory default is blank). -
Page 120: Software License Key Data Entry
Web Page Reference Figure 74 Software License Key Data Entry The user must enter the license key and click the ‘Validate License Key’ button to check that the key is valid and program it to non-volatile memory. If a valid license key is detected then the user will be presented by a system reboot screen. -
Page 121: Properties
Web Page Reference Figure 76 Reboot Confirmation Pop Up 8.3.14 Properties The web page properties screen allows the user to configure the web page interface. Figure 77 Properties WEB Properties:Disable Front Page Login. Allows access to homepage and status page web pages without forcing a login as the system administrator. -
Page 122: Reboot
Web Page Reference 8.3.15 Reboot The reboot page allows the system administrator to perform commanded reboots of the wireless unit. The reboot page also allows the system administrator to view a list of past reboot reasons. The “Previous Reasons For Reset/Reboot” field has been implemented as a drop down selection box, where the latest reason for reboot is located at the top of the list. -
Page 123: Recovery Mode
Recovery Mode 9 Recovery Mode The Motorola PTP 500 point-to-point wireless Ethernet bridges have a special mode of operation that allows the user to recover a unit from configuration errors or software image corruption. Recovery mode is entered by depressing the Recovery Switch located on the underside of the PIDU Plus while applying mains power, as shown in Section 3.3.2... -
Page 124: Recovery Options Page
Recovery Mode Figure 81 Recovery Options Page The recovery options available are: Upgrade Software Image:This allows the user to reload a software image. This may be the original image if software corruption is suspected or a step back to an old image if an incorrect image has just been loaded. -
Page 125: Upgrade Software Image
Recovery Mode Recovery Reason:Indicates the reason the unit is operating in Recovery mode. Possible reasons are “Recovery button active” or “Invalid or corrupt image” MAC Address:The MAC address shown here is the MAC address of the unit programmed during manufacture. 9.1 Upgrade Software Image The first step (Figure... -
Page 126: Reset Ip And Ethernet Configuration
Recovery Mode Figure 84 Reboot Confirmation Pop Up 9.2 Reset IP and Ethernet Configuration To reset IP and Ethernet configuration back to factory defaults the user should press the “Reset IP and Ethernet Configuration back to factory defaults” button on the “Recovery Options” page (Figure 81). -
Page 127: Ip And Ethernet Erased Successfully Page
Recovery Mode Figure 86 IP and Ethernet Erased Successfully page The user will now be presented with a pop up box asking them to confirm the action Figure Figure 87 Reboot Confirmation Pop Up The unit will now reboot. The unit should now start up in normal mode but with the IP address set to 169.254.1.1 and the Ethernet interface set to auto-negotiate and auto-MDI/MDIX. -
Page 128: Erase Configuration
Recovery Mode 9.3 Erase Configuration To erase the unit’s configuration the user should press the “Erase Configuration” button on the “Recovery Options” page (Figure 81). The user will now be presented with a pop up box asking 88). them to confirm the action (Figure Figure 88 Confirm Erase Configuration Pop Up 89). -
Page 129: Erase Configuration Successful Page
Recovery Mode Figure 89 Erase Configuration Successful Page Figure The user will now be presented with a pop up box asking them to confirm the action Figure 90 Erase Configuration – Reboot Confirmation Pop Up The unit will now reboot. The unit should now start up in normal mode but with all configuration Section 10 erased. -
Page 130: Erase Security Parameters
Recovery Mode 9.4 Erase Security Parameters To erase the unit’s security parameters and to comply with FIPS the user should press the “Zeroise Critical Security Parameters” button on the “Recovery Options” page (Figure 81). The user will 91). now be presented with a pop up box asking them to confirm the action (Figure Figure 91 Confirm Zeroise Security Parameters Pop Up On confirmation the following page will be displayed... -
Page 131: Reboot
Recovery Mode Figure 92 Zeroise Parameters Successful Page 9.5 Reboot This option can be used to reboot the unit. The user will now be presented with a pop up box 93). asking them to confirm the action (Figure Figure 93 Recovery – Reboot Confirmation Pop Up The unit will now reboot. -
Page 132: Fault Finding
Fault Finding 10 Fault Finding If communication has been lost with the unit at the near end of the link then there may be a hardware fault with the wiring, network or hardware. Go to the hardware section below. If communication with the far end of the link is lost then go to the radio section below. -
Page 133: Checking Your Wiring
Fault Finding Differentiating between 1-3 and 4 can be achieved by removing the power for 1 second. Watch the Ethernet indicator for 1 minute while power is removed, if it never flashes then the problem is 1-3. Take the jumper (J905) out of the PIDU Plus and check the current taken by the ODU. This should be 300mA to 1A when starting to run normally. -
Page 134: Radio
Fault Finding 3. Check the cable resistance between pins 1 & 3 at the RJ45. Check against column 3 in Table 4. Check the cable resistance between pins 4 & 7 at the RJ45. Check against column 4 in Table 5. -
Page 135: Lightning Protection
Lightning Protection 11 Lightning Protection EMD (Lightning) damage is not covered under standard warranty The recommendations in this user manual when installed correctly give the user the best protection from the harmful effects of EMD. However 100% protection is neither implied nor possible. 11.1 Overview The idea of lightning protection is to protect structures, equipment and people against lightning by conducting the lightning current to ground via a separate preferential solid path. -
Page 136: Odu Mounted In Zones A And B
Lightning Protection Figure 94 ODU mounted in Zones A and B Figure 95 Showing how the use of a Finial enables the ODU to be mounted inside Zone B... -
Page 137: Detailed Installation
Section 3.3.5. Recommended cables as described in Lightning protection: Motorola PTP-LPU - 2 per link (2 Motorola Kits, part number 2978) Grounding Stake RJ45 screened connectors NOTE: There may be a local regulatory requirement to cross bond the CAT 5e cable at regular intervals to the mast. -
Page 138: Diagrammatically Showing Typical Mast And Wall Installations
Figure 96 Diagrammatically Showing Typical Mast and Wall Installations The Lightning protection Unit should be mounted at the building entry point and must be grounded. Figure 97 shows all the components that are supplied with the Motorola Kit 2978. Figure 97 PTP LPU End Kit... -
Page 139: Testing Your Installation
Lightning Protection 11.3 Testing Your Installation If you have followed the above instructions you will have wired your system to the following diagram: Figure 98 Simplified Circuit Diagram... -
Page 140: Pre-Power Testing
Lightning Protection 11.3.1 Pre-Power Testing Before plugging the RJ45 from the lower LPU (or if not fitted the ODU) into the PIDU, check the following resistances at the RJ45: 1. Check the cable resistance between pins 1&2, 3&6, 4&5 and 7&8 at the RJ45. Check against column 2 in Table 17. - Page 141 Lightning Protection 1. Connect the RJ45 to the PIDU and apply power to the PIDU, the power LED should illuminate continuously. 2. 30 seconds after powering, the Ethernet LED should be observed starting with 10 slow flashes. 3. If there is a network connection the Ethernet LED will then show Ethernet activity. If the system does not operate corrctly, refer to the fault finding below.
-
Page 142: Locating The Fault
Lightning Protection 11.4 Locating the Fault Having identified which of the wiring cores are likely to be connected incorrectly, the location of the faulty cable can be narrowed by disconnecting sections of the drop cable and by unplugging the relevant RJ45 connectors from the LPUs. As a further aid to locating the fault the Ethernet connections are also available inside the LPU. -
Page 143: Wind Loading
Wind Loading 12 Wind Loading 12.1 General Antennas and electronic equipment mounted on towers or pole mounted on buildings will subject the mounting structure to significant lateral forces when there is appreciable wind. Antennas are normally specified by the amount of force (in pounds) for specific wind strengths. The magnitude of the force depends on both the wind strength and size of the antenna. -
Page 144: Capabilities Of The Ptp 500 Series Bridges
Wind Loading Note: When the connectorized version of 500 Series bridge is used with external antennas, the figures from the antenna manufacturer for lateral force should be included to calculate to total loading on the mounting structure. 12.3 Capabilities of the PTP 500 Series Bridges The structure and mounting brackets of the PTP Series systems are capable of withstanding wind speeds up to 151mph (242 kph). -
Page 145: Ptp 500 Series Bridge - Connectorized Model
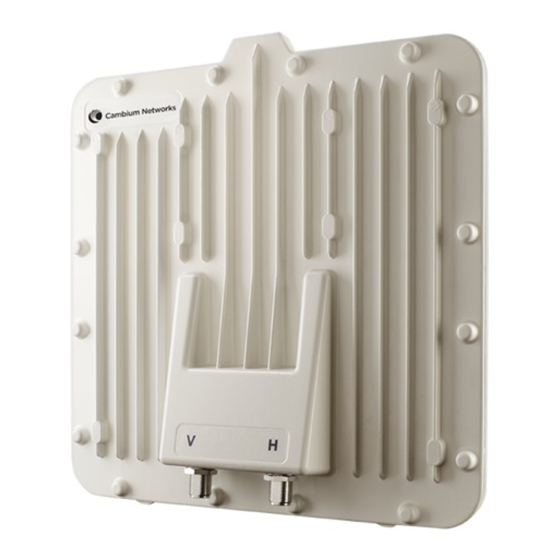
PTP 500 Series Bridge - Connectorized Model 13 PTP 500 Series Bridge - Connectorized Model 13.1 Scope This section details the changes and additional features relevant to the connectorized version of the PTP 500 Series products.. 13.2 Product Description 13.2.1 Hardware The Connectorized PTP 500 Series Bridge is a variant designed to provide the system integrator and installer with the ability to provide extra capability to cope with very difficult radio links compared to the PTP 500 Series Integrated model. -
Page 146: Antenna Choices - 5.4 Ghz
PTP 500 Series Bridge - Connectorized Model In non-FCC regions antenna choice is not restricted but any region specific EIRP limit must be obeyed by reducing the maximum Transmit power , see Table 6 in Section 5.2 “Region Codes”. In FCC regions external antennas from the list in Section 13.6.3 “Antennas for USA / Canada –... -
Page 147: Configuration
PTP 500 Series Bridge - Connectorized Model Figure 101 Connectorized 500 Series bridge Status Page 13.3.2 Configuration Pages The amended Configuration web page is shown below as Figure 102. Please refer to Section 8.3.4 for the definitions of the parameters Antenna Gain, Cable Loss and EIRP. Figure 102 Connectorized 500 Series bridge ‘System Configuration’... -
Page 148: Installation
PTP 500 Series Bridge - Connectorized Model 13.3.3 Installation Pages The installer is prompted to enter the Antenna Gain and Cable Loss (Connectorized PTP 500 Series Figure 103 Bridge to antenna) at each end of the link. The Installation Page(s) is shown as Figure 105. -
Page 149: Connectorized 500 Series Bridge 'Confirm Installation' Page
PTP 500 Series Bridge - Connectorized Model Spectrum Management Control:Is used to configure the 500 Series Bridge Spectrum Man- Section 8.3.7 agement features, see for more details. iDFS is the abbreviation for intelligent Dynamic Frequency Selection, which continually monitors the spectrum looking for the channel with the lowest level of on channel and co-channel interference. -
Page 150: Deployment Considerations
PTP 500 Series Bridge - Connectorized Model EIRP:The Confirm Installation Page displays the EIRP (Effective Isotropic Radiated Power), which describes the strength of the radio signal leaving the wireless unit. This allows the operator to verify that their link configuration (Max Transmit Power, Antenna Gain and Cable Loss) do not cause the link to exceed any applicable regulatory limit. -
Page 151: Link Budget
13.5 Link Budget An estimate of the link budget for a specific application can be obtained by using the Motorola Systems link estimation tools. For more information see the Motorola web site. 13.6 Regulatory Issues Installations must conform to any applicable local regulations for the Equivalent Isotropic Radiated Power (EIRP). -
Page 152: Cable Losses (Fcc Regions Only)
PTP 500 Series Bridge - Connectorized Model 13.6.2 Cable Losses (FCC Regions Only) The FCC approval for the product is based on tests with a cable loss between the units of ap- proximately 1.2dB at 5.8GHz. The use of lower cable losses would result in the installation being outside the FCC rules. -
Page 153: Antennas For Usa / Canada - 5.8 Ghz
PTP 500 Series Bridge - Connectorized Model 13.6.3 Antennas for USA / Canada – 5.8 GHz Manufacturer Antenna Type Gain Flat Parabolic (dBi) Plate Dish Andrew Andrew 1-foot Flat Panel, FPA5250D12-N 23.6 (23.6dBi) Andrew Andrew 2-foot Flat Panel, FPA5250D24-N (28dBi) Gabriel Gabriel 1-foot Flat Panel, DFPD1-52 (23.5dBi) 23.5... - Page 154 PTP 500 Series Bridge - Connectorized Model Manufacturer Antenna Type Gain Flat Parabolic (dBi) Plate Dish Gabriel Gabriel 2-foot High Performance QuickFire 28.2 Parabolic, HQF2-52-N Gabriel Gabriel 4-foot High Performance QuickFire 34.4 Parabolic, HQF4-52-N Gabriel Gabriel 6-foot High Performance QuickFire 37.4 Parabolic, HQF6-52-N Gabriel...
- Page 155 PTP 500 Series Bridge - Connectorized Model Manufacturer Antenna Type Gain Flat Parabolic (dBi) Plate Dish Gabriel Gabriel 4-foot Standard Dual QuickFire 34.7 Parabolic, QFD4-52-N-RK Gabriel Gabriel 6-foot Standard Dual QuickFire 37.7 Parabolic, QFD6-52-N RadioWaves Radio Waves 2-foot Dual-Pol Parabolic, 28.1 SPD2-5.2 (28.1dBi) RadioWaves...
- Page 156 PTP 500 Series Bridge - Connectorized Model Manufacturer Antenna Type Gain Flat Parabolic (dBi) Plate Dish RFS 4-foot Parabolic, SPF4-52AN or 33.9 SPFX4-52AN(33.9dBi) RFS 6-foot Parabolic, SPF6-52AN or 37.4 SPFX6-52AN (37.4dBi) RFS 2-foot HP Parabolic, SDF2-52AN or 31.4 SDFX2-52AN (31.4dBi) RFS 4-foot HP Parabolic, SDF4-52AN or 33.9 SDFX4-52AN (33.9dBi)
-
Page 157: Antennas For Usa / Canada - 5.4 Ghz
PTP 500 Series Bridge - Connectorized Model 13.6.4 Antennas for USA / Canada – 5.4 GHz Manufacturer Antenna Type Gain Parabolic (dBi) Dish Andrew Andrew 2-foot Parabolic, P2F-52 (29.4dBi) 29.4 Andrew Andrew 2-foot Dual-Pol Parabolic, PX2F-52 (29.4dBi) 29.4 Andrew Andrew 3-foot Parabolic, P3F-52 (33.4dBi) 33.4 Andrew Andrew 3-foot Dual-Pol Parabolic, P3F-52 (33.4dBi) -
Page 158: Installation
PTP 500 Series Bridge - Connectorized Model Manufacturer Antenna Type Gain Parabolic (dBi) Dish Gabriel Gabriel 4-foot Standard Dual QuickFire Parabolic, 34.7 QFD4-52-N-RK RadioWaves Radio Waves 2-foot Dual-Pol Parabolic, SPD2-5.2 28.1 (28.1dBi) RadioWaves Radio Waves 2-foot Parabolic, SP2-5.2 (29.0dBi) RadioWaves Radio Waves 3-foot Dual-Pol Parabolic, SPD3-5.2 31.1 (31.1dBi) -
Page 159: Cables And Connectors
LMR400 is a lot more difficult to handle and route than a cable of a type similar to LMR100. Motorola recommends the use of weatherproof connectors – preferably, ones that come supplied with adhesive lined heat shrink sleeve that is fitted over the cable/connector interface. -
Page 160: Mounting The Antennas
PTP 500 Series Bridge - Connectorized Model 13.7.6 Mounting the antennas The Antennas should be mounted according to the manufacturer’s instructions. Actual antenna position will depend on the available mounting positions and link requirements. It may be necessary to mount the antennas 20m apart or at a certain distance from the ground to get the desired results. 13.7.7 Alignment Process When aligning antennas deployed with a Connectorized 500 Series bridge unit it may not be possible to hear the alignment tone emanating from the unit. -
Page 161: Completing The Installation
PTP 500 Series Bridge - Connectorized Model 13.7.10 Completing the Installation The installation should be completed by checking all mounting nuts bolts and screws, securing all cables and weatherproofing the installation. Warning: Finally tightening the antenna mountings may cause the antenna alignment to be altered, due to distortion in the mounting bracket caused by action of tightening. -
Page 162: Additional Lightning Protection
PTP 500 Series Bridge - Connectorized Model Figure 107 Weatherproofing the Antenna Connections 13.8 Additional Lightning Protection Section 11 The following guidelines should be applied in addition to those described in ”Lightning Protection”. 13.8.1 ODU Mounted Outdoors Where the ODU is mounted outdoors and is mounted some distance from the antenna, it is advisable to add additional grounding by utilizing Andrew Assemblies (such as Andrew Type 223158 www.andrew.com) as shown in Figure... -
Page 163: Odu Mounted Indoors
PTP 500 Series Bridge - Connectorized Model 13.8.2 ODU Mounted Indoors Where the ODU is mounted indoors, lightning arrestors should be deployed where the antenna Figure 109. cables enter the building as shown in Figure 109 Lightning Arrestor Mounting The lighting arrestors should be ground bonded to the building ground at the point of entry. Mo- torola recommends Polyphaser LSXL-ME or LSXL lighting arrestors. -
Page 164: Data Rate Calculations
Data Rate Calculations 14 Data Rate Calculations To aid the calculation of data rate throughput, the following plots of throughput verses link range have been produced for all the PTP 500 Series modulation modes, assuming the units are connected using 100 Mbps Ethernet. Please note that only 15 MHz channel bandwidth has been considered and the plots are the same for IP or TDM modes. -
Page 165: Qpsk 0.50 Single Payload
Data Rate Calculations Figure 112 QPSK 0.50 Single Payload Figure 113 QPSK 0.75 Single Payload... -
Page 166: Qam 0.75 Single Payload
Data Rate Calculations Figure 114 16 QAM 0.50 Single Payload Figure 115 16 QAM 0.75 Single Payload... -
Page 167: Qam 0.67 Single Payload
Data Rate Calculations Figure 116 64 QAM 0.67 Single Payload Figure 117 64 QAM 0.83 Single Payload... -
Page 168: Qam 0.75 Single Payload
Data Rate Calculations Figure 118 256 QAM 0.75 Single Payload Figure 119 QPSK 0.50 Dual Payload... -
Page 169: Qpsk 0.75 Dual Payload
Data Rate Calculations Figure 120 QPSK 0.75 Dual Payload Figure 121 16 QAM 0.50 Dual Payload... -
Page 170: Qam 0.75 Dual Payload
Data Rate Calculations Figure 122 16 QAM 0.75 Dual Payload Figure 123 64 QAM 0.67 Dual Payload... -
Page 171: Qam 0.75 Dual Payload
Data Rate Calculations Figure 124 64 QAM 0.83 Dual Payload Figure 125 256 QAM 0.75 Dual Payload... -
Page 172: Aes Encryption Upgrade
Link Encryption is not available in the standard PTP 500 Series system. A license key to enable link encryption can be purchased from your Motorola Point-to-Point Distributor or Solutions Provider. AES can be activated on receipt of the activation on the Motorola Systems Support Page. There are two levels of encryption that are available to purchase:... -
Page 173: Encryption Mode And Key
5. The link will automatically re-establish. 15.1.2 Encryption Mode and Key Entering the license keys only does not initialize AES link encryption. Link encryption can only be enabled via the Configuration or Installation Wizard pages. Motorola recommends that the Figure 127 Configuration page... -
Page 174: Aes Configuration Data Entry Page
AES Encryption Upgrade Figure 127 AES Configuration Data Entry Page Motorola recommends the following process for entering AES link encryption configuration:- 1. Open two browsers, one for each end of the link 2. Navigate to the ‘Configuration’ data entry page for each end of the link 3. -
Page 175: Wireless Link Encryption Faq
AES Encryption Upgrade 5. Submit configuration on both ends of the link, but do not reboot. 6. Reboot both ends of the link Figure 128. The software is designed to allow five seconds so that a user can command both ends of the link to reboot before the wireless link drops. Figure 128 Configuration Reboot Screen 15.2 Wireless Link Encryption FAQ 15.2.1 Encryption data entry fields are not available... -
Page 176: Legal And Regulatory Notices
Legal and Regulatory Notices 16 Legal and Regulatory Notices 16.1 Important Note on Modifications Intentional or unintentional changes or modifications to the equipment must not be made unless under the express consent of the party responsible for compliance. Any such modifications could void the user’s authority to operate the equipment and will void the manufacturer’s warranty. -
Page 177: European Union Notification
This equipment is marked to show compliance with the European R&TTE directive 1999/5/EC. The relevant Declaration of Conformity can be found at www.motorola.com/ptp. European Union (EU) Waste of Electrical and Electronic Equipment (WEEE) direc- tive The European Union’s WEEE directive requires that products sold into EU countries must... -
Page 178: Uk Notification
Legal and Regulatory Notices by the WEEE directive, this cross-out trash bin label means that customers and end-users in EU countries should not dispose of electronic and electrical equipment or accessories in house- hold waste. Customers or end-users in EU countries should contact their local equipment supplier representative or service center for information about the waste collection system in their country. -
Page 179: European Union Notification
EuroNorm EN 301 893. This equipment is marked to show compliance with the European R&TTE directive 1999/5/EC. The relevant Declaration of Conformity can be found at www.motorola.com European Union (EU) Waste of Electrical and Electronic Equipment (WEEE) directive The European Union’s WEEE directive requires that products sold into EU countries must have the... -
Page 180: Exposure
(which may include diskette, CD-ROM, downloadable internet, hardware, or firmware) licensed to you. The word “Documentation” refers to electronic or printed manuals and accompanying instructional aids licensed to you. The word “Product” refers to Motorola’s MOTOwi4âĎć fixed wireless broadband devices for which the Software and Documentation is licensed for use. - Page 181 Title and copyrights to the Software and Documentation and any copies made by you remain with Motorola and its licensors. You will not, and will not permit others to: (i) modify, translate, decompile, bootleg, reverse engineer, disassemble, or extract the inner workings of the Software or Documentation, (ii) copy the look-and-feel or functionality of the Software or Documentation;...
- Page 182 Except as required in 19.6.1.3 above, you will not, during the term of this Agreement or thereafter, use any trademark of Motorola, or any word or symbol likely to be confused with any Motorola trademark, either alone or in any combination with another word or words.
- Page 183 Software will terminate immediately without notice upon a breach of this Agreement by you. Within 30 days after termination of this Agreement, you will certify to Motorola in writing that through your best efforts, and to the best of your knowledge, the original and all copies, in...
- Page 184 16.5.1.17 Entire Agreement This agreement contains the parties’ entire agreement regarding your use of the Software and may be amended only in writing signed by both parties, except that Motorola may modify this Agreement as necessary to comply with applicable laws.
- Page 185 PLACE OF PURCHASE FOR A FULL REFUND. THE FOLLOWING AGREEMENT IS A LEGAL AGREEMENT BETWEEN YOU (EITHER AN INDIVIDUAL OR ENTITY), AND MOTOROLA, INC. (FOR ITSELF AND ITS LICENSORS). THE RIGHT TO USE THIS PRODUCT IS LICENSED ONLY ON THE CONDITION THAT YOU AGREE TO THE FOLLOWING TERMS.
-
Page 186: Limit Of Liability
Mark Adler madler@alumni.caltech.edu 19.6.2 Hardware Warranty in U.S. Motorola U.S. offers a warranty covering a period of one year from the date of purchase by the customer. If a product is found defective during the warranty period, Motorola will repair or replace the product with the same or a similar model, which may be a reconditioned unit, without charge for parts or labor. -
Page 187: Specifications
Specifications 17 Specifications 17.1 System Specifications 17.1.1 Wireless 5.4GHz Variant Radio Technology Specification RF Band 5.470-5.725GHz Channel Selection By dynamic frequency control and manual intervention. Automatic detection on start-up and continual adaptation to avoid interference. Dynamic Frequency Control Initial capture 10-15 sec. Out of service on interference 100 ms. -
Page 188: Wireless 5.8Ghz Variant
Specifications 17.1.2 Wireless 5.8GHz Variant Radio Technology Specification RF Band 5.725-5.850GHz Channel Selection By dynamic frequency control and manual intervention. Automatic detection on start-up and continual adaptation to avoid interference. Dynamic Frequency Control Initial capture 10-15 sec. Out of service on interference 100 ms. -
Page 189: Management
Specifications 17.1.3 Management Management Specification Status Indication Power status Ethernet Link Status Data activity Installation Web server and browser for setup Audio tone feedback during installation , plus graphical installation tool suitable for laptop and PDA computing devices Web server for confirmation Radio Performance and Management Via web server and browser, SNMP Alarms Via configurable email alerts, SNMP... -
Page 190: Physical
Specifications 17.1.5 Physical Integrated Specification Dimensions Width 14.5” (370mm), Height 14.5” (370mm), Depth 3.75” (95mm) Weight 12.1 lbs (5.5 Kg) including bracket Connectorized Specification Dimensions Width 12” (305mm), Height 12” (305mm), Depth 4.01” (105mm) Weight 9.1 lbs (4.3 Kg) including bracket 17.1.6 Powering Power Supply Separate power supply unit (included) -
Page 191: Emc Immunity Compliance
Specifications Region Specification FCC Part 15 Class B Canada CSA Std C108.8, 1993 Class B Europe EN55022 CISPR 22 17.4 EMC Immunity Compliance Top-level Specification ETSI 301-489. Specification Comment EN 55082-1 Generic EMC and EMI requirements for Europe EN 61000-4-2: 1995 Electro Static Discharge Testing will be carried to ensure immunity to (ESD), Class 2, 8 kV air, 4 kV contact 15kV air and 8kV contact... -
Page 192: Radio Certifications - 5.8 Ghz Variant
Specifications 17.5.2 Radio Certifications - 5.8 GHz Variant Region Specification (Type Approvals) FCC Part 15.247 Canada RSS 210 Issue 7 IR 2007 Eire Comreg 03/42 17.6 Environmental Specifications Category Specification Temperature ODU -40 F (-40 C) to 140 F (+60 C) PIDU Plus (indoor) 32 F (0 C) to 104 F (+40 C) PIDU Plus (outdoor)-40 F (-40 C) to 140 F (+60 C) Wind Loading 150mph Max (242 kmh). -
Page 193: System Connections
Specifications 17.7 System Connections 17.7.1 PIDU Plus to ODU and ODU to Network Equipment Connections Figure 129 Cable Connection Diagram (T568B Color Coding) -
Page 194: Faqs
Indoor Unit could result in equipment damage and will invalidate the safety certification and may cause a safety hazard. Why has Motorola launched the 500 Series bridge? The 500 Series bridge is the first product to feature Multiple-Input Multiple-Output (MIMO). The PTP 500 Series solutions allow wireless connections of up to 200km (124 miles) in near line-of-sight conditions and up to 10km (6 miles) in deep non-line-of-sight conditions. - Page 195 FAQs that is clear of interference. In operation 500 Series bridge continuously monitors the spectrum to ensure it is operating on the cleanest channel. How does the 500 Series bridge integrate into my data network?The 500 Series bridge acts as a transparent bridge between two segments of your network. In this sense, it can be treated like a virtual wired connection between the two buildings.
-
Page 196: Glossary
Glossary 19 Glossary Advanced Encryption Standard Address Resolution Protocol Automatic Repeat reQuest BPSK Binary Phase Shift Keying Channel Availability Check Direct Current Multiplex Dynamic Frequency Selection EIRP Equivalent Isotropically Radiated Power Earth Movers Distance ETSI European Telecommunications Standards Institute Frequently Asked Question Federal Global Positioning System HTTP... - Page 197 Glossary Unshielded Twisted Pair VLAN Virtual Local Area Network...
- Page 198 Telephone Support: +1 877 515-0400 (Worldwide) +44 803 234 4640 (UK) www.motorola.com/ptp Motorola, the stylized M Logo and all other trademarks indicated as such herein are trademarks of Motorola, Inc. Reg. US Pat & TM. Office. All other product or service names are the property of their respective owners. C 2008...