
Related Manuals for Motorola DSR-4410MD


Summary of Contents for Motorola DSR-4410MD
- Page 1 DSR-4410MD Commercial Satellite Multiplex Decrypter Operator Guide Document No.: 536006-001 Connected Home Solutions...
- Page 2 Copyright © 2007 Motorola, Inc. point of cable entry as practical. MOTOROLA and the Stylized M Logo are registered in the US Patent & Trademark Office. All other product or service names are the property of their respective owners. Dolby Digital is a registered trademark of Dolby Laboratories.
-
Page 3: Table Of Contents
Chapter 2 Connecting the DSR-4410MD......................5 Unpacking And Connecting The DSR-4410MD ................5 Unpacking And Mounting ........................7 Connecting a DSR-4410MD for L-Band Input ................... 7 Chapter 3 Operating the DSR-4410MD ......................9 Using The Front Panel ........................10 Navigating The Menus ........................ 11 How To Use The Menus ...................... - Page 4 MAC Address Menu........................42 IP PORT 10/100 DHCP Menu ....................42 IP Address Menu ........................43 Subnet Mask Menu ........................43 IP Gateway Menu ........................44 GigE Menus ..........................44 GigE MAC Address Menu ......................44 GigE IP Address Menu ....................... 45 GigE Subnet Mask Menu ......................
-
Page 5: Introducing The Dsr-4410Md
Future Release Key Features • A variable front-end allows the DSR-4410MD to be used in either full or partial transponder mode. • Manual tuning for either ASI input or two L-band inputs (ports). ®... - Page 6 • Ethernet port for SNMP control and/or IP data pass through. • Memory to recall the operating configuration when power sags or is removed. • Security features include Motorola DigiCipher II security technology. • A two line, 40-character front panel with a time-out backlit Liquid Crystal Display (LCD).
- Page 7 Introducing the DSR-4410MD Digital Satellite Receiver DTMF Dual-Tone Multi-Frequency Digital Video Broadcasting Electronic Industries Association Entitlement Management Message Federal Communications Commission GigE Gigabyte Ethernet Ground H/LHP Horizontal/Left-Hand Polarization Internet Protocol Light Emitting Diode Low-Noise Block Converter MPEG Motion Picture Experts Group...
-
Page 9: Connecting The Dsr-4410Md
Connecting the DSR-4410MD Unpacking And Connecting The DSR-4410MD Cable connections, described in this chapter, are made to the back panel of the DSR-4410MD. Ethernet and GigE Ports RF Input Primary Relay/Alarm Ports 0 and 1 Audio Out RF IN 0... - Page 10 ASI OUT 2 VIDEO OUT CUE TONE ALARM 10/100 SECONDARY AUDIO GND GND Q+Q- COM NC GND G ND Note: Additional audio and data connectors may be ordered through Phoenix Contact part numbers 1840447 / 1840528. Figure 2-2: DSR-4410MD Back Panel (Detailed)
-
Page 11: Unpacking And Mounting
• For installations using both polarities of a satellite, connect one LNB coax to each port. The polarity is programmable for the DSR-4410MD. The default polarity for Port 0 is ---. To view video and On-Screen Diagnostics (OSD) during installation, connect the OSD Video Output on the DSR-4410MD to a 75-ohm video monitor. - Page 12 DSR-4410MD to the device receiving the tones. The cautions on cable and grounding noted in the audio instructions also apply to cue tones. Plug the DSR-4410MD into a power source. Verify that the LCD screen is lit. Proceed with the installation using the front panel menus.
-
Page 13: Operating The Dsr-4410Md
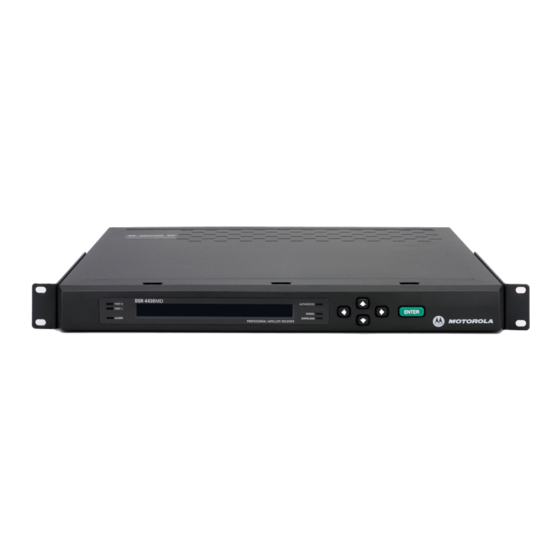
Operating the DSR-4410MD All operations described in this chapter require use of the front panel, as shown in Figure 3-1. Port 0 LCD Screen Authorized Arrow Buttons ENTER Button Port 1 Signal Alarm Download Figure 3-1: DSR-4410MD Front Panel DSR-4410MD... -
Page 14: Using The Front Panel
Using The Front Panel The front panel LCD screen displays a series of menus that can be used to configure and control the system. The name of the current menu is always in the upper left corner of the screen for easy identification. •... -
Page 15: Navigating The Menus
Operating the DSR-4410MD Navigating The Menus Even though the keypad options shown on the LCD screen may change for each menu and for each field, the control buttons basically do the same thing. The user may want to practice on a screen to become familiar with how the buttons work. -
Page 16: How To Use The Menus
S ta tu s D ia g The DSR-4410MD allows the user to scroll only to menus that are in the same group. To scroll to a menu that is in a different menu group, return to the main top-... -
Page 17: Overview Of The Lcd Panel Menu Tree
Operating the DSR-4410MD Overview of The LCD Panel Menu Tree Pressing the ENTER button when the cursor is on a menu name causes the cursor to return to the main, top level menu. The charts on the following pages show the menus organized into five main groups: Installation menus, Channel selection menus, Status menus, IP menus (including the GigE), and Diagnostic menus. - Page 18 Status Menus Channel Selection Menus STATUS1 FrontPanel Input Type CHANNEL Chnl Xpndr Local Control L-Band 00000 0000 (Not in map) MPEG SELECT Program STATUS2 Source Channel Quality 00000 ---- AUD1LANG Dspl Left Right InputMode STATUS3 Signal_Quality ||||||||||||||||||......AUD2LANG Dspl Left Right InputMode STATUS4...
- Page 19 Operating the DSR-4410MD Diagnostic Menus DIAG Menus Fact1 AUDIO TEST SIGNAL L1/R1 L2/R2 VIDEO TEST SIGNAL Pattern VITS Waveform Transmitted AD INSERTION TEST Cue Tone DSR-4410MD...
-
Page 20: Installation Menus
With the blinking cursor at the upper left, press ENTER button to return to the main top-level menu. Press the 34 buttons until the cursor is at the Install label, and press the ENTER button. The DSR-4410MD displays the previously selected sub-menu. Manual Tune Menu...