Table of Contents
Advertisement
Quick Links
Advertisement
Table of Contents

Related Manuals for D-Link DPH-400SE


Summary of Contents for D-Link DPH-400SE
-
Page 2: System Requirements
If any of the above items are missing, please contact your reseller. ©2007 D-Link Systems, Inc. All rights reserved. Trademarks or registered trademarks are the property of their respective holders. Software and specifications subject to change without notice. -
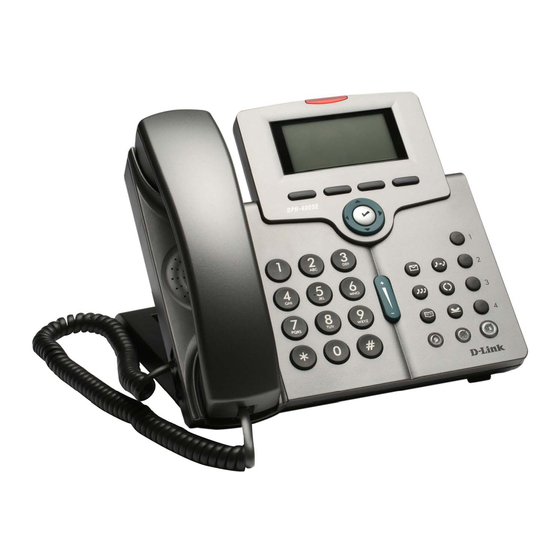
Page 3: Hardware Overview
The DPH-400S is a SIP-based Internet desktop phone that connects to a digital network rather than the traditional PSTN line. It can perform VoIP calls and data transfer for network users. The DPH-400 series includes DPH-400SE (PoE built-in), DPH-400S (no PoE), and DPH- 400EDM (Expanded Dial Module). Front View... - Page 4 LCD screen. Soft keys Each key function depends on its corresponding content displayed on the LCD screen at that time. Navigator OK key It is used to confirm a setting or dial a phone number D-Link DPH-400S(SE) Quick Install Guide...
- Page 5 IP phone. The key lights red to indicate that the phone is muted. Headset key The Headset key is used to activate/de-activate the Headset. A green LED is associated to indicate its status. D-Link DPH-400S(SE) Quick Install Guide...
- Page 6 Volume Control Key handset, speaker, and headset output volume is adjusted. [1], [2]…[9], [*], [0], [#]: The numeric keypad for dialing numbers Built-in Microphone The built-in microphone is on the front edge of the IP phone. D-Link DPH-400S(SE) Quick Install Guide...
- Page 7 PC port RJ-45 Jack 100/10Mbps Ethernet port for connecting to a PC or Notebook Power Jack If a power source from an adapter is required, please use the standard power adapter supplied in the package (5VDC/2A). D-Link DPH-400S(SE) Quick Install Guide...
- Page 8 While in on-hook dialing Headset key Green mode or hands-free mode using a headset In normal operation mode All LEDs for Steady During system booting system status Green Blinking When system booting failed or critical error D-Link DPH-400S(SE) Quick Install Guide...
-
Page 9: Installation
Follow the figure below to connect the ports on the phone to different devices. Handset Ethernet Ethernet Cable Ethernet Cable If your Ethernet switch supports PoE(Power over Ethernet), the DPH-400SE IP phone can be powered thru the LAN port. A power adapter is not required. D-Link DPH-400S(SE) Quick Install Guide... -
Page 10: Getting Started
Getting Started When the DPH-400SE/DPH-400S IP phone is registered successfully to a SIP server, then you can start the phone operations. At first, please refer to the LCD screen on the IP phone to configure the settings. Basic Phone Operations... - Page 11 Caller ID is known (using the Redial soft key). Press the Cancel soft key to exit the Missed Calls menu. Press the left navigator control key 2 times to exit the menu. D-Link DPH-400S(SE) Quick Install Guide...
- Page 12 Use the navigator control keys to select the item ▲▼ 18.Admin and confirm with the OK key Enter “1234” for the Admin Password and confirm with the OK key The LCD screen displays the Admin Setting menu D-Link DPH-400S(SE) Quick Install Guide...
- Page 13 Note: You may use the Backsp soft key to delete the previous character. Press the left arrow key 5 times to exit the LCD menu. Select ◄ Yes and press the OK key to save the settings. D-Link DPH-400S(SE) Quick Install Guide...
- Page 14 DHCP feature. Select On and confirm with the OK key Press the left arrow key 5 times to exit the LCD menu. ◄ Select Yes and press the OK to save the settings. D-Link DPH-400S(SE) Quick Install Guide...
- Page 15 ▲▼ information you would like ▲▼ to know. Press the key 4 ▼ times to show the IP address of your IP phone. Press the left arrow key 3 ◄ times to exit the menu. D-Link DPH-400S(SE) Quick Install Guide...
- Page 16 IP address if your phone is using a dynamic IP address or if you have changed the default IP address.) - You will be prompted to enter a username and a password. The default username is “user” and the default password is “1111”. D-Link DPH-400S(SE) Quick Install Guide...
-
Page 17: Web Configuration Interface
Web Configuration Interface This page allows you to check the status of the phone and configure the settings of the phone. Refer to the User's Manual for more information. D-Link DPH-400S(SE) Quick Install Guide... - Page 18 •802.1x Items - System •Administer Settings •Time Settings Items - Phone •Volume Control •Tones Used •Phone Parameters •Speed Dial Entry Settings •Line Button Settings SW Upgrade •Upgrade by http •Profile Items •Server Items •Firmware Items D-Link DPH-400S(SE) Quick Install Guide...
- Page 19 - Line1~ 4 Personal •Call Forward Settings •Caller Blocking Settings Phonebook Phonebooks 1-10 •Phonebook Entry 001-200 D-Link DPH-400S(SE) Quick Install Guide...
- Page 21 2007/10/03 Ver.1.00 381-001445R...