Table of Contents
Advertisement
Quick Links
Advertisement
Table of Contents

Related Manuals for D-Link DPH-400S


Summary of Contents for D-Link DPH-400S
- Page 1 Table of Contents D-Link DPH-400S(SE) User Manual...
-
Page 2: Table Of Contents
Review missed phone calls .............19 ................53 ........20 HONEBOOK IEWING HONE ETTING NFORMATION View information about the IP Phone ..........20 TROUBLESHOOTING ..............54 ADVANCED OPERATIONS............22 CONTACTING TECHNICAL SUPPORT ........55 ..............22 ETWORK ETTINGS ............24 DVANCED PERATIONS 3-way conference call..............24 D-Link DPH-400S(SE) User Manual... -
Page 3: Product Overview
• Wall-mounting template sheet • D-Link Warranty Guide Caution: Using a power supply with a different voltage rating than the one included with the DPH-400S(SE) will cause damage and void the warranty for this product. System Requirements • 10/100Mbps Ethernet network environment •... -
Page 4: Introduction
Introduction The DPH-400S(SE) IP Phone is an Internet Telephony desktop phone that connects to a digital network rather than the traditional PSTN line. Basically, it needs to be connected to a LAN enterprise network and works as an office phone. Like a traditional office telephone, it can deliver good voice quality and perform a great number of PBX-equivalent call features. - Page 5 When you receive a call, the caller's phone number is shown on the screen if the caller didn’t choose to hide his number and if the network supports the Caller ID feature. The IP Phone will display both the Caller ID and the User ID of the caller if it is available. D-Link DPH-400S(SE) User Manual...
-
Page 6: Features And Specifications
-Supports VAD (Voice Auto Detection) and CNG (Comfort Noise Generation) -Supports AGC (Automatic Gain Control) -Volume adjustable for Handset, Headset, Speakerphone and Speakerphone Ring output. -Support G.165 16ms line Echo Cancellation (AEC). -Adaptive Jitter Buffering function supported. D-Link DPH-400S(SE) User Manual... - Page 7 This equipment complies with the requirements relating to electromagnetic compatibility, EN55022 class B for ITE and EN 50082-1. This meets the essential protection requirements of the European Council Directive 89/336/EEC on the approximation of the laws of the Member States relating to electromagnetic compatibility. D-Link DPH-400S(SE) User Manual...
-
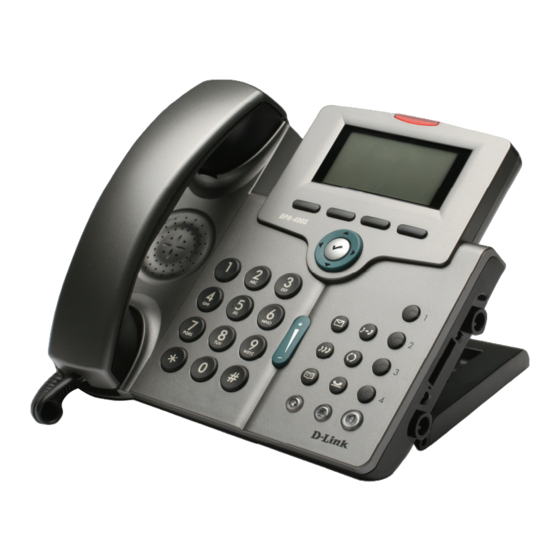
Page 8: Hardware Overview
1,2,3,4 Number keys This Speaker key is used to turn on and off the hands-free dial or talk feature. A green LED is associated to indicate its status. Speaker key D-Link DPH-400S(SE) User Manual... - Page 9 Handset/Speaker/Headset output volume is adjusted. Volume Control key [1], [2]…[9], [*], [0], [#]: The numeric keypad is used for dialing numbers. Built-in Microphone The built-in microphone is on the front edge of the IP phone. D-Link DPH-400S(SE) User Manual...
-
Page 10: Leds And Lcd Screen Indicators
When system booting failed or critical error The following figure shows the format of the LCD screen. There are 4 soft keys used to operate the LCD display. The display format will be different for other menus or status settings. D-Link DPH-400S(SE) User Manual... - Page 11 2. When you enable DND, “*DND* “ is displayed instead of the Date & Time on the top of the LCD Screen. 3. When you enable Phone Lock, “ PHONE LOCKED….” Is displayed on the LCD Screen. You can input user password or administrator password to unlock the phone. D-Link DPH-400S(SE) User Manual...
-
Page 12: Rear View And Connections
Section 1 - Product Overview Rear View and Connections Part Name Description of function Wall-Mount Hole Used to mount the phone on the wall. D-Link DPH-400S(SE) User Manual... - Page 13 RJ-45 10/100Mbps Ethernet port for connecting to an IP network RJ-45 10/100Mbps Ethernet port for connecting to a PC or Notebook PC port Power Jack If a power source from a power adapter is required, please use the power adaptor supplied in the package (5VDC/2A). D-Link DPH-400S(SE) User Manual...
-
Page 14: Installation
Set up the stand and place the phone on the desk (see steps below). Step 1 Step 2 Step3 ° ° ° Angle Angle Angle Use the handset cord to connect the handset to the handset port on the left side of the phone. D-Link DPH-400S(SE) User Manual... - Page 15 Connect the external power adapter to the phone. For the DPH-400SE, if your Ethernet switch supports PoE (Power over Ethernet), the phone can be powered through the LAN port, so there is no need to connect the power adapter. Finally, connect the power adapter to a power outlet. D-Link DPH-400S(SE) User Manual...
-
Page 16: Configure Your Ip Phone For Service
The menu to configure your IP Phone is as follows: You can navigate through the menu with the navigator control keys . The following sections will describe how you can setup your IP Phone through this menu. D-Link DPH-400S(SE) User Manual... -
Page 17: General Operations
The Mute key lights red. At this point, you can speak and the other party will not hear anything. Adjust the voice During a conversation, if the voice volume is too low or too high, you may adjust it. volume during a conversation Press the volume control key to adjust the volume. D-Link DPH-400S(SE) User Manual... -
Page 18: Call Record
Use the navigator control keys to review the different dialed calls. You may choose to redial the number (using the Dial soft key). Press the Cancel soft key to exit the menu. Press the left navigator control key 2 times to exit the Configuration menu. D-Link DPH-400S(SE) User Manual... -
Page 19: Review Received Calls
Use the keypad to enter a line number (1-4) and confirm with the OK key calls Select the item Call Record to enter the Call logs menu. Press the OK key to confirm the selection. Call Record D-Link DPH-400S(SE) User Manual... -
Page 20: Viewing Phone Setting Information
Use the navigator control keys to select the item 5.Info and confirm with the OK key to enter the Info Phone menu. Info Use the navigator control keys to choose the information you would like to review. Press the left navigator control key 3 times to exit the Configuration menu. D-Link DPH-400S(SE) User Manual... - Page 21 The following information can be reviewed from the LCD screen of your IP Phone: Company Model Name Firmware Number MAC Address IP Address Subnet Mask Default Gateway DHCP Status DNS Server SIP Proxy Server SIP Outbound Proxy Registrar Server Outbound Registrar Register Status Service Number D-Link DPH-400S(SE) User Manual...
-
Page 22: Advanced Operations
“1234” for the Admin Password and confirm with the OK key The LCD screen displays the Admin Setting menu. Select the item Network and then the item Network Type. Select Static IP. The LCD screen prompts you the enter the IP address of your IP Phone. D-Link DPH-400S(SE) User Manual... - Page 23 The LCD screen prompts you to select On or Off for the DHCP feature. Select On and press the OK key to confirm. Press the left arrow key 5 times to exit the menu. Select Yes and press the OK key to save the settings. D-Link DPH-400S(SE) User Manual...
-
Page 24: Advanced Call Operations
Use the keypad to dial the phone number. You may also choose a phone number from the phonebook or from your speed dial list. The IP phone will call the other party. D-Link DPH-400S(SE) User Manual... - Page 25 You may talk with the transfer target prior to letting them join the conference. When you are ready to start the conference, press the Conference key The LCD screen will show that the two calls are in a conference. D-Link DPH-400S(SE) User Manual...
-
Page 26: Call Hold
Use the keypad to dial the phone number. You can also choose a phone number from the phonebook or from your speed dial list. The call will be transferred automatically to the other party. You can hang up the phone. D-Link DPH-400S(SE) User Manual... -
Page 27: Call Transfer (Attended Transfer)
Dial the transfer target phone number. You can talk with the transfer target prior to transferring the call. When you are ready to transfer the call, press the transfer key. You can hang up the phone. D-Link DPH-400S(SE) User Manual... -
Page 28: Phonebook
Find the number you would like to delete, then press the Del soft key. Press the Phonebook key Dial a Phonebook number Find the number you would like to dial using the navigator control keys, then press the Dial soft key to dial the number. D-Link DPH-400S(SE) User Manual... -
Page 29: Speeddial
If you want to add a new number, find an empty position, then press the Edit soft key to enter the new number. If you want to edit an existing number, find the number you would like to edit using the navigator control keys, then press the Edit soft key to edit the number. D-Link DPH-400S(SE) User Manual... -
Page 30: Speeddial (Delete A Number)
Pick up the handset or press a line button (if you want to dial hands-free). Dial a Press the SPD (SpeedDial) soft key. SpeedDial number Enter the SpeedDial number you would like to dial using the keypad. D-Link DPH-400S(SE) User Manual... -
Page 31: Caller Blocking
If you want to add a new number, find an empty position, then press the Edit soft key to enter the new number. If you want to edit an existing number, find the number you would like to edit using the navigator control keys, then press the Edit soft key to edit the number. D-Link DPH-400S(SE) User Manual... -
Page 32: Caller Blocking (Delete A Number)
You may directly enter the desired number using the keypad or use the navigator control keys to browse all the blocked Caller ID numbers. Find the number you would like to delete, then press the Del soft key. D-Link DPH-400S(SE) User Manual... -
Page 33: Call Forward
Enter the phone number and confirm with the OK key Forward Number Note: If you select No Answer Forward, you will also be prompted to enter the timeout value (No Answer Time) in seconds before redirecting the call to the forward number. D-Link DPH-400S(SE) User Manual... -
Page 34: Auto Answer
Use the navigator control keys to select the item 6.DND and press the OK key to enter the Do Not Disturb menu. Use the navigator control keys to turn on or off the DND feature and confirm with the OK key D-Link DPH-400S(SE) User Manual... -
Page 35: Phone Lock
Use the navigator control keys to select the item 10.Phone Lock and press the OK key to enter the Phone Lock menu. Phone Lock Use the navigator control keys to turn the phone lock On or Off. D-Link DPH-400S(SE) User Manual... -
Page 36: Reset To Factory Default Settings
Use the keypad to enter the Admin password and confirm by pressing the OK key . The default settings password is 1234. Select the item 8.Reset. The LCD screen prompts you to confirm the selection. Reset Select Yes and confirm by pressing the OK key to reset the settings. D-Link DPH-400S(SE) User Manual... -
Page 37: Configuration
Section 5 - Configuration CONFIGURATION Web-based Configuration This section will show you how to configure your new D-Link IP Phone using the web-based configuration interface. The default network settings are the following: Default IP address/ Subnet mask: 192.168.1.10 / 255.255.255.0 Default Gateway: 192.168.1.1... -
Page 38: Information
The INFORMATION page displays a summary overview of your IP Phone, including the device software version and a summary of your Internet configuration. Click on the Reboot button to reboot the system. Click on the Logout button to logout system and close the browser window. D-Link DPH-400S(SE) User Manual... -
Page 39: Setup
EAP-TLS, or OFF. you only need to input the 802.1x Identity 802.1x Type and 802.1x Password. If you select EAP-TLS, you need to select the CA and Private key file and upload them to the phone. D-Link DPH-400S(SE) User Manual... - Page 40 Click on the Logout button to logout and close the browser window. Note: You have to reboot your phone in order to enable any changed network settings. Please go to the Information page to reboot your Phone. D-Link DPH-400S(SE) User Manual...
- Page 41 Set the Time Format Time Zone Set the Time Zone Click Save Settings to save changes in this page. Click Cancel to discard all changes in this page. Click Logout to logout and close the browser window. D-Link DPH-400S(SE) User Manual...
-
Page 42: Phone Settings
Lock or unlock the phone Enable Call Waiting Turn on/off Call Waiting Enable CLIP Turn on/off CLIP Enable CLIR Turn on/off CLIR Enable Hold Reminder Turn on/off Hold Reminder Enable Silence Turn on/off Silence Suppression Suppression D-Link DPH-400S(SE) User Manual... - Page 43 Click on the Save Settings button to save changes in this page. Click on the Cancel button to discard all changes in this page. Click on the Logout button to logout and close the browser window. D-Link DPH-400S(SE) User Manual...
- Page 44 Section 5 - Configuration EDM SETTINGS After you connect the DPH-400EDM to DPH-400S(SE), you will be able to see this EMD setting page on the web-based configuration interface. This setting page shows that DPH-400EDM supports a maximum of 22 speed dial settings and 22 feature keys settings.
-
Page 45: Sw Upgrade
HTTP/TFTP/FTP. Here is the description of each field from the screen: Select Firmware You can download the latest firmware from D-Link’s website. Click Browse to find the file on your computer. Click Upload to load the new firmware to the phone, and wait a moment, don’t close... - Page 46 Hint: If there are errors when you update the software and the phone doesn’t work, please hold the first soft key when rebooting. Then you can see the hint on the LCD screen. The phone will update the software from 192.168.1.11 after pressing the navigator OK key. D-Link DPH-400S(SE) User Manual...
-
Page 47: Sip
Phone Number User Name User Name Authorized ID Authorized ID Authorized Password Authorized Password The called phone will show Enable Caller ID your display name Display Name Display Name Locating SIP Server Enable Locating SIP Server D-Link DPH-400S(SE) User Manual... - Page 48 Click on the Save Settings button to save changes in this page. Click on the Cancel button to discard all changes in this page. Click on the Logout button to logout and close the browser window. D-Link DPH-400S(SE) User Manual...
- Page 49 Click on the Save Settings button to save changes in this page. Click on the Cancel button to discard all changes in this page. Click on the Logout button to logout and close the browser window. D-Link DPH-400S(SE) User Manual...
- Page 50 “Prefix Entry Type” is “Add” Prefix Entry Setting mode, the “Prefix Entry Replace” will be added to the “Prefix Entry Pattern”. For example, the “Prefix Entry Pattern” is 220 and the “Prefix Entry Replace” is 210. When D-Link DPH-400S(SE) User Manual...
- Page 51 The following are a description of the syntax used for each pattern: Symbol Description 0, 1, 2, 3, 4, 5, 6, 7, 8 ,9 Digit symbol Wildcard matching any symbol *, #, . Other keypad symbol 0 or more of the preceding symbol or [] expression D-Link DPH-400S(SE) User Manual...
- Page 52 : Lets you dial any 5-digit number starting with 42 or any 8-digit number starting with a 0 followed by 2 or 3. 4X+9 : Let’s you dial any n-digit number starting with 4 and ending with 9. D-Link DPH-400S(SE) User Manual...
-
Page 53: Phonebook
Then press on the “Dial” button in order to start dialing. Click on the Save Settings button to save changes in this page. Click on the Logout button to logout and close the browser window. D-Link DPH-400S(SE) User Manual... -
Page 54: Troubleshooting
I cannot connect to the Check if the Ethernet cable is properly connected. configuration website of the IP Check the IP address of the IP phone. Check if your firewall/NAT settings are correct. phone D-Link DPH-400S(SE) User Manual...