Table of Contents
Advertisement
Quick Links
Advertisement
Table of Contents

Related Manuals for D-Link DPH-850S


Summary of Contents for D-Link DPH-850S
-
Page 2: Table Of Contents
Contents 1 INTRODUCTION................ 4 1.1 A IP V DPH-850S O ............4 NDROID IDEO HONE VERVIEW 1.2 P ................5 HONE COMPONENT DESCRIPTIONS 1.3 T ................7 NSTALLATION OF BACKPLANE 1.4 I ..................7 NTERFACE INTRODUCTION 1.5 T ................... 9... - Page 3 3.9.2 Web server ........................45 3.9.3 Menu password......................46 3.9.4 Factory reset.........................47 3.9.5 Reboot..........................47 3.10 A ......................48 UDIO 3.10.1Audio ...........................48 3.10.2 Audio param.......................48 3.11 V ......................49 IDEO 3.11.1 Video param.......................49 3.11.2 Bandwidth ........................50 3.12 C ....................51 ALL FIREWALL 4 PHONE APPLICATION...............53 4.1 P ......................
- Page 4 6.1.4 Language & keyboard....................89 6.1.5 Date & time........................89 6.2 V IP S ....................90 ETTINGS 6.3 C ....................94 ALL SETTINGS 6.4 A .................... 96 DVANCED SETTINGS 6.4.1 Location & security.......................96 6.4.2 Privacy ..........................96 6.4.3 Applications........................97 6.4.4 Accounts & sync ......................97 6.4.5 SD card and memory....................97 6.4.6 Search...........................98 6.5 A...
-
Page 5: Introduction
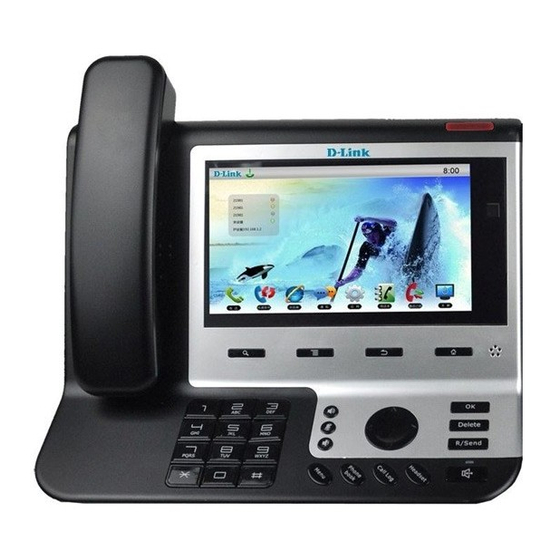
1 Introduction 1.1 Android IP Video Phone DPH-850S Overview Item Description DPH-850S IP Video Phone with display and DPH-850S Phone keypad. Power supply for telephone. Power Adapter Network Cable Used to access network for the phone. Make phone calls with the phone’s basic Handset functions. -
Page 6: Phone Component Descriptions
1.2 Phone component descriptions Function Search key. Tap the key and you can enter the search interface. Menu key. You can browse and accomplish all functions of the phone through pressing this key. Return key. Press this button in the detailed interface, it will return to the previous interface;... - Page 7 When the phone call is ringing, press this button to turn off the ring tips. Confirm key. Delete key. R/Send key. Use the key to dial the last call number. It also could be used to make a phone call by sending a phone number.
-
Page 8: The Installation Of Backplane
1.3 The Installation of backplane Set the telephone The back plate is horizontally placed in the telephone at the bottom, and makes the phone and joint part of the two screws tightened, right now its steady placed on the desktop. 1.4 Interface introduction Name Meaning... - Page 9 Input: 220V AC DC Power Interface Output: 12V DC (Left second) Specification RJ45, connect it LAN Network interface computer. (Left third) Specification RJ45, connect it WAN Internet interface to network. (Right third) Specification RJ11, connect the PSTN Normal phone general public telephone interface...
-
Page 10: Touch Screen Description
Name Meaning USB interface. Connect it to USB disk. (Left first) Handset interface. Connect the handset. (Center) Interface high-definition audio and video. A-A interface, HDMI interface. A to A interface. (Right first) Note: 1. Put the handset line into the handset interface according to the interface illustration picture. - Page 11 Long press: Long press the idle desktop. After that, an option box could be popped up, and then you can do more according to the prompt. Long press one list such as a list of contact list. After that, another option box could be popped up, and then you can do more about this list according to the prompt.
-
Page 12: Update Of The Phone
Slide: Slide your hand on the screen upward or downward slowly to move the interface on the screen. On some kinds of screen such as idle desktop, you can switch the desktop just by moving your fingers on the screen to left or right. Dragging your finger to slide will not select or activate anything on the screen. -
Page 13: Basic Function
Enter 2.2 Status Bar All of the status information about Android IP Video Phone DPH-850S is displayed on the top of the screen. You can click on the notification icon in the left of the status bar or drag down the drop-down list with your fingers to enter... - Page 14 Status bar Name Meaning Displays that the network connection is Network successful. Tap the icon directly into status (successful) the network settings. Shows no network connection. You need to check the network is properly Network status (failed) connected and the parameters are configured correctly.
-
Page 15: Main Screen
New record unread phone recordings. 2.3 Main Screen Android IP Video Phone DPH-850S will go directly to the main screen after rebooting. The main screen contains three idle interfaces. Each one can display some programs shortcuts. You can switch the desktop just by moving your fingers on the screen to left or right. - Page 16 Click the "Application" icon, and then it will jump to the following interface. You can slide your fingers on this interface to glance over all of the applications. You can click on some program icons to open the corresponding application program. The application program interface If you want to delete application shortcuts on the idle interface, you can long press the shortcut, and then put it into the dustbin at the bottom of the interface.
-
Page 17: The Application Of Dph-850S's Function
2.4 The Application of DPH-850S’s Function: Click this icon, and it will switch to pre-dial interface. You can make some phone calls through the screen or keyboard. Phone Has the function of sending and receiving e-mail. When an account has been configured successfully, you can send and receive your e-mail on the phone and this account will automatically sync the contacts to the mailbox account. - Page 18 Set the time and the alarm will remind you at the appointed time. Alarm Clock It contains the Call settings, Basic settings ,Advanced settings, VOIP and so on, you can configure some settings in the corresponding menu.(Android system settings) Android settings View photos stored on the phone, or through the USB storage device storing photos or videos, you can enter the photo gallery...
-
Page 19: Desktop Widgets
Calibration Enter into the calendar and you can view the accurate date. Calendar Enter the call logs and you can view all call records. You can also view the "Incoming Calls", "Outgoing Calls" and "Missed Calls" records by pressing the menu key. Call logs Ping box is the system's built-in toolbox of network testing tool;... - Page 20 status, the power light have been always light;when the telephone has one call, then another call is ringing, the power light will twinkle. Idle screen display: Light off Light up Analog clock which looks like a watch can be displayed on any space of the idle screen;...
- Page 21 gray null not registered phone number@ server Failed address phone number@ server successful on the main green address server phone number@ backup successful on the yellow server address backup server Idle screen display: You can display anyone of your favorite picture on the idle screen through this picture frame.
-
Page 22: Settings
Starred contacts: Show favorites contacts in it; tap a contact to view detailed information. Contacts with phone Show the contact which has the number and do not show the numbers: contact which has no phone number. 3 Settings 3.1 System info Tap "Settings"... -
Page 23: Network
Alert DNS Display the standby DNS server address of the current use of the network model. Display the current MAC address. Display the current phone model. Phone model Display the current version of the phone. Version Account Display the current configuration of the Account and more detailed information will be displayed on the desktop widget. - Page 24 DHCP interface Static IP interface Configuration Meaning Select to use DHCP, which means whether to use the DHCP DNS to connect network assigned by the DHCP server. IP address: Input the assigned IP address. Static IP NetMask: Input the assigned subnet mask. Gateway: Input the assigned gateway.
-
Page 25: Pppoe
3.2.2 PPPoE Tap "Network" ----> "PPPoE". After configuring the parameters, you can click "Save" button to save successfully. PPPoE interface Configuration Meaning User name: Input the assigned PPPoE Username. PPPoE Password: Input the assigned PPPoE Password. Auto connect on power up: Whether to automatically connect PPPoE on boot. -
Page 26: Qos
3.2.3 QoS Tap "Network"----> "QoS", after selecting or modifying the default settings click the "Save" button to save successfully. QoS:Quality of Service is a security mechanism of network. It is used to solve the network delay and congestion of a technology. For the network service, quality of service including the transmission bandwidth, transmission delay, data packet loss rate and so on. - Page 27 QoS-VLAN interface VLAN is Virtual Local Area Network. Enable VLAN, then you can set VLAN ID,from 0 to 4095; you can set the priority of 802.1p from 0 to 7. Note: It must enable DSCP before you set 802.1p . Configuration item Meaning QoS- VLAN...
- Page 28 Port VLAN interface Port VLAN is based on port VLAN, in the same VLAN port to communicate with each other. Configuration item Meaning Enable Port VLAN: Enable/Disable Port VLAN. QoS- Port VLAN Untagged: Disable Port VLAN. Disable: Follow the ID number of WAN. ...
-
Page 29: Port
3.2.4 Port Tap "Network" ----> "Port", after selecting or modifying the default settings click "Save" button to save successfully. Port interface Configuration item Meaning Port Media initial port(10000-60000): Set the telephone’s media initial port. This port is distributed to dynamic allocation. Media port quantial: Set the maximum number of allocated RTP port, the default is 200. -
Page 30: Account
Stun interface Configuration item Meaning Stun Stun Server: Configure the SIP STUN server address. Stun port: Configure the SIP STUN server port. 3.3 Account Tap "Account"---->"Account1", after setting the parameters you can click the "More" button to switch to the next page to set; it has a total of five interfaces, after all the parameters are set, you can click "Save"... - Page 31 Account page 1 Configuration item Meaning Account active: Enable/Disable register. Account Disable register, Enable register. SIP server: Set your SIP server address. It supports the address in the form of domain name.. Phone number: Input the phone number assigned by your VoIP service provider.
- Page 32 DTMF_SIP_INFO DTMF_AUTO Different server vendors can provide different models. RFC protocol edition: Configure the protocol version of the phone. When the phone needs to communicate with gateway which uses SIP1.0, such as CISCO5300, it need to configure to RFC2543 to conduct normal communication.
-
Page 33: Call
calling line identification restriction (CLIR) business functions, The caller’s telephone number will not be displayed in the called party’s telephone. Use stun: Enable/Disable SIP STUN. Enable BLF List: Enable/Disable BLF List. BLF List URL: Input the URL of BLF List. Enable session timeout: Enable/Disable session timeout. - Page 34 Configuration Meaning Do not disturb: Enabled the "Do not disturb", the General phone will not allow incoming phone calls, but the notification about missed calls will be displayed at the status bar. Call waiting: Set whether to enable the call waiting function.
-
Page 35: Dial Plan
3.4.2 Dial plan Tap "Call"----> "Dial plan" interface. After configuring the parameters, you can click "Save" button to save successfully. Dial plan interface Configuration item Meaning Use E164: Enable/Disable E164. After it is enabled, Dial plan it will directly dial numbers according with E164 rules. -
Page 36: Accounts
3.4.3 Accounts Tap "Call "----> "Account1, 2, 3, 4". After configured the parameters, you can click "Save" button to save successfully. Account interface Configuration item Meaning Call forward: Enabled/Disable Call forward function. Account (You can select "Always" , "No answer" , "Busy" and "None") Forward number: Set the forward number for each SIP line. -
Page 37: Screen
3.5.1 Screen Tap "Display" ----> "Screen saver" interface. After configuring the parameters, you can click "Save" button to save successfully. Screen saver interface Configuration item Meaning Mode: Enable/Disable. After enabling this function, Screen saver the LCD screen will be the state of the screen saver mode after the specified time. -
Page 38: Display
Hibernate interface Configuration item Meaning Hibernate Use hibernate: Enable/Disable. After enabling this function, the LCD screen will be the state of the hibernate mode after the specified time. Hibernate timeout: Input the waiting time after enabling the hibernate mode, the default unit is minute. -
Page 39: Tone
Configuration item Meaning Animation: Set the window animation mode, there Display are three kinds of mode ("No animations", "Some animations" and "All animations") for you to choose. Power indicator: You can select "Open" or "Close" to control the power indicator. Brightness: Regulate brightness of screen display. -
Page 40: Volume
the function, when you use a dialing keyboard it can play sound. Audible selection: Enable/Disable. After enabled the function, when you select the screen it can play sound. 3.6.2 Volume Tap "Tone" ----> "Volume" interface. After configuring the parameters, you can click "Save"... -
Page 41: Date Time
Language interface 3.8 Date time Tap "Settings" ----> "Date time" interface. After configuring the parameters, you can click "Save" button to save successfully. Date time interface Configuration item Meaning Use DHCP time: Enable/Disable DHCP time. After Date time enabling, the phone will automatically synchronize the network time in a certain period of time. -
Page 42: Maintain
Select time zone: Select the current time zone. Time format: Select the current time format. You can choose "Use 12-hour format" or "Use 24-hour format." Select date format: Select the current date format. There are three types for you to choose ("Year - Month - Day", "Day - Month - Year"... - Page 43 Note: 1. PnP and DHCP support Common CFG file and MAC-Oriented CFG file and ID-Oriented CFG file for auto provision. The endpoints download Common CFG file firstly, and then download MAC-Oriented CFG file or ID-Oriented file. 2. Phone Flash support Common CFG file and MAC-Oriented CFG file or Custom CFG file.
- Page 44 2. Download the MAC-Oriented file. URL is: http://192.168.1.206/$mac.cfg, input the MAC-Oriented file in the server file. 3. Download the ID-Oriented file. URL is: http://192.168.1.206/$input.cfg, if the 123.cfg is input in the server file, then when the telephone reboot, you should input 123 to download the 123.cfg configuration file.
- Page 45 Update-DHCP interface Support Common CFG file and MAC-Oriented CFG file and ID-Oriented CFG file auto provision. The endpoints download Common CFG file firstly, and then download MAC-Oriented CFG file or ID-Oriented file. Configuration Meaning DHCP Option Set: Select "DHCP Option Update 43","DHCP Option 66"...
-
Page 46: Web Server
Support Common CFG file and MAC-Oriented CFG file or Custom CFG file. If customer deploys Custom CFG file name in the web page, the endpoint will download Custom CFG file. If customer doesn’t deploy Custom CFG file name, the endpoint will download MAC-Oriented. Configuration Meaning Server: Input the server address. -
Page 47: Menu Password
Web server interface Configuration Meaning Web server: Select "HTTP" or "HTTPS". Web server After selecting one server, you can use the selected server to login the telephone’s web page. Such as: https://192.168.1.20 HTTP port: Input server port, default is 80. 3.9.3 Menu password Tap "Maintain"---->"Menu password"... -
Page 48: Factory Reset
3.9.4 Factory reset Tap "Maintain"----> "Factory reset" interface. After configured the parameters, you can click "Reset phone" button to reset successfully. Factory reset interface Configuration Meaning Reset phone: Click "Reset phone" to reset. Factory reset 3.9.5 Reboot Tap "Maintain"----> "Reboot" interface. You can click "Reboot" button to pop-up "reboot"... -
Page 49: Audio
3.10 Audio Touch "Settings" ----> "Audio", enter the detailed interface. 3.10.1Audio Touch "Audio"----> "Audio" interface. After configuring the parameters, you can click "Save" button to save successfully. Audio interface Configuration Meaning item Audio First audio codec: Set the first priority in the use of voice coding. -
Page 50: Video
Audio param interface Configuration item Meaning G729 payload length: Set G729 codec payload Audio param length. DTMF payload type: Set DTMF payload type, values between 96 and 127. ILBC payload type: Set ILBC payload type, values between 96 and 127. ILBC payload length: Set ILBC payload length. -
Page 51: Bandwidth
Video param interface Configuration item Meaning Video param First video codec:Set the first priority in the use of video coding. Second video codec: Set the second priority in the use of video coding. Third video codec: Set the third priority in the use of video coding. -
Page 52: Call Firewall
Bandwidth interface Configuration item Meaning Media Bandwidth: Set receiving video bandwidth Bandwidth in video calls. You can choose 9 kinds of video bandwidth types ("64Kbps", "192Kbps", "256Kbps", "384Kbps", "512Kbps", "768Kbps", "1Mbps", "1.6Mbps", or "2Mbps). Video Resolution: Set video encoding resolution in a video call. - Page 53 Call firewall interface Delete selected status interface Configuration item Meaning Enable the firewall: Whether to enable the Call firewall firewall. After enabling the function, there will be a notification note in the status bar. When a number is added to the firewall, the telephone will automatically reject all incoming calls of this number, at the same time there won't be any note.
-
Page 54: Phone Application
firewall. Next page: When the "Call firewall" number is more than one page, you can tap "Next page" button. Previous page: When the number you added is more than one page and then you can tap "Previous page" button. M/N: M represents the current number of pages; N represents the total number of pages. - Page 55 button to call the contact; 3. Tap the "Video" or "Audio" button to dial. Use the call logs 1. Press the "Phone" icon in the launcher. 2. Tap the "Call logs" tab, select the number you want to call, when the content is larger than one screen, use a finger sliding up and down the screen to view.
- Page 56 Ringing view (Unknown contact) Ringing view (Known contact) 3. In the ringing view, you can choose "forward", "Video", "Audio" or "Reject", just press the corresponding button or the soft key to choose. Call options Video call You can make a video call by the following way: 1.
- Page 57 Video calling interface Video talking interface 2. Tap the video button to start a video invite in the audio talking, waiting for the "Accept" of the others to enter the video call. 3. When you receive a remote video invite in the audio talking, tap the "Accept"...
- Page 58 Note: If you want to enter the three-ways conference from video talking, the video will be stopped first. The conference cannot support video call. Call recording You can press the button to record the talking, the view will be shown, and the record button will turn Press the button to stop recording.
-
Page 59: Contacts
Three-ways conference If there are two or more talking calls, tap the "Conference" button and select a number to enter the three-ways conference with the current call. The figure: Multi-line calls This phone supports multi-line calls. When there are two or more calls, you can tap "Transfer"... - Page 60 Search contacts You can search the contacts on the phone by the contacts’ first letter (Chinese names are searched by its first letter of the alphabets). 1. Tap the contacts button; 2. Tap the "Search" button, or press , then tap the search button input the name of the contact you are searching for.
- Page 61 Contacts interface 1 Contacts interface 2 Delete a contact Two methods: Method one: 1. Tap "Contacts" button. 2. Tap the "Delete" or press and tap "Delete Manager". 3. Select the contact you want to delete, and then tap the "Picture Trash" to delete or you can bulk delete, by tapping the right button of the contact you want to delete , to make the state checked just as 4.
- Page 62 will be checked, then press "Menu" button and tap Delete selected. Method two: 1. Long press one "Contact", then the contacts edit list will be popped up. You can just tap "Delete contact". 2. Then a selection box will be popped up and you can click "OK" to delete or tap "Cancel"...
- Page 63 Import/export contacts Our Phone Book support three kinds of files to import or export. They are: xxx.vcf file, xxx.xml file and xxx.csv file. 1. Tap "Contacts", and then tap the "I/E port" button or press menu key Then select the "Import/Export" label, you can choose to import or export at the option box "Import/Export contacts".
-
Page 64: Call Logs
delete many groups , you can tap the Del Group to select groups to delete, when the turns to , then select “ Delete”. 4.3 Call logs The Call logs are a list of all the calls you’ve dialed, received, or missed. It offers a convenient way for you to redial a number, call back, or add a number to your contacts. - Page 65 To view missed calls When you have some missed calls, the status bar will show us the missed call icon , open notification panel and touch "Missed call" to view all of the missed call. Open Call logs you can tap or have the Phone /Contacts tab opened, and then touch the Call logs tab.
-
Page 66: Memory Key
3. Long touch the call logs to open a menu with options then touch "Call ***" or touch "Edit" number before call, it will open the dial-up interface. You can call the number which you edit and select from call logs. Add a record’s number to your Contacts 1. - Page 67 Memory Key Management Editing Memory Key Open your "Memory Key", touch & hold a null button, then touch "Edit". Add a contact name, number, call the line (SIP1/2/3/4), and call type (video / voice). When you are finished, touch "OK". ...
-
Page 68: Network Phonebook
4.5 Network Phonebook Android IP Video Phone DPH-850S terminal can download contacts from the Internet where the information stored by the users. If you use Network Phonebook, you can follow these steps: 1. Configure parameters related to the network phonebook in settings. - Page 69 Basic Setting Configuration Meaning The name of your network phonebook. It will display on Account the screen. Support HTTP/FTP/TFTP/LDAP server. Protocol Type Server The address of your HTTP/FTP/TFTP/LDAP server. The port of the HTTP/FTP/TFTP/LDAP server Port Name of the update file where you put in the File Name ServerDirectory.
-
Page 70: Mwi
You can long press My colleague to Edit or Delete the User. 5. Click My colleague to look up. 6. Now you can long press a contact to make a call or send messages and so 4.6 MWI Easily view voice messages, quickly listen in voice messages. Touch the MWI icon on the home screen or in the Launcher, you can view voice messages information. -
Page 71: Other Application
call, you can answer the new call by off-hook, press the "Speaker" key, tap the "Audio" or "Video" key to answer new calls. You can achieve to switch multiple calls by clicking the small card in call interface to cooperate with four keys below. - Page 72 Domain\Username: gmail.com\username (**@gmail.com); Password: Input your password; Exchange server: m.google.com. QQ account Log on QQ mailbox in web page, you can click "Settings" ----> "experience room" "Exchange mobile terminal synchronization service" ----> "I want to open"; In the Contact interface you can press and select "more"...
-
Page 73: Calculator
Click "Done", then you can go directly to the inbox interface to view mails. In the Inbox interface, you can press , and then choose "Refresh", "Compose", "Folders", "Accounts" or "Account settings". The "Folders" contains "Inbox", "Drafts", "Outbox", and "sent", "Trash" and so Click on the "Accounts,"... - Page 74 Figure: In the basic panel, you can enter the "advanced panel" either by selecting the "advanced panel" after touching the "menu" button, or sliding your single finger from right to left; In the advanced panel, you can return to the "basic panel"...
-
Page 75: Note Pad
5.3 Note pad You can write down a memo for checking at any time. Add a memo record You can either touch "Add note", or select the "Add note" after touching the "menu" button to enter the interface of "edit notepad". You can enter the information that you want to record. -
Page 76: Browser
5.4 Browser You can surf and browse web with the terminal just like using a computer. The default home page is Google search home page; you can change it by setting. Open web For the first time, please touch "Browser" and go into the page, the default home page is Google search home page. - Page 77 You can tap "Recorder" application to make local record or you can make talking record when you have a call. Add record You can enter the interface of recording, if you touch "Add a recording" in the recorder window. Then, you can tap the "Record" button to start recording. If it is finished, you can tap the "Stop"...
-
Page 78: Digital Clock
5.6 Digital clock By using the digital clock, you can know the date and time more easily. Digital clock supports desktop widget; it is showed on the idle screen by default. It shows the date and the time. 5.7 Alarm Clock Open the Alarm Clock application. -
Page 79: Gallery
5.8 Gallery You can browse photos and videos easily. Browse Pictures Tap "Gallery" application, open a gallery album, press "Option" key, select "Slideshow", then the screen will display the pictures in the form of slide mode. You can also manually view each picture by sliding the screen from left to right or click the left (right) arrow on the screen. -
Page 80: File Manager
5.9 File Manager You can easily organize multiple files. The view of the File Manager as the Figure 1 and Figure 2 are as follows Figure 1 Figure 2 "Figure 1" is showing files as icon, "Figure 2" is showing files as a list, the form of the list will display the operation time of the file (need to be checked in the settings). -
Page 81: Camera
After your taping on the "Icon/List" button, it will show files as different view. By taping the "Refresh", you can refresh the view. By taping the "More" button, you can do more operations such as "New Folder", "New File", "Paste", "Search", "APK Manager", "Settings", "Multiple/Cancel", and "Exit", as shown in the Figure 3: Figure 3 New Folder: You can create a new folder. -
Page 82: Music
5.11 Music It has high-quality sound, and you may enjoy listening to music in android IP video phone DPH-850S. Tap "music" to open the application. View music files You can view the music files in different statuses by tapping "Artists", "Albums", "Songs", "Playlists"... - Page 83 pop-up box, you can play all the songs of this album. Long press a playlist in the "Playlists" interface, then select "Play" in the pop-up box, you can play all the songs of the playlist. Long press a song in the "Songs" interface, then select "Play" in the pop-up box, then it can be played.
-
Page 84: Calibration
5.12 Calibration Screen calibration uses the five calibration method. After using the phone a long time, there may be inaccurate, then set the "upper left", "upper right" and "left down" and "right down" and "middle" five icons through the screen calibration procedures to adjust the screen, and let the screen in a state of accurate. - Page 85 Start: Tap Start button, then will pop-up a list with Configuration parameters tips. Capture Protocol Type: Support UDP, TCP, SIP, HTTP and All of the eth0. You Can select one protocol or multiple protocols. Save Path: The default path is SD Card. Export System Log: Select export path is SD Card or U disk.
-
Page 86: Android Settings
6 Android settings 6.1 Basic settings Tap "Android settings" to enter android settings interface to configure. 6.1.1 WAN Tap "Android settings", the default selection is" Basic settings", select "WAN" to switch to "WAN" interface. Configuration item Meaning Display telephone’s Mode,IP,Netmask,Gateway,DNS Status and DNS2 that are using currently. -
Page 87: Sound & Display
Ethernet Network: After enabling, the phone will try to connect network. configuration Ethernet configuration: Tap the Ethernet configuration button, it will pop up a "Configure Ethernet device" dialog, and then do the following configurations, after configuring, you can tap "OK" button to make settings take effect. - Page 88 calls. Notification ringtone: Set notification ringtone of the telephone. Audible touch tones: Enable/Disable. After enabling Tone Set the function, when you use a dialing keyboard it can play sound. Audible selection: Enable/Disable. After enabling the function, when you select the screen it can play sound. Use screen saver: Enable/Disable.
-
Page 89: Configuration Management
6.1.3 Configuration management Tap "Settings", and then select "Configuration management" to switch to Configuration management interface. Configuration item Meaning Server: Input the upgrade server address. Auto provision Protocol: Select the protocol used by the automatic upgrade, Include: FTP, HTTP, HTTPS and TFTP. User: Input the upgrade server account. -
Page 90: Language & Keyboard
not upgrade. Server: Upgrade the server address that is using. Image: The file that need to be updated, the suffix name must use tar.gz. Protocol: Upgrade the protocol that is using, For example ftp, tftp, http etc. User: According to the protocol, fill in the corresponding user name. Password: According to the protocol, fill in the corresponding password. -
Page 91: Oip Settings
Select the current time zone. Select time zone Set the current time manually. Set time When enabled, the time will be displayed in a Use 24-hour format 24-hour format. Select the current date format. There are three Select date format types for you to choose ("Year - Month - Day", "Day - Month - Year"... - Page 92 such as voice coding, whether to enable VAD, etc. Configure video parameters in the process of video Video calls, such as encoding resolution, frame rate, etc. DiffServ enable: Configure whether to enable differentiated services. DiffServ value: Configure differentiated services parameter value, if you set normal level, the value is 0x00.
- Page 93 DTMF mode Set DTMF mode, there are four types: DTMF_RELAY DTMF_RFC2833 DTMF_SIP_INFO DTMF_AUTO Different server vendors can provide different models. Configure the protocol version of the phone. When RFC protocol edition your phone needs to communicate with gateway which uses SIP1.0, such as CISCO5300, you need to configure to RFC2543 to conduct normal communication.
- Page 94 primary server is not connected, you can use the backup server for calling communications (The backup server can be connected only when the primary server cannot connect); When the primary server is connected, the phone will automatically switch back to the primary server to communicate. Configure the backup server port.
-
Page 95: Call Settings
Mpeg4 payload type Set payload type of Mpeg4, value between 96 and 127. Set video encoding resolution during a video call, Video resolution There are three ways for choice: QCIF, CIF and 4CIF. Set the media bandwidth of receiving video during Media Bandwidth a video call. - Page 96 Call waiting Set whether to enable the call waiting function. Set the parameters of the voicemail: Voicemail Check for voicemail: Check which line enabled the voicemail , you can also enable it from here. Number to dial for checking voicemail: Set the phone number to listen the voicemail for each line.
-
Page 97: Advanced Settings
2. Digital Map : "Use E164" ,"End with #","Use fixed length", "Use time out" are in effect under the condition of non pre-dial. 6.4 Advanced settings 6.4.1 Location & security Tap "Advanced Settings" and then select "location and security" switch to the location and security settings interface. -
Page 98: Applications
6.4.3 Applications Tap "Advanced Settings" and then select "Applications" switch to the application settings interface. Configuration item Meaning Allow install of non-Market application. Unknown sources Manage and remove installed application. Manage applications View and control current running services. Running services Set options for application development. -
Page 99: Search
Available space Show the available phone memory space. 6.4.6 Search Tap "Advanced Settings" and then select search" switch to search settings interface. Tap "search" to switch to search settings interface. Configuration item Meaning Show page proposal: When enabled, it displays the Google search advice that Google propose when inputting. - Page 100 My phone number: Display phone number on each line. Mobile network type: Whether successfully or unsuccessfully the phone connect to the network. MAC address: Show the physical address of the phone. Up time: Shows the running time of the phone to boot.
-
Page 101: Web Page Configuration Description
7 Web page configuration description When both of the DPH-850S phone and your PC are successfully connected to the network, enter the IP address and the web browser port about your phone as the URL such as "http://xxx.xxx.xxx.xxx" (Telephone IP address can be found on the phone status or at the system interface of Settings), then you can see the login page shows as the following picture. -
Page 102: Basic
7.1 BASIC Status Status interface Status Field name Explanation Network Shows the configuration information on WAN: Including the IP address and the MAC address. Phone Number Shows the phone numbers provided by the SIP LINE 1-4 servers. Version and Model The top line shows the version number and the first line shows Phone model. -
Page 103: Network
7.2 NETWORK QOS&VLAN interface QOS&VLAN Field name Explanation LLDP Set Enable Report Open the phone's function to send LLDP messages. Function Open the phone's function to learn LLDP. After enabling LLDP Learn, telephone can automatically learn the number of DSCP, 802.1p, VLAN ID of the Enable Learn Function network. - Page 104 QoS Set Enable/Disable DSCP. Enable DSCP Set the number of Voice DSCP. Voice DSCP Set the number of Video DSCP. Video DSCP Set the number of Signal DSCP. Signal DSCP VLAN Set Enable Port Enable/Disable VLAN. VLAN Set the number of VLAN ID. Range is 0~4095. WAN Port VLAN ID Set the priority number of Video 802.1p.
- Page 105 Service Port If modify HTTP or telnet port, you'd better set it more than 1024, then restart! Use the type of web server, you can choose HTTP or HTTPS. After selecting one server, you can use the selected server to login the Web Server Type telephone’s web page.
-
Page 106: Voip
Enable/Disable DHCP time. After enabling, the phone will automatically synchronize the network DHCP Time time in a certain period of time. Configure the main SNTP server address of the Main Server phone to get the current time. Configure the backup SNTP server address of the BackUp Server phone to get the current time. - Page 107 Advanced Set interface Sip Configuration Field name Explanation Choose line to set info about SIP, there are 4 lines to choose. You can switch by [Load] button. Basic Setting Shows whether the phone has been registered the SIP server, Register if not, show Unapplied.
- Page 108 Input the phone number assigned by your VoIP service Phone provider. Phone will not register if there is no phone number Number configured. Enable Start to register or not by selecting it or not. Register Display Set the display name. Name Set proxy server IP address.
- Page 109 Interval Set the user agent if you have, the default is VoIP Phone 1.0. User Agent Select DTMF sending mode, there are three modes: * DTMF_RELAY * DTMF_RFC2833 DTMF Type * DTMF_SIP_INFO. Different service providers may provide different mode. Set sip port of each line. Local port Set Anonymous call out safely;...
- Page 110 automatically the time into the time recommended by the server, and register again. Select the special type of server which is encrypted, or has Server Type some unique requirements or call flows. Select SIP protocol version to adapt for the SIP server which uses the same version as you select.
- Page 111 Stun interface Stun Field name Explanation Stun Set Shows STUN NAT Transverse estimation, true STUN NAT means STUN can penetrate NAT, while False Transverse means not. Set your SIP STUN Server IP address. STUN Server Addr Set your SIP STUN Server IP port. STUN Server Port When use stun, call waiting for the response of the SIP Wait Stun Time...
-
Page 112: Phone
release the mapping and the system need send a STUN packet to keep the mapping effective and alive. Set SIP Line Enable Stun Select SIP Line to use Stun. Enable / disable SIP STUN. Use Stun Note: SIP STUN is used to realize SIP penetration to NAT. If your phone configures STUN Server IP and Port (default is 3478), and enable SIP Stun, you can use the ordinary SIP Server to realize penetration to NAT. - Page 113 Voice Configuration The fist preferential DSP codec: First Codec G.711A/u,G.722,G.723,G.729,iLBC,ARM,ARM-WB. The second preferential DSP codec: Second Codec G.711A/u,G.722,G.723,G.729,iLBC,ARM,ARM-WB. The third preferential DSP codec: Third Codec G.711A/u,G.722,G.723,G.729,iLBC,ARM,ARM-WB. The fourth preferential DSP codec: Fourth Codec G.711A/u,G.722,G.723,G.729,iLBC,ARM,ARM-WB. The fifth preferential DSP codec: Fifth Codec G.711A/u,G.722,G.723,G.729,iLBC,ARM,ARM-WB.
- Page 114 H.264 Payload Type Set the H.264 payload type, value based on 96-127. Mpeg4 Payload Type Set the Mpeg4 payload type, value based on 96-127. Set the Video Bit Rate. Video Bit Rate Set the Video Frame Rate. Video Frame Rate Set video resolution: QCIF, CIF, VGA and 4CIF.
-
Page 115: Maintenance
DND Return Code 480 , do not disturb. Input the server IP of the active URI. Active URI Limit IP Action URL Setting Input the Action URL, then click the Apply button to see whether the operation of the lcd screen is right. 7.5 MAINTENANCE ... - Page 116 Version Common Config The common config version of the telephone. Version Whether to save the information of the Save autoprovision. Such as: username, password and Autoprovision so on. Information DHCP Custom Select "DHCP Option 43","DHCP Option 66" DHCP Option Set or "DHCP Option Custom".
- Page 117 SYSLOG interface Syslog Field name Explanation Set Syslog server IP address. Server IP Set Syslog server port. Server Port Set the level of MGR log. MGR Log Level SIP Log Level Set the level of SIP log. Select it or not to enable or disable syslog. Enable Syslog CONFIG interface...
- Page 118 Config Field name Explanation You can save all changes of configurations. Click the Save button, all changes of configuration will be Save Config saved, and be effective immediately. Right clicks on “ Right click here…” and select “ Save Backup Config Target As….”...
- Page 119 FTP Update Set the FTP/TFTP server address for Server download/upload. The address can be IP address or Domain name with subdirectory. Set the FTP server Username for download/upload. Username Password Set the FTP server password for download/upload. Set the name of update file or config file. It depends File name on which Type you select to update.
- Page 120 ACCOUNT interface ACCOUNT Field name Explanation User Set User Name, User User-set Six configuration items. Level, admin, Root, guest, General Add User Set account user name. User Name Set user level. Root user has the right to User Level modify configuration, General can only read. Set the password.
-
Page 121: Security
REBOOT interface REBOOT Field name Explanation Reboot Phone Press the "Reboot" button to reboot Phone! 7.6 SECURITY MMI FILTER MMI FILTER interface... - Page 122 MMI FILTER Field name Explanation MMI Filter Table Set Add the IP address segments that access to the phone. Set initial IP address in the Start IP column, Set end IP address in the End IP column, and click Add to add this IP segment. MMI Filter Table Set Enable/Disable MMI Filter.
-
Page 123: Logout
7.7 LOGOUT LOGOUT LOGOUT interface Logout Field name Explanation Click "Logout" and you will exit web page. If LOGOUT you want to enter it next time, you need input user name and password again.