
Related Manuals for Sharp AL-1631


Summary of Contents for Sharp AL-1631
-
Page 1: Table Of Contents
DIGITAL MULTIFUNCTIONAL INTRODUCTION SETTING UP THE UNIT LOADING PAPER INSTALLING THE SOFTWARE (AL-1641CS) MAKING COPIES SPECIAL FUNCTIONS MAINTENANCE TROUBLESHOOTING THE UNIT APPENDIX AL-1631/AL-1641CS MODEL AL-1631 AL-1641CS DIGITAL LASER COPIER SYSTEM OPERATION MANUAL Page... - Page 2 For customer assistance, please visit http://www.sharpusa.com/ (for USA) or http://www.sharp.ca/ (for Canada) on the World Wide Web or call 1-(630)378-3590 (for USA). Do not make copies of anything which is prohibited from copying by law. The following items are normally prohibited from copying by national law. Other items may be prohibited by local law.
-
Page 3: Cautions On Using
CAUTIONS Caution label on the unit The label ( ) in the fusing area of the unit indicates the following: : Caution, risk of danger : Caution, hot surface Cautions on using Follow the cautions below when using this unit. Warning: •... -
Page 4: Cautions On Handling
© 1987- 2002 Adobe Systems Incorporated. All rights ® NERGY Partner, SHARP has determined that NERGY The Environmental Choice Program guidelines are applied to the products only in Canada. The products that meet the Environmental Choice Program guidelines carry the logo shown to the left. - Page 5 PAPER... 14 LOADING THE PAPER TRAY... 15 BYPASS FEED (including special paper)... 17 INSTALLING THE SOFTWARE (AL-1641CS) SOFTWARE FOR THE SHARP PERSONAL MFP SERIES ... 19 HARDWARE AND SOFTWARE REQUIREMENTS... 20 BEFORE INSTALLATION ... 20 INSTALLING THE SOFTWARE .. 21 INDICATORS ON THE OPERATION PANEL...
-
Page 6: Introduction
Some model may not be available in some countries. USING THE MANUALS In addition to this printed manual an online manual is also provided. (The AL-1631 does not have an online manual.) To get full use of all features and functions of this product, be sure to familiarize yourself with both manuals. -
Page 7: Part Names
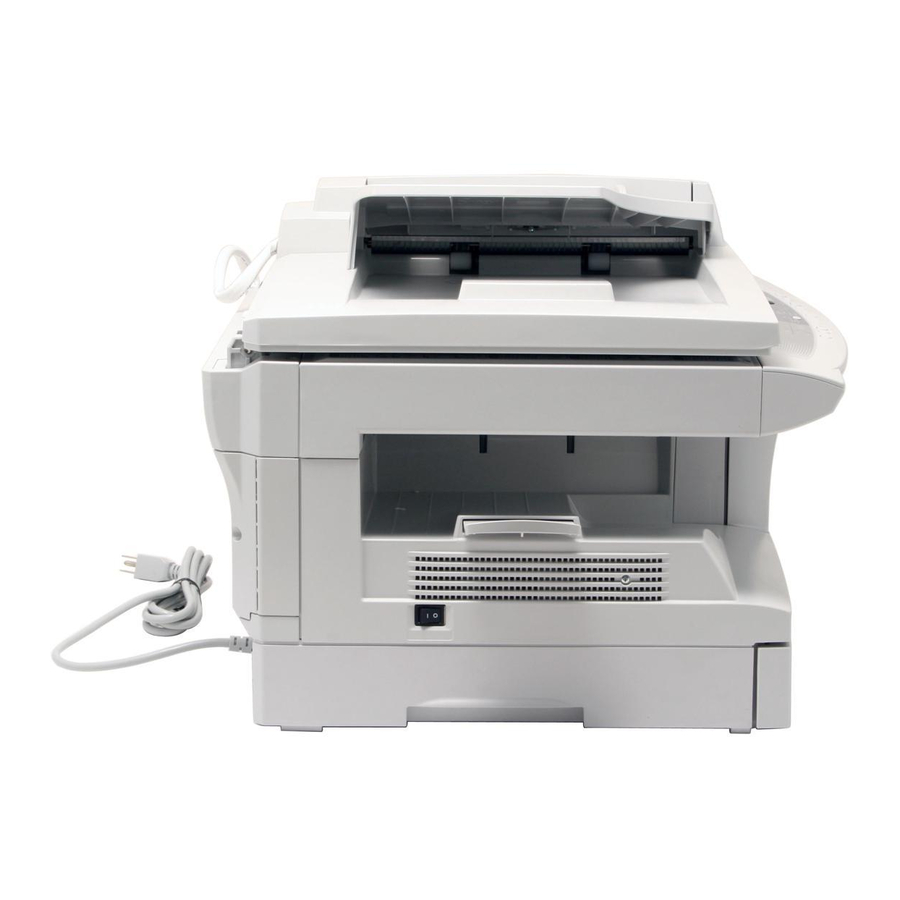
PART NAMES Exit area Document feeder tray Multi-bypass tray Document glass Operation panel Front cover Paper tray Side cover Side cover open button Bypass tray paper guides Paper output tray Original guide Document feeder cover TD cartridge Drum cartridge Paper output tray extension Power switch Handle Power cord... -
Page 8: Operation Panel
OPERATION PANEL Original to copy key and indicators (AL-1641CS) Exposure mode selector key and indicators Use to sequentially select the exposure modes: AUTO, MANUAL or PHOTO. Selected mode is shown by a lit indicator. (p.49) Light and dark keys and indicators Use to adjust the MANUAL or PHOTO exposure level. -
Page 9: Setting Up The Unit
SETTING UP THE UNIT Follow the installation procedure below to use the unit properly. If the unit does not function properly during setup or use, or if a function cannot be used, see "TROUBLESHOOTING THE UNIT" (p.61). SETUP PROCEDURE When using the unit for the first time, setup the unit following the procedure shown below. -
Page 10: Checking Packed Components And Accessories
CHECKING PACKED COMPONENTS AND ACCESSORIES Open the carton and check if the following components and accessories are included. If anything is not included or is damaged, contact our Technical Assistance Department at 1-(630)378-3590 in the USA or 905-568-7140 in Canada. Operation manual AL-1641CS Software CD-ROM... - Page 11 Remove all pieces of tape shown in the illustration below. Then open the SPF and remove protective materials. After that, take out the bag containing the TD cartridge. Release the scan head locking switch. The scan head locking switch is under the document glass. If the switch is locked ( as shown below.
-
Page 12: Installing The Td Cartridge
INSTALLING THE TD CARTRIDGE Open the multi-bypass tray, and then open the side cover. Remove the CAUTION tape from the front cover and remove the two protective pins from the fusing unit by pulling the strings upward one at a time. CAUTION tape Push gently on both sides of the front cover to open the cover. - Page 13 Gently insert the TD cartridge until it locks in place while pushing the lock release button. Close the front cover and then the side cover by pressing the round projections near the side cover open button. When closing the covers, be sure to close the front cover securely and then close the side cover.
-
Page 14: Power On
POWER ON Ensure that the power switch of the unit is in the OFF position. Plug the other end of the power cord into the nearest outlet. Turn the power switch on the left side of the unit to the "ON" position. The start ( which show the initial settings of the operation panel will also light up to indicate the ready condition. - Page 15 Initial settings of operation panel When the unit power is on, the operation panel will revert to the initial settings when the time set with the "Auto clear time" setting (p.55) elapses after a copy or scanner job is finished, or when the clear ( The initial settings of the operation panel are shown below.
-
Page 16: Loading Paper
Follow the steps below to load paper into the tray. PAPER For best results, use only paper recommended by SHARP. Type of paper feeding Paper tray Standard paper Multi-bypass Standard paper and tray thick paper Special media * Do not use non-standard envelopes, and envelopes that have metal clasps, plastic snappers, string closures, windows, linings, self-adhesive, patches or synthetic materials. -
Page 17: Loading The Paper Tray
LOADING THE PAPER TRAY Raise the handle of the paper tray and pull the paper tray out until it stops. Remove the pressure plate lock. Rotate the pressure plate lock in the direction of the arrow to remove it while pressing down the pressure plate of the paper tray. - Page 18 Fan the paper and insert it into the tray. Make sure the edges go under the corner hooks. Do not load paper above the maximum height line ( the line will cause a paper misfeed. Gently push the paper tray back into the unit. •...
-
Page 19: Bypass Feed (Including Special Paper)
BYPASS FEED (including special paper) The multi-bypass tray can be used to feed standard paper, transparency film, labels, envelopes, and other special purpose paper. Paper measuring from 3-1/2" x 5-1/2" to 8-1/2" x 14" and in the weight range of 14 lbs. to 34.5 lbs. (52g/m be used in this tray. - Page 20 Set the paper guides to the paper width. Insert the paper (print face down) all the way into the multi-bypass tray. • Paper must be fed narrow side into the feed slot. • Special papers such as transparency film, labels, and envelopes •...
-
Page 21: Installing The Software (Al-1641Cs)
The following term is used in this chapter. CD-ROM Means the supplied CD-ROM with the SHARP Personal MFP series software. SOFTWARE FOR THE SHARP PERSONAL MFP SERIES The supplied CD-ROM includes software for this unit. -
Page 22: Hardware And Software Requirements
HARDWARE AND SOFTWARE REQUIREMENTS Check the following hardware and software requirements in order to install the software. Computer type Operating system* Display Hard disk free space 150MB or more Other requirement for hardware Compatible with Windows 98, Windows Me, Windows 2000 Professional, Windows XP Professional or Windows XP Home Edition preinstalled model with USB interface equipped as standard. -
Page 23: Installing The Software
Flow of installation Refer to the following table and then begin installation. Operating Interface system USB/ Windows XP Parallel Windows 98 Parallel Windows Me Parallel Windows 2000 Parallel Windows 95/ Parallel NT 4.0 INSTALLING THE SOFTWARE The following term is used in this section. Means the unit as a printer and scanner. - Page 24 Double-click the "setup" ( If the language selection screen appears after you double click the "setup" icon, select the language you wish to use and click the "Next" button. (Normally, the correct language is selected automatically.) Select the software packages to be installed, and then click the "Next"...
- Page 25 Click the "Next" button in the dialog box to install the MFP driver or Cancel to quit the installation. The setup program will start to copy the files. If the following screen appears while the files are being copied (the message may appear more than once), click "Continue Anyway".
- Page 26 Windows XP with the parallel interface, go to step 12. Begin installation of the scanner driver. "SHARP AL-1641CS" will appear in the "Found New Hardware Wizard" dialog box. Select "Install the software automatically (Recommended)" and click the "Next" button.
- Page 27 Installing onto Windows 98/Me/2000 (USB interface) Before starting the installation, make sure the USB interface cable is not connected to the MFP. Insert the supplied CD-ROM into your CD-ROM drive. Double-click "My Computer" ( CD-ROM ( ) icon. When any of "Hardware Found", or "Found New Hardware Wizard" messages appear during the software installation, be sure to click the "Cancel"...
- Page 28 Copying files for MFP driver installation. After confirming the message in the "Welcome" window, click the "Next" button. A dialog box appears asking you to verify that the interface cable is not connected to the MFP. Make sure that the interface cable is not connected and click the "Next"...
- Page 29 Begin installation of the Sharpdesk (This step will start if it was selected in step 4). After confirming the message in the "Welcome to Sharpdesk installation" window, click the "Next" button. Read the message in the "Information" window, and then click the "Next"...
-
Page 30: Parallel Interface
Installing onto Windows 95/98/Me/NT4.0/2000 (Parallel interface) Before starting the installation, make sure the USB or parallel interface cable is not connected to the MFP. Insert the supplied CD-ROM into your CD-ROM drive. Double-click "My Computer" ( CD-ROM ( When any of "Hardware Found", or "Found New Hardware Wizard" messages appear during the software installation, be sure to click the "Cancel"... - Page 31 Copying files for MFP driver installation and parallel interface setup (This step will start if it was selected in step 4). After confirming the message in the "Welcome" window, click the "Next" button. A dialog box appears asking you to verify that the USB or parallel interface cable is not connected to the MFP.
- Page 32 Begin installation of the Sharpdesk (This step will start if it was selected in step 4). After confirming the message in the "Welcome to Sharpdesk installation" window, click the "Next" button. Read the message in the "Information" window, and then click the "Next"...
-
Page 33: Indicators On The Operation Panel
INDICATORS ON THE OPERATION PANEL The ONLINE indicator and the start ( scanner. SCANNER indicator Start indicator Indicates the unit is ready for copying or scanning is being performed. Blinking: The indicator blinks in the following situations: • When a print job is interrupted. •... -
Page 34: Using The Printer Mode
Click "Control Panel", select "Printers and Other Hardware", and then click "Printers and Faxes". On Windows 95/98/Me/NT4.0/2000, select "Settings" and click "Printers". Click the "SHARP AL-1641CS" printer driver icon and from the "File" menu select "Properties". Click "Printing Preferences" button in the "General" tab. -
Page 35: How To Print
Open the document you intend to print, and select "Print" from the application's "File" menu. Make sure that "SHARP AL-1641CS" is selected as the current printer. If you intend to change any print setting, click the "Preferences" button to open the setting dialog. -
Page 36: Using The Scanner Mode
Click the "start" button, select "Control Panel" and click "Printers and Other Hardware", and then click "Scanners and Cameras" in the start menu. Right click the "SHARP AL- 1641CS" icon and click "Properties" in the menu that appears. In the "Properties" screen, click the "Events"... - Page 37 Repeat Step4 to set "ScanMenu SC2" through "ScanMenu SC6". Click the "Scanner events" and select "ScanMenu SC2" from the pull-down menu. Select "Button Manager (SHARP Personal MFP series)" in "Start this program" and click "Apply". Do the same for each ScanMenu through "ScanMenu SC6".
- Page 38 Scan Button Destination Setting Dialog Box After you have completed the Button Manager settings in Windows, configure the scan settings in Button Manager. To configure the scan settings in Button Manager, right click the ( ) icon in the Taskbar and select "Setting" from the menu that appears.
- Page 39 Windows OS The settings for the Windows Event Manager for the SHARP AL-1641CS device allow the user to take advantage of the Sharp Button Manager to take control of events from Windows and send scanned images to any application that can be selected in Button Manager.
- Page 40 Windows 98, Windows Me, Windows 2000 and Windows XP. Windows Platforms provide a mechanism for software to handle external events for a scanner device like the SHARP AL-1641CS products. This mechanism is controlled by the device manager on a device basis. Applications that can handle events from a scanner/camera device register with the Windows Event Manager and shown as available in the registered applications.
- Page 41 Using the SCANNER key to begin scanning • Scanning is not possible during a copy job. • If the SCANNER ( be stored. • When scanning an original that has been placed in the SPF, only one original can be placed unless you are using Sharpdesk. Press the SCANNER ( The unit enters scan mode.
-
Page 42: Using The Sharp Twain
SPF will be output to the exit area after previewing. To scan the original after previewing, place the original in the SPF once again. Using the SHARP TWAIN Place the original(s) you wish to scan on the document glass/ SPF. - Page 43 Select "SHARP Personal MFP series", and click the "Select" button. If you use more than one scanning device, select the scanner you want to use through the application. The method for accessing the "Select Scanner" option, depends upon the application. For more information, see the online manual or the help file of your application.
- Page 44 Panel", and click "Printers and Other Hardware", and then click "Scanners and Cameras" in the start menu. Click the "SHARP AL-1641CS" icon and click "Get picture" in "Imaging Tasks". The "Scanner and Camera Wizard" appears. Click "Next" and establish the basic settings for scanning.
-
Page 45: How To Use The Online Manual
To close the online manual, click the ( the window. • The online manual can be printed out using Acrobat Reader. SHARP recommends printing out the sections which you refer to regularly. • Refer to "Help" of Acrobat Reader for more details on the operation and function of Acrobat Reader. -
Page 46: Using Other Installed Drivers
GDI printer or a Windows Printing System printer, you must change the port setting of the printer driver using the following procedure. If another printer does not operate properly when the SHARP Personal MFP series printer driver is set to "FILE" as described below, uninstall the SHARP Personal MFP series printer driver. -
Page 47: Connecting The Interface Cable
CONNECTING THE INTERFACE CABLE This unit includes both USB and parallel interface connectors. Interface cables for connecting the unit to your computer are not included with this unit. Please purchase the appropriate cable for your computer. • If you intend to use the unit as a scanner, it must be connected to your computer with a USB interface cable. -
Page 48: Making Copies
This chapter explains basic and other copying functions. The unit is equipped with a one-page memory buffer. This memory allows the unit to scan an original once only and make up to 99 copies. This feature improves workflow, reduces operation noise from the copier, and provides higher reliability by reducing wear and tear on the scanning mechanism. -
Page 49: Original Placement
• If you start a print job while a copy job is in progress, the print job will begin when the copy job is completed. • The scanning function cannot be used while a copy job is in progress. About interrupt copying If you press the start ( ) key to begin a copy job while a print job using the paper tray or multi-bypass tray is in progress, the copy job will begin automatically after the... -
Page 50: Using The Spf
Using the SPF The SPF is designed to hold up to 30 originals measuring from 5-1/2" x 8-1/2" to 8-1/2" x 14" and weighting from 14 lbs. to 23.9 lbs. (52g/m • Before feeding originals in the document feeder tray, be sure to remove any staples or paper clips from them. -
Page 51: Set The Copy Quantity
SET THE COPY QUANTITY Set the number of copies using the two copy quantity ( from the document glass or copying from SPF. • Press the clear ( • A single copy can be made with the initial setting, i.e., when "0" is displayed. -
Page 52: Automatic Exposure Adjustment
Automatic exposure adjustment This automatic exposure level will remain in effect until you change it again by this procedure. The automatic exposure level can be adjusted to suit your copying needs. This level is set for copying from the document glass and copying from the SPF respectively. When adjusting the automatic exposure level for copying from the SPF, place an original in the document feeder tray and make sure that the SPF (... -
Page 53: Reduction/Enlargement/Zoom
REDUCTION/ENLARGEMENT/ZOOM Three preset reduction ratios and two enlargement ratios can be selected. The zoom function enables copy ratio selection from 25% to 400% in 1% increments. Set the original and check the paper size. Use the copy ratio selector key and/or ZOOM ( select the desired copy ratio. -
Page 54: Special Functions
This chapter describes the special functions of this unit. Use these functions as needed. ABOUT THE SPECIAL FUNCTIONS OF AL-1641CS Two sided copying When copying from one-sided originals to two-sided copies, copying orientation can be selected between Turn on Long Edge and Turn on Short Edge. •... - Page 55 Making two-sided copies Place the original(s) on the document glass or in the SPF. (see "ORIGINAL PLACEMENT" (p.47). Select two-sided copy mode. When copying in a one-sided to two-sided mode: Use the original to copy key to select the desired one-sided to two-sided copying mode (Turn on Long Edge or Turn on Short Edge).
-
Page 56: Description Of Special Functions
DESCRIPTION OF SPECIAL FUNCTIONS Toner save mode (page 54) Reduces toner consumption by approximately 10%. Power save modes (page 55) The unit has two power save modes of operation: preheat mode and auto power shut-off mode. Preheat mode When the unit enters the preheat mode, the power save ( and other indicators will remain on or off as before. -
Page 57: User Programs
Press and hold down the exposure mode selector key for approximately 5 seconds. The MANUAL ( and the PHOTO ( to blink. The light and dark indicator marked "5" will light up, indicating the standard toner mode is active. To enter the toner save mode, press the light ( ) key. -
Page 58: Displaying Total Number Of Copies
Program Auto clear time Preheat mode Auto power shut- off timer Stream feeding mode Auto power shut- off mode Resolution of AUTO & MANUAL mode * Factory default settings are indicated with an asterisk (*). Press the start ( will be steadily lit and the entered value will be stored. Press the light ( copy mode. -
Page 59: Maintenance
This chapter describes how to replace the TD cartridge and drum cartridge and how to clean the unit. Be sure to use only genuine SHARP parts and supplies. TD CARTRIDGE REPLACEMENT The TD cartridge replacement required ( needed. For more information on purchasing the TD cartridge, see "ABOUT SUPPLIES AND OPTIONS"... -
Page 60: Drum Cartridge Replacement
Close the front cover and then the side cover by pressing the round projections near the side cover open button. The indicator ) will go out and the start ( When closing the covers, be sure to close the front cover securely and then close the side cover. -
Page 61: Cleaning The Unit
CLEANING THE UNIT Proper care is essential in order to get clean, sharp copies. Be sure to take a few minutes to regularly clean the unit. Do not spray flammable cleaner gas. Gas from the spray may come in contact with the internal electrical components or high-temperature parts of the fusing unit, creating a risk of fire or electrical shock. -
Page 62: Transfer Charger
Transfer charger If copies start becoming streaky or blotchy, the transfer charger may be dirty. Clean the charger using the following procedure. Turn the power switch off. (p.13) Ensure that the multi-bypass tray is open and then open the side cover while pressing the side cover open button. Take the charger cleaner out by holding the tab. -
Page 63: Troubleshooting The Unit
TROUBLESHOOTING THE UNIT This chapter describes misfeed removal and troubleshooting. For problems with the printer function or the scanner function, see the online manual or the Help file for the printer/scanner driver. TROUBLESHOOTING If any problem occurs, check the list below before contacting our Technical Assistance Department. -
Page 64: Status Indicators
When the following indicators light up or blink on the operation panel or the following alphanumeric codes appear in the display, solve the problem immediately referring to both the table below and the relevant page. Be sure to use only genuine SHARP parts and supplies. Indication Drum replacement... -
Page 65: Misfeed Removal
MISFEED REMOVAL When the misfeed ( ) indicator blinks or stop because of a misfeed. If a misfeed occurs when using the SPF, a number may appear in the display after a minus sign. This indicates the number of the originals that must be returned to the document feeder tray after a misfeed. -
Page 66: A: Misfeed In The Paper Feed Area
A: Misfeed in the paper feed area Gently remove the misfed paper from the paper feed area as shown in the illustration. When the misfeed ( blinks, and the misfed paper is not seen from the paper feed area, pull out the paper tray and remove the misfed paper. If the paper cannot be removed, proceed to "B: Misfeed in the fusing area". - Page 67 B: Misfeed in the fusing area Lower the fusing unit release lever. Gently remove the misfed paper from under the fusing unit as shown in the illustration. If the paper cannot be removed, proceed to "C: Misfeed in the transport area".
- Page 68 C: Misfeed in the transport area Lower the fusing unit release lever. See "B: Misfeed in the fusing area" (p.65). Open the front cover. To open the front cover, see "INSTALLING THE TD CARTRIDGE" (p.10). Rotate the roller rotating knob in the direction of the arrow and gently remove the misfed paper from the exit area.
- Page 69 D: Misfeed in the SPF An original misfeed may occur at one of three locations: if the misfed original is seen from the document feeder tray, (A) in the document feeder tray; if the misfed original is not seen from the document feeder tray, (B) in the exit area or (C) under the document feeder cover.
-
Page 70: Appendix
Light source Copier Resolution Printer Scanner Scan Gradation Output Bit depth Sensor APPENDIX AL-1631 Digital laser copier, desk-top type Dry, electrostatic transfer Sheets, bound documents — — 250 sheets Multi-bypass tray (50 sheets) 100 sheets Max. 8-1/2" x 14" Up to 30 sheets 3-1/2"... - Page 71 Data transmission time is not included. (Only for printer) Not includes TD and drum cartridges. As a part of our policy of continuous improvement, SHARP reserves the right to make design and specification changes for product improvement without prior notice. The performance specification figures indicated are nominal values of production units.
-
Page 72: About Supplies And Options
When ordering supplies, please use the correct part numbers as listed below. Be sure to use only genuine SHARP parts and supplies. For best copying results, be sure to use only SHARP Genuine Supplies which are designed, engineered, and tested to maximize the life and performance of SHARP copiers. -
Page 73: Moving And Storing The Unit
MOVING AND STORING THE UNIT Moving instructions When moving the unit, follow the procedure below. When moving this unit, be sure to remove the TD cartridge in advance. Turn the power switch off and remove the power cord from the outlet. -
Page 74: Software License
SHARP’S Licensors and any other proprietary legends of SHARP and/or its Licensors that were on the original copy of the Software. You may also transfer all your license rights in the software, the backup copy of the Software, the related documentation and a copy of this License to another party, provided the other party reads and agrees to the terms and conditions of this License. - Page 75 DAMAGES SO THE ABOVE LIMITATION OR EXCLUSION MAY NOT APPLY TO YOU. In no event shall SHARP'S total liability to you for all damages, losses, and causes of action (whether in contract, tort (including negligence) or otherwise) exceed the amount paid by you for the Software.
- Page 76 Credit Card Number (should it be required). How Exchange is Obtained A replacement unit in exchange for your copier is provided directly by Sharp to any U.S. location. You will be required to provide consent for acceptance of an exchange unit and provide credit card authorization for the value of the exchange unit and the outbound shipping cost.
- Page 77 Sharp to the purchaser with respect to the Product, and shall constitute full satisfaction of all claims, whether based on contract, negligence, strict liability or otherwise. In no event shall Sharp be liable, or in any way responsible, for any damages or defects in the Product which were caused by repairs or attempted repairs performed by anyone other than an authorized servicer.
-
Page 78: Msds
Emergency telephone number Canada Sharp Electronics of Canada Ltd. Telephone number for information Emergency telephone number Australia Sharp Corporation of Australia PTY. Ltd. No1 Huntingwood Drive Huntingwood Blacktown N.S.W. Telephone number for information Germany Sharp Electronics (Europe) GMBH Sonninstrasse 3, 20097 Hamburg... - Page 79 MATERIAL SAFETY DATA SHEET 3. HAZARDS IDENTIFICATION Most Important Hazards and Effects of the Products Human Health Effects :There are no anticipated carcinogenic effects from exposure based on animal tests performed using toner. When used as intended according to instructions, studies do not indicate any symptoms of fibrosis will occur. Environmental Effects :No data are available.
- Page 80 8. EXPOSURE CONTROL / PERSONAL PROTECTION Engineering Measures Ventilation Exposure limit values OSHA-PEL (USA) ACGIH-TLV (USA) Personal Protective Equipment Respiratory Protection Hand Protection Eye Protection Skin Protection Other Protective equipment :Use of a dust mask and goggles are recommended when 9.
- Page 81 MATERIAL SAFETY DATA SHEET Chronic Effect :In a study in rats of chronic inhalation exposure to a typical toner, a mild to moderate degree of lung fibrosis was observed in 92% of the rats in the high concentration (16mg/m fibrosis was noted in 22% of the animals in the middle (4mg/m group, but no pulmonary change was reported in the lowest (1mg/m exposure group, the most relevant level to potential human exposures.
- Page 82 Emergency telephone number Canada Sharp Electronics of Canada Ltd. Telephone number for information Emergency telephone number Australia Sharp Corporation of Australia PTY. Ltd. No1 Huntingwood Drive Huntingwood Blacktown N.S.W. Telephone number for information Germany Sharp Electronics (Europe) GMBH Sonninstrasse 3, 20097 Hamburg...
- Page 83 MATERIAL SAFETY DATA SHEET 3. HAZARDS IDENTIFICATION Most Important Hazards and Effects of the Products Human Health Effects :There are no anticipated carcinogenic effects from exposure based on animal tests performed using toner. When used as intended according to instructions, studies do not indicate any symptoms of fibrosis will occur. Environmental Effects :No data are available.
- Page 84 Personal Protective Equipment Respiratory Protection Hand Protection Eye Protection Skin Protection Other Protective equipment :Use of a dust mask and goggles are recommended when 9. PHYSICAL AND CHEMICAL PROPERTIES Appearance Physical State : Solid Boiling/Melting Point Flash Point (°C ) Explosion Properties Density (g/cm Solubility in water...
- Page 85 MATERIAL SAFETY DATA SHEET 12. ECOLOGICAL INFORMATION No data are available. 13. DISPOSAL CONSIDERATION Waste from residues Contaminated Packaging :Waste may be disposed or incinerated under conditions which meet 14. TRANSPORT INFORMATION UN Classification Not classified as hazardous for transport. 15.
- Page 86 Emergency telephone number Canada Sharp Electronics of Canada Ltd. Telephone number for information Emergency telephone number Australia Sharp Corporation of Australia PTY. Ltd. No1 Huntingwood Drive Huntingwood Blacktown N.S.W. Telephone number for information Germany Sharp Electronics (Europe) GMBH Sonninstrasse 3, 20097 Hamburg...
- Page 87 MATERIAL SAFETY DATA SHEET 3. HAZARDS IDENTIFICATION Most Important Hazards and Effects of the Products Human Health Effects :There are no anticipated carcinogenic effects from exposure based on animal tests performed using toner. When used as intended according to instructions, studies do not indicate any symptoms of fibrosis will occur. Environmental Effects :No data are available.
- Page 88 8. EXPOSURE CONTROLS / PERSONAL PROTECTION Engineering Measures Ventilation Exposure Limit Values OSHA-PEL (USA) ACGIH-TLV (USA) Personal Protective Equipment Respiratory Protection Hand Protection Eye Protection Skin Protection Other Protective Equipment :Use of a dust mask and goggles are recommended when 9.
- Page 89 MATERIAL SAFETY DATA SHEET Chronic Effect :In a study in rats of chronic inhalation exposure to a typical toner, a mild to moderate degree of lung fibrosis was observed in 92% of the rats in the high concentration (16mg/m fibrosis was noted in 22% of the animals in the middle (4mg/m group, but no pulmonary change was reported in the lowest (1mg/m exposure group, the most relevant level to potential human exposures.
- Page 90 Emergency telephone number Canada Sharp Electronics of Canada Ltd. Telephone number for information Emergency telephone number Australia Sharp Corporation of Australia PTY. Ltd. No1 Huntingwood Drive Huntingwood Blacktown N.S.W. Telephone number for information Germany Sharp Electronics (Europe) GMBH Sonninstrasse 3, 20097 Hamburg...
- Page 91 MATERIAL SAFETY DATA SHEET 3. HAZARDS IDENTIFICATION Most Important Hazards and Effects of the Products Human Health Effects :There are no anticipated carcinogenic effects from exposure based on animal tests performed using toner. When used as intended according to instructions, studies do not indicate any symptoms of fibrosis will occur. Environmental Effects :No data are available.
- Page 92 8. EXPOSURE CONTROLS / PERSONAL PROTECTION Engineering Measures Ventilation Exposure Limit Values OSHA-PEL (USA) ACGIH-TLV (USA) Personal Protective Equipment Respiratory Protection Hand Protection Eye Protection Skin Protection Other Protective Equipment :Use of a dust mask and goggles are recommended when 9.
- Page 93 MATERIAL SAFETY DATA SHEET Chronic Effect :In a study in rats of chronic inhalation exposure to a typical toner, a mild to moderate degree of lung fibrosis was observed in 92% of the rats in the high concentration (16mg/m fibrosis was noted in 22% of the animals in the middle (4mg/m group, but no pulmonary change was reported in the lowest (1mg/m exposure group, the most relevant level to potential human exposures.
-
Page 94: Index
INDEX Acrobat Reader ... 43 Alarm indicator - Drum replacement required indicator... 6, 58, 62 - Misfeed indicator ... 6, 62, 63 - TD cartridge replacement required indicator... 6, 57, 62 Appendix ... 68 Auto clear time ... 54, 55 Auto power shut-off mode ... - Page 95 Setting up the unit ... 7 Setup procedure... 7 Sharpdesk ... 19 Side cover ... 5 Side cover open button ... 5 Software for the SHARP Personal MFP series... 19 Specifications ... 68 SPF ... 5, 48 SPF indicator... 6, 48 SPF misfeed indicator ...
- Page 96 Using other installed drivers ... 44 Using the manuals... 4 Using the printer mode ... 32 Using the scanner mode ... 34 Using the SHARP TWAIN ... 40 Checking the package ... 8 Cleaning the unit - Cabinet ... 59 - Document glass...
- Page 97 MEMO...
- Page 98 MEMO...
- Page 99 Model Number: AL- 12PK (Printer/Scanner Expansion Kit) Responsible Party: SHARP ELECTRONICS CORPORATION Sharp Plaza, Mahwah, New Jersey 07430-1163 TEL: 1-800-BE-SHARP AL-12PK Tested To Comply With FCC Standards...
- Page 100 SHARP ELECTRONICS CORPORATION Sharp Plaza, Mahwah, New Jersey 07430-1163. www.sharpusa.com SHARP ELECTRONICS OF CANADA LTD. 335 Britannia Road East, Mississauga, Ontario, L4Z 1W9 SHARP CORPORATION Printed on 100% post-consumer recycled paper PRINTED IN CHINA 2003J TINSE1161QSZZ...