Table of Contents
Advertisement
Advertisement
Table of Contents

Related Manuals for Hitachi SMU400


Summary of Contents for Hitachi SMU400
- Page 1 System Manager Unit (SMU) Hardware Reference MK-92HNAS065-03...
- Page 2 Hitachi Data Systems Corporation or its suppliers have been advised of the possibility of such damages.
- Page 3 Document Revision Level Revision Date Description April 2015 First publication June 2015 Updated SMU Removal and Replacement section December 2015 Added Use an ssh session to the SMU Removal and Replacement section January 2016 Revised...
-
Page 4: Table Of Contents
Table of Contents Introduction to the SMU400 ........................2 SMU400 hardware ..........................4 Introduction to the SMU300 ........................5 SMU300 hardware ..........................7 Supported server releases ......................... 7 Port usage and connectivity ........................8 Serial port (COM1 and COM2) connection settings ................8 Laptop Serial/KVM Configuration ...................... -
Page 5: Introduction To The Smu400
Introduction to the SMU400 The SMU400 is a 1U rack mounted device, used to manage the servers and clusters of the Hitachi NAS Platform and the Hitachi HUS File Module storage systems. HDS does not support component replacement, and the entire SMU should be replaced in case of hardware failures. - Page 6 IPMI Ethernet port (optional). Warning: IPMI functionality is provided as-is. The IPMI functionality for the SMU400 is not provided by HDS, and the use of IPMI with the SMU400 is not supported by the HDS Technical Resource Centre. Use at your own risk.
-
Page 7: Smu400 Hardware
Off - No connection or 10 Mb/s • Green – 100 Mbps • Amber – 1 Gbps SMU400 hardware The following table provides an overview of the hardware support offered by the SMU400: Area • Front Removable hard disk •... -
Page 8: Introduction To The Smu300
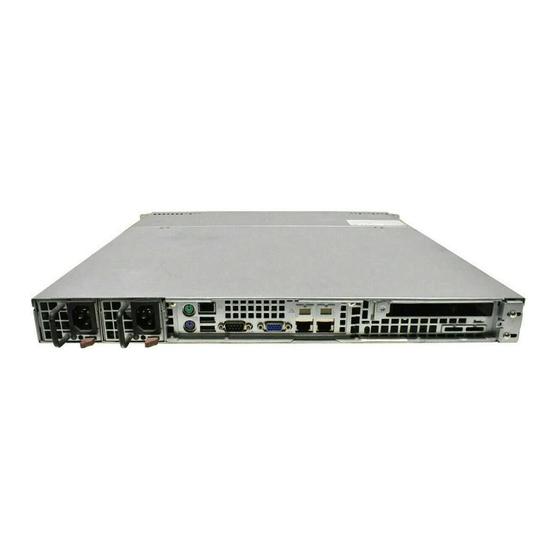
The SMU300 is a 1U rack mounted device, used to manage the servers and clusters of the Hitachi NAS Platform and the Hitachi HUS File Module storage systems. HDS does not support component replacement, and the entire SMU should be replaced in case of hardware failures. - Page 9 Figure 4: SMU300 Rear View Item Description PSU. Keyboard and mouse PS/2 ports (keyboard and mouse may be connected through USB ports). USB ports. COM1 (serial connector A). This port is preferred for serial communications, since it works at boot time and after boot time. VGA video out.
-
Page 10: Smu300 Hardware
Core2 E7500 Series • 4 GB RAM DDR2 • 2.93 Ghz Supported server releases See Hitachi NAS Platform, NAS Operating System 12.3 Release Notes or later for the most current values. CentOS Version Supported Number of Supported Servers / Server Releases... -
Page 11: Port Usage And Connectivity
Port usage and connectivity For serial (COM1 and COM2) port settings, see Serial port (COM1 and COM2) connection settings below. For all other connections, refer to the Hitachi NAS Platform and Hitachi Unified Storage System Installation guide (MK-92HNAS015) for more information. -
Page 12: Laptop Serial/Kvm Configuration
Laptop Serial/KVM Configuration 1. Make a connection to the external SMU Note: On newer notebooks, you will need a USB to serial dongle and a 9-pin DB9 null modem cable. This is the preferred method, as it will allow you to capture the output to a file when using a Putty serial connection a. -
Page 13: Smu Removal And Replacement
SMU Removal and Replacement The following sections provide the procedure for removing and replacing the SMU. HDS does not support component replacement, and the entire SMU should be replaced in case of hardware failures. Retrieve an SMU backup Perform one of the following procedures to retrieve an SMU backup (listed below in easiest to hardest order): 1. - Page 14 b) Hostname: 192.0.2.1 c) Username: manager d) Password: nasadmin e) Click Login. f) Above the left pane, open the drop-down and navigate to the location where you want to store the backup. g) In the right pane, click .. multiple times to get to the root of the SMU file structure a.
-
Page 15: Configuring The Replacment Smu
1. Execute umount /mnt 2. Remove the USB stick from the old SMU The USB stick can now be used to recover the SMU configuration to the Replacement Configuring the Replacment SMU 1. On the original SMU, label all the cables. 2. -
Page 16: Replacement Of The Original Smu
cp SMUsetup_<file_name>.hds.iso /tmp/ cp smu_date_stamp.zip /tmp 7. Enter (changes to the root directory) cd / 8. Enter (unmounts the USB drive) umount /mnt2 9. Remove the USB drive nstall the SMU Application Mount the SMU .iso file: • mount -o loop /tmp/SMUsetup_<filename>_hds.iso /mnt2 Type /mnt2/autorun Note: The SMU installation may take up to 20 minutes to install,... - Page 17 Execute smu-version (verify the SMU version is the matching or latest version of firmware) 7. Logout by typing exit Using the ethernet connection to the HNAS management switch, open an ssh putty session to the new SMU at 192.0.2.1 9. Login as Username: manager Password: nasadmin 10.
- Page 19 Hitachi Data Systems Corporate Headquarters 2845 Lafayette Street Santa Clara, California 95050-2639 U.S.A. www.hds.com Regional Contact Information Americas +1 408 970 1000 info@hds.com Europe, Middle East, and Africa +44 (0) 1753 618000 info.emea@hds.com Asia Pacific +852 3189 7900 hds.marketing.apac@hds.com MK-92HNMAS065-03...