Table of Contents
Advertisement
Thank you for purchasing this product.
Please read these instructions carefully before using this product,
and save this manual for future use.
Included Installation Instructions
The installation work should be done by a qualified installation specialist. ( 12 to 15)
Before commencing work, carefully read these installation instructions and the operating instructions
to ensure that installation is performed correctly.
(Please keep these instructions. You may need them when maintaining or moving this system.)
Model number suffix "EB" denotes UK model.
EB
EG
GN
Operating Instructions
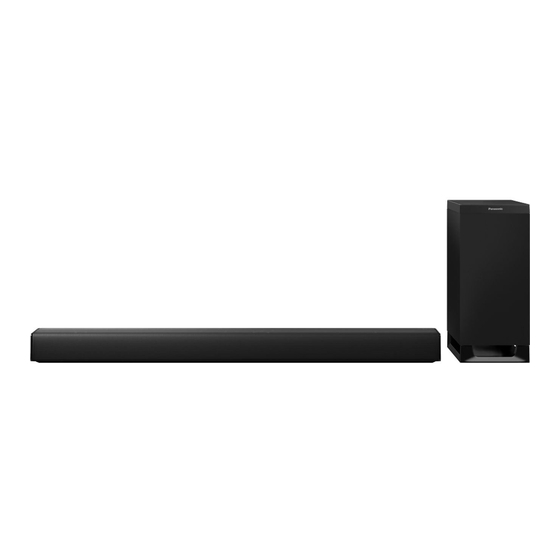
Home Theater Audio System
Model No. SC-HTB900
TQBM0479
Advertisement
Table of Contents

Related Manuals for Panasonic SC-HTB900


Summary of Contents for Panasonic SC-HTB900
- Page 1 Operating Instructions Home Theater Audio System Model No. SC-HTB900 Thank you for purchasing this product. Please read these instructions carefully before using this product, and save this manual for future use. Included Installation Instructions The installation work should be done by a qualified installation specialist. ( 12 to 15) Before commencing work, carefully read these installation instructions and the operating instructions to ensure that installation is performed correctly.
-
Page 2: Safety Precautions
CAUTION Unit ≥ Do not place sources of naked flames, such as lighted Safety precautions candles, on this unit. ≥ This unit may receive radio interference caused by mobile telephones during use. If such interference occurs, please WARNING increase separation between this unit and the mobile telephone. ≥... -
Page 3: About Bluetooth
About Bluetooth ® Caution for AC Mains Lead (For the AC mains plug of three pins) Panasonic bears no responsibility for data and/or information that is compromised For your safety, please read the following text carefully. during a wireless transmission. -
Page 4: Table Of Contents
≥ The illustrations shown may differ from your unit. ≥ These operating instructions are applicable to model SC-HTB900 for variety of regions. Unless otherwise indicated, illustrations in these operating instructions are of the model for the United Kingdom and Ireland. -
Page 5: Control Reference Guide
Control reference guide This system (Front) Main unit (SU-HTB900) Active subwoofer (SB-HWA900) [Í/I] Standby/on switch (Í/I)* Indicator Touch to switch the unit from on to standby ≥ This flashes 2 times when playback is mode or vice versa. In standby mode, the unit started or when the power is turned on from is still consuming a small amount of power. - Page 6 This system (Others) Main unit (Bottom) Active subwoofer (Rear) AC IN ( ) terminal ( 11) The symbols on this product represent the following. HDMI AV OUT (TV (ARC)) terminal (ARC compatible) ( 8) HDMI AV IN (HDMI 2) terminal ( 10) Class II equipment (The construction of the product is double-insulated.) HDMI AV IN (HDMI 1) terminal (...
- Page 7 ∫ Before using for the first time Remote control Remove the insulation sheet A. INPUT ≥ Dispose of the insulation sheet responsibly after SETUP SOUND removing it. ∫ To replace a button-type battery Battery type: CR2025 (Lithium battery) ...
-
Page 8: Step 1 Connections
Step 1 Connections Turn off all equipment before connection and read the appropriate operating instructions. Do not connect the AC mains lead until all other connections are completed. When connecting to 4K compatible equipment and 4K Ultra HD TV, use High Speed HDMI cables which support 18 Gbps bandwidth. - Page 9 Connection with players, etc., supporting HDR10+ and Dolby Vision This system does not support HDR10+ and Dolby Vision . When connecting to a player, TV, etc., that supports HDR10+ or Dolby Vision , use the following connection. ≥ The name of the terminal may be different depending on the device that supports HDR10+. Refer to the operating instructions of the supporting device for details.
- Page 10 Connection from an HDMI Using the IR Blaster compatible device (When the remote control does not work properly) You can direct the audio signal from the connected Blu-ray Disc player, DVD player, Set Depending on how the main unit is setup, it may Top Box, etc.
- Page 11 3 Aim the TV’s remote control at this AC mains lead connection system’s remote control sensor and operate the TV. ≥ Connect only after all other connections are completed. ≥ For the location of the TV’s remote control signal sensor, refer to the operating instructions for the TV.
-
Page 12: Step 2 Placement
Take care not to damage the inside speaker unit. Professional installation is required. The installation should never be done by any other than a qualified installation specialist. PANASONIC DISCLAIMS ANY PROPERTY DAMAGE AND/OR SERIOUS INJURY, INCLUDING DEATH RESULTING FROM IMPROPER INSTALLATION OR INCORRECT HANDLING. - Page 13 When placing the main unit in a rack or on a table Additionally required accessories (commercially available) ≥ Fall prevention cord ........................k 2 ≥ Screw eyes (to attach the fall prevention cord) ................k 2 ≥ Use commercially available screws that are capable of supporting over 60 kg. ≥...
- Page 14 When attaching the main unit to a wall The main unit can be wall mounted using the supplied wall mount brackets, etc. Make sure that the screw used and the wall are strong enough to support the weight of at least 60 kg. The screws and other items are not supplied as the type and size will vary with each installation.
- Page 15 3 Drive a screw into the wall. ≥ Use the measurements indicated below to identify the screwing positions on the wall. ≥ Leave at least 200 mm of space above of the main unit to allow enough space for fitting the main unit. ≥...
-
Page 16: Step 3 Active Subwoofer Wireless Connection
Step 3 Active Step 4 Network subwoofer wireless settings connection You can stream online music services. To use these features, this unit must join the Preparation same internet-connected network as the device. ≥ Turn on the main unit. ≥ Please update the system’s firmware after the network settings are complete. - Page 17 Restore the factory settings on the main unit if this occurs.( 26, “To return to the factory preset.”) ≥ This system will be displayed as “Panasonic HTB900-****” if the device name is not set. (“****” stands for characters unique to each set.) This system's name can be changed with the app “Google...
-
Page 18: Using This System
[INPUT]. [INPUT] “TV” --# “HDMI 1” -# “HDMI 2” Remote control code ^- “NETWORK” ( “BLUETOOTH”(} When other Panasonic devices respond to this Select the Bluetooth device as ® system’s remote control, change the remote -PAIRING] the source. -
Page 19: Streaming Music Over The Network
Streaming music over Not all music streaming services are available the network in all countries/regions. Registration/ subscription may be required, or fees may be charged to use music streaming services. You can stream online music services or music Services are subject to change or be files from your smartphone/tablet to this system. -
Page 20: Bluetooth ® Operations
2 Press and hold [ -PAIRING] until Press and hold [ -PAIRING] until the “PAIRING” is indicated on the display. “BLUETOOTH READY” is indicated on the display. 3 Select “Panasonic HTB900-****” from the Bluetooth device’s Bluetooth ® ® ≥ When “BLUETOOTH” is selected as the source, this menu. -
Page 21: Sound Menu
Sound menu ∫ CLR DIALOG You can change the level of dialogue clarity when 1 Press [SOUND] repeatedly to select you want to emphasise people’s voices, etc. the sound effect and then press [OK]. Of the levels “LEVEL 1” to “LEVEL 4”, the effect increases the higher the level number. -
Page 22: Setup Menu
Setup menu ∫ WALL MOUNT Select the appropriate speaker placement mode 1 Press [SETUP] repeatedly to select to suit your placement method. This system will adjust the sound effect according to the the setup item and then press [OK]. placement mode setting. ≥... - Page 23 ( 32) Firmware update ∫ Wi-Fi The wireless LAN function can be enabled or Occasionally, Panasonic may release updated disabled. firmware for this system that may add or improve the way a feature operates. These updates are ∫...
-
Page 24: Linked Operations With The Tv (Viera Link "Hdavi Control Tm ")
VIERA Link “HDAVI Control” is a convenient ( 16) function that offers linked operations of this 1 Press [SETUP] repeatedly to select “F/ system, and a Panasonic TV (VIERA) under W UPDATE” and then press [OK]. “HDAVI Control”. You can use this function by connecting the ≥... - Page 25 TV input or the TV channel is ≥ This unit supports “HDAVI Control 5” function. changed. “HDAVI Control 5” is the standard for Panasonic’s HDAVI If the speaker output setting on the TV is set to this Control compatible equipment. This standard is compatible system, the TV and the main unit turn on automatically with Panasonic’s conventional HDAVI equipment.
-
Page 26: Troubleshooting
Troubleshooting Reference The remote control does not work properly. ≥ The battery is depleted. Replace it with a new Before requesting service, make the following one. ( 7) checks. If you are in doubt about some of the ≥ It is possible that the insulation sheet has not check points, or if the solutions indicated in the been removed. - Page 27 (HDMI AV IN or HDMI AV OUT), this device it is connected to, via HDMI, does not system will not operate correctly. Turn the main support Panasonic’s VIERA Link feature (HDAVI unit off, disconnect the AC mains lead and Control 3 or later).
- Page 28 Sound stops. ( 8) The power of the main unit turns off ≥ If the main unit is connected to a Panasonic TV automatically. and turned on using the remote control or the (When the main unit detects a problem, a safety...
- Page 29 Network Active Subwoofer Cannot connect to the network. No power. ≥ This system’s Wi-Fi security supports WPA2 Ensure the AC mains lead of the active subwoofer only. Your wireless router must therefore be is connected properly. WPA2 compatible. For details on the security supported by your router and how to change the After turning the subwoofer on, it immediately settings, please refer to the operating...
- Page 30 Main unit displays “DL ERROR” The firmware download has failed. Press [OK] to exit. Please try again later. “F61” ≥ There is a problem with the amplifier of the system. “FAIL” ≥ Disconnect the AC mains lead and consult the Setting has failed.
-
Page 31: Unit Care
∫ Clean this system with a soft, dry States and other countries. cloth HDAVI Control is a trademark of Panasonic Corporation. ≥ When dirt is heavy, wring a cloth moistened in The Bluetooth word mark and logos are registered trademarks ®... -
Page 32: Specifications
Specifications GENERAL AMPLIFIER SECTION RMS OUTPUT POWER (non-simultaneous drive) Power consumption FRONT SPEAKER (L/R) Main unit 40 W 85 W+85 W Active subwoofer 48 W (1 kHz, T.H.D. 10.0 %, 4 Ω, 20 kHz LPF) Standby FRONT SPEAKER (Centre) 85 W Main unit (1 kHz, T.H.D. - Page 33 Wi-Fi SECTION WIRELESS SECTION Wireless module Standard Frequency Range IEEE802.11a/b/g/n/ac Frequency Band 2.40335 GHz to 2.47735 GHz 2.4 GHz band/5 GHz band No. of channels Security WPA2 , Mixed mode WPA2 /WPA * The WLAN feature of this product shall exclusively be used Bluetooth SECTION ®...
- Page 34 English Declaração de Conformidade (DoC) Declaration of Conformity (DoC) Com o presente documento, a “Panasonic Corporation” declara que este Hereby, “Panasonic Corporation” declares that this product is in produto se encontra em conformidade com os requisitos específicos e compliance with the essential requirements and other relevant demais especificações referentes à...
- Page 35 Slovensky Latviski Vyhlásenie o zhode (DoC) Atbilstības deklarācija (DoC) “Panasonic Corporation” týmto vyhlasuje, že tento výrobok je v Ar šo “Panasonic Corporation” paziņo, ka šis izstrādājums súlade so základnými požiadavkami a ďalšími príslušnými atbilst pamatprasībām un pārējiem Direktīvas 2014/53/ES ustanoveniami smernice 2014/53/EÚ.
- Page 36 Български Izjava o skladnosti (DoC) Декларация за съответствие (DoC) “Panasonic Corporation” v tem dokumentu izjavlja, da je izdelek v skladu z С настоящото “Panasonic Corporation” декларира, че този bistvenimi zahtevami in drugimi pomembnimi določbami Direktive 2014/53/EU. продукт е в съответствие с основните изисквания и други...
- Page 37 At least three (3) years from delivery of this product, Panasonic will give to any third party who contacts us at the contact information provided below, for a charge no more than our cost of physically performing source code distribution, a complete machine-readable copy of the corresponding source code covered under GPL V2.0, LGPL V2.1 or the other licenses with the obligation to do so, as well...
- Page 38 If there is a major failure in regard to the product which cannot be remedied then you must no fy us within a reasonable period by contac ng the Panasonic Customer Care Centre. If the failure in the product is not a major failure then Panasonic may choose to repair or replace the product and will do so in a reasonable period of me from receiving no ce from you.
- Page 39 TQBM0479...
- Page 40 ≥ Or go on line through our Internet Accessory ordering application at www.pas-europe.com. ≥ Most major credit and debit cards accepted. ≥ All enquiries transactions and distribution facilities are provided directly by Panasonic UK. ≥ It couldn’t be simpler! ≥ Also available through our Internet is direct shopping for a wide range of finished products. Take a browse on our website for further details.