Fujitsu UTY-RNRUZ2 Operating Manual
Remote controller (wired type)
Hide thumbs
Also See for UTY-RNRUZ2:
- Installation manual (11 pages) ,
- Design & technical manual (978 pages)

Related Manuals for Fujitsu UTY-RNRUZ2


Summary of Contents for Fujitsu UTY-RNRUZ2
- Page 1 REMOTE CONTROLLER (WIRED TYPE) OPERATING MANUAL WIRED REMOTE CONTROLLER Keep this manual for future reference. UTY-RNRUZ2 PART NO. 9380859697...
-
Page 2: Table Of Contents
OPERATING MANUAL Initial Setting (for administrator)......18 3-8-1 Language Setting ........... 19 PART NO. 9380859697 WIRED REMOTE CONTROLLER 3-8-2 Date Setting ............19 3-8-3 Temp. Unit Setting ..........20 3-8-4 R.C.Group Name Setting ........20 Contents 3-8-5 R.C. Sensor Setting ..........20 INTRODUCTION 3-8-6 Password Setting ........... - Page 3 Screen structure Mode Air Flow Direction Setting Cool Heat Setting Setting 2-2-1 Custom Auto Individual VT Hold Cancel Back Set Temp. Auto Off Timer Setting Fri 10:00AM 2-2-2 Cool Heat Enable /Disable [Dnable] Operation Stop Time [in 30 min.] °F °F Time Range Setting [ –...
-
Page 4: Introduction
INTRODUCTION ■ SYSTEM OUTLINE 1 Terminology ■ SAFETY PRECAUTIONS System related terms (♦ is for VRF system) • The “SAFETY PRECAUTIONS” indicated in the manual (a) VRF system ♦: contain important information pertaining to your safety. Be VRF (Variable Refrigerant Flow) is a large multi system sure to observe them. -
Page 5: Password Configuration
2 Password configuration This unit can set the following 2 kinds of passwords: (a) Password This is a password for administrator. Password is re- quested by the setting which requires management. For a description of password setting and change, refer to [3. -
Page 6: Monitor
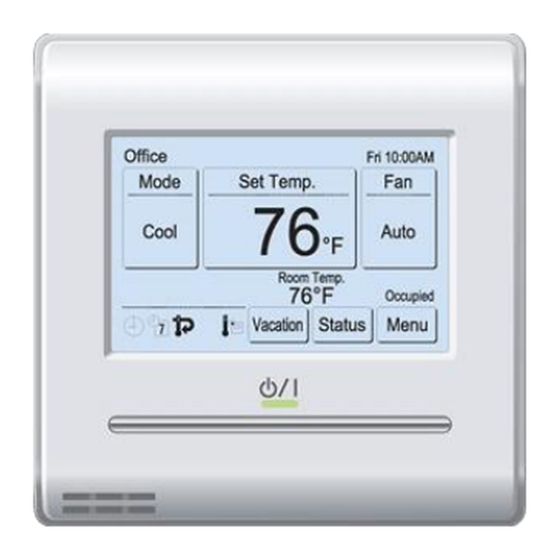
1 MONITOR (k) Status: When this is touched, the display switches to the “Status” screen. Refer to [1-1-2 Status Display]. 1-1 Monitor Vacation: When this is touched, the schedule is disabled and the 1-1-1 Monitor mode screen indoor unit remains unoccupied. Refer to [1-1-3 Vaca- tion]. - Page 7 < Page 1 > Under Maintenance: Indoor unit is inspected. Indoor unit operation is stopped during this time. Status Page 1/ 4 Air Flow Direction Forced Stop: Individual Indoor unit is stopped forcibly by external input. Economy Anti Freeze Next Monitor Page Mode Mismatch:...
-
Page 8: Vacation
1-1-3 Vacation 1-1-5 Indoor Unit Stop When the room will be empty for a long time due to vaca- When cleaning an indoor unit or when the room is not used, tion, etc., disable the indoor units schedule and continue the etc., the indoor unit can be stopped. -
Page 9: Operation Settings
2-2-2 Set the Temperature Notes • The Operation button cannot be operated at screens (1) Touch the [Set Temp.] on the other than the Monitor Mode Screen. Fri 10:00AM monitor mode screen. Set Temp. Mode • Depending on the occupied state and the indoor unit op- 80°F Cool Custom... -
Page 10: Setting
3 SETTING Note When using this unit together with a wireless remote 3-1 Select the Setting Items controller, the air flow direction of the indoor unit may not match the direction indicated on this unit. (1) Touch the [Menu] on the moni- Fri 10:00AM tor mode screen. -
Page 11: Auto Off Timer Setting
Notes • To clear the air flow direction setting of all the displayed Auto Off Timer Enable/Disable Fri 10:00AM indoor units, touch [Reset]. When [Yes] of the confir- Enable /Disable [Disable] Enable mation screen is touched, the setting is cleared and Operation Stop Time [In 30 min.] switches to the air flow direction setting of “VT setting”... -
Page 12: Weekly Timer Setting (For Administrator)
3-4-1 Enable Schedule (11) Touch the [End Time] on the “Time Range Setting” screen. Select the schedule to be used. (12) “End Time” screen is displayed. Set the End Time by touching [ ] or [ ]. (1) Touch the [Enable Schedule] on the “Weekly Timer Set- ting”... - Page 13 (6) The items that can be set for one time are the [Op. (11) When the [OK] on the screen Monday Page 1/ 3 Time], [Status], and [Set. Temp]. When each item is of (5) is touched, the display 08:00 AM Cool °F /Heat...
-
Page 14: Day Off Setting
3-4-3 Day Off Setting • Away Setting (for administrator): Set the operation start temperature at Unoccupied. To use this function, “Used” must be set by “R.C. Sensor Set the day of the week of which Weekly Timer is to be Setting”. -
Page 15: Set Temp. Range Setting (For Administrator)
Set the Lower Limit and Upper Limit When the [OK] is touched, the display returns to “Set Temp. Auto Return” screen. (4) Touch the [Lower Limit - Upper Limit] on the “Set Temp. Range Setting” screen. Set the Return Time and Temperature (5) “Setting”... -
Page 16: Away Setting
3-5-5 Away Setting 3-5-6 Human Sensor Setting (for administrator) (1) Touch the [Human Sensor Setting] on the “Special Set- (1) Touch the [Away] on the “Spe- Special Setting Page 2/ 2 ting” screen. When the “Password Verification” screen is cial Setting” screen. When the Human Sensor Away Setting displayed, enter the password and touch the [OK]. -
Page 17: Fan Control For Energy Saving (For Administrator)
3-6 Summer Time (Daylight Saving Time) Setting (for administrator) Auto Off Enable/Disable Fri 10:00AM Enable Enable/Disable [Disable] The time display and timer operation are 1 hour earlier than usual. Absence Detection Time [In 24 hr] Disable (1) Touch the [Summer Time Cancel Cancel Main Menu... -
Page 18: Panel Calibration
3-7-1 Panel Calibration 3-7-2 Backlight Setting (1) Touch the [Backlight Setting] (1) Touch the [Panel Calibration] on the “Preference” Preference on the “Preference” screen. screen. Panel Backlight Calibration Setting (2) “Panel Calibration” screen is displayed. Touch the [Start] on the “Panel Calibration” screen. Contrast Back Preference... -
Page 19: Contrast Setting
Apply the setting. • Date Setting: The date and time display format are set. When the (8) After setting is complete, power is turned off, the date and time data hold time Backlight Setting touch the [OK] on the “Back- by built-in battery is approximately 7 days. -
Page 20: Language Setting
3-8-1 Language Setting When the [OK] is touched, the display returns to the “Date and Time Setting” screen. (1) Touch the [Language Setting] Note Initial Setting Page 1/ 3 on the “Initial Setting” screen. Language Setting Date Setting Setting screen format corresponds to the preference of “Language Setting”... -
Page 21: Temp. Unit Setting
3-8-3 Temp. Unit Setting 3-8-5 R.C. Sensor Setting (1) Touch the [Temp. Unit Setting] on the “Initial Setting” (1) Set the [R.C. Sensor Setting] on the “Initial Setting” screen. screen. (2) “Temp. Unit Setting” screen is displayed. Select the [°F] (2) “R.C. -
Page 22: Display Item Setting
Password request to the setting item On/Off is set. (5) Touch the [Change Setting] Display Item Setting Filter Sign Password Setting on the “Password Setting” Filter Sign [Visible] Visible Change Password screen. Room Temp. [Invisible] Invisible Change Setting Cancel Cancel Back When the [OK] is touched, the display returns to the “Change Setting”... -
Page 23: Maintenance (For Administrator)
3-9-1 Error History Initial Setting Optimum Start Setting Page 3/ 3 (1) Touch the [Error History] on RC Master/ Maintenance Page 1/ 3 Deadband Setting the “Maintenance” screen. Slave Setting Setting Error History Status List Optimum Start I.U. Display Setting Number Setting Filter Sign Version... -
Page 24: Filter Sign Reset
3-9-3 Filter Sign Reset 4-1-3 RB priority connection in heat recovery system (1) Touch the [Filter Sign Reset] on the “Maintenance” (a) For indoor units or RB groups by RB priority connec- screen. tion, refer to the following table: After the data transmission screen is displayed, the Status Selectable Not selectable... -
Page 25: Deadband And Set Temperature
Data acquisition error Unit: in (mm) 4-3/4(120) 13/16 (20.4) All Fujitsu General products are manufactured to metric units and tolerances. United States customary units are provided for reference only. In cases where exact dimensions and tolerances are required, always refer to metric units.