Table of Contents
Advertisement
Available languages
Available languages
Advertisement
Chapters
Table of Contents
Troubleshooting

Related Manuals for Electrolux EQAXF01BXSI


Summary of Contents for Electrolux EQAXF01BXSI
- Page 1 EQAXF01BXSI EQAXF01BXWI PANDUAN PENGGUNA...
- Page 2 Terima kasih telah memilih Electrolux. Panduan ini mengandung semua informasi yang Anda butuhkan untuk menggunakan dispenser air Anda dengan aman dan benar. Silahkan baca semua instruksi sebelum menggunakan alat, dan simpan panduan ini di tempat yang aman untuk referensi di masa mendatang. Jangan lepaskan label pelat peringkat, yang melampirkan label identifikasi perekat yang berisi kode, nomer model, pabrikan, dan informasi lainnya.
-
Page 3: Table Of Contents
Daftar Isi Informasi dispenser air Tindakan pencegahan Ilustrasi Menggunakan dispenser air Anda Instruksi operasi Pembersihan dan pemeliharaan Penyelesaian masalah Trouble Shooting Diagram sirkuit Informasi teknis Customer Care Customer Care Perhatian Jangan mencoba memasang atau menghidupkan unit tanpa membaca tindakan pencegahan yang diindikasikan dalam panduan ini. Dispenser memanaskan air hingga suhu 90 C. -
Page 4: Informasi Dispenser Air
Informasi dispenser air 1. This unit is designed for drinkable water only. Put bottles as specified inside 1. Unit ini dirancang hanya untuk air minum. Masukan botol sebagaimana the cabinet before using. ditentukan dalam kabinet sebelum menggunakan. 2. Unit ini harus digunakan dalam lingkungan dengan suhu mulai dari 10 C hingga C dengan kelembaban relatif tidak lebih tinggi dari 90%. -
Page 5: Tindakan Pencegahan
Tindakan pencegahan Untuk anak-anak 1. Hancurkan karton, kantong plastik dan bahan pengemas lainnya setelah dispenser dibongkar. Anak-anak mungkin menggunakannya untuk bermain. 2. Anak-anak membutuhkan pengawasan saat menggunakan dispenser. 3. Rekomendasikan untuk memasang braket anti 3. Recommend to install the anti-tilt bracket at the goyang di bagian belakang dispenser air ini back side of this water dispenser to prevent untuk mencegah dispenser jatuh, yang dapat... - Page 6 7. Jangan menarik atau memasukkan steker (Fig. 3) dengan tangan basah untuk menghindari kejutan listrik. (Gbr. 3) 8. Use the switch when turning the heating/ cooling On/Off. Locate on the left back 8. Gunakan saklar saat memutar side of water dispenser.(page 6) pemanas/pendingin ON/OFF.
-
Page 7: Ilustrasi
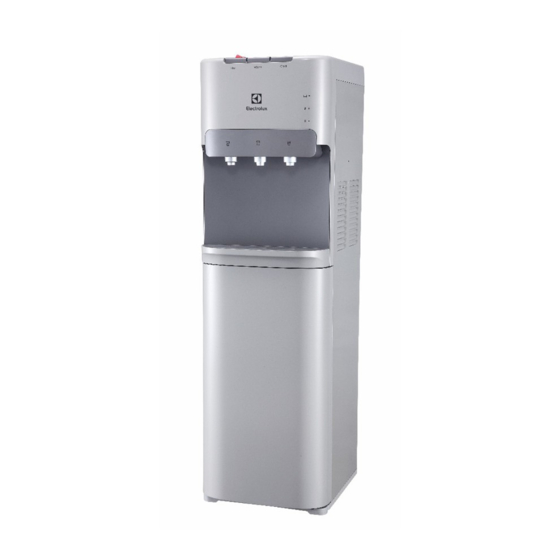
Ilustrasi (FRONT) saklar pendinginan tombol air panas tombol air biasa saklar pemanas kabel daya tombol air dingin panel lubang pembuangan cerat kondensator tempurung depan baki tetesan... -
Page 8: Menggunakan Dispenser Air Anda
Menggunakan dispenser air Anda Meletakkan dispenser 1. Tempatkan dispenser dengan tegak. 2. Letakkan dispenser pada permukaan yang keras dan rata di lokasi yang near a grounded socket. Do not plug in power cord yet. teduh dan sejuk di dekat soket yang diarde. Jangan pasang kabel daya. 3. -
Page 9: Instruksi Operasi
Menyediakan listrik Colokkan kabel ke soket yang dibumikan socket. dengan benar. Pada saat ini, pompa akan mulai memindahkan air dari botol ke tangki panas dan dingin. Diperlukan waktu sekitar approximate 12 minutes to fill the tanks 12 menit untuk mengisi tangki untuk for the first time. - Page 10 Dispensing air dingin After setup, it will take up to approximate Setelah pengaturan, diperlukan waktu 1 hour get water to maximum cold sekitar 1 jam untuk mendapatkan air hingga suhu dingin maksimum. Selama ini, kompresor bisa berjalan terus menerus. ini normal.
-
Page 11: Pembersihan Dan Pemeliharaan
Menukar botol A flashing orange light on your function lights alerts you Lampu yang berkedip pada lampu fungsi Anda memberi tahu Anda ketika botol Anda kosong. mengganti botol secepat mungkin. Jangan membuang air panas, dingin atau dingin jika orange lampu orange berkedip saat Anda dapat mengosongkan tangki dan menyebabkan dispenser terlalu panas. - Page 12 Sanitasi Mesin harus didesinfeksi dengan disinfektan yang dibeli secara terpisah dari toko obat atau pasar sesuai dengan instruksi manual disinfektan dan kemudian bersihkan dengan air (lihat instruksi pembersihan dan pengeringan). Umumnya, ini harus dilakukan setiap tiga bulan. Gbr. 14 Untuk menghilangkan deposit mineral Campurkan 1 galon air dengan setengah pon kristal asam sitrat, masukkan ke dalam mesin dan pastikan air dapat mengalir keluar dari cerat air panas ketika tombol air panas diaktifkan.
-
Page 13: Trouble Shooting Penyelesaian Masalah
Penyelesaian masalah Sebelum menghubungi perwakilan layanan Anda, periksa item berikut: Dispenser air tidak berfungsi • Pastikan dispenser air terhubung dengan benar ke soket yang berfungsi dan tombol pemanas / pendingin disetel ON. Air bocor • Cabut dispenser air, keluarkan botol dan ganti dengan yang baru. •... -
Page 14: Diagram Sirkuit
CON5 N_COM EARTH2 FLOAT EARTH L_HEATER1 KEY1 N_HEATER2 KEY2 L_HEATER2 Hot Thermostat HEATE N_HEATE Informasi Teknis EQAXF01BXSI EQAXF01BXWI Cooling Power 100W 100W 420W 420W 1.0A 1.0A L310mmxW374mmxH1040mm L310mmxW374mmxH1040mm 14.7kg 14.7kg Catatan: Data teknis di atas didasarkan pada metode pengujian standar, lihat... -
Page 15: Customer Care Customer Care
Office Fax : (+84 8) 3910 5470 Email : vncare@electrolux.com Malaysia Domestic Toll Free : 1300-88-11-22 Electrolux Home Appliances Sdn. Bhd. Unit T2-7, 7th Floor, Tower 2 , Jaya33 Hyperoffice, No. 3, Jalan Semangat, Seksyen 13, 46100 Petaling Jaya, Selangor Office Tel : (+60 3) 7843 5999... - Page 17 EQAXF01BXSI EQAXF01BXWI USER MANUAL...
- Page 18 This label will be used by an ELECTROLUX authorized service representative in the event that your water dispenser needs service. Environmental Notice The packaging material used is recyclable.
- Page 19 Contents Water dispenser information ............Precautions ................. Illustration ................... Using your water dispenser ............Operation instructions ............... Cleaning and maintenance ..............Trouble Shooting ................Circuit diagram ................Technical Information ............... Customer Care ................Attention Do not try to install or turn on the unit without having read the indicated safety precautions in this manual.
-
Page 20: Water Dispenser Information
Water dispenser information 1. This unit is designed for drinkable water only. Put bottles as specified inside the cabinet before using. 2. This unit should be used in an environment with temperatures ranging from 10°C to 43°C with a relative humidity not higher than 90%. 3. -
Page 21: Precautions
Precautions For children 1. Destroy the carton, plastic bag and other packing materials after the dispenser is unpacked. Children might use them for play. 2. Children require supervision when using the dispenser. 3. Recommend to install the anti-tilt bracket at the back side of this water dispenser to prevent the dispenser from falling down which could cause injury.(Fig. - Page 22 7. Do not pull out or insert the plug with wet hands to avoid electric shock.(Fig. 3) 8. Use the switch when turning the heating/ cooling On/Off. Locate on the left back side of water dispenser.(page 6) 9. Do not fasten, twist or tie the power cord. if the power cord is damaged, it should be replaced by the manufacturer, service technician or a qualified person to prevent...
-
Page 23: Illustration
Illustration (FRONT) (REAR) cooling switch button of hot water button of normal water heating switch power cord button of cold water panel drain hole spout condenser front carapace drip tray... -
Page 24: Using Your Water Dispenser
Using your water dispenser Locate dispenser 1. Place dispenser upright. 2. Locate dispenser on a hard and level surface in a cool shaded location near a grounded socket. Do not plug in power cord yet. 3. Position dispenser so the back is at least 20 cm from wall and there are at least 20 cm of clearance on both sides. -
Page 25: Operation Instructions
Provide electricity Plug cord into a properly grounded socket. At this time the pump will begin to move water from the bottle to the hot and cold tanks. It will take up to approximate 12 minutes to fill the tanks for the first time. - Page 26 Dispensing cold water After setup, it will take up to approximate 1 hour get water to maximum cold temperature. During this time the compressor could run continuously. This is normal. 1. Position bottle, glass, pitcher or cooking pot below spout. 2.
-
Page 27: Cleaning And Maintenance
Changing bottles A flashing orange light on your function lights alerts you when your bottle is empty. Replace the bottle as soon as possible. Do not dispense hot, cool or cold water if the orange light is flashing as you could empty the tanks and cause the dispenser to overheat. - Page 28 Sanitizing The machine should be disinfected with disinfectant separately bought from drugstore or marketplace according to the instruction manual of the disinfectant and then clean it with water (see cleaning and draining instructions). Generally this should be done every three months. Fig.
-
Page 29: Trouble Shooting
Trouble Shooting Before calling your service representative check the following items: Water dispenser does not work • Make sure the water dispenser is properly connected to a working socket and the heating/cooling switches are set ON. Water is leaking • Unplug the water dispenser, remove bottle and replace with new one. •... -
Page 30: Circuit Diagram
EARTH2 COMP EARTH FLOAT KEY1 KEY2 L_HEATER1 L_HEATER2 N_HEATER2 Hot Thermostat 1 Hot Thermostat 2 HEATER N_HEATER1 Technical Information EQAXF01BXSI EQAXF01BXWI Model Power supply 220V-240V~ 50/60Hz 220V-240V~ 50/60Hz Cooling Power 100W 100W Heating Power 420W 420W Hot Water 4L/h(≥90°C) 4L/h(≥90°C) Cold Water 2L/h(≤10°C) -
Page 31: Customer Care
Office Fax : (+84 8) 3910 5470 Email : vncare@electrolux.com Malaysia Domestic Toll Free : 1300-88-11-22 Electrolux Home Appliances Sdn. Bhd. Unit T2-7, 7th Floor, Tower 2 , Jaya33 Hyperoffice, No. 3, Jalan Semangat, Seksyen 13, 46100 Petaling Jaya, Selangor Office Tel : (+60 3) 7843 5999...