
Related Manuals for NEC GT200


Summary of Contents for NEC GT200
- Page 1 GT200 Terminal User’s Guide for UNIVERGE SV Series (ITX-1DE-1W(BK)TEL) A50-035098-001 Issue 1.0...
- Page 2 Document History Document History 1. Revision 1.0 Jan 1st, 2014 First release...
- Page 3 (SLA) or UNIVERGE SV8100 system (SLA). The software contains certain third party open source software components which are provided under the terms and conditions designated at http://www.bcom.nec.co.jp/soft-license/ITX-1DE-1W_OSS.html. The terms and conditions of SLA are not applied to such third party open source software components.
-
Page 4: Table Of Contents
Table of Contents Table of Contents 1 Overview ..........................5 Package Contents ......................... 5 2 Product Description ......................6 Front View ..........................6 Back View ..........................7 Connecting the Phone ......................8 Supporting Communication Servers ..................8 3 MMI (Man Machine Interface) Configuration ..............9 Phone Book .......................... -
Page 5: Overview
Chapter 1 Overview Your IP Phone is a full-feature telephone that provides voice communication over an IP network, that allows you to place and receive phone calls, put calls on hold, transfer calls, and so on. Read this user manual carefully to learn how to operate this product and take advantage of its features. -
Page 6: Product Description
Chapter 2 Product Description This chapter contains important information to help you familiarize yourself with the functions of the VoIP phone. -
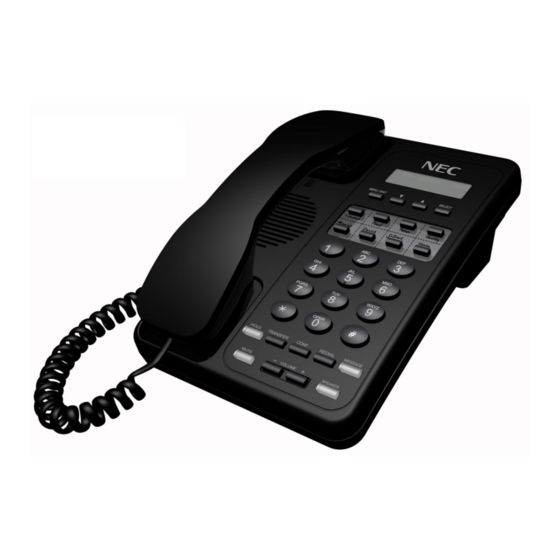
Page 7: Back View
Chapter 2 Product Description Name Description Display screen Displays calls and status information. MENU/ EXIT Press to access the menu options or cancel your selection and return to the previous level. Press to scroll through lists and menus on the display. SELECT Press to enter a menu or confirm a selection. - Page 8 Chapter 2 Product Description The following illustration shows how to connect the VoIP phone to power, LAN and the handset. LAN Cable Backside LAN Hub The following communication servers support the VoIP Phone: UNIVERGE SV8500: S7 or higher UNIVERGE SV8300: R9 or higher UNIVERGE SV8100: R9 or higher...
-
Page 9: Phone Book
Chapter 3 MMI Configuration The menu directory enables you to access the product settings and set up the device according to the network conditions and your preferences. The menu is set up in a simple and easily accessible manner. Follow these steps to access the menu and the menu items. -
Page 10: Call History
Chapter 3 MMI Configuration The VoIP phone stores information about calls made or received. The lists are stored from the newest to oldest entries. The oldest entries are deleted as new entries are added. Press the MENU/EXIT key, then select Call History to view call information. A maximum of 200 calls can be saved for each of the received and dialed call logs. -
Page 11: Phone Settings
Chapter 3 MMI Configuration Phone Settings allow you to set up phone functions such as call forwarding, speed dialing, and more. These settings are not available Always Forward These settings are not available Always Forward allows you to set the account number to which all incoming calls are to be forwarded. Press the MENU/EXIT key. - Page 12 Chapter 3 MMI Configuration Press the MENU/EXIT key, then use the UP and DOWN keys to switch from YES/NO. Press the SELECT key again to confirm or cancel and return to the previous menu level. Even if No Answer Forward is set, no indication on the LCD. Speed Dial You can use the speed dial feature to assign a hotkey with the phone numbers that you dial most frequently.
-
Page 13: Network Settings
Chapter 3 MMI Configuration 12/24Hour You can select the time format according to your preference. To set the time format, do the following: Use the UP and DOWN keys to select the date format, and then press the SELECT key to confirm selection. 12 Hour (Default) 24 Hour Press the MENU/EXIT and use UP and DOWN keys to switch from YES/NO. -
Page 14: Sip Settings
Chapter 3 MMI Configuration VLAN Setting To configure the VLAN setting, press the SELECT key to access the submenu options and perform necessary functions. Press the SELECT key to enter the VLAN setting submenu options. Switch:Select this option to enable/ disable VLAN connection. ... -
Page 15: Sip Account
Chapter 3 MMI Configuration Note: Unless requested, Port Settings do not require modification. Codec Settings This function allows you to set Codec priorities and types. This VoIP phone supports the following Codecs: G.711 u- law/G.711 A-law, G.729A. A maximum of three priority levels can be set in the SDP; “First Priority”, “Second Priority” and “Third Priority”. - Page 16 Chapter 3 MMI Configuration Press the MENU/EXIT key, then use the UP and DOWN keys to switch from YES/NO. Press SELECT again to confirm or to cancel and return to previous menu level. Note: If you have more than one SIP account, repeat the settings in step 1 to configure additional SIP accounts. For SV8300 Select one of the ten SIP accounts to display the submenu.
-
Page 17: System Settings
Chapter 3 MMI Configuration Expire time: User can set the timeout duration for registration request, it should be “120” or more. DTMF Type: Input the DTMF type options: RFC2833 / SIP INFO / and In-Band, “SIP INFO” is recommended on SV8100 ... -
Page 18: Web Configuration
Chapter 4 Web Configuration This chapter contains important information to help you configure the network settings for your VoIP phone from the phone and your web browser. Note: Supported Web browsers are Internet Explorer 7, 8, 9 and 10. To access the web configuration menu: Connect a PC to a switch or hub that has access to the subnet of the IP Address assigned to the VoIP phone Set the network setting to DHCP on your PC. - Page 19 Chapter 4 Web Configuration To check the call history from the web browser: Click Call History. The following screen will be displayed. In the Call History Type: dropdown, select call type to view. Dialed Calls to check dialed calls. ...
- Page 20 Chapter 4 Web Configuration In the Phone Book Page: dropdown, select page number to view. The web page will display the phone book information for the phone book page selected. To remove a certain phone entry, check the Select box of the entry to be removed, then click Delete Selected button.
- Page 21 Chapter 4 Web Configuration Call Forward These Settings are not available To configure Call Forward settings through the web browser: Click Phone Settings, Call Forward. The following screen will be displayed. Always Forward: To forward all incoming calls, enter the phone number, domain and account in the Always field.
-
Page 22: Dial Plan
Chapter 4 Web Configuration Ring Tone To configure ring tone settings through the web browser: Click Phone Settings, Ring Tone. The following screen is displayed. Select the Ringtone Name from the drop-down box according to your preference. Choose the Music On Hold settings: select Enable to enable music on hold, or Disable to disable it. Click Submit to save your settings or Reset to cancel. -
Page 23: Voice Settings
Chapter 4 Web Configuration Click New to add a new dial plan. The following screen will be displayed. Select the dialing timeout from the drop list. Select Enable in the Switch field to activate the setting of the dial plan numbered 1. Input all the information required for the following parameters: Rule: you can plan the dialing rule for more users friendly. - Page 24 Chapter 4 Web Configuration Play Ring Back Tone cadence: Set the ring back tone cadence range you hear before the recipient of your call picks up and answers your call. Play Busy tone cadence: Set the busy tone cadence range when your line is busy. ...
-
Page 25: Auto Config
Chapter 4 Web Configuration Auto Config Configuration file can be retrieved. Set the following: Select Enable in Auto Configuration field to activate the setting of the auto configuration. Select Enable in DHCP OPTION 66 field to allow the configuration file to be retrieved by DHCP option66 settings. Select Disable in DHCP OPTION 66 field to manual specified location of configuration file. -
Page 26: System Auth
Chapter 4 Web Configuration Backup & Recover To backup or recover the configuration values of system settings to a file from the device through the web browser: Click System Settings, Backup & Recover. The following screen will be displayed. Click Backup button in the Backup System Configuration section to create the configuration file, then click the configuration file, use Save As and enter the file name. -
Page 27: Global Sip Settings
Chapter 4 Web Configuration Factory Defaults You can reset all the settings on the VoIP phone to factory default settings. Click System Settings, Factory Defaults. The following screen will be displayed. Click Submit. A confirmation message appears, click OK to proceed with reset, the system will automatically reboot. Click Cancel to cancel reset. -
Page 28: Codec Settings
Chapter 4 Web Configuration Codec Settings You can also configure the Codec priority, and RTP packet length through the web browser. To configure Codec settings from the web browser: Click Global SIP Settings, Codec Settings. The following screen will be displayed. Note: These configurations need to be the same setting as the SV systems. -
Page 29: Sip Accounts
Chapter 4 Web Configuration To configure the SIP account setting from the web browser, click SIP Accounts. The following screen will be displayed. To delete an SIP account: Check the Select box of the corresponding item to delete. Click Delete button. To edit an SIP account setting: Click the underlined ID number. - Page 30 Chapter 4 Web Configuration Note: SRTP is not supported To activate the account, choose the Enable option for Registration. Next, enter the information provided by your ITSP or MIS in each field. For SV8500 The following options are available: Send Register: Enable / Disable sending SIP account information, set to “Enable”...
- Page 31 Chapter 4 Web Configuration SRTP: Select “Disable”, SRTP is not supported on SV8500. Expire time: User can set the timeout duration for registration request, it should be “120” or more. DTMF Type: Input the DTMF type options: RFC2833 / SIP INFO / In-Band, “SIP INFO” is recommended on SV8500.
-
Page 32: Network
Chapter 4 Web Configuration Reg. Server: Input the registration server IP address, “(IP Address of SV8100): (port number)”, a port number is necessary, and default value of SV8100 is “5070” Registration Server port: Input the registration server port ... -
Page 33: Lan Port Settings
Chapter 4 Web Configuration LAN Port Settings To configure IP settings through the web browser: Click Network, LAN Port Settings. The following screen will be displayed. Static IP To configure Static IP settings: Select Static IP in IP Type. The following fields are enabled for user input. Enter the required information. ... - Page 34 Chapter 4 Web Configuration VLAN Setting To activate the VLAN settings: Select Enable for Activation. The Identifier and Priority fields are enabled for user input. Enter the required information. Click Submit to save your settings or Reset to cancel. NTP & Time Settings The NTP &...
-
Page 35: Routing Table
Chapter 4 Web Configuration To configure Day Light setting manually: Choose Enable to enable Day Light setting. Above image will be displayed to set Start and End setting Click Submit to save your settings or Reset to cancel. Routing Table , click Network, Routing Table. - Page 36 Chapter 4 Web Configuration Example 1 to access only one IP address Example 2 to access the entire network...
-
Page 37: Feature List
Chapter 5 Feature List The following table is a feature list. Class Function Description SV8500 SV8300 SV8100 Operation Making a Call Dialing with the Keypad Looking up a Number from the Phone Book Making a Call to an IP Address Yes (Local Feature) Switching SIP Accounts Speed Dial... - Page 38 Chapter 5 Feature List Class Function Description SV8500 SV8300 SV8100 SIP Accounts Registration Send Register Registration ID Display Name Authentication Name Password Registration Server Registration Port Proxy Server Proxy Port Outbound Proxy Outbound Proxy Port Expire Time RFC2833 RFC2833 DTMF Type RFC2833 SIP Info SIP Info...
- Page 39 Chapter 5 Feature List Class Function Description SV8500 SV8300 SV8100 Web Configuration Call History Phone Book Phone Settings Call Forward Speed Dial Ring Tone Dial Plan Voice Settings Other Settings (Pound Key Dial, Data Format, 12/24 Hour, Auto Anser) System Settings Auto Config Firmware Upgrade Backup &...
-
Page 40: Operation
Chapter 6 Operation An incoming call is indicated by a ringing tone and a red light on the incoming call indicator. You can answer the call by one of the followings: Pick up the handset. Press the Speaker key. Dialing with the Keypad Enter the telephone number using the keypad. -
Page 41: Transferring A Call
Chapter 6 Operation Conducting a Three‐Way Conference Call (For SV8500 only) The holding function is used in conducting a three‐way conference call. To initiate a three‐way conference call: Call the first participant of the conference call as described in Making a Call on page 40. Press the Hold key or TRANSFER key to put the call on hold. -
Page 42: Specification
Chapter 7 Specification Call Features Dimension: (L)225mm x (W)152 x (H)95mm Operating humidity: 10~95% Call Redialing Operating temperature: 0 to 40℃ Call Hold Storage temperature: -10 to 60℃ Call Transfer RJ9 Handset jack x 1 ...