Advertisement
Available languages
Available languages
Quick Links
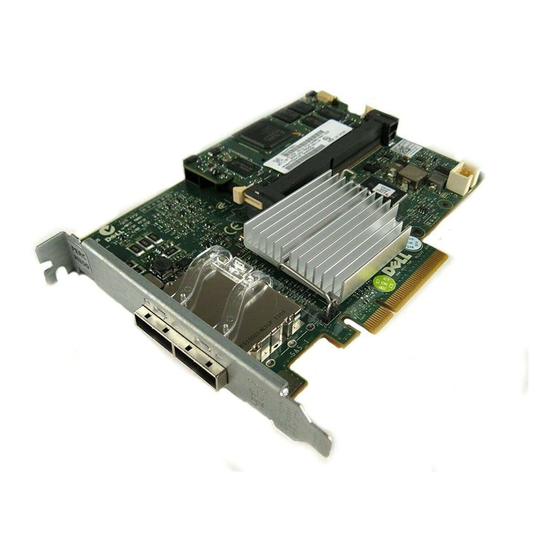
Deploying the Dell™ PERC Adapter
CAUTION:
Many repairs may only be done by a certified service technician.
You should only perform troubleshooting and simple repairs as authorized in
your product documentation, or as directed by the online or telephone service and
support team. Damage due to servicing that is not authorized by Dell is not covered
by your warranty. Read and follow the safety instructions that came with the system.
NOTE:
For information on removing and reinstalling system parts, see the system's
Hardware Owner's Manual at support.dell.com/manuals.
NOTE:
For more information on your storage controller and a detailed set of
instructions, see the relevant storage controller documentation at
support.dell.com/manuals.
This document provides a set of high level installation and removal instructions
for your Dell PowerEdge™ RAID Controllers (PERC) and battery.
Removing the PERC Adapter
1 Ensure that there is no preserved cache on the PERC adapter. See "Managing
Preserved Cache" on page 4.
2 Perform a controlled shutdown of the system and attached peripherals.
3 Disconnect the system from the electrical outlet and remove the system cover.
4 Remove the storage controller from the system's PCI-E slot. See Figure 1-1.
Installing the PERC Adapter
1 Perform a controlled shutdown of the system and attached peripherals.
2 Disconnect the system from the electrical outlet and remove the system cover.
3 Install the storage controller in the appropriate PCI-E slot and connect all
the cables to the storage controller. See Figure 1-1.
4 Replace the system cover.
5 Reconnect the system to its electrical outlet and turn the system on,
including any attached peripherals.
February 2010
Advertisement

Related Manuals for Dell PERC 5/i


Summary of Contents for Dell PERC 5/i
- Page 1 Damage due to servicing that is not authorized by Dell is not covered by your warranty. Read and follow the safety instructions that came with the system.
- Page 2 PERC adapter DIMM tabs (2) Replacing the BBU on a PERC 5/i, PERC 6/i, PERC H700, or PERC H800 1 Ensure that there is no preserved cache on the PERC adapter. See "Managing Preserved Cache" on page 4. 2 Perform a controlled shutdown of the system and attached peripherals.
- Page 3 Replacing the TBBU on a PERC 5/E, PERC 6/E, PERC H700, or PERC H800 NOTE: The Transportable Battery Backup Unit (TBBU) on the storage controller consists of a DIMM and a BBU. 1 Ensure that there is no preserved cache on the PERC adapter. See "Managing Preserved Cache"...
-
Page 4: Managing Preserved Cache
Exit the configuration utility. 4 You can choose to discard the cache on the Manage Preserved Cache screen. For more information about importing and preserving the cache contents, see the Dell PowerEdge RAID Controller (PERC) H700 and H800 documentation at support.dell.com/manuals. - Page 5 Reproduction of these materials in any manner whatsoever without the written permission of Dell Inc. is strictly forbidden. Trademarks used in this text: Dell, the DELL logo, and PowerEdge are trademarks of Dell Inc. Other trademarks and trade names may be used in this document to refer to either the entities claiming the marks and names or their products.
- Page 7 中的授权,或者在联机或电话服务和支持小组的指导下,进行故障排除和简单 的维修。未经 Dell 授权的维修所造成的损坏不在保修范围之内。请阅读并遵循 系统附带的安全说明。 注 : 有关卸除和重新安装系统部件的信息,请参阅系统的 Hardware Owner's Manual (硬件用户手册) ,它位于 support.dell.com/manuals。 注 : 有关存储控制器的更多信息和详细的指令集,请参阅在 support.dell.com/manuals 上的相关存储控制器的说明文件。 此说明文件提供一组用于 Dell PowerEdge™ RAID Controllers (PERC) 和电池 的高级安装和卸除指令 卸下 PERC 适配器 PERC PCI-E 安装 PERC 适配器 PCI-E 2010 年 2 月...
- Page 8 图 1-1. 卸除和安装 PERC 适配器 PCI-E 插槽 PERC 适配器 DIMM 卡舌 (2 个) 装回在 PERC 5/i、 PERC 6/i、 PERC H700 或 PERC H800 上的 BBU PERC (BBU)
- Page 9 装回 PERC 5/E、 PERC 6/E 、 PERC H700 或 PERC H800 上的 TBBU 注 : 存储控制器上的 Transportable Battery Backup Unit (TBBU 便携式电池备份单 元 ) 包括 DIMM 和 BBU。 PERC DIMM TBBU DIMM 图 1-2. 在 DIMM 上卸除和安装电池和电池电缆 DIMM 电池电缆 DIMM 上的连接器 电池...
- Page 10 Virtual Disk Management 主菜单 主菜单 RAID RAID <Enter> Virtual Disk Management 控制器 <F2> Manage Preserved Cache Manage Preserved Cache 注 : 如果没有保留的高速缓存,Manage Preserved Cache(管理保留的高速 缓存)选项被禁用并且无需进一步操作。退出配置公用程序。 Manage Preserved Cache 有关导入和保留高速缓存内容的更多信息,请参阅 support.dell.com/manuals 上的 Dell PowerEdge RAID Controller (PERC) H700 和 H800 说明文件。...
- Page 11 ____________________ 本说明文件中的信息如有更改,恕不另行通知。 © 2010 Dell Inc. 版权所有,翻印必究。美国印制。 未经 Dell Inc. 书面许可,严禁以任何形式复制这些材料。 本文中使用的商标:Dell、 DELL 徽标和 PowerEdge 是 Dell Inc. 的注册商标。 本说明文件中述及的其它商标和产品名称是指拥有相应商标和产品名称的公司或其制造的产品。 Dell Inc. 对其它公司的商标和产品名称不拥有任何所有权。...
- Page 13 部署 Dell™ PERC 控制器 警示: Dell 註: 如需卸下與重新安裝系統零件的資訊,請參閱 support.dell.com/manuals 上 的系統 Hardware Owner's Manual 硬體擁有者手冊 。 註: 如需儲存控制器的更多相關資訊與詳細說明,請參閱 support.dell.com/manuals 上相關的儲存控制器說明文件。 本文件提供 Dell PowerEdge™ RAID 控制器 (PERC) 與電池的高階安裝與卸下 說明。 卸下 PERC 配接器 PERC PCI-E 安裝 PERC 配接器 PCI-E 2010 年 2 月...
- Page 14 1-1. PERC PCI-E 插槽 PERC 配接器 DIMM 彈片 (2 個 ) 更換 PERC 5/i、PERC 6/i、PERC H700 或 PERC H800 上的 BBU PERC (BBU)
- Page 15 更換 PERC 5/E、PERC 6/E、PERC H700 或 PERC H800 上的 TBBU 註: 儲存控制器上的可轉換備援電池組 (Transportable Battery Backup Unit, TBBU) 包含 DIMM 與 BBU。 PERC DIMM TBBU DIMM 1-2. DIMM DIMM 電池纜線 DIMM 上的連接器 電池 電池上的連接器 TBBU 7 將電池纜線一端插入 DIMM 上的連接器,並將另一端插入新電池的連接器。...
- Page 16 Virtual Disk Management ( Controller ( <F2> Manage Preserved Cache ( ) Manage Preserved Cache ( 註: 如果沒有保留的快取資料,Manage Preserved Cache ( 管理保留的快取 資料 ) 選項會停用並且不需要進一步動作。離開組態公用程式。 Manage Preserved Cache ( 關於匯入與保留快取內容的更多資訊,請參閱位於 support.dell.com/manuals 上的 Dell PowerEdge RAID 控制器 (PERC) H700 與 H800 說明文件。...
- Page 17 ____________________ 本文件中的資訊如有變更,恕不另行通知。 © 2010 Dell Inc. 版權所有,翻印必究。美國印製。 未經 Dell Inc. 的書面許可,嚴格禁止以任何形式複製這些材料。 本文中使用的商標:Dell、DELL 標誌和 PowerEdge 是 Dell Inc. 的商標。 本文件中述及的其他商標和商業名稱可能指擁有相應商標和名稱的公司實體或其產品。Dell Inc. 對本公司之外的商標和產品名稱不擁有任何所有權。...
- Page 19 Tout dommage causé par une réparation non autorisée par Dell est exclu de votre garantie. Lisez et respectez les consignes de sécurité fournies avec le système.
- Page 20 PERC DIMM pattes (2) Réinstallation de la BBU sur un PERC 5/i, PERC 6/i ou PERC H700 1 Assurez-vous de l'absence de tout cache préservé sur l'adaptateur PERC. Voir « Gestion du cache préservé » à la page 4.
- Page 21 Réinstallation de la TBBU sur un PERC 5/E, PERC 6/E ou PERC H700 REMARQUE : l'unité de batterie de secours transportable (TBBU) située sur le contrôleur de stockage se compose d'une barrette de mémoire (DIMM) et d'une BBU. 1 Assurez-vous de l'absence de tout cache conservé sur l'adaptateur PERC. Voir «...
- Page 22 4 Vous pouvez choisir d'éliminer le cache dans l'écran Manage Preserved Cache. Pour en savoir plus sur l'importation et la préservation du contenu du cache, voir la documentation des Contrôleurs RAID PowerEdge Dell (PERC) H700 et H800 à l'adresse support.dell.com/manuals.
- Page 23 D'autres marques commerciales et noms de marque peuvent être utilisés dans ce document pour faire référence aux entités se réclamant de ces marques et de ces noms ou de leurs produits. Dell Inc. dénie tout intérêt propriétaire vis-à-vis des marques et des noms de marque autres que les siens.
- Page 25 Garantie abgedeckt. Lesen und befolgen Sie die zusam- men mit dem System gelieferten Sicherheitshinweise. ANMERKUNG: Informationen zum Entfernen und neu Installieren der Systemkompo- nenten finden Sie im Hardware-Benutzerhandbuch zum System auf der Dell Support- Website unter support.dell.com/manuals. ANMERKUNG: Weitere Informationen zu Ihrem Speicher-Controller sowie eine aus- führliche Anleitung finden Sie jeweils in den Dokumenten für den entsprechenden Spei-...
- Page 26 Installation des PERC-Adapters 1 Fahren Sie das Systems und die angeschlossenen Peripheriegeräte kontrolliert herunter. 2 Trennen Sie das System von der Steckdose und entfernen Sie die Systemab- deckung. 3 Installieren Sie den Speicher-Controller im entsprechenden PCI-E-Steckplatz und schließen Sie alle Kabel am Speicher-Controller an. Siehe Abbildung 1-1. 4 Bringen Sie die Systemabdeckung wieder an.
- Page 27 Ersetzen des BBU auf einem PERC 5/i, PERC 6/i, PERC H700 oder PERC H800 1 Stellen Sie sicher, dass kein Cache auf dem PERC-Adapter beibehalten wird. Siehe „Verwalten von beibehaltenem Cache“ auf Seite 5. 2 Fahren Sie das Systems und die angeschlossenen Peripheriegeräte kontrolliert herunter.
- Page 28 Abbildung 1-2. Entfernen und Installieren des Akkus und Akkukabels am Speichermodul Akkukabel Anschluss am DIMM DIMM Akku Anschluss am Akku 6 Packen Sie das neue TBBU aus und befolgen Sie alle Vorsichtsmaßnahmen gegen statische Elektrizität. 7 Schließen Sie ein Ende des Akkukabels am Anschluss am DIMM und das an- dere am Anschluss am neuen Akku an.
- Page 29 4 Im Bildschirm Manage Preserved Cache (Beibehaltenen Cache verwalten) können Sie auswählen, ob Sie den Cache löschen wollen. Weitere Informationen zum Importieren und Aufbewahren des Cache-Inhalts finden Sie in der Dokumentation Dell PowerEdge RAID Controller (PERC) H700 und H800 unter support.dell.com/manuals.
- Page 30 Die Vervielfältigung oder Wiedergabe dieser Materialien in jeglicher Weise ohne vorherige schriftliche Genehmigung von Dell Inc. sind strengstens untersagt. In diesem Text verwendete Marken: Dell, das DELL Logo und PowerEdge sind Marken von Dell Inc. Alle anderen in dieser Dokumentation genannten Marken und Handelsbezeichnungen sind Eigentum der entsprechenden Hersteller und Firmen.
- Page 31 Dell™ PERC アダプタの導入 注意 メモ システム部品の取り付けおよび取り外しに関する情報は、 サポートサイト Dell でシステムの『ハードウェアオーナーズマニュアル』 support.jp.dell.com/manuals を参照してください。 メモ お使いのストレージコントローラに関する詳細情報、および詳細手順は、 サ Dell ポートサイト で関連するストレージコントローラの support.jp.dell.com/manuals マニュアルを参照してください。 Dell PowerEdge™ RAID Controllers PERC PERC アダプタの取り外し PERC PCI-E PERC アダプタの取り付け PCI-E 年 月 2010...
- Page 32 1-1. PERC スロット アダプタ PCI-E PERC DIMM タブ( ) PERC 5/i PERC 6/i PERC H700 PERC H800 、 、または または の の交換 PERC...
- Page 33 PERC 5/E PERC 6/E PERC H700 PERC H800 TBBU 、 、 、または の の交換 メモ ストレージコントローラ上の可搬式バッテリバックアップユニット( )は、 TBBU および から成っています。 DIMM PERC DIMM TBBU DIMM 1-2. DIMM DIMM バッテリケーブル のコネクタ DIMM バッテリ バッテリのコネクタ TBBU DIMM DIMM DIMM...
- Page 34 注意 BIOS <Ctrl><R> Virtual Disk Management Main Menu Main Menu RAID RAID <Enter> 仮想ディスク管理 Controller <F2> Manage Preserved Cache Manage Preserved Cache メモ 保存キャッシュがない場合、 オプションは無 Manage Preserved Cache 効のためそれ以上の処理は必要ありません。設定ユーティリティを閉じます。 Manage Preserved Cache support.jp.dell.com/manuals Dell PowerEdge RAID Controller PERC H700 H800...
- Page 35 ____________________ 本書の内容は予告なく変更されることがあります。 すべての著作権は にあります。 。 ® 2010 Dell Inc. Printed in the U.S.A の書面による許可のない複製は、いかなる形態においても厳重に禁じられています。 Dell Inc. 本書に使用されている商標: 、 ロゴ、および は の商標です。 Dell DELL PowerEdge Dell Inc. 商標または製品の権利を主張する事業体を表すためにその他の商標および社名が使用されていることがあ ります。それらの商標や会社名は、一切 に帰属するものではありません。 Dell Inc.
- Page 37 자는 제품 설명서에서 허가한 경우나 온라인 또는 전화서비스 / 지원팀에서 지시 한 경우에만 문제 해결 절차 및 단순 수리 작업을 수행할 수 있습니다 . Dell 의 승 인을 받지 않은 서비스 작업으로 인한 손상에 대해서는 보증을 받을 수 없습니다 .
- Page 38 그림 1-1. PERC 어댑터 분리 및 설치 PCI-E 슬롯 PERC 어댑터 DIMM 탭 (2 개 ) PERC 5/i, PERC 6/i PERC H700 또는 PERC H800 에 BBU 장착 1 PERC " " (controlled shutdown) (BBU)
- Page 39 PERC 5/E, PERC 6/E PERC H700 또는 PERC H800 에 TBBU 장착 주 : 스토리지 컨트롤러에 있는 이동식 배터리 백업 장치 (TBBU) 는 DIMM 및 BBU 로 구성되어 있습니다 . 1 PERC " " (controlled shutdown) . DIMM TBBU DIMM 그림...
- Page 40 보존된 캐시가 없는 경우 , Manage Preserved Cache ( 보존된 캐시 관리 ) 옵션은 비활성화되며 어떤 추가 조치도 요구되지 않습니다 . 구성 유틸리티 를 종료합니다 . 4 Manage Preserved Cache ( 캐시 내용 가져오기 및 보존하기에 관한 자세한 사항은 , support.dell.com/manuals 의 Dell PowerEdge RAID Controller (PERC) H700 및 H800 설명서를 참조하십시오.
- Page 41 본 설명서에 사용된 상표 : Dell, DELL 로고 및 PowerEdge 는 Dell Inc. 의 상표입니다 . 본 문서에서 특정 회사의 표시나 제품 이름을 지칭하기 위해 기타 상표나 상호를 사용할 수도 있 습니다 . Dell Inc. 는 자사가 소유하고 있는 것 이외에 기타 모든 상표 및 상호에 대한 어떠한 소유 권도 없습니다 .
- Page 43 и более подробный набор инструкций см. в документации к соответствующему контроллеру хранилища данных на веб сайте support.dell.com/manuals. В данном документе приведены инструкции по установке и удалению высокого уровня для котроллеров Dell™ PowerEdge™ RAID (PERC) и аккумулятора. Снятие адаптера PERC 1 Убедитесь, что на адаптере PERC отсутствует резервный кэш. См.
- Page 44 адаптер PERC модуль DIMM язычки (2) Замена BBU на PERC 5/i, PERC 6/i, PERC H700 или PERC H800 1 Убедитесь, что на адаптере PERC отсутствует сохраненный кэш. См. раздел «Управление резервным кэшем» на стр. 5. 2 Выполните контролируемое выключение системы и подключенных к ней...
- Page 45 4 Снимите модуль резервного аккумулятора (BBU) с пластмассового монтажного кожуха вашей системы и отсоедините кабель аккумулятора. 5 Повторно подсоедините резервный аккумулятор (BBU) к контроллеру, вставив конец кабеля аккумулятора в разъем на контроллере. Замена TBBU на PERC 5/E, PERC 6/E, PERC H700 или PERC H800 ПРИМЕЧАНИЕ.
- Page 46 Рис. 1 2. Удаление и установка аккумулятора и кабеля аккумулятора на модуле DIMM кабель аккумулятора разъем на модуле DIMM модуль DIMM аккумулятор разъем на аккумуляторе 6 Распакуйте новый переносной резервный аккумулятор (TBBU). При работе соблюдайте все процедуры антистатической защиты. 7 Вставьте один конец кабеля аккумулятора в разъем на модуле памяти DIMM, а...
- Page 47 действия не требуются. Выйдите из утилиты конфигурирования. 4 Вы можете выбрать очистку кэша в окне Manage Preserved Cache. Дополнительная информация об импорте и сохранении содержимого кэша приведена в документации Контроллер Dell PowerEdge RAID Controller (PERC) H700 и H800 на веб-сайте support.dell.com/manuals.
- Page 48 Остальные товарные знаки и названия продуктов могут использоваться в данном документе для обозначения компаний, заявляющих права на эти товарные знаки и названия, или продуктов этих компаний. Dell Inc. не претендует на права собственности в отношении каких-либо товарных знаков и торговых наименований, кроме своих собственных.
- Page 49 La garantía no cubre los daños ocasionados por reparaciones que Dell no haya autorizado. Lea y siga las instrucciones de seguridad que se entregan con el sistema.
- Page 50 Adaptador PERC DIMM Lengüetas (2) Sustitución de la unidad BBU en un adaptador PERC 5/i, PERC 6/i, PERC H700 o PERC H800 1 Asegúrese de que no haya caché conservada en el adaptador PERC. Consulte el apartado “Administración de la caché conservada”en la página 4.
- Page 51 Sustitución de la unidad TBBU en un adaptador PERC 5/E, PERC 6/E, PERC H700 o PERC H800 NOTA: la Unidad de respaldo de la batería transportable (TBBU, por sus siglas en inglés) de la controladora de almacenamiento consta de un DIMM y una unidad BBU. 1 Asegúrese de que no haya caché...
- Page 52 6 Desembale la TBBU y siga todos los procedimientos antiestáticos. 7 Introduzca un extremo del cable de la batería en el conector del DIMM y el otro extremo en el conector de la nueva batería. 8 Coloque el borde superior de la batería sobre el borde superior del DIMM, de modo que los brazos del lado de la batería encajen en los zócalos del DIMM.
- Page 53 4 Puede elegir descartar la caché en la pantalla Manage Preserved Cache (Administrar caché conservada). Para obtener más información sobre cómo importar y conservar el contenido caché, consulte la documentación Dell PowerEdge RAID Controller (PERC) H700 and H800 (Controladora RAID Dell Power Edge (PERC) H700 y H800) en support.dell.com/manuals.
- Page 54 Otras marcas y otros nombres comerciales pueden utilizarse en este documento para hacer referencia a las entidades que los poseen o a sus productos. Dell Inc. renuncia a cualquier interés sobre la propiedad de marcas y nombres comerciales que no sean los suyos.