Table of Contents
Advertisement
Quick Links
Advertisement
Table of Contents

Related Manuals for Philips CID3680/93


Summary of Contents for Philips CID3680/93
- Page 1 Register your product and get support at www.philips.com/welcome EN User manual...
-
Page 2: Table Of Contents
Contents 1 Important Safety Notice Introduction What’s in the box Overview of the main unit 2 Get started Install the car audio Turn on Adjust screen Set date and time 3 Use map Upgrade the map 4 Listen to radio Tune to a radio station Store radio stations in memory Tune to a preset station... -
Page 3: Important
DivX, Inc. and are used under license. registered trademarks owned by Bluetooth SIG, Inc. and any use of such marks by Philips is under license. Manufactured under license from Dolby Laboratories. “Dolby” and the double-D symbol are trademarks of Dolby Laboratories. -
Page 4: Introduction
Philips Consumer Lifestyle may void the user’s authority to operate the equipment. 2008 © Koninklijke Philips Electronics N.V. All rights reserved. -
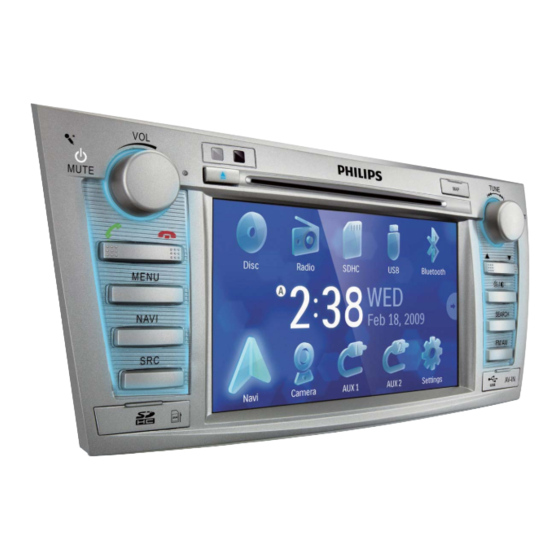
Page 5: Overview Of The Main Unit
Overview of the main unit (Green) Answer phone. Dial number. (Red) Terminate call. b MENU Return to the home menu. c NAVI Enter the GPS navigation system or exit. d SRC Select source. e SD/SDHC/MMC card slot Built-in microphone for phone calls. /MUTE/VOL Turn the unit on or off. - Page 6 n DISP/ / Adjust screen brightness/contrast/ color. Turn on/off the screen display. Adjust the display aspect ratio. o SEARCH Change waveband. p FM/AM Switch to the FM/AM source. USB socket. r AV IN External equipment audio/video in socket.
-
Page 7: Get Started
These instructions are for a typical installation. However, if your car has different requirements, make the corresponding adjustment. If you have any questions regarding installation kits, consult your Philips car audio dealer. Caution This unit is designed for negative ground (earth) 12 V DC operation only. - Page 8 Connector Connect to Telephone mute Red wire The +12V power terminal which is live in the accessory (ACC) position of the ignition switch If there is no accessory position, connect to the +12V car battery terminal that is always live. Be sure to connect the black ground (earth) lead to a metal surface of the car...
- Page 9 Yellow Green Connect GPS antenna To receive signal from satellites, connect the supplied GPS antenna to your car and the system. Connect the supplier GPS antenna to the Blue Yellow White Black Touch controller Yellow Rear screen Amplifier...
-
Page 10: Turn On
Stick the other end of the GPS antenna to a metal surface of the car. Connect GPS antenna If your car has built-in radio antenna, connect it to the radio antenna of the system for better radio signal. Connect the radio antenna to the car antenna. -
Page 11: Adjust Screen
Adjust screen To adjust screen brightness/contrast/color Press DISP/ / to show the manual. Press to select an item. Touch / to adjust the value. Press DISP/ / To turn on/off the screen, press and hold DISP/ / . Set date and time Touch the upper left corner to display main menu. -
Page 12: Use Map
3 Use map Note You may need to upgrade the map before using it (see “Upgrade the map” section) Touch the upper left corner to display home menu. Touch [Navigation]. » The navigation menu is displayed in a few seconds. Refer to the map manual (in Chinese) to operate the navigation tool. -
Page 13: Listen To Radio
4 Listen to radio Tune to a radio station Touch the upper left corner to display home menu. Touch [Radio]. » Band and frequency information is displayed. Touch on FM or AM to select band: FM band options: FM1, FM2, FM3 AM band options: AM1, AM2 to tune to a radio station by step. -
Page 14: Store Radio Stations In Memory
Store radio stations in memory You can store up to 6 stations in each band. Store stations manually Tune to the station. Touch Touch [Save]. Touch one of the channels 01 to 06 to save the select band. Store stations automatically You can search for a station with intro search, which broadcasts a 10-second preview of each detected radio station. -
Page 15: Play
5 Play Load discs You can play video, audio or images stored on the following discs: DVD video, DVD-R, DVD-RW Audio CD, CD-R, CD-RW Note Ensure that the disc contains playable content. Insert the disc into the disc slot with label side facing up. -
Page 16: Insert Sd/Mmc Card
Remove the USB device Press SRC to switch to another source. Remove the USB device. Insert SD/MMC card Note Ensure that the device contains playable content. The unit supports SDHC card. Open the SD/MMC card cover. Insert the SD/MMC card into the SD/MMC card slot. -
Page 17: Search Within A Title/Folder
Touch to return to playlist menu. Touch to display all available audio folders. Touch a folder, then touch Touch to start play. Touch to return to playlist menu. Touch to display all available picture folders. Touch a folder, then touch select a picture. -
Page 18: Repeat A Section
For VCD karaoke or audio CD: Touch anywhere except for the upper left corner to display menu on the screen, if necessary. Touch to select: [Repeat]: play the current track repeatedly. [Repeat off]: cancel repeat play. Touch anywhere except for the upper left corner to display menu on the screen, if necessary. -
Page 19: Select Subtitle Language
Select subtitle language For DVD or DivX discs that contain two or more subtitle languages. During play, touch anywhere except for the upper left corner to display menu on the screen, if necessary. Touch to display the 2nd menu Touch repeatedly to select a language. -
Page 20: Play With Bluetooth Device
6 Play with Bluetooth device You can make or receive phone calls with Bluetooth-enabled phones through the unit. You can also listen to music from a Bluetooth- enabled device. Pair the Bluetooth-enabled devices To connect your Bluetooth device to the unit, you need to pair the device to the unit. -
Page 21: Receive Call
Touch to search for phone number from the following list: [Missed calls] [Received calls] [Dialed calls] [Phone book] [Sim phone book] [Local phone book] Or touch to dial number directly, then touch to dial. Receive call By default, all incoming calls are received automatically. -
Page 22: Adjust Bluetooth Settings
Adjust Bluetooth settings You can change below Bluetooth settings: [Bluetooth]: to turn on or off “Bluetooth” function [Auto connect]: to turn on or off “Auto connect” function [Auto answer]: to turn on or off “Auto answer” function [Pairing code]: to set paring code [Phone Book Sync]: to synchronize phone book In Bluetooth menu, touch... -
Page 23: Adjust Sound
7 Adjust sound Adjust volume Turn /MUTE/VOL button clockwise to increase volume. Turn /MUTE/VOL button anti-clockwise to reduce volume. Mute During play, press /MUTE/VOL. To turn the sound back on, press MUTE/VOL again. You can also turn off sound by touching the screen. -
Page 24: Set Dynamic Bass Boost (Dbb)
Touch to select subwoofer volume. [Sub] subwoofer volume: 0 to 24. Touch F, R, L, or R to adjust fader/balance value. [Fade]fader range: +24 to -24. (F = front speaker, R = rear speaker) [Balance] balance range: -24 to +24. (L = left speaker, R = right speaker) Touch to exit. -
Page 25: Adjust Settings
8 Adjust settings Display system setup menu Touch the upper left corner to display main menu. Touch in the middle right side of the screen. » The second main menu is displayed. Touch [Settings]. » The settings menu is displayed. When the setup adjustment is completed, touch main menu. -
Page 26: Adjust Sound Settings
[Key color] [Red] Button backlight turns red. [Blue] Button backlight turns blue. [Beep] [On] Turn on the beep sound. Each time you press a button, the unit beeps. [Off] Turn off the beep sound. [Calibration] Calibrate the touch screen. Press to exit. -
Page 27: Adjust Bluetooth Settings
Touch an option repeatedly to select: Video Options Description settings [Aspect [Full] For widescreen ratio] display. [Normal] For normal display. [Video [Auto] The correct format input] is set automatically. Select this option if you are not sure which format should be selected. -
Page 28: Adjust Language Settings
Adjust language settings Touch [Language]. Touch an option repeatedly to select: Language Options Description settings [OSD] [English] Select on-screen- display language. [DVD [English] Select DVD audio audio] language. Options available are depends on DVD disc. [DVD [English] Select DVD subtitle subtitle] language. - Page 29 Touch an option repeatedly to select: DVD rating Options Description [Set Set password to password] restrict the play of discs. The default password is 0000. [Rating [Kid Acceptable for level] safe] children. Acceptable for general viewers. [PG] Parental guidance suggested. [PG-13] Unsuitable for children under age 13.
-
Page 30: Others
9 Others Listen to other devices You can connect an external audio/video device to the unit. Connect the car audio to the device with the supplied AV cable. Touch the upper left corner to display the main menu. Touch [AV-IN1]. Operated the connected the device (see the instructions manual of the device). -
Page 31: Replace Fuse
Check the electric connection. Buy a fuse that matches the voltage of the damaged fuse (15A) Replace the fuse. If the fuse gets damaged immediately after it has been replaced, there may be an internal malfunction. In such case, consult your Philips dealer. -
Page 32: Product Information
10 Product information Note Product information is subject to change without prior notice. General Power supply 12 V DC (11 V - 16 V), negative ground Fuse 15 A Suitable speaker 4 - 8 impedance Maximum power 50 W x 4 channels output Continuous power 24 W x 4 channels... - Page 33 Compatible USB devices: USB1.1) USB1.1) memory cards (SD / MMC / SDHC) Supported formats: FAT16, FAT32 MP3 bit rate (data rate): 32-320 Kbps and variable bit rate WMA v9 or earlier Directory nesting up to a maximum of 8 levels Number of albums/ folders: maximum 99 Number of tracks/titles:...
-
Page 34: Troubleshooting
If you encounter problems when using this apparatus, check the following points before requesting service. If the problem remains unsolved, go to the Philips web site (www.philips.com/welcome). When you contact Philips, ensure that the apparatus is nearby and the model number and serial number are available. - Page 35 The paired mobile phone connects and disconnects constantly. The Bluetooth reception is poor. Move the mobile phone closer to the system or remove any obstacle between the mobile phone and the system. Some mobile phones may connect and disconnect constantly when you make or end calls.
-
Page 36: Glossary
12 Glossary Bite rate The max data transfer through the USB port. Bluetooth that is meant to allow mobile devices to share information and applications without the worry of cables or interface incompatibilities. Denmark. Operate at 2.4GHz. For more information, see www.bluetooth.com. MultimediaCard. - Page 37 Name of the Parts Lead) Hazardous/toxic Substance M er cur y) cadm i um ) – –...
- Page 38 © 2009 Koninklijke Philips Electronics N.V. All rights reserved. CID3680_93_UM_V1.0...