
Related Manuals for Philips PSC724/00


Summary of Contents for Philips PSC724/00
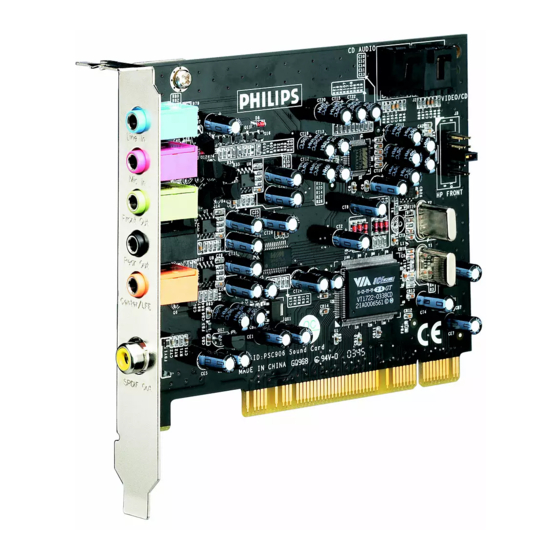
- Page 1 User’s Guide ™ Ultimate Edge High Definition 24-bit Sound Card ™ PSA2 HD plus PHILIPS Philips Sound Solutions...
- Page 2 Termination. This Agreement shall be effective upon installation or first use of the Software and shall terminate (i) at the discretion of Philips, due to your failure to comply with any term of this Agreement; or (ii) upon destruction of all copies of the Software and related materials provided to you by Philips hereunder.
- Page 3 Software and documentation. If any provision of this Agreement is held invalid, the remainder of this Agreement will continue in full force and effect. Should you have any questions concerning this Agreement, or if you desire to contact Philips for any reason, please contact info@Philips.com.
- Page 4 © Copyright 2004 PSC724™ and Philips Ultimate Edge™ are trademarks of Philips Sound Solutions. Philips Sound Agent 2 HD™, Sound Agent 2 HD™, and PSA2 HD™ are trademarks of Philips Sound Solutions. QSound™, QEM™, QSound Environment Modeling, QSound Multi-Speaker Systems, QMSS™, QMSS™, Q3D™, QSurround™, QXpander™, QInteractive3D™, Audio Pix™, and the Q logo are trademarks of...
-
Page 5: Table Of Contents
2.2.5. Installing the New Soundcard...9 2.2.6. Speaker Connection...10 2.2.6.1. Digital Speakers ...10 2.3. Software Installation ...11 3. The Philips Sound Agent 2 HD ... 12 3.1. Basic Interface Operation...12 3.2. Compact Control Panel ...14 3.3. Main Control Panel...16 3.3.1. Effects Tab ...16 3.3.2. - Page 6 4. Uninstalling PSA2 HD... 27 5. Technical Support And Warranty ... 28 5.1. Internet Address: ...28 5.2. Technical Support Information: ...28 6. Appendix A ... 29 Useful Tips For Speaker setup...29 6.1. Ideal Listening Scenario (Speakers) ...29 6.2. Ideal Listening Scenario (Headphones) ...29 6.3.
-
Page 7: Introduction
Philips Sound Solutions 1. Introduction Congratulations on your purchase of the Ultimate Edge Soundcard! The Ultimate Edge has been designed to transform your computer into a next generation Media PC. We are confident that you will experience the ultimate in PC audio performance and features. -
Page 8: Key Features
1.1. KEY FEATURES Professional grade audio components transform your computer into an advanced digital audio processor! • Front output external speaker jack (Left/Right) – 24-bit / 96KHz • Surround output external speaker jack (Left/Right) – 24-bit / 96KHz • Center / LFE output external speaker jack – 24-bit / 96KHz •... -
Page 9: Minimum System Requirements
Philips Sound Solutions 1.2. Minimum System Requirements Genuine Intel Pentium III 450 MHz or faster 64 MB RAM (128 MB recommended) One CD-ROM Drive 800 x 600 screen resolution (1024 x 768 recommended) 20 MB of available hard drive space PCI 2.2 compliant slot... -
Page 10: Installation Of The New Sound Card
Philips Sound Solutions 2. Installation of The New Sound Card Installing your Philips Ultimate Edge soundcard is easy. Please take a moment to read all the steps before proceeding with the installation. If you need more details, read through this user’s guide. -
Page 11: Detailed Installation Guide
2.2. Detailed Installation Guide Please have the PC and the old soundcard documents at hand. Refer to them for the removal or disabling the existing soundcard on your PC. 2.2.1. Before Installing the New Soundcard Before starting the installation of the new soundcard you will need to determine if your PC already has a soundcard, or an integrated sound device on the motherboard. -
Page 12: Disabling The Integrated Sound
If the sound system is integrated on the motherboard, usually, the connectors are similar to the add-on card, but they are not on a bracket. They might be stacked up in one or two rows. Figure 2 shows examples of on-board audio connectors. If your PC does not have any type of sound system, proceed to 2.2.5. - Page 13 Follow these steps to remove the old card. See Figure 3. • Remove the PC cover. Because every PC is different it is very important that you refer to the users manual that came with your PC on how to remove the cover. •...
- Page 14 Philips Sound Solutions The Ultimate Edge™ Soundcard Users Guide...
-
Page 15: Installing The New Soundcard
2.2.5. Installing the New Soundcard Follow these steps to install the Ultimate Edge soundcard. See Figure 4. • Remove the Ultimate Edge soundcard from the anti-static bag. • Align the soundcard with the selected PCI bus slot and firmly push it into the slot. Be sure the soundcard is aligned properly and fits snugly into the slot. -
Page 16: Speaker Connection
(see Mixer tab description under Main Control Panel section of this document), select the advanced sub-tab and click on S/PDIF Enable radio button. Check out www.philips.com/ce of self-powered speakers. The Ultimate Edge™ Soundcard Users Guide Figure 5 (US) or www.philips.com/sound Aux In CD In/ Video In (Europe) to see Philips’s full range... -
Page 17: Software Installation
Setup tab section of this document. 2.3. Software Installation Install the Philips Sound Agent 2 using the Installation CD (included). Place the CD in the CD- ROM and if Autorun is enabled, it will launch the PSA2 HD Autolauncher panel. Click on the “Install Philips Sound Agent 2”... -
Page 18: The Philips Sound Agent 2 Hd
The following sections provide a detail description of the PSA2 HD features. 3.1. Basic Interface Operation To launch and setup Philips Sound Agent 2 control panel, double click on the PSA2 HD icon in the System Tray (normally the lower right hand corner of the screen). See Figure 7. - Page 19 Philips Sound Solutions When PSA2 HD is launched for the first time, it appears in the fully expanded form as shown in Figure 8. The panel contains three distinct sections; Compact Control Panel, Main Control Panel, and Visual Control Panel. Use the Resize button to reduce the expanded form to a compact form.
-
Page 20: Compact Control Panel
Philips Sound Solutions 3.2. Compact Control Panel The Compact Control Panel contains the following controls: Mute Button Resize Button Close Button Figure 9 Master Volume Master Volume controls the overall output level of the sound system. This volume control is synchronized with the volume control on the system tray (the yellow speaker icon). - Page 21 Philips Sound Solutions QSizzle Toggles the QSizzle effect. When on, enhances the mid/high frequency range of a digitally compressed audio stream. The button label illuminates when QSizzle is enabled. QRumble Toggles the QRumble effect. When on, it enhances the low frequency range of the audio stream.
-
Page 22: Main Control Panel
Philips Sound Solutions 3.3. Main Control Panel The Main Control Panel is in the center of the expanded mode, and it provides access to advanced settings for most PSA2 HD controls, which are grouped in five separate tabs. See Figure 10. - Page 23 Philips Sound Solutions QRumble responds in real time to the varying nature of the input signal, automatically adjusting itself accordingly. This is very different from the Equalizer, which is a static frequency processor. The Equalizer does not monitor the input signal or perform self-adjustment.
-
Page 24: Equalizer Tab
Philips Sound Solutions 3.3.2. Equalizer Tab The Equalizer (EQ) controls the frequency response of the system by increasing or decreasing the frequency response of ten independent frequency bands. This Equalizer works very much the same as the equalizers in high quality sound systems. Each slider controls the relative level of a band (range) of frequencies. -
Page 25: Setup Tab
3.3.3. Setup Tab Located under the setup tab is a speaker configuration panel and other critical audio controls. This tab contains the controls to select and configure the speaker mode based on the type and number of speakers you have. The Ultimate Edge soundcard supports a wide range of speakers. From the list on the left side of the Setup tab, you can choose the desired output configuration. - Page 26 Philips Sound Solutions Preamp Slider The Preamp Level control allows you to boost the input audio signal before it is processed by the PSA2 HD. It has a similar effect as the master volume, but should not be used instead of it. The Preamp can be particularly useful to boost low level DVD movie soundtracks.
-
Page 27: Mixer Tab
3.3.4. Mixer Tab Mixer controls allow you to select and control playback and recording input sources. 3.3.4.1. Playback source controls You can individually mute or un-mute as many playback sources as you wish. Volume sliders set the playback level for each source. Balance sliders adjust the relative left and right output levels for each stereo source. -
Page 28: Advanced Mixer Sub-Tab
Before you start recording, you need to configure the recording source. Select a source by clicking the appropriate “Select” button. Each source has its own level and balance controls. To set each slider in its default position, right click on the sliders. See Figure 15. The default recording source is Input Mix, but you can select other sources by going to the Mixer tab and clicking on the Recording sub-tab. - Page 29 HI-SR(96KHz) Selecting the HI-SR (High Sample Rate) button will enable 96KHz sample rate for both input and output from the Ultimate Edge. When you enable HI-SR on the Ultimate Edge: Input streams are sampled at 96kHz and processed by PSA2 HD at that rate. PSA2 HD output may then be converted to a lower rate if required by the recording program.
-
Page 30: Presets Tab
Philips Sound Solutions 3.3.5. Presets Tab The Preset functions enable you to make snapshots of the state of all Philips Sound Agent 2 controls, so that you can conveniently reload the same settings at any time. Figure 17 The Preset system enables you to save the state of PSA2 HD controls once you have made adjustments to customize your listening experience, so you can recall settings for any source and playback environment. -
Page 31: Info Tab
Philips Sound Solutions Deletes the selected preset permanently from the list. When you select one your presets and click on this button, a confirmation dialog box will appear and when you confirm by clicking the OK button, the preset will be removed from the list. This button will not delete any of the factory presets. -
Page 32: Visualization Control Panel
Philips Sound Solutions 3.4. Visualization Control Panel The Visualization Control Panel provides a graphical representation of the environments and effects that are created by Sound Agent 2. It also contains two drop-down menus and the Reverb Intensity Slider. The drop-down menu on the right contains fifteen different types of environmental effects to select from. -
Page 33: Uninstalling Psa2 Hd
Or, you may choose the uninstall program that comes with PSA2 HD program. For this you click on the Windows Start button, click on the “All Programs”, click on the Philips folder, then select and execute the Philips Uninstall program. -
Page 34: Technical Support And Warranty
Other hardware connected to the soundcard. 5.1. Internet Address: Technical support and driver: http://www.philips.com/support The web site for Europe is: http://www.philips.com/sound Philips general web site is: http://www.philips.com/ce 5.2. Technical Support Information: Toll-Free telephone numbers: Available 6:00 AM – 10:00 PM Central Standard Time USA: 1-800-835-3506 Elsewhere: See the Warranty Conditions document in your package. -
Page 35: Appendix A
If each speaker has separate volume controls, try to set them as equally as possible. You can use the Philips Sound Agent 2 test utility to help you judge the volume levels. This practice applies to headphones as well. -
Page 36: Appendix B
7. Appendix B Uninstalling the Old Drivers and the Soundcard Regardless of which one of the supported operating systems you have, the following general steps are used to remove the old drivers. It is recommended that you remove the drivers before you take the old soundcard out of your computer. -
Page 37: Appendix C
Philips Sound Solutions 8. Appendix C Disabling the Integrated Sound To disable the on-board audio you need to enter the system BIOS setup. Most computers only allow you to enter the setup right after power up and just before the operating system starts loading. -
Page 38: Appendix D
9. Appendix D Troubleshooting This appendix covers some of the basic mistakes and pitfalls you might encounter. No Sound is coming out 1. Check the speakers. a. Ensure the speakers are plugged into the back of the soundcard. b. Ensure the speaker power supply plugged into the AC power outlet, or if they use batteries, try new batteries. - Page 39 System Tray, go to the start menu, click on Programs (Windows 2000 or Windows XP), click on Philips, then click on Philips PSA2 HD, then click on PSA2 HD Control Panel. When playing DVD there is background music but no dialog, or the dialog is very Check speaker connection.
- Page 40 Philips Sound Solutions Listen to Analog Inputs is causing feedback when recording from Microphone The microphone is too close to the speaker or the Mic In recording level is too high. Please remove the microphone away from the speaker or lower the level of Mic In slider from the Mixer Tab->Recording in the Main Control Panel.