
Related Manuals for Philips PSC705/05


Summary of Contents for Philips PSC705/05
-
Page 1: Philips Seismic Edge
Philips Seismic Edge™ 5.1 Channel PCI Sound Card ____________________________ User’s Manual Philips Sound Solutions... - Page 2 5.1 Channel PCI Sound Card © Copyright 2001 Seismic Edge™ is a trademark of Philips Consumer Electronics ThunderBird Avenger™ is a trademark of Philips Semiconductors QSound™, QEM™, QSound Environmental Modeling™, QSound Multi-Speaker System, QMSS™, Q3D™, QSound3DInteractive, QXpander™, AudioPix™ and the Q logo are trademarks of QSound Labs, Inc.
- Page 3 TRADEMARK OR OTHER RIGHT OF THIRD PARTIES. Updated This license does not grant you the right to any upgrades or updates of the Licensed Software. However, Philips will be entitled to offer updates and/or modifications to the Licensed Software at its discretion.
-
Page 4: Table Of Contents
Table of Contents: INTRODUCTION______________________________________________________________ 6 _______________________________________________________________ 7 EATURES INIMUM YSTEM EQUIREMENTS ’ ____________________________________________________________ 7 NCLUDED INSTALLING SEISMIC EDGE __________________________________________________ 8 HAT YOU NEED FOR INSTALLATION _________________________________________________________________ 8 IDEO UIDE ____________________________________________________________ 9 MPORTANT OTICE _____________________________________________________ 10 ARDWARE NSTALLATION OUND ONFIGURATION ONNECTING TO EISMIC SOFTWARE INSTALLATION _________________________________________________ 14 ®... - Page 5 Fade Slider _______________________________________________________________ 29 Volume Sliders ____________________________________________________________ 29 Tone Control ______________________________________________________________ 29 Default Button_____________________________________________________________ 29 S/PDIF T _________________________________________________________________ 30 Disabled _________________________________________________________________ 30 Front Left and Right Channels ________________________________________________ 30 Rear Left and Right Channels_________________________________________________ 31 DVD AC3/DTS ____________________________________________________________ 32 ________________________________________________________________ 33 FFECTS Reverb/QXpander/QMSS to External Input Source ________________________________ 33 Enable ___________________________________________________________________ 33...
-
Page 6: Introduction
… a full-blown, digital surround-sound, discrete six-channel home theater experience, through your new Philips Seismic Edge Sound Card. Seismic Edge is the first PC card to deliver the impact of 6 distinct channels of sound, using advanced digital signal processing algorithms and extreme hardware acceleration, extracting audiophile-quality sound from your PC with no added strain to your processor –... -
Page 7: Key Features
QMSS™ enhanced DVD playback mode (compatible SoftDVD player required) Minimum System Requirements Installation of your Philips Seismic Edge requires the following hardware and operating system: One available PCI 2.1 compliant slot Intel Pentium® class or 100% compatible 166Mhz or faster processor Intel®... -
Page 8: Installing Seismic Edge
A 3-part video installation guide can be found on the Seismic Edge Installation CD. If CD/DVD autorun is enabled, a Philips Edge series Autorun window will pop up when the CD is inserted into the CD drive. Then click on the “View PSC703/705 Installation Videos” icon from the window. Another Philips Edge Series Autorun window will pop up;... -
Page 9: Important Notice
Important Notice Uninstall the drivers for any previously installed sound cards. Consult your previous sound card documentation for details. Turn off computer and remove existing sound card. If your computer has on-board sound, consult your PC documentation to disable it. STATIC ELECTRICITY CAN CAUSE PERMANENT DAMAGE TO YOUR SOUND CARD. -
Page 10: Hardware Installation
Hardware Installation Turn off your computer, and disconnect the power cable. Disconnect all devices that are connected to the computer. Remove the computer cover Select an available PCI slot and, if necessary, remove its cover plate. Keep the mounting screw to secure your sound card later. - Page 11 Remove the Seismic Edge Sound Card from the anti-static bag. Align your sound card with the selected PCI Bus-Slot and firmly push it into the slot. Be sure the sound card is aligned properly and fits snugly into the slot. Use the screw from the slot cover to secure the sound card to the frame of the computer chassis, but do not over-tighten.
-
Page 12: Sound Card Configuration
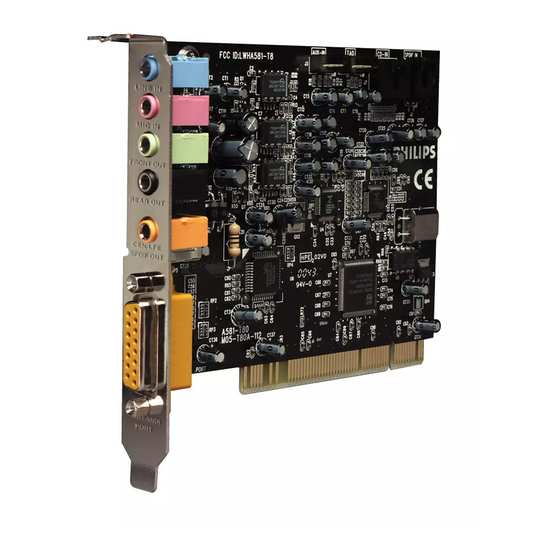
Sound Card Configuration Please note that actual card layout may vary... -
Page 13: Connecting To Yours
S/PDIF Out Mode (Headphone, 2 or 4 speaker mode only) To utilize the S/PDIF Out (Sony Philips Digital Interface Format) feature of your Seismic Edge card, insert a 1/8” stereo or mono plug to dual or single RCA plug adapter cable (not included) into the Cen/LFE or S/PDIF Out stereo jack on the end bracket. -
Page 14: Software Installation
Windows® 95/98/2000/XP Installation Now that the hardware is installed, it is time to install the drivers. Plug and Play uses your system’s BIOS to allocate resources for Philips Seismic Edge. WHICH VERSION OF WINDOWS DO YOU HAVE? Microsoft issued a maintenance release of Windows® 95 referred to as OSR2. This version shipped as the stock operating system on many PC’s. -
Page 15: T O Install The Drivers
To Install The Drivers For Windows® 95/98/2000/XP: 1. Turn on the computer and place the Philips Seismic Edge CD in your CD-ROM When the Add New Hardware Wizard dialog box reports that a new PCI Multimedia Audio Device NEXT has been detected, click 2. - Page 16 3. If you are installing from the install CD or if you have copied the install to any other location, select Specify a location and browse to your directory where the setup files are located. For Windows® 95/98, select Win9x directory then choose a language. For Windows® 2000/XP, select WDM NEXT.
- Page 17 GamePort Enumerator devices. Browse to the Driver disk directory WDM\English to install these files. You will find these files in the same WDM install directory and Windows® will finish installing the drivers for Philips Seismic Edge automatically. Click FINISH 2 times on each screen to install each of these devices.
- Page 18 msjstick.drv. It is recommended that you keep your existing files. Click appear. 8. Next, the software launcher will allow you to open the Seismic Edge control panel and configure your speaker settings if desired. Select Speaker settings are described under the Analog Output Tab in this manual Note: Any time you say No to a Applications Launcher dialog box like the one shown above, a second box will appear asking if you want launch the next time Windows is started.
- Page 19 If you prefer to register your product at a later time, go to: www.philipsusa.com/prod_reg_bounce.html and follow the instructions CONGRATULATIONS! You have successfully installed your Philips Seismic Edge™. on the dialog box and follow the...
-
Page 20: Windows Nt® Installation
3) Go to D:\NT40\English and double click on Philips Seismic Edge Install.exe. (D: represents your CD-ROM drive). 5) Wait a couple of minutes while the data transfers. Once it finishes the Philips Seismic Edge Settings window will appear. Click OK on the settings page and then when the “System Settings Change” page comes up and prompts you to restart, click the “Restart Computer Now”... -
Page 21: Using The Philips Seismic
Windows® mixer for adjusting playback and recording levels. Joystick Configuration for Windows® 95/98/2000/XP: 1. Open the Control Panel and double-click on the Game Controllers icon. Select the Advanced tab and under Port Driver Assignment and select Philips Seismic Edge GamePort. - Page 22 2. Select the General tab and click the Add button. You may select any one of the Game Controllers listed, then click OK. 3. After making your selection, highlight the selected controller in Game Controllers and click the Properties button. Select Calibrate and calibrate your joystick. Your joystick should be installed and ready for flight!
- Page 23 Product Return Before returning the Philips sound card, you must first contact the Philips Technical Support group to determine the nature of product defect. Once the nature of the problem has been determined, a Return Authorization number and address will be supplied. A RETURN AUTHORIZATION NUMBER MUST ACCOMPANY THE RETURN OF THIS PRODUCT.
-
Page 24: Seismic Edge Dsp Special Effects And Algorithms
DSP S EISMIC PECIAL FFECTS AND LGORITHMS EAX™ Game Compatibility (Effects Tab) The Seismic Edge uses QSound Environmental Modeling™ (QEM™) to achieve compatibility with games utilizing EAX™ 1.0 or EAX™ 2.0 properties including environmental reverb, obstruction and occlusion modeling. EAX™ is a trademark of Creative Labs. DVD QSurround™... -
Page 25: Seismic Edge Control Panel
EISMIC ONTROL ANEL Help Button Click the yellow “Help” button on any tab and you will have access to comprehensive hyper linked help file describing the control panel. Within the help file you can navigate by simply clicking on parts of the image of the control panel, or by using index lists. -
Page 26: Space Junk & Wumpus
Space Junk & Wumpus: 3D audio applications that demonstrate QSound Lab’s 3D audio technology. You must have the Seismic Edge install CD in your CD-ROM drive to launch these applications. Show Control Panel Icon in the TaskBar: Enabling this allows you to open the control panel from the taskbar. Default setting is enabled. -
Page 27: Settings Tab
Settings Tab This tab allows you to select your exact speaker configuration and provides you with sliders for adjusting the master volume, left/right speaker balance, fade control (balance between front and back speakers), Center/LFE (Low Frequency Effects) level control for 5.1 channel playback, and Tone Control which affects all channels. Output Mode Headphone Select this mode when listening using headphones rather than speakers. -
Page 28: Qxpander
QXpander QXpander widens the sound field of stereo music and provides 3D enhancement to 2D audio games. Using this feature in combination with speakers providing “3D enhancement” may cause distortion and is not recommended. DVD QSurround This feature will greatly enhance your listening experience when used during DVD playback in 2 speaker mode. This feature will provide the sensation of a full-blown 5.1 speaker system by virtualizing the surround speakers. -
Page 29: Dvd Ssm (Small Speaker Mode)
DVD SSM (Small Speaker Mode) Check this box if you will be utilizing Dolby Digital DVD playback mode using small satellite speakers. This will enable the subwoofer connected to the sound cards’ LFE output to produce the bass content that the satellites cannot produce. -
Page 30: S/Pdif Tab
S/PDIF Tab This page of the Philips Seismic Edge Control Panel will control the settings for the Digital Audio input and output. S/PDIF is the acronym for industry-wide standard called Sony/Philips Digital Interface. This tab is linked to the settings tab. If you selected 5.1 speakers under the settings tab, S/PDIF Out is disabled and will be grayed out. -
Page 31: Rear Left And Right Channels
Rear Left and Right Channels In this mode the same content being sent to the rear/surround Line Out speaker jack in analog format will also be sent to the S/PDIF in digital format for applications running on your PC (MP3, games, etc.). For external inputs (CD-In or Line In), select the proper source on the “Apply Reverb/QXpander/QMSS to External Input Source”... -
Page 32: Dvd Ac3/Dts
DVD AC3/DTS Use this mode if you wish to play DVD audio using an external AC3 or DTS decoder such as a speaker set, receiver or decoder box connected to S/PDIF Out. This mode is only available when using a compatible soft- DVD player capable of streaming AC3 or DTS data to the sound card... -
Page 33: Effects Tab
Effects Tab Reverb/QXpander/QMSS to External Input Source Reverb, QXpander (when enabled), and expansion of stereo to 4 or 5.1 channels (QMSS) are automatically applied to all sounds generated by applications running on your PC however they are not applied to inputs such as analog “CD In”... -
Page 34: Environment
If you are using the Philips Seismic Edge (H/W) Synth, the “Environment” you select will also be used when playing MIDI music and the intensity will be controlled on the reverb slider on the MIDI tab. -
Page 35: Midi Tab
MIDI Tab Your Seismic Edge™ sound card includes a wavetable music synthesis engine. This WaveTable Synth is a pure hardware synthesis engine designed for use with games or other applications were low CPU consumption is critical. Select the Seismic Edge WaveTable Synth only for games that utilize MIDI for music. Note that most current PC games do not use MIDI music. -
Page 36: H/W Wavetable Voices
H/W Wavetable Voices Use this and the H/W Wavetable Chorus and Reverb Level controls to adjust Seismic Edge WaveTable synth. These adjustments will have no effect on MIDI playback unless the Seismic Edge Wavetable synth is selected as the MIDI device. Better Gaming To achieve the best sound in gaming use the default setting. -
Page 37: Speaker Test Tab
Speaker Test Tab The speaker test tab is a utility to help verify proper speaker connections to your sound card. The acronyms are defined as follows: LF – Left Front Speaker CTR – Center Speaker RF – Right Front Speaker RS –... -
Page 38: Information Tab
Use the Master Volume Slider to adjust the overall output level of your speaker system. Adjust speaker connections as required to complete your sound card installation. Information Tab The information tab provides detailed information about your sound card. This includes the model number for your product and software version information. -
Page 39: Dvd Playback Modes
DVD P LAYBACK ODES Using 4 or 5.1 channel surround speakers your Seismic Edge™ sound card can deliver true multi-channel surround sound from a compatible soft-DVD player application even if the player only supports stereo output. If the soft-DVD player is capable of providing a true 5.1 Dolby Digital or a 4 channel Dolby Digital™ down-mix Seismic Edge will output all 4 or 5.1 Dolby Digital channels. -
Page 40: Siren Xpress
Siren™ XPress. Siren XPress allows you to operate in Philips compact mode or normal mode. The compact mode includes only the Transport buttons (Play, Stop, Pause, etc.). The normal mode displays the entire Siren XPress window, and allows access to all Siren XPress functionality. -
Page 41: Music Files
Music Files A music file refers to any audio file that Siren will play from your computer. Siren supports the following music file formats: *.wav, *.mp3, *.wma. Finding Music After you install Siren XPress, a configuration wizard will scan your local hard drives for any *.mp3, *.wma, and *.wav files, and add them to your Siren XPress music library. -
Page 42: Recording From Acd
Recording from a CD 1. Place an audio CD in your computer’s CD-ROM drive. 2. In normal mode, choose Play or Record Music CDs from the View menu. Your computer’s CD drives are displayed in the Explorer panel. 3. In the drop-down list in the Explorer panel, specify the CD drive containing the audio CD. The CD’s tracks are displayed in the Explorer panel, and Siren attempts to access information for the CD. -
Page 43: Audio Pix
UDIO AudioPix™ makes it easy to combine digital images with MP3 sound to get the ultimate multimedia presentation. In just three simple steps you will have an exciting new MPEG format that can be played back in either of the popular players, RealPlayer® or Windows Media™ Player. Now for the first time, you don’t have to be a Web Master to create your own unique presentations –... -
Page 44: Recording Source Configuration
ECORDING OURCE Philips Seismic Edge™ allows you to record sounds and music from various input sources (i.e. microphone, audio CD, line in, etc). Before you start recording, you need to configure the recording source as follow: Open the Volume Mixer, go to Options, and select Properties. -
Page 45: Resolving I/O Conflicts
Device Manager in Windows® 95/98. If you are still unable to determine which card is causing the conflict, remove all cards except the Philips Seismic Edge card and other essential cards (for example, disk controller and graphics cards). Add each card back until Device Manager indicates that a conflict has occurred. -
Page 46: Uninstalling Software Drivers
Windows NT Uninstall Browse to the Multimedia page in the Control Panel, click on the “Devices” tab, under “Audio Devices” select “Philips Seismic Edge Audio”, and then click the “Remove” button. Shutdown your computer and remove Philips Seismic Edge™ from your system.