Table of Contents
Advertisement
Note:
Register at www.Toro.com.
Original Instructions (EN)
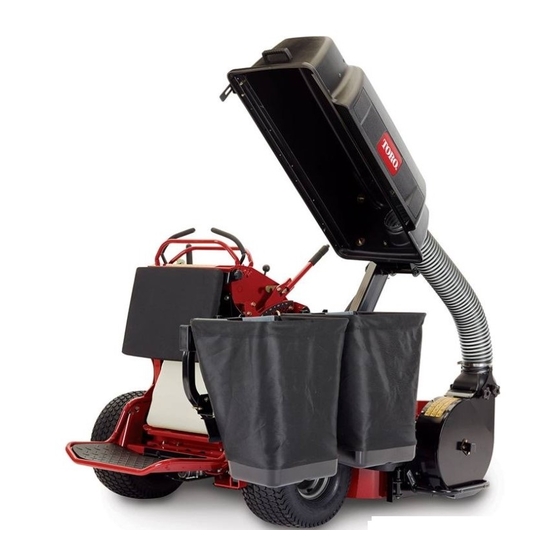
E-Z Vac
2016 and After Grandstand
Model No. 78570—Serial No. 400000000 and Up
This kit requires the simultaneous installation of other kits to
function properly. Contact your Authorized Service Dealer
to obtain the corresponding necessary parts. For more
information, visit us at www.Toro.com.
Form No. 3415-397 Rev C
™
Twin Bagger
®
Mower
*3415-397* C
Advertisement
Table of Contents

Related Manuals for Toro E-Z Vac 78570


Summary of Contents for Toro E-Z Vac 78570
- Page 1 Model No. 78570—Serial No. 400000000 and Up Note: This kit requires the simultaneous installation of other kits to function properly. Contact your Authorized Service Dealer to obtain the corresponding necessary parts. For more information, visit us at www.Toro.com. *3415-397* C Register at www.Toro.com. Original Instructions (EN)
-
Page 2: Table Of Contents
Whenever you need service, genuine Toro parts, or g000502 Figure 3 additional information, contact an Authorized Service Dealer or Toro Customer Service and have the model 1. Safety-alert symbol and serial numbers of your product ready. Figure 1 identifies the location of the model and serial numbers on the product. -
Page 3: Safety
• Take care when opening the bagger cover to keep debris from falling onto the engine and muffler area. • Allow the machine to cool before storing it. The following list contains safety information specific to Toro products and other safety information you must know. - Page 4 • Become familiar with the safe operation of the equipment, with the operator controls, and safety signs. • Use extra care with grass catchers or other attachments. These can change the operating characteristics and the stability of the machine. • Follow the recommendations for adding or removing weights as described in the Operator’s Manual for the machine.
-
Page 5: Safety And Instructional Decals
Safety and Instructional Decals Safety decals and instructions are easily visible to the operator and are located near any area of potential danger. Replace any decal that is damaged or missing. 136-4053 decal136-4053 136-4053 1. Warning; loss of traction—do not operate only with counterbalance weights installed;... -
Page 6: Setup
Setup Loose Parts Use the chart below to verify that all parts have been shipped. Procedure Description Qty. – No parts required Prepare the machine. E-Z Vac Blower and Drive Kit (sold Install the E-Z Vac Blower and Drive Kit (sold separately). -
Page 7: Preparing The Machine
Preparing the Machine Installing the Blower Assembly, Belt, and Belt No Parts Required Cover Procedure Parts needed for this procedure: Note: Remove the Roller Striper Kit, if installed, prior Blower assembly (from the Blower and Drive Kit) to installing this attachment. Belt (from the Blower and Drive Kit) Disengage the PTO, move the motion-control levers to the N... -
Page 8: Installing The Brackets
g037529 Figure 7 1. Knob 3. Belt cover 2. Idler screw g038472 Figure 5 Close the blower assembly so that the handle latches on the blower mount. 1. Blower assembly 3. Insert the pin here. 2. Pin Note: Whenever you need to open the blower assembly, remove the belt cover first. - Page 9 g037604 Figure 8 1. Right tire 3. Right transaxle 2. Lug nut Raise the operator’s platform. Remove the 2 rear bolts and 2 nuts from the right transaxle (Figure 9). Retain the nuts. g185953 Figure 10 1. Carriage bolt (3/8 x 1 inch) 4.
- Page 10 g037608 Figure 12 1. Front of the control tower 3. Front mount bracket 2. Carriage bolt (1/4 x 5/8 4. Nut (1/4 inch) inch) g037607 Figure 11 Lower the operator’s platform. 1. Transmission bolt 3. Tower-panel bolt Install the right tire, torque the lug nuts to 115 to 2.
-
Page 11: Installing The Bagger Frame
Secure the frame to the pin on the rear mount bracket using a thrust washer and hairpin cotter (Figure 14). Installing the Bagger Frame Parts needed for this procedure: Bagger-frame assembly Clevis pin Hairpin cotter Thrust washer Nut (3/8 inch) Carriage bolt (3/8 x 1 inch) Procedure With the assistance of another person, lift the... -
Page 12: Installing The Bags
Secure the bagger frame to the front mount bracket using a carriage bolt (3/8 x 1 inch) and nut (3/8 inch) as shown in Figure Installing the Bags Parts needed for this procedure: Procedure Unlatch and open the hood assembly. g037650 Figure 16 Install the bags onto bag mounts... - Page 13 Installing the Bagger Tube Parts needed for this procedure: Tube Hose clamp Blower clamp Procedure Thread 1 end of the tube into the hood until it forms approximately a 90-degree bend from the g185954 Figure 20 blower and is secure (Figure 19).
-
Page 14: Installing The Weight
Operation Operation Safety Installing the Weight • Become familiar with all operating and safety instructions in the Operator's Manual for your machine before using this attachment. Parts needed for this procedure: • Never remove the bagger or bagger tubes while Weight the engine is running. -
Page 15: Positioning The Flow Baffle
Positioning the Flow Baffle Emptying the Grass Bags Adjust the baffle to position C (front position) for Grass bags are heavy when full. Be careful when bagging. Refer to the Operator Manual for the lifting or handling a grass bag that is full. machine. -
Page 16: Clearing Obstructions From The Bagger System
Clearing Obstructions from Removing the Bagger the Bagger System WARNING Components around the engine will be hot if WARNING the machine has been running. Touching hot When the bagger is in operation, the blower components can cause burns. can rotate and cut off or injure your hands. •... -
Page 17: Transporting The Machine
Operating Tips DANGER Without the grass deflector, discharge cover, Machine Size or complete grass catcher assembly mounted in place, you and others are exposed to blade Remember that the machine is longer and wider with contact and thrown debris. Contact with this attachment installed. - Page 18 In most mowing conditions, the standard high lift blades provide the best bagging performance. Use a Toro Atomic blade for bagging leaves in dry conditions. In dry dusty conditions, the medium lift or low lift blades, in combination with the Bagging Enhancement Kit, reduce dust and dirt blowout while providing effective bagging air flow.
-
Page 19: Maintenance
Maintenance Recommended Maintenance Schedule(s) Maintenance Service Maintenance Procedure Interval • Inspect the bagger belt. After the first 8 hours • Inspect the bagger. • Clean the bagger, bags, and fill-indicator impeller. After each use • Inspect the bagger belt. Every 25 hours •... -
Page 20: Inspecting The Bagger
1. Blower assembly 3. Hex nut Use a Toro Atomic blade for bagging leaves in dry 2. Pulley conditions. In dry dusty conditions, the medium lift or low lift blades reduce dust and dirt blowout while Remove the existing bagger belt from the deck providing effective bagging air flow. -
Page 21: Storage
Storage Clean the bagger attachment. Refer to Cleaning the Bagger and Bags (page 19). Inspect the bagger attachment for damage. Refer to Inspecting the Bagger (page 20). Make sure that the bags are empty and thoroughly dry. Check the belt for wear or cracks. Store the machine in a clean, dry place, out of direct sunlight. -
Page 22: Troubleshooting
Troubleshooting Problem Possible Cause Corrective Action There is abnormal vibration. 1. Cutting blade(s) is/are bent or 1. Install new cutting blade(s). unbalanced. 2. The blade-mounting bolt is loose. 2. Tighten the blade-mounting bolt. 3. The blower pulley or pulley assembly 3. - Page 23 The method of transmission shall be electronic transmittal. This machinery shall not be put into service until incorporated into approved Toro models as indicated on the associated Declaration of Conformity and in accordance with all instructions, whereby it can be declared in conformity with all relevant Directives.
- Page 24 Contact your seller to arrange service of the product. If for any reason it is impossible for you to contact your seller, you may contact any Toro The following time periods apply from the original date of purchase: Authorized Distributor to arrange service.