Table of Contents
Advertisement
Advertisement
Table of Contents

Related Manuals for Siemens RL Series


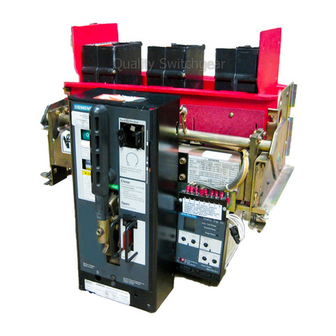
Summary of Contents for Siemens RL Series
- Page 3 The contents of this instruction manual shall not become part of or modify any prior or ex1sting agreement, commit & ment or relationship. The sales contract contains the entire obligation of Siemens Energy Automation, Inc. The & warranty contained in the contract between the parties is...
-
Page 5: Table Of Contents
Table of Contents Maintenance (Parts Replacement) 17-19 Introduction and Safety ................... 17 Introduction ..Contact Replacement ..........Qualified Person . .. -
Page 7: Introduction And Safety
Caution - ind icates a potentially hazardous situation which, Contact the nearest Siemens representative if any additional Information is desired. if not � voided, may result in minor or moderate injury. -
Page 9: Installation
Be sure to lubricate primary and secondary Immediately upon receipt of this equipment, carefully disconnect fingers with Siemens electrical contact lubricant, remove all packing braces. Examine parts and check them part no. or Mobilgrcase part no. 15-171-370-002,... -
Page 11: Installation (And Removal) Sequence
Installation IMPORTANT: circuit breaker operating characteristics before placing the circuit breaker in service. Make sure power circuits are not Be certain that you check points energized, before testing. through below before placing circuit breaker in 12. Trip units and accessory devices should receive a compartment. - Page 13 Installation Heavy weight. serious injury or cause personal death, property damage. l1ft1nQ device place ci ;1 or crEJne v1.:ill hc<-J\"y . Avoid spcccJs. v;•:1q!lts CJ\ccsstvc <1no ,�,torts insert large ir2.rne t�(" 0 1 ;.-�move d�cmpt to "' t�."r,akers fuse carriages unless located.
-
Page 15: Operation
Description alignment of the Secondary Disconnect fingers. This Check The continuous current and interrupting ratings of the circuit breakers are ensures against misalignment due to possible distortion of fingers as shown on the circuit breaker rating label. during shipment and handling Close the compartment door and secure door latch or latches prior to The circuit breakers are also available with integrally mounted current racking the circuit breaker to or from the CONNECTED position. - Page 17 When the closing springs are fully charged, roller (43) the toggle into its upright position, as shown in d etail C . The engages latch (47). Closing ratchet (140) engages a closing cycle can be interrupted at any point by operation of pawl in such a manner that the charging cam must one of the tripping means.
- Page 19 G _Green Indicating Lamp CC -Circuit Breaker Closing Coil TC -Circuit Breaker Shunt) Trip Coil -Aux. Switch Contact - Open when Breaker is Open -Aux. Closing Relay - Anti-Pump b -Aux. Switch Contact -Closed - Motor Cutoff Switch Breaker is Open Spring Charging Motor MDS -Motor ON-OFF Switch Control Switch...
-
Page 21: Electrically Operated Circuit Breakers
Drawout Interlock A draw-out circuit breaker mechanism includes: Electrically Operated Circuit Breakers Means to rack the circuit breaker in or out of the compartment. Interlock to prevent racking a closed circuit breaker into or out The mechanism of the electrically operated circuit breaker is the of any position. -
Page 23: Spring Discharge Interlock
Spring Discharge Interlock When racking the circuit breaker out to the DISCONNECT position, the closing springs will automatically discharge, at or before reaching the DISCONNECT position. The barrel nut (1 09) engages the spring interlock. This, in turn, is connected to the manual close hood which releases the closing springs. -
Page 25: Maintenance
Siemens lubricant, part no. 1 5-1 72-7 9 1 -2 1 4. Or 1 5-171 -370-002 . user to determine choice based on existing lubricant in the Cubicle or Adapter. -
Page 27: Recommended Periodic
Test the tripping system, using an appropriate test set, such With the cubicle door closed, rack the circuit breaker to the as the Siemens Portable Static Trip Test Set, model PTS-4. Refer DISCONNECT position. to 'Static Trip Ill Information and Instruction Guide', SG-3118, and 'Portable Test Set Instructions', SG3138, for information on testing. - Page 29 Test the tripping system, using an appropriate test set, This is necessary before the closing springs can be charged, primary current or secondary injection, such as the Siemens and also makes removal of the arc chutes easier. Portable Static Trip Set, model PTS4. Refer to 'Static Trip Ill...
-
Page 31: Adjustments
Maintenance A CAUTION Excessive test vottages may result in damage to High-speed moving parts. equipment. May cause personal injury. When performing maintenance close operation. mainta1n a firm g r p on the manual charging handle dunng the closing stroke to counteract the large force in the closing springs. -
Page 33: Main Contact Make
Maintenance Adjustments, continued Latch Engagement During maintenance inspections, the following items should be checked to ensure that the original settings are maintained: Trip (Refer to Figure 2) Toggle latch ( 1 5 ) should engage the full width of trip latch ( 1 2) when the breaker is closed in normal manner. - Page 35 ( 1 ) Mobilgrease 28; Siemens: part number 1 5- 1 72-79 1 -2 1 4 Siemens contact lubricant: part number 1 5- 1 7 1 -370-002 Points where contact is made with stationary equipment. the user should chose lubricant to best match the existing conditions.
-
Page 37: Maintenance (Parts Replacement)
Maintenance (Parts Replacement) lower a � Remove connectors and moving contacts described in the Contact Replacement (See Figure 9) The contact structure ( 80) (78) The complete movable contact assembly may preced ing consists of main current carrying contacts and arcing contacts now be brought to the bench. - Page 39 Maintenance (Parts Replacement) I ns i de 8 1 I ns i de 8 1 RL - 32 0 0 R L E - 3 2 0 0 RL - 4 0 0 0 RLE - 4 0 0 0 5 6 5 G Figure 9.
- Page 41 Maintenance (Parts Replacement) .or Cutoff Switches (for Electrically Operated Circuit Breakers) .. - . . ----- Figure'10c. Position 3. Springs charged; motor stopped. Position 3. Springs Charged; Motor Stopped. The springs have reached charged position. The motor/gear lever (2) has been retracted by roll pins on the large gear as the cam follower (82, Figure 2) on the large spur gear has disengaged from the wind Figure 1 0a.
-
Page 45: Fuse Functions
Fuse Functions (RLF-3000 through RLF-5000) 1 8 - 75 5 - 7 5 3 - 4 l l o Open Fuse Trip Device ··- - - - - 1 8 - 755-753- 4 l l b Open Fuse Trip Device Views and Trigger Fuse Assembly Views er Fuse Assembl l l . -
Page 47: Fuse Carriage
Fuse Carriage Introduction Type RFC-3200 through RFC-5000 fuse carriages for use with Type RLF-3200 through RLF-5000 circuit breakers are furnished for mounting in metal-enclosed switchgear of the Drawout type. (See Fi g u res and 1 3 ). All fuse carriages are completely assembled, tested, and calibrated at the factory in vertical position, and must be so installed to operate properly. -
Page 49: Installation Sequence
Fuse Carriage Precautions to be observed in the Operation of RLF Circuit B reakers with RFC Fuse Carriages: Using the proper lifting equipment and following the instructions (Steps A-D, on Figure 1 on Page 5) for Read this I nstruction Manual before installing or circuit breaker installation, insert the FUSE CARRIAGE making any changes or adjustments. -
Page 51: Fuses
Fuse Carriage Fuses O n ly special purpose fuses i n acco rdance with Siemens drawing number 7 1 -1 42-200 can be used with the circuit breaker/fuse carriage combination. Fuses which do not conform to this specification will not mount properly on the fuse carriage terminals. -
Page 55: Optional Devices
Operation Counter Latch Check Switch This option consists of a mechanically operated counter This option is a small switch mounted on a bracket. The with a bracket that mounts at the bottom of the breaker switch operator is adjusted so the switch is operated by, mounted auxiliary switch. - Page 57 Include breaker type, rating, and breaker serial number with your order. Place order with your Siemens representative. When ordering relays o r other electrical parts, include control voltage (see recommended spare parts list f or p art numbers). Ord erin g Ex ample...
- Page 59 Parts 2 4 0 2 4 1 2 4 2 L:� R o c k i ng B l oc k R o c k i n g Pos i t i on St op f o r R L - 3 2 0 0 th ru RL - 5 0 0 0 23 6 F u s e d B r e 11 k e r...
- Page 61 Parts 1 6. Figure er to Item Description Usage Part N umber Usage Part N umber Item Description 1 6 1 A 1 1 9 PTO Support ....1 8-732-790-004 Barrier .
- Page 63 Parts T yp i cu l R L - 2 0 0 0 (Part 2) Figure 1 RL Brea ker Assem ·...
- Page 65 Parts Refer to Figures 17 and 1 8 Description Part N u m ber Usage Item Description Part N u m ber Usage RH Sideplate 1 8-398-289-510 37 K Upper Cont ..1 8-734-436-501 · · - - - - RL- 1 600 Stationary Assy LH Sideplate .
- Page 67 Parts 24 7 1 24 & 93 2 34 ---- -- -- -- - � l / 3 �:: / 17 4 • � �/ l�l 87 88 1 4 0 T yp i c a l RL - 2 0 0 0 ( /j �...
- Page 71 PARTS M o v Cl b l P RL 32 0 0 , � L [ ' 3 2 0 0 Figure 1 8 � 7 5 5 � 7 53 - 4 1 9 l� o w e r Contacts RL-3200 Through...
- Page 73 PARTS :-��-- E , 2 E:o2 f,J A � ----- -- - 7 7 RL l b OO R L - 2 0 0 0 Rl E - i 6 00 - 2 0 0 0 M o v o b l e C o n t o c t D e t o i RL l 6 0 0 RLE - B O O RL I -B OG...
- Page 75 Parts 1 25 V 1 e w F - F 1 24 1 1 2 NUTS FAR SIDE 800 AMP ONLY &9 ;� 1 1 8 1 1 9 V i e w E - E V 1 e w 72 73 7f:, 75 78 79 C - C...