
Related Manuals for Electrolux ESF5533LOW


Summary of Contents for Electrolux ESF5533LOW
- Page 1 ESF5533LOW ESF5533LOX Dishwasher User Manual Geschirrspüler Benutzerinformation Lavavajillas Manual de instrucciones...
-
Page 2: Table Of Contents
13. TECHNICAL INFORMATION................. 21 WE’RE THINKING OF YOU Thank you for purchasing an Electrolux appliance. You’ve chosen a product that brings with it decades of professional experience and innovation. Ingenious and stylish, it has been designed with you in mind. So whenever you use it, you can be safe in the knowledge that you’ll get great results every time. -
Page 3: Safety Information
ENGLISH SAFETY INFORMATION Before the installation and use of the appliance, carefully read the supplied instructions. The manufacturer is not responsible for any injuries or damages that are the result of incorrect installation or usage. Always keep the instructions in a safe and accessible location for future reference. -
Page 4: Safety Instructions
The operating water pressure (minimum and • maximum) must be between 0.5 (0.05) / 8 (0.8) bar (MPa) Obey the maximum number of 13 place settings. • If the supply cord is damaged, it must be replaced by •... - Page 5 ENGLISH • Connect the mains plug to the mains • If the water inlet hose is damaged, socket only at the end of the immediately close the water tap and installation. Make sure that there is disconnect the mains plug from the access to the mains plug after the mains socket.
-
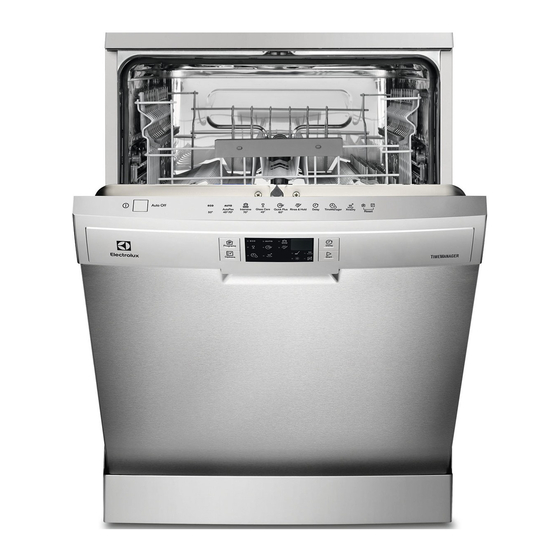
Page 6: Product Description
3. PRODUCT DESCRIPTION Worktop Rinse aid dispenser Upper spray arm Detergent dispenser Lower spray arm Cutlery basket Filters Lower basket Rating plate Upper basket Salt container Air vent... -
Page 7: Control Panel
ENGLISH 4. CONTROL PANEL On/off button Start button Programs button Indicators Programme indicators Options button Display Delay button 4.1 Indicators Indicator Description Washing phase. It comes on when the washing phase operates. Drying phase. It comes on when the drying phase operates. TimeManager indicator. - Page 8 Programme Degree of soil Programme phases Options Type of load • All • Prewash • XtraDry • Crockery, cut‐ • Wash from 45 °C to lery, pots and 70 °C pans • Rinses • Dry • Heavy soil • Prewash •...
-
Page 9: Settings
ENGLISH 5.2 Information for test In your request please include the product number code (PNC) found on institutes the rating plate. To receive the necessary information for For any other questions regarding your conducting performance tests (e.g. dishwasher please refer to the service according to EN60436), send an email book provided with your appliance. - Page 10 German de‐ French de‐ mmol/l Clarke de‐ Water softener grees (°dH) grees (°fH) grees level 29 - 36 51 - 64 5.1 - 6.4 36 - 45 23 - 28 40 - 50 4.0 - 5.0 28 - 35...
-
Page 11: Options
ENGLISH To improve the drying performance refer to the XtraDry option or activate AirDry. CAUTION! If children have access to the appliance, it is advised to deactivate AirDry as opening the door may pose a danger. How to deactivate AirDry Make sure the appliance is in user mode. -
Page 12: Before First Use
Every time shorter. activated, XtraDry is off and The total programme duration decreases needs to be chosen by approximately 50%. manually. The washing results are the same as Activating XtraDry deactivates with the normal programme duration. The TimeManager and vice versa. -
Page 13: Daily Use
ENGLISH 6. Turn the cap of the salt container clockwise to close the salt container. CAUTION! Water and salt can come out of the salt container when CAUTION! you fill it. After you fill the Only use rinse aid salt container, immediately specifically designed for start a programme to dishwashers. - Page 14 • The washing phase indicator comes on . • The programme duration starts to decrease with steps of 1 minute. Starting a programme with delay start 1. Set a programme. 2. Press Delay again and again until the display shows the delay time you want to set (from 1 to 24 hours).
-
Page 15: Hints And Tips
ENGLISH Cancelling the delay start while End of the programme the countdown operates When the programme is completed the display shows 0:00. The phase indicators When you cancel the delay start you are off. have to set the programme and options again. -
Page 16: Care And Cleaning
10.3 What to do if you want to • Put light items in the upper basket. Make sure that the items do not move stop using multi-tablets freely. • Put cutlery and small items in the Before you start to use separately cutlery basket. - Page 17 ENGLISH 5. Make sure that there are no residues of food or soil in or around the edge 1. Turn the filter (B) counterclockwise of the sump. and remove it. 6. Put back in place the flat filter (A). Make sure that it is correctly positioned under the 2 guides.
-
Page 18: Troubleshooting
11.2 Cleaning the spray arms • If you regularly use short duration programmes, these can leave Do not remove the spray arms. If the deposits of grease and limescale holes in the spray arms are clogged, inside the appliance. To prevent this,... - Page 19 ENGLISH Problem and alarm code Possible cause and solution The appliance does not fill • Make sure that the water tap is open. with water. • Make sure that the pressure of the water supply is not too low. For this information, contact your local The display shows water authority.
- Page 20 Refer to "Before first use", Authorised Service Centre. "Daily use", or "Hints and For alarm codes not described in the tips" for other possible table, contact an Authorised Service causes. Centre. Once you have checked the appliance, deactivate and activate the appliance.
-
Page 21: Technical Information
ENGLISH Problem Possible cause and solution Traces of rust on cutlery. • There is too much salt in the water used for wash‐ ing. Refer to "The water softener". • Silver and stainless steel cutlery were placed to‐ gether. Avoid to put silver and stainless steel items close together. - Page 22 Water supply max 60 °C Cold water or hot water Capacity Place settings Power consumption Left-on mode (W) Power consumption Off-mode (W) 0.50 1) Refer to the rating plate for other values. 2) If the hot water comes from alternative source of energy, (e.g. solar panels, aeolian ener‐...
- Page 23 13. TECHNISCHE DATEN................... 45 WIR DENKEN AN SIE Vielen Dank, dass Sie sich für ein Gerät von Electrolux entschieden haben. Sie haben ein Produkt gewählt, hinter dem jahrzehntelange professionelle Erfahrung und Innovation stehen. Bei der Entwicklung dieses großartigen und eleganten Geräts haben wir an Sie gedacht.
-
Page 24: Sicherheitshinweise
SICHERHEITSHINWEISE Lesen Sie vor der Montage und dem Gebrauch des Geräts zuerst die Gebrauchsanleitung. Bei Verletzungen oder Schäden infolge nicht ordnungsgemäßer Montage oder Verwendung des Geräts übernimmt der Hersteller keine Haftung. Bewahren Sie die Anleitung immer an einem sicheren und zugänglichen Ort zum späteren Nachschlagen auf. - Page 25 DEUTSCH Bauernhöfe, Personalküchenbereiche in – Geschäften, Büros und anderen Arbeitsumfeldern. Für Gäste in Hotels, Motels, Pensionen und – anderen wohnungsähnlichen Räumlichkeiten. Nehmen Sie keine technischen Änderungen am Gerät • vor. Der Betriebswasserdruck (Mindest- und Höchstdruck) • muss zwischen 0.5 (0.05) / 8 (0.8) bar (MPa) liegen Beachten Sie, dass die Höchstzahl an Maßgedecken •...
-
Page 26: Sicherheitsanweisungen
2. SICHERHEITSANWEISUNGEN 2.1 Montage • Ziehen Sie nicht am Netzkabel, wenn Sie das Gerät von der WARNUNG! Stromversorgung trennen möchten. Die Montage des Geräts darf Ziehen Sie stets am Netzstecker. nur von einer qualifizierten • Das Gerät entspricht den EC- Fachkraft durchgeführt... -
Page 27: Gerätebeschreibung
DEUTSCH des Wasserzulaufschlauchs an den solche nicht in die Nähe oder auf das autorisierten Kundendienst. Gerät. 2.4 Gebrauch 2.5 Service • Setzen oder stellen Sie sich niemals • Wenden Sie sich zur Reparatur des auf die geöffnete Gerätetür. Geräts an einen autorisierten •... -
Page 28: Bedienfeld
Reinigungsmittelbehälter Oberkorb Besteckkorb Unterkorb 4. BEDIENFELD Taste „Ein/Aus“ Taste Start Taste Programs Kontrolllampen Programmkontrolllampen Taste Options Display Taste Delay 4.1 Kontrolllampen Kontrolllam‐ Beschreibung Hauptspülgang. Leuchtet während des Hauptspülgangs auf. Trockenphase. Leuchtet während der Trocknungsphase auf. Kontrolllampe TimeManager. Kontrolllampe XtraDry. -
Page 29: Programme
DEUTSCH 5. PROGRAMME Programm Verschmutzungs‐ Programmphasen Optionen grad Beladung • Normaler Ver‐ • Vorspülen • TimeManager schmutzungs‐ • Hauptspülgang 50 °C • XtraDry grad • Spülen • Geschirr und • Trocknen Besteck • Alle • Vorspülen • XtraDry • Geschirr, Be‐ •... -
Page 30: Einstellungen
5.1 Verbrauchswerte Wasserverbrauch Energieverbrauch Dauer Programm (kWh) (min.) 0.921 7 - 12 0.7 - 1.5 45 - 160 13 - 15 1.4 - 1.6 140 - 160 13 - 14 0.9 - 1.1 70 - 85 1) Druck und Temperatur des Wassers, die Schwankungen in der Stromversorgung, die ausgewählten Optionen und die Geschirrmenge können die Werte verändern. - Page 31 DEUTSCH auf die Spülergebnisse und das Gerät Aufrufen des Benutzermodus auswirken könnten. Stellen Sie sicher, dass sich das Gerät Je höher der Mineralgehalt ist, um so im Programmwahlmodus befindet. härter ist Ihr Wasser. Die Wasserhärte wird in gleichwertigen Einheiten Halten Sie zum Aufrufen des gemessen.
- Page 32 • Im Display wird die aktuelle – Einstellung angezeigt: z. B. Klarspülmittelnachfüllanzeige Stufe 5. eingeschaltet. 2. Drücken Sie Programs wiederholt – zum Ändern der Einstellung. Klarspülmittelnachfüllanzeige 3. Drücken Sie die Taste Ein/Aus zur ausgeschaltet. Bestätigung der Einstellung. 2. Drücken Sie Options zum Ändern der Einstellung.
-
Page 33: Optionen
DEUTSCH • Die Kontrolllampen VORSICHT! Haben Kinder Zugang zum erlöschen. Gerät, wird empfohlen • Die Kontrolllampe blinkt AirDry auszuschalten, da weiterhin. das Öffnen der Tür eine • Im Display wird die aktuelle Gefahr darstellen könnte. Einstellung angezeigt: AirDry eingeschaltet. So schalten Sie AirDry aus 2. -
Page 34: Vor Der Ersten Inbetriebnahme
7.2 TimeManager Trockenergebnisse können beeinträchtigt werden. Wenn diese Option eingeschaltet ist, erhöht sich der Wasserdruck und die So schalten Sie TimeManager Wassertemperatur. Die Spül- und Trockenphasen verkürzen sich. Die Programmdauer verkürzt sich um Drücken Sie Options, bis die etwa 50 %. -
Page 35: Täglicher Gebrauch
DEUTSCH VORSICHT! VORSICHT! Beim Befüllen des Verwenden Sie Salzbehälters können ausschließlich Klarspülmittel Wasser und Salz austreten. für Geschirrspüler. Starten Sie nach dem Füllen 1. Drücken Sie die Entriegelungstaste des Salzbehälters (D), um den Deckel (C) zu öffnen. umgehend ein Programm, 2. - Page 36 9.1 Verwenden von • 5 Minuten nach Programmende. • Nach 5 Minuten, wenn das Programm Reinigungsmittel nicht gestartet wurde. Starten eines Programms 1. Drücken Sie die Taste Ein/Aus, um das Gerät einzuschalten. Stellen Sie sicher, dass sich das Gerät im Programmwahlmodus befindet.
-
Page 37: Tipps Und Hinweise
DEUTSCH Halten Sie Programs und Options Wenn die Tür während der gleichzeitig gedrückt, bis sich das Gerät Trockenphase länger als 30 im Programmwahlmodus befindet. Sekunden geöffnet wird, wird das laufende Programm Beenden des Programms beendet. Dies geschieht nicht, wenn die Tür durch die Halten Sie Programs und Options Funktion AirDry geöffnet gleichzeitig gedrückt, bis sich das Gerät... - Page 38 10.4 Beladen der Körbe für Geschirrspüler. Andere Produkte können das Gerät beschädigen. • Verwenden Sie das Gerät • Wir empfehlen in Bereichen mit ausschließlich zum Spülen hartem und sehr hartem Wasser spülmaschinenfester Teile. Reinigungsmittel ohne Zusätze • Spülen Sie im Gerät keine...
-
Page 39: Reinigung Und Pflege
DEUTSCH 10.6 Entladen der Körbe Am Programmende kann sich noch Wasser an den 1. Lassen Sie das Geschirr abkühlen, Seitenwänden und der bevor Sie es aus dem Gerät nehmen. Gerätetür befinden. Heißes Geschirr ist stoßempfindlich. 2. Entladen Sie zuerst den Unter- und dann den Oberkorb. -
Page 40: Fehlersuche
11.2 Reinigen der Sprüharme 5. Achten Sie darauf, dass sich keine Lebensmittelreste oder Bauen Sie die Sprüharme nicht aus. Verschmutzungen in oder um den Falls die Löcher in den Sprüharmen Rand der Wanne befinden. verstopft sind, reinigen Sie sie mit einem 6. - Page 41 DEUTSCH Bei manchen Störungen zeigt das WARNUNG! Display einen Alarmcode an. Nicht ordnungsgemäße Die meisten Störungen, die auftreten, Reparaturen stellen ein können behoben werden, ohne dass Sicherheitsrisiko für den der autorisierte Kundendienst gerufen Benutzer dar. Die werden muss. Reparaturarbeiten dürfen nur von qualifiziertem Personal durchgeführt werden.
- Page 42 Störung und Alarmcode Mögliche Ursache und Abhilfe Das Programm dauert zu • Wählen Sie die TimeManager-Option, um die Pro‐ lang. grammdauer zu verkürzen. • Wenn die Zeitvorwahl eingestellt ist, brechen Sie die‐ se ab oder warten Sie, bis sie abgelaufen ist.
- Page 43 DEUTSCH 12.1 Die Spül- und Trocknungsergebnisse sind nicht zufriedenstellend Störung Mögliche Ursache und Abhilfe Nicht zufriedenstellende • Siehe „Täglicher Gebrauch“, „Tipps und Hin‐ Spülergebnisse. weise“ sowie die Broschüre zum Beladen der Kör‐ • Nutzen Sie intensivere Spülprogramme. • Reinigen Sie die Austrittsdüsen der Sprüharme und das Sieb.
- Page 44 Störung Mögliche Ursache und Abhilfe Ungewöhnliche Schaumbil‐ • Verwenden Sie ausschließlich speziell für Geschirr‐ dung während des Spül‐ spüler bestimmte Reinigungsmittel. gangs. • Der Klarspülmittel-Dosierer hat ein Leck. Wenden Sie sich an den autorisierten Kundendienst. Rostspuren am Besteck. • Das Spülwasser enthält zu viel Salz. Siehe „Was‐...
-
Page 45: Technische Daten
DEUTSCH 13. TECHNISCHE DATEN Abmessungen Breite/Höhe/Tiefe (mm) 600 / 850 / 625 Spannung (V) 220 - 240 Elektrischer Anschluss Frequenz (Hz) Wasserdruck Min./max. bar (MPa) 0.5 (0.05) / 8 (0.8) Wasserversorgung max. 60 °C Kalt- oder Warmwasser Fassungsvermögen Maßgedecke Leistungsaufnahme Ein-Zustand (W) Leistungsaufnahme Aus-Zustand (W) - Page 46 13. INFORMACIÓN TÉCNICA................67 PENSAMOS EN USTED Gracias por adquirir un aparato Electrolux. Ha escogido un producto que contiene décadas de experiencia e innovación profesionales. Ingenioso y elegante, se ha diseñado pensando en usted. Así pues, siempre que lo utilice, puede tener la seguridad de que conseguirá...
-
Page 47: Información Sobre Seguridad
ESPAÑOL INFORMACIÓN SOBRE SEGURIDAD Antes de instalar y utilizar el aparato, lea atentamente las instrucciones facilitadas. El fabricante no se hace responsable de lesiones o daños producidos como resultado de una instalación o un uso incorrectos: Conserve siempre estas instrucciones en lugar seguro y accesible para futuras consultas. -
Page 48: Instrucciones De Seguridad
– entornos de tipo residencial. No cambie las especificaciones de este aparato. • La presión de agua de funcionamiento (mínima y • máxima) debe estar entre 0.5 (0.05) / 8 (0.8) bares (MPa) Respete el máximo número de ajustes de lugar de... - Page 49 ESPAÑOL compatibles con los valores eléctricos del suministro eléctrico. • Utilice siempre una toma con aislamiento de conexión a tierra correctamente instalada. • No utilice adaptadores de enchufes múltiples ni cables prolongadores. • Asegúrese de no provocar daños en el enchufe ni en el cable de red. Si es necesario cambiar el cable de alimentación del aparato, debe hacerlo el centro de servicio técnico...
-
Page 50: Descripción Del Producto
2.6 Desecho • Corte el cable de conexión a la red y deséchelo. ADVERTENCIA! • Retire el pestillo de la puerta para Existe riesgo de lesiones o evitar que los niños y las mascotas asfixia. queden encerrados en el aparato. -
Page 51: Panel De Control
ESPAÑOL 4. PANEL DE CONTROL Botón de encendido/apagado Tecla Start Tecla Programs Indicadores Indicadores de programa Tecla Options Pantalla Tecla Delay 4.1 Indicadores Indicador Descripción Fase de lavado. Se enciende durante la fase de lavado. Fase de secado. Se enciende durante la fase de secado. Indicador TimeManager. -
Page 52: Programas
5. PROGRAMAS Fases del Grado de sucie‐ Fases del programa Opciones Tipo de carga • Suciedad nor‐ • Prelavado • TimeManager • Lavado a 50 °C • XtraDry • Vajilla y cubier‐ • Aclarados • Seco • Todo • Prelavado •... -
Page 53: Ajustes
ESPAÑOL Agua Energía Duración Programa (kWh) (min) 7 - 12 0.7 - 1.5 45 - 160 13 - 15 1.4 - 1.6 140 - 160 13 - 14 0.9 - 1.1 70 - 85 1) La presión y temperatura del agua, las variaciones del suministro de energía, las opcio‐ nes y la cantidad de platos pueden alterar los valores. - Page 54 6.2 Descalcificador de agua El descalcificador de agua debe ajustarse en función de la dureza que El descalcificador elimina minerales del presente el agua de su zona. La suministro de agua, ya que podrían empresa local de suministro de agua...
- Page 55 ESPAÑOL El abrillantador se añade automáticamente durante la fase de aclarado caliente. Cuando el depósito de abrillantador está vacío, el indicador se enciende para solicitar que se rellene. Si el resultado de secado es satisfactorio usando solo tabletas múltiples, puede desactivar el aviso para rellenar el abrillantador.
-
Page 56: Opciones
2. Pulse Delay para cambiar el ajuste: 3. Pulse encendido/apagado para confirmar el ajuste. = AirDry desactivado. 7. OPCIONES En los otros programas, el ajuste de Cada vez que inicie un XtraDry es permanente y se usa programa debe activar las automáticamente para los siguientes... - Page 57 ESPAÑOL 4. Abra la llave de paso. 5. Inicie un programa para eliminar todos los restos de procesamiento que pueda haber en el aparato. No utilice detergente ni cargue los cestos. Después de iniciar un programa, el aparato puede tardar hasta 5 minutos en recargar la resina del descalcificador.
-
Page 58: Uso Diario
PRECAUCIÓN! espuma. Utilice exclusivamente 4. Cierre la tapa. Asegúrese de que el abrillantador diseñado botón de apertura se encaja en su específicamente para sitio. lavavajillas. Puede girar el selector de la 1. Pulse el botón de apertura (D) para cantidad (B) entre la abrir la tapa (C). - Page 59 ESPAÑOL • Después de 5 minutos si no se ha Si la puerta se abre más de iniciado el programa. 30 segundos durante la fase de secado, el programa en Inicio de un programa funcionamiento se termina. Esto no sucede si la puerta 1.
-
Page 60: Consejos
2. Cierre la llave de paso. aparato. Si se abre la puerta antes de la activación de Auto Off, el aparato se desactiva automáticamente. 10. CONSEJOS 10.1 General sal por separado para unos resultados de limpieza y secado Los consejos siguientes le aseguran un óptimos. -
Page 61: Mantenimiento Y Limpieza
ESPAÑOL • No lave en el aparato objetos que • La tapa del depósito de sal está puedan absorber agua (esponjas, apretada. paños de limpieza, etc.). • Los brazos aspersores no están • Quite los restos de alimentos grandes obstruidos. de los platos. - Page 62 7. Vuelva a montar los filtros (B) y (C). 8. Vuelva a colocar el filtro (B) en el filtro plano (A). Gírelo hacia la derecha hasta que encaje. 2. Extraiga el filtro (C) del filtro (B). 3. Retire el filtro plano (A).
-
Page 63: Solución De Problemas
ESPAÑOL 11.4 Limpieza del interior larga duración al menos dos veces al mes. • Limpie cuidadosamente el aparato, • Para mantener el funcionamiento incluida la junta de goma de la puerta, óptimo del aparato, se recomienda con un paño húmedo. utilizar un producto específico de •... - Page 64 Problema y código de Causa y soluciones posibles alarma El aparato no desagua. • Compruebe que el desagüe no esté obstruido. • Asegúrese de que el filtro de la manguera de salida La pantalla muestra no está obstruido. • Compruebe que el filtro de desagüe no está obstrui‐...
- Page 65 ESPAÑOL vuelve a producir, póngase en contacto Consulte otras posibles con un Centro de servicio técnico. causas en "Antes del Para los códigos de alarma no descritos primer uso", "Uso diario" en la tabla, póngase en contacto con un o "Consejos". Centro de servicio técnico.
- Page 66 Problema Causa y soluciones posibles Espuma inusual durante el • Utilice solo detergentes adecuados para lavavaji‐ lavado. llas. • Hay una fuga en el dosificador de abrillantador. Póngase en contacto con un servicio técnico auto‐ rizado. Rastros de óxido en los cu‐...
-
Page 67: Información Técnica
ESPAÑOL 13. INFORMACIÓN TÉCNICA Medidas Ancho / alto / fondo (mm) 600 / 850 / 625 Voltaje (V) 220 - 240 Conexión eléctrica Frecuencia (Hz) Presión del suministro de Mín. / máx. bares (MPa) 0.5 (0.05) / 8 (0.8) agua Suministro de agua máx. - Page 68 www.electrolux.com/shop...