Table of Contents
Advertisement
®
Household
Massage Lounger
Sillón de Masaje Doméstico
Fauteuil vibromasseur
Operating Instructions
Instrucciones de Uso
Mode d'emploi
EP3513
Model/Modelo/Modéle No.
Before operating this unit, please read these instructions completely, and save for future reference.
Antes de utilizar esta unidad, lea completamente estas instrucciones y guárdelas para referencia futura.
Avant d'utiliser cet appareil, nous vous recommandons de lire l'ensemble de ces instructions et de les ranger dans
un endroit accessible pour une consultation ultérieure.
Advertisement
Table of Contents

Related Manuals for Panasonic EP3513CU


Summary of Contents for Panasonic EP3513CU
-
Page 1: Operating Instructions
® Household Massage Lounger Sillón de Masaje Doméstico Fauteuil vibromasseur Operating Instructions Instrucciones de Uso Mode d’emploi EP3513 Model/Modelo/Modéle No. Before operating this unit, please read these instructions completely, and save for future reference. Antes de utilizar esta unidad, lea completamente estas instrucciones y guárdelas para referencia futura. Avant d’utiliser cet appareil, nous vous recommandons de lire l’ensemble de ces instructions et de les ranger dans un endroit accessible pour une consultation ultérieure. - Page 2 INDEX English INDICE Español INDEX Français See pages 1- 39 Ver página S1- S39 Reportez-vous à la page F1- F39...
-
Page 3: Important Safety Instructions
IMPORTANT SAFETY INSTRUCTIONS Basic precautions should always be followed when using an electrical unit, including the following. Please ensure that you read all instructions before using the Household Massage Lounger. DANGER – To reduce the risk of electric shock: 1. Always unplug the unit immediately after use. 2. -
Page 4: Safety Precautions
SAFETY PRECAUTIONS WARNING: To avoid the risk of injury: 1. Persons with any of the conditions listed below or who are undergoing medical treatment should consult with their physicians before using the unit: a) Pregnant women, people who are ill, in poor physical shape. b) People suffering from back, neck, shoulder, or hip pain. -
Page 5: Operating Precautions
OPERATING PRECAUTIONS WARNING: To avoid damaging the chair, follow these precautions: 1. The chair is designed for a maximum user weight of 264 lbs (120 kg). Exceeding the maximum weight may cause permanent damage to the massage mechanism and/or other components of the unit. Any such damage is deemed to be user abuse and is not covered under the Limited Warranty. -
Page 6: Grounding Instructions
GROUNDING INSTRUCTIONS This product must be grounded. If it should malfunction or break down, grounding provides a path of least resistance for electric current to reduce the risk of electric shock. This product is equipped with a cord having an equipment-grounding conductor and a grounding plug. -
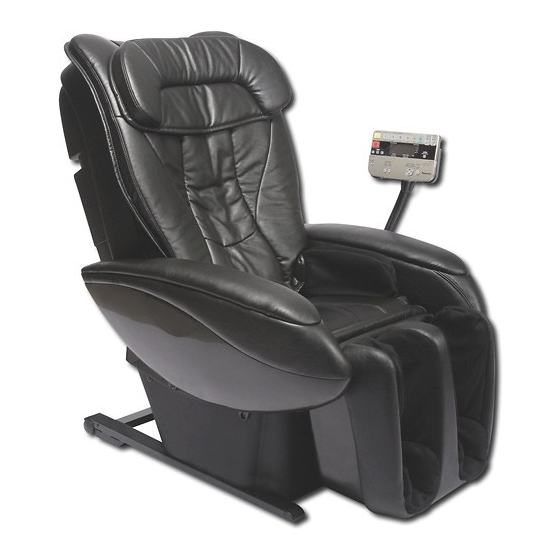
Page 7: Part Names And Functions
PART NAMES AND FUNCTIONS MASSAGE LOUNGER Control Panel Stand Seat/Thigh Side Airbag Shiatsu Point in Hip Massage • Sliding up/down possible. Legrest Slide Lever • Extendable length of 9 in. (22 cm). Legrest • Includes integrated air massage function. Back Cushion Zipper Back Cover Handle Safety Precaution Label... -
Page 8: Control Panel
CONTROL PANEL Cover Closed (Massage Programs Use) OFF/ON button • Use this button to turn the control panel power on and off. Quick Stop button off/on • Press this button to stop the massage immediately. User Memory buttons • Use these buttons when open using the user memory function. -
Page 9: Time Remaining
DISPLAY Time Remaining Display User Memory Display • Displays time remaining • Uses animation to indicate before the end of a massage when data is being in minutes. recorded to or recalled from • “OFF” is shown as the the user memory. massage heads return to the retracted position after a massage. -
Page 10: Before Using The Unit
BEFORE USING THE UNIT SETTING UP THE MASSAGE LOUNGER After Removing Everything from the Box, You Should Have the Following Massage Lounger Armrests Marks indicating left and right can be found on the underside of each armrest. Front Back Air Plug Where to Use the Unit Ensure there is adequate space for reclining. - Page 11 ASSEMBLY Attaching the Armrests (On Both Right and Left Sides) Connecting the Air Plugs (On Both Right and Left Sides) Allen Key Attachment Screw (M5#16) Attaching the Control Panel Stand to the Right or Left Armrest Attachment Screw (M6#10) Allen Key •...
- Page 12 Attaching the Control Panel Stand Covers (On Both Right and Left Sides) Cover for Side WITH Control Panel Stand Top Tabs Bottom Tabs Notches When Removing the Control Panel Stand Covers Attaching the Pillow Cover for Side WITHOUT Control Panel Stand The method of attaching the covers is the same for both sides.
- Page 13 Raising the Backrest to the Upright Position Moving the Control Panel Cord to the Left Side (When Control Panel Stand is on Left Side) · Clips for Fastening Control Panel Cord Placing the Control Panel into the Control Panel Stand To remove the control panel, slide it upwards.
-
Page 14: Before Sitting Down
BEFORE SITTING DOWN Please Check the Following Before Using the Unit Check the Surrounding Area (1) Check that there is nothing around the unit. (2) Check that there is enough room (15.7 in. (40 cm)) to recline the unit. Lower the Legrest Prior to Sitting Down •... -
Page 15: Adjusting The Seat
ADJUSTING THE SEAT Adjusting the Reclining Angle Approx. 85° ottoman reclining Approx. 0° Extending the Legrest Raise legs slightly and legrest returns. Adjusting the Pillow for Correct Height During a Massage Adjust the height of the pillow so that the bottom edge is at ear level. •... - Page 16 ADJUSTING THE VOICE GUIDANCE VOLUME AND THE CONTROL PANEL STAND Adjusting the Voice Guidance Volume The single beep (when a button is pressed) and the triple beep (when the adjustable setting limit is reached) are still audible. Adjusting the Control Panel Stand The arm section bends to allow positioning towards the front or the rear.
- Page 17 USING THE MASSAGE LOUNGER USING THE PRE-PROGRAM AND QUICK MASSAGES – Basic Usage Recommended when you want a complete massage. off/on user open leg stretch off / on Leg Stretch OFF/ON button Back Vibration OFF/ON button Additional Information Pre-Program and Quick Massage Characteristics (Upper Body) •...
- Page 18 2. Press one of the flashing buttons ( • The body scanning will commence when the program is selected. (See Page 36) • The body height range that can be properly detected by the body scanning is between approximately 4.6 and 6.1 ft. (140 and 185 cm). Sit as far back in the seat as possible with your head on the pillow.
- Page 19 4. Adjust the length of the legrest when the backs of your calves or knees are not resting in the legrest wells. 5. Open the lift-up portion of the armrest and insert your hand and forearm. CAUTION • Remove hard objects, such as false fingernails, wristwatches or rings, when massaging hands or arms.
- Page 20 6. When the massage is finished the unit will automatically shut off. last approximately 15 minutes. lasts approximately 5 minutes. To stop mid-way through a massage, press • The massage heads will return to the retracted position. • The backrest and legrest will automatically return to the upright position.
- Page 21 USING THE PRE-PROGRAM AND QUICK MASSAGES – Adjusting to Your Preference Adjusting Massage Strength intensity hands/ lower upper arms body body Press to adjust. • Lower body and hand/arm massages will stop when set to zero. Turning Back Vibration and Leg Stretch Functions Off and On During a Program leg stretch vibration off/on...
- Page 22 Additional Information Overview of Pre-Program and Quick Massages (Upper Body) Shiatsu Program (I) Overall Neck/Shoulder Loosening Shiatsu • Swedish C • Shiatsu C • Shiatsu A • Swedish B • Shiatsu D • Tap B Deep Program (II) Overall Neck/Shoulder Loosening Kneading •...
- Page 23 USING THE SELF PROGRAM – Basic Usage Recommended when certain areas of your body are more fatigued than others. pre-programs off/on shiatsu deep time remaining user intensity intensity hands /arms open leg stretch vibration intensity off/on off / on hands/ lower upper arms...
-
Page 24: Close The Cover
2. Press The display will flash. 3. Open the cover and input the time settings. (1) Set the time for each area of the body. self program time input • The time will change, as shown below, neck/shoulder hands/arms back (2) Press lower back •... - Page 25 USING THE SELF PROGRAM Changing Time Settings Part Way through a Massage 1. Open the cover and input the time settings. (1) Open the cover and input the time self program time input settings you want to change. neck/shoulder hands/arms back (2) Press lower back...
- Page 26 Additional Information About the Time Settings in Self Program • The type and duration of massage actions in self program are determined according to different areas of the body based on the time settings. Order of Massage for Upper Body •...
- Page 27 ADVANCED USAGE WITH THE USER MEMORY FUNCTION A function that allows you to create customized programs for massages better suited to your needs. Change and record massage programs according to your preference. pre-programs off/on shiatsu deep swedish stretch time remaining user intensity intensity intensity speed...
- Page 28 Additional Information About Recorded Massage Settings Shown on the Display • The settings you record after a massage finishes or the control panel. • Setting adjustments shown on the display do not indicate changes made to recorded settings unless the above procedure has been performed (“3.
- Page 29 When You Want to Use Your Recorded Massage Settings pre-programs off/on stretch shiatsu deep swedish time remaining user intensity intensity intensity speed hands /arms lower body upper body open leg stretch vibration intensity off/on off/on hands/ lower upper arms body body 3.
-
Page 30: Erasing Recorded Data
Erasing Recorded Data 1. Turn on the 2. Press the button corre- power. sponding to the data you wish to delete. user Only the button pressed lights up. user Additional Information About the Focus Function Number of Times an Action Is Repeated •... - Page 31 USING MANUAL OPERATION (Upper Body) Recommended for focused massage using preferred actions on specific parts of the body. Manual Operation for Massage of the Upper Body Please open the controller cover to use in manual operation. off/on leg stretch Back Vibration OFF/ON button Massage Strength button Massage Speed Adjustment button...
- Page 32 3. Adjust massage position and strength. (These adjustments cannot be made with the controller cover closed.) Adjusting Massage Position • The approximate position of the massage will be shown on the Massage Area Display. position • If you hold the up or down button down the massage heads will continue to move until you release the button.
- Page 33 USING MANUAL OPERATION (Lower Body) Manual Operation for Massage of the Lower Body knead leg stretch vibration intensity intensity hands/ arms Leg Stretch OFF/ON button Massage Strength button 3. Adjust to your preferred level of strength. intensity • The strength of the massage is shown on the Lower Body Massage Display in five stages. •...
- Page 34 USING MANUAL OPERATION (Hands/Arms) Manual Operation for Massage of the Hands/Arms knead leg stretch vibration intensity intensity hands/ Massage Strength button 3. Adjust to your preferred level of strength. intensity • The strength of the massage is shown on the Hand/Arm Massage Display in five stages. •...
- Page 35 USING MANUAL OPERATION Additional Information How to Get the Most Out of Your Massage Lounger (1) Start with a rolling massage only to allow your body to get used to the massage lounger. (2) Next use a kneading or tapping massage in areas surrounding stiff muscles. (3) Finish with a rolling massage to stretch your spine again.
-
Page 36: After Completing The Massage
AFTER COMPLETING THE MASSAGE Return the Seat to the Original Position 1. Check that nothing is under the legrest and that air is being released. Check that nothing is under the legrest. 3. Press twice to return the chair to the upright position. If no one is sitting in it, the chair will stop part way. -
Page 37: Cleaning And Maintenance
CLEANING AND MAINTENANCE CAUTION • Always unplug the unit before cleaning it. Never touch a power plug with wet hands. Failure to follow these instructions may lead to electrocution or burns. Areas Covered with Synthetic Leather • Wipe these areas with a soft, dry cloth. (Do NOT use cloths containing any kind of chemical, etc.) •... -
Page 38: Additional Information
ABOUT THE BODY SCANNING FUNCTION Additional Information (4) Soft Tapping When the Body Scanning Function is Not Completed Successfully • A recorded voice message will announce, “In the interests of safety, the massage will now finish because an occupant could not be detected in the chair.” during the body scanning. This may occur in the following situations: 1. -
Page 39: Troubleshooting
TROUBLESHOOTING PROBLEM Problem Motor Noises • It sounds and feels like the massage heads are straining to get over wrinkles in the cloth. • The motor groans when it comes under load. • There is excessive noise during Tapping. (The noise is greater at the top of the massage lounger.) •... - Page 40 Problem Reclining does not take place even though a massage is started in pre-programs. (The seat does not automatically recline.) The backrest does not return to the upright position. The legrest does not go down. The unit will not operate at all. •...
-
Page 41: Specifications
SPECIFICATIONS Power Supply: Power Consumption: Upper Body Massage Massage Area (Up-Down): Massage Area (Left-Right): Massage Area (Forward-Back): Maximum Total Massage Surface: Approx. 188 sq. in. (1,216 cm Up-Down Movement Speed: Massage Speed: Lateral/Vertical Travel: Massage Width: Hand/Arm Massage Air Pressure: Sole/Calf/Seat Massage Air Pressure: Reclining Angle:... - Page 42 No.1 EN, SP, FR Panasonic Consumer Electronics Company One Panasonic Way 4A-3 Secaucus, New Jersey 07094 1-800-338-0552 for questions and comments. www.panasonic.com/massage P93103513231 Printed in Japan Impreso en Japón Imprimé au Japon...