
Related Manuals for Zanussi ZGO63414BA


Summary of Contents for Zanussi ZGO63414BA
- Page 1 User Manual GETTING STARTED? EASY. ZGO63414BA NL Gebruiksaanwijzing Kookplaat EN User Manual FR Notice d'utilisation Table de cuisson...
-
Page 2: Veiligheid Van Kinderen En Kwetsbare Mensen
VEILIGHEIDSINFORMATIE Lees zorgvuldig de meegeleverde instructies voor installatie en gebruik van het apparaat. De fabrikant is niet verantwoordelijk voor letsel of schade veroorzaakt door een verkeerde installatie of verkeerd gebruik. Bewaar de instructies altijd op een veilige en toegankelijke plaats voor toekomstig gebruik. VEILIGHEID VAN KINDEREN EN KWETSBARE MENSEN Dit apparaat kan worden gebruikt door kinderen van 8 jaar en... - Page 3 WAARSCHUWING: Zonder toezicht koken op een kookplaat • met vet of olie kan gevaarlijk zijn en brandgevaar opleveren. Probeer brand NOOIT met water te blussen, maar schakel in • plaats daarvan het apparaat uit en bedek de vlam bijv. met een deksel of blusdeken.
- Page 4 isolatiehoes) met onderdelen die temperaturen kunnen bereiken van 50°C hoger dan kamertemperatuur. WAARSCHUWING: Gebruik alleen kookplaatbeschermers die • door de fabrikant van het kookapparaat zijn ontworpen of door de fabrikant van het apparaat in de gebruiksinstructies als geschikt zijn aangegeven of kookplaatbeschermers die in het apparaat zijn geïntegreerd.
- Page 5 • Steek de stekker pas in het stopcontact als de WAARSCHUWING! Risico op brand installatie is voltooid. Zorg ervoor dat het en explosie netsnoer na installatie bereikbaar is. • Sluit de stroomstekker niet aan op een losse • Verhitte vetten en olie kunnen ontvlambare stroomaansluiting.
-
Page 6: Montage
andere doeleinden, zoals het verwarmen van • Reinig het apparaat met een vochtige zachte een kamer. doek. Gebruik alleen neutrale • Laat geen zure vloeistoffen, zoals bijv. azijn, reinigingsmiddelen. Gebruik geen citroensap of reinigingsmiddelen voor het schuurmiddelen, schuursponsjes, verwijderen van kalkaanslag, in aanraking komen oplosmiddelen of metalen voorwerpen. -
Page 7: Vervanging Spuitmonden (Alleen Voor België)
gebruikt (zie de tabel in het hoofdstuk 'Technische gegevens'). 4. Zet de onderdelen in omgekeerde volgorde terug. 5. Vervang het typeplaatje (naast de gastoevoerleiding) door het plaatje voor het nieuwe type gastoevoer. U kunt het plaatje vinden in het zakje dat bij het apparaat geleverd Als de toevoergasdruk aanpasbaar is of verschilt van de vereiste druk, moet u een geschikte A. - Page 8 • Zorg ervoor dat het netsnoer na installatie bereikbaar is. • Trek niet aan het netsnoer om het apparaat los te koppelen. Trek altijd aan de stekker. • Er is brandgevaar als het apparaat verbinding min. min. 650 mm maakt met een verlengkabel, een adapter of een 600 mm min.
-
Page 9: Mogelijkheden Voor Inbouw
Keukenmeubel met 30 mm min 20 mm (max 150 mm) 60 mm LET OP! Installeer het apparaat alleen op een werkblad met een plat oppervlak. A. Verwijderbaar paneel MOGELIJKHEDEN VOOR INBOUW B. Ruimte voor aansluitingen Het paneel geïnstalleerd onder de kookplaat moet eenvoudig te verwijderen zijn en eenvoudig Keukenmeubel met oven toegang bieden indien technische hulp nodig is. -
Page 10: Dagelijks Gebruik
DAGELIJKS GEBRUIK WAARSCHUWING! Raadpleeg de WAARSCHUWING! Houd de hoofdstukken Veiligheid. bedieningsknop niet langer dan 15 seconden ingedrukt. Als de brander na 15 seconden nog niet brandt, de BRANDEROVERZICHT bedieningsknop loslaten en minstens 1 minuut wachten voordat u opnieuw probeert de vlam te ontsteken. LET OP! Bij afwezigheid van elektrische stroom kunt u de brander ontsteken zonder elektrische inrichting. -
Page 11: Aanwijzingen En Tips
AANWIJZINGEN EN TIPS WAARSCHUWING! Raadpleeg de LET OP! Zorg dat de potten zich in hoofdstukken Veiligheid. het midden van de brander bevinden, voor een maximum aan stabiliteit en lager gasverbruik. KOOKGEREI LET OP! Vloeistoffen die tijdens het LET OP! Gebruik geen gietijzeren koken worden gemorst kunnen ervoor pannen, aardewerk of grillplaten. -
Page 12: De Kookplaat Schoonmaken
DE KOOKPLAAT SCHOONMAKEN REINIGEN VAN DE ONTSTEKINGSKNOP • Verwijder direct: gesmolten kunststof, plastic Dit onderdeel is uitgerust met een keramische folie, suiker en suikerhoudend voedsel, anders ontstekingsbougie met een metalen elektrode. kan dit schade aan de kookplaat veroorzaken. Reinig deze onderdelen altijd grondig, om Doe voorzichtig om brandwonden te voorkomen. -
Page 13: Technische Gegevens
LABELS MEEGELEVERD IN DE ZAK MET ACCESSOIRES Bevestig de stickers zoals hieronder weergegeven: MOD. MOD. MOD. TYPE PROD.NO. IP20 PROD.NO. PROD.NO. SER.NO. 0049 SER.NO SER.NO 03 IT DATA DATA MADE IN ITALY A. Plak het op de garantiekaart en verstuur dit C. - Page 14 GASBRANDERS VOOR LPG G30/G31 28-30/37 mbar NOMINALE GASSTROMING g/h NORMAAL MINIMUM INSPUITMAR- BRANDER VERMOGEN VERMOGEN KERING G30 28-30 mbar G31 37 mbar Snelle bran- 0,75 Normale 0,45 brander Sudderbran- 0,33 ENERGIEZUINIGHEID PRODUCTINFORMATIE VOLGENS EU-RICHTLIJN 66/2014 Modelidentificatie ZGO63414BA Type kooktoestel Ingebouwde kook- plaat Aantal gasbranders...
-
Page 15: Energie Besparen
Links achter - semi-snel 54.9% Rechts achter - semi-snel 54.9% Energiezuinigheid per gasbrander (EE gas burner) Linksvoor - Snelle brander 57.5% Rechts voor - hulp niet van toepassing Energiezuinigheid voor de gaskook- 55.8% plaat (EE gas hob) EN 30-2-1: Huishoudelijke kookapparaten op gas - deel 2-1 : Energieverbruik - Algemeen ENERGIE BESPAREN •... -
Page 16: Safety Information
SAFETY INFORMATION Before the installation and use of the appliance, carefully read the supplied instructions. The manufacturer is not responsible for any injuries or damages that are the result of incorrect installation or usage. Always keep the instructions in a safe and accessible location for future reference. - Page 17 NEVER try to extinguish a fire with water, but switch off the • appliance and then cover flame e.g. with a lid or a fire blanket. CAUTION: The cooking process has to be supervised. A short • term cooking process has to be supervised continuously. WARNING: Danger of fire: Do not store items on the cooking •...
-
Page 18: Safety Instructions
SAFETY INSTRUCTIONS plug (if applicable) can make the terminal This appliance is suitable for the following markets: become too hot. BE LU • Use the correct electricity mains cable. • Do not let the electricity mains cable tangle. INSTALLATION • Make sure that a shock protection is installed. - Page 19 • Make sure the flame does not go out when you quickly turn the knob from the maximum to the WARNING! Risk of injury, burns and minimum position. electric shock. • Use only the accessories supplied with the appliance. • Remove all the packaging, labelling and •...
-
Page 20: Installation
• Disconnect the appliance from the mains • Flat the external gas pipes. supply. • Cut off the mains electrical cable close to the appliance and dispose of it. INSTALLATION WARNING! Refer to Safety chapters. BEFORE THE INSTALLATION Before you install the hob, write down the information bellow from the rating plate. -
Page 21: Adjustment Of Minimum Level (Only For Belgium)
• Make sure that there is an access to the mains 3. With a socket spanner 7 remove the injectors plug after the installation. and replace them with the ones which are • Do not pull the mains cable to disconnect the necessary for the type of gas you use (see appliance. -
Page 22: Possibilities For Insertion
A) supplied seal B) supplied brackets min. min. 650 mm 600 mm min. 55 mm 30 mm 470 mm 550 mm CAUTION! Install the appliance only on a worktop with flat surface. POSSIBILITIES FOR INSERTION The panel installed below the hob must be easy to remove and let an easy access in case a technical assistance intervention is necessary. -
Page 23: Product Description
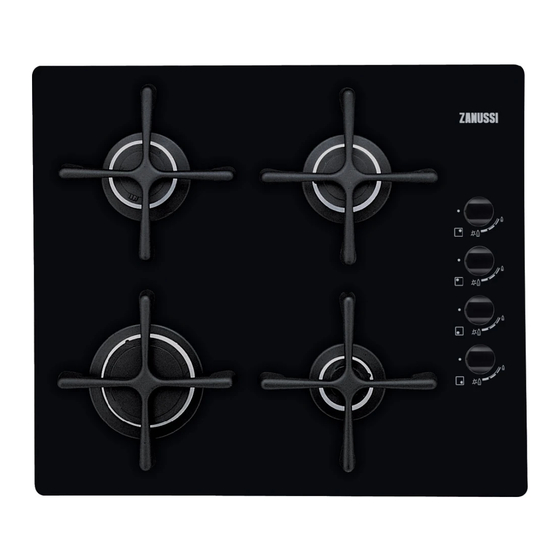
PRODUCT DESCRIPTION COOKING SURFACE LAYOUT Rapid burner Semi-rapid burner Auxiliary burner Control knobs CONTROL KNOB Symbol Description Symbol Description minimum gas supply no gas supply / off position ignition position / maximum gas supply DAILY USE BURNER OVERVIEW WARNING! Refer to Safety chapters. A. -
Page 24: Ignition Of The Burner
C. Ignition candle If the burner accidentally goes out, turn the control knob to the off position IGNITION OF THE BURNER and try to light the burner again after Always light the burner before you put minimum 1 minute. on the cookware. The spark generator can start automatically when you switch on the WARNING! Be very careful when you... -
Page 25: Care And Cleaning
DIAMETERS OF COOKWARE CAUTION! Make sure that the bottoms of pots do not stand too Use cookware with diameters close to the control knob, otherwise applicable to the size of burners. the flame heats the control knob up. CAUTION! Make sure that pot Diameter of cook- Burner handles are not above the front edge... -
Page 26: Troubleshooting
TROUBLESHOOTING WARNING! Refer to Safety chapters. WHAT TO DO IF... Problem Possible cause Remedy There is no spark when you try The hob is not connected to an Check if the hob is correctly to activate the spark generator. electrical supply or it is con- connected to the electrical nected incorrectly. -
Page 27: Technical Data
LABELS SUPPLIED WITH THE ACCESSORIES Stick the adhesive labels as indicated below: MOD. MOD. MOD. TYPE PROD.NO. IP20 PROD.NO. PROD.NO. SER.NO. 0049 SER.NO SER.NO 03 IT DATA DATA MADE IN ITALY A. Stick it on Guarantee Card and send this part C. -
Page 28: Energy Efficiency
0,75 Semi-rapid 0,45 Auxiliary 0,33 ENERGY EFFICIENCY PRODUCT INFORMATION ACCORDING TO EU 66/2014 Model identification ZGO63414BA Type of hob Built-in hob Number of gas burners Left rear - Semi-rapid 54.9% Right rear - Semi-rapid 54.9% Energy efficiency per gas burner... -
Page 29: Energy Saving
Energy efficiency for the gas hob 55.8% (EE gas hob) EN 30-2-1: Domestic cooking appliances burning gas - Part 2-1 : Rational use of energy - General ENERGY SAVING • Before use, make sure that the burners and pan supports are assembled correctly. •... -
Page 30: Informations De Sécurité
INFORMATIONS DE SÉCURITÉ Avant d'installer et d'utiliser cet appareil, lisez soigneusement les instructions fournies. Le fabricant ne pourra être tenu pour responsable des blessures et dégâts résultant d'une mauvaise installation ou utilisation. Conservez toujours les instructions dans un lieu sûr et accessible pour vous y référer ultérieurement. SÉCURITÉ... - Page 31 Ne faites pas fonctionner l'appareil avec un minuteur externe ou • un système de commande à distance. AVERTISSEMENT : Il peut être dangereux de laisser chauffer • de la graisse ou de l'huile sans surveillance sur une table de cuisson car cela pourrait provoquer un incendie. N'essayez JAMAIS d'éteindre un feu avec de l'eau.
-
Page 32: Consignes De Sécurité
Lorsque vous acheminez le câble d'alimentation, assurez-vous • qu'il n'entre pas en contact direct (par exemple, à l'aide d'un manchon isolant) avec des parties pouvant atteindre des températures supérieures de 50 °C à la température ambiante. AVERTISSEMENT : Utilisez uniquement les dispositifs de •... -
Page 33: Raccordement Au Gaz
électricien pour remplacer le câble • Éteignez les zones de cuisson après chaque d'alimentation s'il est endommagé. utilisation. • La protection contre les chocs des parties sous • Ne posez pas de couverts ou de couvercles sur tension et isolées doit être fixée de telle manière les zones de cuisson. -
Page 34: Maintenance
• Assurez-vous que la flamme ne s'éteint pas • Nettoyez régulièrement l'appareil afin de lorsque vous tournez rapidement la manette de maintenir le revêtement en bon état. la position maximale à la position minimale. • Éteignez l'appareil et laissez-le refroidir avant de •... -
Page 35: Remplacement Des Injecteurs (Pour La Belgique Uniquement)
avec des parties mobiles ni être comprimés. Soyez AVERTISSEMENT! Lorsque également vigilant lorsque la table est installée avec l'installation est terminée, assurez-vous un four. que chaque raccord est étanche. Utilisez une solution savonneuse et Assurez-vous que la pression de pas de flamme ! l'alimentation en gaz de l'appareil correspond aux valeurs recommandées. -
Page 36: Connexion Électrique
MONTAGE AVERTISSEMENT! Assurez-vous que la flamme ne s'éteint pas lorsque vous tournez rapidement la manette de la position maximale à la position minimale. CONNEXION ÉLECTRIQUE • Assurez-vous que la tension nominale et le type d'alimentation sur la plaque signalétique correspondent bien à la tension et à la puissance de l'alimentation locale. - Page 37 ATTENTION! Installez l'appareil uniquement sur un plan de travail dont la surface est plane. POSSIBILITÉS D'INSERTION Le panneau installé sous la table de cuisson doit être facile à retirer et facilement accessible au cas où une intervention technique serait nécessaire. Élément de cuisine avec une porte 30 mm min 20 mm...
-
Page 38: Description De L'appareil
DESCRIPTION DE L'APPAREIL DESCRIPTION DE LA TABLE DE CUISSON Brûleur rapide Brûleur semi-rapide Brûleur auxiliaire Manettes de commande MANETTE DE COMMANDE Symbole Description Symbole Description alimentation en gaz minimale pas d'alimentation en gaz / position Arrêt position d'allumage / alimen- tation en gaz maximale UTILISATION QUOTIDIENNE VUE D'ENSEMBLE DES BRÛLEURS... -
Page 39: Allumage Du Brûleur
C. Bougie d'allumage ATTENTION! En cas de coupure d'électricité, vous pouvez allumer le ALLUMAGE DU BRÛLEUR brûleur sans dispositif électrique : pour Allumez toujours le brûleur avant de cela, approchez une flamme du poser un récipient dessus. brûleur, tournez la manette vers la gauche jusqu'à... -
Page 40: Entretien Et Nettoyage
ATTENTION! Assurez-vous que les Diamètre du réci- récipients de cuisson sont bien Brûleur pient (mm) centrés sur le brûleur afin de garantir leur stabilité et de réduire la consommation de gaz. Rapide 180 - 260 ATTENTION! Des liquides renversés Semi-rapide 120 - 220 durant la cuisson peuvent provoquer le Auxiliaire... -
Page 41: Entretien Périodique
NETTOYAGE DE LA BOUGIE D'ALLUMAGE ENTRETIEN PÉRIODIQUE Cette fonctionnalité est obtenue grâce à une Contactez périodiquement votre service après- bougie d'allumage en céramique dotée d'une vente pour contrôler l'état du tuyau d'arrivée de gaz électrode en métal. Veillez à maintenir ces et du régulateur de pression si votre installation en composants propres afin de faciliter l'allumage. -
Page 42: Étiquettes Fournies Dans Le Sachet Des Accessoires
ÉTIQUETTES FOURNIES DANS LE SACHET DES ACCESSOIRES Collez les étiquettes adhésives comme indiqué ci- dessous : MOD. MOD. MOD. TYPE PROD.NO. IP20 PROD.NO. PROD.NO. SER.NO. 0049 SER.NO SER.NO 03 IT DATA DATA MADE IN ITALY A. Collez-la sur la carte de garantie et envoyez C. -
Page 43: Rendement Énergétique
G30 28-30 mbar G31 37 mbar Rapide 0,75 Semi-rapide 0,45 Auxiliaire 0,33 RENDEMENT ÉNERGÉTIQUE INFORMATIONS DE PRODUIT SELON LA NORME EU 66/2014 Identification du modèle ZGO63414BA Type de table de cuisson Table de cuisson intégrée Nombre de brûleurs à gaz... -
Page 44: Économies D'énergie
Arrière gauche - Semi-rapide 54.9% Efficacité énergétique selon le brûleur Arrière droit - Semi-rapide 54.9% à gaz Avant gauche - Rapide 57.5% (EE gas burner) Avant droit - Auxiliaire non applicable Efficacité énergétique de la table de 55.8% cuisson (EE gas hob) EN 30-2-1 : Appareils de cuisson domestiques à... - Page 48 WWW.ZANUSSI.COM/SHOP...