Zanussi ZCV662 User Manual
Zanussi cooktop user manual
Hide thumbs
Also See for ZCV662:
- User manual (24 pages) ,
- User manual (24 pages) ,
- User manual (24 pages)
Table of Contents
Advertisement
Advertisement
Table of Contents

Related Manuals for Zanussi ZCV662


Summary of Contents for Zanussi ZCV662
- Page 1 User manual Cooker ZCV662...
-
Page 2: Table Of Contents
Contents Safety information _ _ _ _ _ _ _ _ _ _ _ _ _ _ _ _ _ _ 2 Product description _ _ _ _ _ _ _ _ _ _ _ _ _ _ _ _ _ 5 Before first use _ _ _ _ _ _ _ _ _ _ _ _ _ _ _ _ _ _ _ 6 Hob - Daily use _ _ _ _ _ _ _ _ _ _ _ _ _ _ _ _ _ _ _ 7 Hob - Helpful hints and tips _ _ _ _ _ _ _ _ _ _ _ _ _ 7... - Page 3 • The electrical installation must have an isolation device which lets you disconnect the appliance from the mains at all poles. The isolation device must have a contact opening width of minimum 3 mm. • The shock protection parts must be fixed in such a way that they cannot be undone without tools.
- Page 4 Care and cleaning • Before maintenance, make sure that the appliance is cold. There is a risk of burns. There is a risk that the glass panels can break. • Keep the appliance clean at all times. A build-up of fats or other foodstuff can result in a fire.
-
Page 5: Product Description
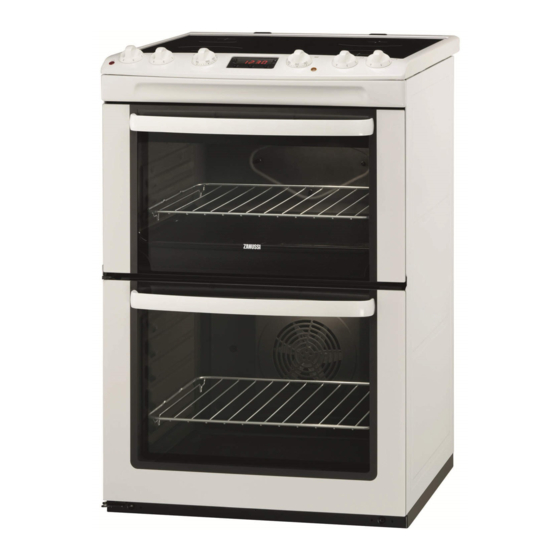
Product description General overview Control panel Knobs for the hob Knob for the top oven and grill Electronic programmer Control panel and hob Air vents for cooling fan Heating element Rating plate Oven lamp Fan and heating element Shelf positions of the main oven Shelf positions of the top oven Knob for the main oven Main oven indicator... -
Page 6: Before First Use
Cooking surface layout Accessories • Deep grill roasting pan To bake and roast or as pan to collect fat. • The roasting pan grid Before first use Warning! Refer to "Safety information" chapter. Initial Cleaning • Remove all parts from the appliance. •... -
Page 7: Hob - Daily Use
Hob - Daily use Warning! Refer to "Safety information" chapter. Heat settings Control knob Off position Heat settings (1 = lowest heat setting; 6= high- est heat setting) Hob - Helpful hints and tips Warning! Refer to "Safety information" chapter. Cookware •... -
Page 8: Oven - Daily Use
Oven - Daily use Warning! Refer to "Safety information" chapter. Cooling fan When the appliance operates, the cooling fan switches on automatically to keep the surfaces of the appliance cool. If you switch off the appliance, the cooling fan continues to operate until the appliance cools down. -
Page 9: Oven - Clock Functions
Oven - Clock functions Electronic programmer Clock function Time of day Minute minder Duration Duration and End can be used at the same time, if the oven is to be switched on and off auto- matically later. In this case first set Duration Setting the clock functions Push the Selection button again and again until nec- essary function indicator flashes. -
Page 10: Oven - Helpful Hints And Tips
Warning! Risk of burns when removing the accessories from a hot oven. You can use the grilling You can use the grilling set to roast larger pieces set to grill flat dishes in of meat or poultry on one large quantities and to level: toast: Put the roasting pan grid... - Page 11 Tips on baking Baking results The cake is not browned Incorrect oven level sufficiently below The cake sinks (becomes Oven temperature too high soggy, lumpy, streaky) The cake sinks (becomes Baking time is too short soggy, lumpy, streaky) The cake sinks (becomes Too much liquid in the mixture soggy, lumpy, streaky) Cake is too dry...
- Page 12 Food Cakes: Flapjack Cakes: Shortbread Cakes: Apple Pie Casseroles: Beef/Lamb Casseroles: Chicken Convenience Foods Fish Fish Pie (Potato Topped) Fruit Pies, Crumbles Milk Puddings Pasta Lasagne etc. Pastry: Choux Pastry: Eclairs, Profiteroles Pastry: Flaky/Puff Pies Shortcrusts: Mince Pies Shortcrusts: Meat Pies Shortcrusts: Quiche, Tarts, Flans Scones...
- Page 13 Baking Food Biscuits Bread Cakes: Small & Queen Cakes: Sponges Cakes: Madeira Cakes: Rich Fruit Cakes: Christmas Cakes: Apple Pie - Shortbread Fish Fruit Pies, Crumbles Milk Puddings Pastry: Choux Pastry: Shortcrust Pastry: Flaky Pastry: Puff Follow manufacturer`s instructions. Reduce the tempera- Plate Tarts Quiches/Flans Scones...
-
Page 14: Grilling
Thermaflow or Conventional Cooking (if available) Roasting Meat Beef/Beef boned Mutton/Lamb Pork/Veal/Ham Chicken Turkey/Goose Duck Pheasant Rabbit Grilling Always use the grilling function with maximum tempera- ture setting Important! Always grill with the oven door closed Always pre-heat the empty oven with the grill func- tions for 5 minutes. -
Page 15: Oven - Care And Cleaning
Food Kidneys - Lamb/Pig Sausages Steaks: Rare Steaks: Medium Steaks: Well Done Toasted Sandwiches Defrosting • Put the food out of the packaging and set it on a plate on the oven shelf. • Do not cover with a plate or bowl. This can extend the time to defrost very much. - Page 16 The oven ceiling is ready to clean. Installing the heating element Install the heating element in opposite sequence. Important! Install the heating element correctly on the two sides above the support on the inner wall of the oven. Insert shelf support rails. Cleaning the top oven glass panels The door glass on your product can be different in type and shape from what you see in diagrams.
-
Page 17: What To Do If
To replace the glass panels obey the procedure in opposite sequence. Before you lower the trim attach the A trim part to the door. Refer to picture. Oven lamp Warning! There is a danger of electrical shock! Before you change the oven lamp: •... -
Page 18: Installation
Installation Warning! Refer to "Safety information" chapter. Technical Data Dimensions Height Width Depth Top oven capacity Main oven capacity Location of the appliance You can install your freestanding appliance with cabinets on one or two sides and in the corner. Minimum distances Dimension Levelling... -
Page 19: Environment Concerns
Electrical installation Warning! Only a qualified and competent person must do the electrical installation. The manufacturer is not responsible if you do not follow safety precautions from the chapter "Safety information". This appliance is supplied without a main plug or a main cable. -
Page 20: Great Britain & Ireland - Guarantee/Customer Service
Electrolux 08445 613 613 AEG-Electro- 08445 611 611 Zanussi-Elec- 08445 612 612 trolux For Customer Service in The Republic of Ireland please contact us at the address below: Electrolux Group (Irl) Ltd, Long Mile Road, Dublin 12, Re- public of Ireland Tel: +353 (0)1 4090751, Email: service.eid@electrolux.ie... -
Page 21: Www.electrolux.com
Addington Way, Luton, Bedfordshire LU4 9QQ 4, Limnou Str., 54627 Thessaloniki Slavonska avenija 3, 10000 Zagreb Long Mile Road Dublin 12 C.so Lino Zanussi, 26 - 33080 Porcia (PN) Kr. Barona iela 130/2, LV-1012, Riga Ozo 10a, LT-08200 Vilnius Rue de Bitbourg, 7, L-1273 Hamm H-1142 Budapest XIV, Erzsébet kirá-... - Page 22 Slovensko Suomi Sverige Türkiye Россия Україна +421 2 32 14 13 34-5 www.electrolux.fi +46 (0)771 76 76 76 +90 21 22 93 10 25 8-800-200-3589 +380 44 586 20 60 Electrolux Slovakia s.r.o., Electrolux Domáce spotrebiče SK, Galvaniho 17/B, 821 04 Brati- slava Electrolux Service, S:t Göransgatan 143, S-105 45 Stockholm...
- Page 24 www.zanussi.com/shop...